HEY THIS IS IMPORTANT whats your favorite place to find drawing references?
so far we’ve got
senshi stock
croquis cafe
line-of-action.com
quickposes.com
posemaniacs
clip studio paint models
pexels.com
sketchdaily
eggazyoutatsu atarichan drawer
designdoll
if you have any more please reply!
Unsplash: All photos published on Unsplash can be used for free. You can use them for commercial and noncommercial purposes. You do not need to ask permission from or provide credit to the photographer or Unsplash, although it is appreciated when possible. More precisely, Unsplash grants you an irrevocable, nonexclusive copyright license to download, copy, modify, distribute, perform, and use photos from Unsplash for free, including for commercial purposes, without permission from or attributing the photographer or Unsplash. This license does not include the right to compile photos from Unsplash to replicate a similar or competing service.
Freeimages: You can use the images in digital format on websites, blog posts, social media, advertisements, film and television productions, web and mobile applications. In printed materials such as magazines, newspapers, books, brochures, flyers, product packaging for decorative use in your home, office or any public place or personal use. The rights granted to you by FreeImages.com are: Perpetual, meaning there is no expiration or end date on your rights to use the content. Non-exclusive, meaning that you do not have exclusive rights to use the content. FreeImages.com can license the same content to other customers. Unlimited, meaning you can use the content in an unlimited number of projects and in any media. For purposes of this agreement, “use” means to copy, reproduce, modify, edit, synchronize, perform, display, broadcast, publish, or otherwise make use of.
Stocksnap: Every single image on StockSnap are governed exclusively by the generous terms of the Creative Commons CC0 license. Specifically, that license means you can do any and all of the following: Download the image file.Publish, revise, copy, alter, and share that image. Use the image (as-is or as you’ve altered it), in both personal and commercial contexts. Moreover, you can put StockSnap CC0 images to any of these usages without buying the right to do it, acquiring written permission from the image’s creator, or attributing the work to the image creator. In other words, there’s no fee to download or use these StockSnap images in accordance with the CC0 license. They’re free to download, free to edit, and free to use - even in a commercial project! You don’t even need to attribute the image to the creator, the way you do with other CC or traditional copyright licensing schemes. (However, even though it’s not required, we here at StockSnap do encourage you to include an appropriate attribution. It’s a nice thing to do.)
Burst.Shopify: Burst is a free stock photo platform that is powered by Shopify. Their image library includes thousands of high-resolution, royalty-free images that were shot by their global community of photographers. You can use their pictures for just about anything — your website, blog or online store, school projects, Instagram ads, facebook posts, desktop backgrounds, client work and more. All of their photos are free for commercial use with no attribution required.
Pixabay: Images and Videos on Pixabay are released under Creative Commons CC0. To the extent possible under law, uploaders of Pixabay have waived their copyright and related or neighboring rights to these Images and Videos. You are free to adapt and use them for commercial purposes without attributing the original author or source. Although not required, a link back to Pixabay is appreciated.
Viintage: All images hosted by Viintage.com are considered to be public domain images, each image is presumed to be in the public domain. It may be distributed or copied as permitted by applicable law. Viintage.com assumes no ownership of the images and they may be downloaded and can be used free of charge for any purpose. They may be downloaded and used for commercial and personal use. Understand “public domain” as the permission to freely use an image without asking permission from the photographer or the illustrator. Thus, the creator of the work will not sue you for violating his/her copyrights. It is your responsibility to make sure, displaying the image does not violate any other law. Viintage.com assumes no responsibility for how or where you use the images found on the site.
Gratisography: You may use Gratisography pictures as you please for both personal and commercial projects. You can adapt and modify the images and get paid for work that incorporates the pictures. This includes advertising campaigns, adding your logo or text to an image, printed in any size print runs (e.g., book covers, magazines, posters, etc.), on your website, blog, or other digital mediums, and on merchandise as long as the picture itself is not the merchandise.
As someone who draws a lot of faeries, Faestockis godlike.
A wonderful addition to the list!
Unsplash. Another whopping huge free images site like pixabay: free for commercial and noncommercial use and remixing; just don’t sell the photos unmodified or add them to other photo-sharing sites.
Morguefile.Big old free photo archive from the dawn of the web. “We are a community-based free photo site, and all photos found in the Morguefile archive are free for you to download and re-use in your work, be it commercial or not. The photos have been contributed by a wide range of creatives from around the world, ranging from amateur photo hobbyists to professionals.”
Open Access at the Met. The Metropolitan Museum of Art in New York: “Whether you’re an artist or a designer, an educator or a student, a professional or a hobbyist, you now have more than 406,000 images of artworks from The Met collection to use, share, and remix—without restriction.”
Smithsonian Open Access. Download, share, and reuse millions of the Smithsonian’s images […] from across the Smithsonian’s 19 museums, nine research centers, libraries, archives, and the National Zoo.
Limited use, if you’re doing a Science and need control panels/rockets/futuristic an image search with qualifier site: nasa.gov You have to double-check a photo’s caption it’s really a NASA photo, but photos which were taken by NASA spacecraft and astronauts are public domain, since they’re funded by taxpayer dollars. (This also goes for images of animals archived at the USFWS Digital Library, i.e the US Fish and Wildlife Service, or rocks and landscapes on USGSwebsites.
Okay updating and consolidating lots of info here; as well as adding links for ease of access. Adding a brief description for some too; as is the case that not all of them have descriptions above. (Warning that some of these links contain nude refs, I will try to mark where possible which ones have more prominent ones.)
Posing Sites and Apps:
Adorkastock. Stock photos for pose refs. DeviantArt gallery started in 2007.
FreePhotoMuscle.com. (translated page link click here) Japanese stock photo pose site that includes buff people, but in funny poses and costumes.
CroquoisCafe. (NSFW, nude model poses warning) A stock photo pose site. You should be aware this org has been linked as pro-Trump. I leave it to y’all to decide if you want to use the resources or not. I highly encourage not financially supporting them and trying to support the individual models if you can.
Line of Action. Fantastic site that includes posing refs, community discussions from other artists, figure study, anatomy, etc. So much stuff in here.
PoseSpace. Extensive library of poses. Some free resources others are paid. I’ve not fully evaluated both, but you should be able to use this all mostly free and get great use out of it.
SketchDaily. This one is one of the better ones out there. You can time yourself, search by pose, clothing options, body type, perspective, etc. All real models.
JustSketch.me. A pose app for any device. Has apps for most devices and a webapp. Customize and pose models/props/scenes.
Quickposes. Pose site that gives you timed challenges to become more proficient at poses.
POSEMANIACS. Ref site with anatomical poses. All the ref pics are of 3D models with only the bones and muscles. Can be helpful for seeing how muscles behave in certain poses. limited to two body types tho.
MagicPoser. A wonderful app that’s great on mobile. Lets you choose size of models, number of them, style, etc. Significant features are use of snap point with the physics engine, adjustable lighting, multiple perspective, 360 angle, articulated hand posing.
Clip Studio Paint Modeler. Free 3d tool that works with Clip Studio Paint. You can import your own data or other models you find online. Not quite an alternative to Blender, but the integration with CSP is very nice.
Egg a Zyoutatsu Atarichan Drawer. (requires enabling flash player or downloading and using standalone flashplayer) Drawing tool for pose practice. The developer is working on an html5 version.
DesignDoll. One of the best pose tool apps out there. You can customize so many things. They also have an extensive collection of ready made poses here. You can use the free or pay once for life and have the poses integrated into the client as well as the ability to export your obj to other programs like blender or smt.
freeimages.com. Another stock photo site, less features than some others.
StockSnap.io. Stock photos with a creative commons CC0 license, which essentially means you can use the photos however you want and don’t have to attribute to them. (though its nice if you do attribute)
Burst.Shopify. Tons of royalty free high quality images. Similar licensing to StockSnap.
pixabay. I feel like most people know about this one, but it features entirely free CC0 licensed Photos, Videos, and Music. No attribution required, but still nice to support a giant site with all this content.
Viintage. Big collection of public domain vintage photos.
Gratisography. For commercial or personal use. They specialize in odd, quirky, wild stock photos.
pexels. Great free stock photos and videos. Only a few stipulations of what they don’t allow, but their license info can be found here.
Faestock. An artist and model with a huge amount of fantasy and fae and other types of photos available. Their terms for use are here.
MorgueFile. Old stock photo archive that’s been around a long time.
The first step is figuring out how behind you actually are. Will you get anxious? Yes. Will you panic? Most likely. However, brace yourself. You got yourself in this, so make sure you get yourself out too. If you don’t, nobody else will. Grab a paper or open a document. And do the following:
List all your subjects
Mark what you will be evaluated for. Is it an essay, presentation or your good old theoretic exam?
For each item that you have to deliver write down the following
Essay: How long should it be? Is it a team project or individual? How
Presentation: Is it an individual presentation or with a partner?
Theoretic: How many chapters will the test be based on?
Don’t panic. Prioritize.
I’m not going to lie, you WILL be overwhelmed once you finish that list. However, you are not obligated to do all of them. What do I mean by this? Well, why don’t you try to make a couple of them during resit period? I started a whole semester late, I had double the exams than my peers. Is taking all the exams at once doable? Certainly, but you will have to sacrifice your sanity and be content with a passing grade. However, I am not the type of person that is satisfied with a passing grade and I am also kinda lazy so I would choose which exams I would take in the examination period and which ones I would take in the resit period. That way, I didn’t overload myself with stuff and ensure a high grade nonetheless. Work smarter, not harder, kids.
This is where prioritizing came in handy. Based on the previous information gathered in the first step, filter which exams are the most important. Do you have a subject that requires an essay, presentation and a theoretic exam? Make it a priority. Is that theoretic exam feared among all students for being hella difficult? Make it a priority. As a rule of thumb, make all team projects a priority. So, then… What do you leave for resit? Is it an individual paper that does not require a lot of work or cannot be too long? Resit. Is it an individual presentation? Resit. Is it a simple test in a subject you are confident in? Resit. Although I do recommend trying to take all the written exams in the examination week. However, if you see that the workload is too much, move one to the resit.
Create a Master Calendar
Now that you know what you will be prioritizing, it is important to create a master calendar that will help you catch up. Here are some guidelines on how I do it.
Mark off all your deadlines first
Per subject divide the study material in tasks: What chapters do you need to study? When will you outline your paper? When will you write? Revise it?
Schedule the most pressing or time consuming assignments first
Assign 1 or 2 study subjects per day
If you work with programs such as Notion or other software that helps you with project management, doing a big backlog can be a game changer. Want more in depth information? I wrote a blog just about that here.
Have a structured and mindful study routine
I was surprised at how much I improved my study when I implemented a study routine. Before having one, I would spend hours and hours on one thing, or I would start reading about something and quickly started doing unnecessary research on what I’ve read. I thought I was being productive but truth of the matter is that I wouldn’t finish what I actually HAD TO do. Some weeks back, I shared my study routine with you. Having a study routine is important, if you want to ensure you are completing your tasks. Pro-tip: use the pomodoro technique or set a specific time for you to finish each of your tasks. You’ll finish more things that way.
Have a partner to keep you accountable
Finding a study buddy is one of the best decisions you can make when you are behind your studies. BUT make sure they are serious. This helped me so much back in my minor, I teamed up with another classmate and we created a shared doc where we each assigned a chapter to summarize. We would then come together and explain the chapter to each other. Thus cutting the time we spent reading and writing the summaries in half in order to focus on learning. Try to come up with ways to divide the workload between the two of you and then explain and discuss about it. This is a more interactive way of learning and is sure to keep you more engaged and help you remember it afterwards.
Since a major symptom of ADHD is never knowing how long a task will take you, routines can really help you get your stuff done. So how to trick your brain into making (and keeping) one?
Write your routine down!
Be flexible with times. Some things may have really rigid times (like class times, meals) but when it’s hard to know how long stuff takes, getting a general idea is better than stressing out trying to guess how long it takes to do your class readings etc
Have time for “busy work”— bad short term memory means that you forget to answer important emails, make appointments, do forms. If you set a specific time for this type of thing, it’s like a built in reminder to go deal with it.
Sometimes you just can’t focus as well as you’d like. Sometimes you get distracted talking to friends. Sometimes you randomly get invited to do something fun. Have times that are intentionally flexible, for work if you’re hyper focused, or fun if you need a break
Remeber that a routine is to provide sweet sweet structure, not to provide stress and guilt. It’s a guideline to help you, and you don’t have to feel bad if you don’t follow it perfectly.
Having cohesive and effective notes is one of the key skills I think one should have, especially in an academic setting. When you’re receiving a ton of information each day, you want to be able to keep track of that and remember what you’ve learned. I’m constantly trying out ways to make my note-taking more effective and tailored to my needs. Here’s what my note-taking system looks like so far.
Quick note: click on the images for better quality!
Class Notes
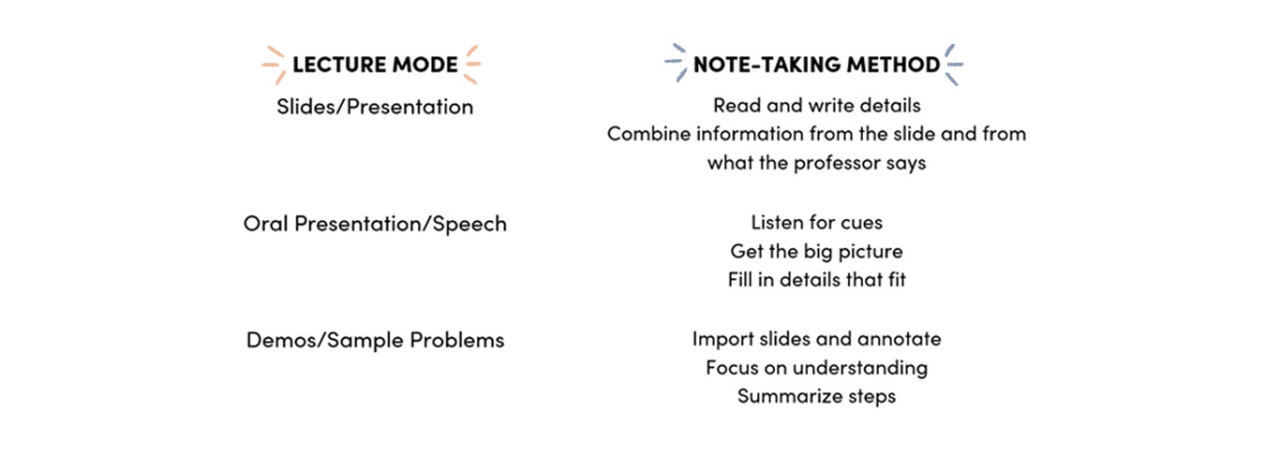
Taking notes in class is an invaluable way to keep track of the new knowledge you’ve gained. However, depending on the mode in which the lecture material is conveyed, I take my notes differently. Here’s a summary of how I take my notes for each type of lecture, as well as some examplesfrom the classes I’m taking now.
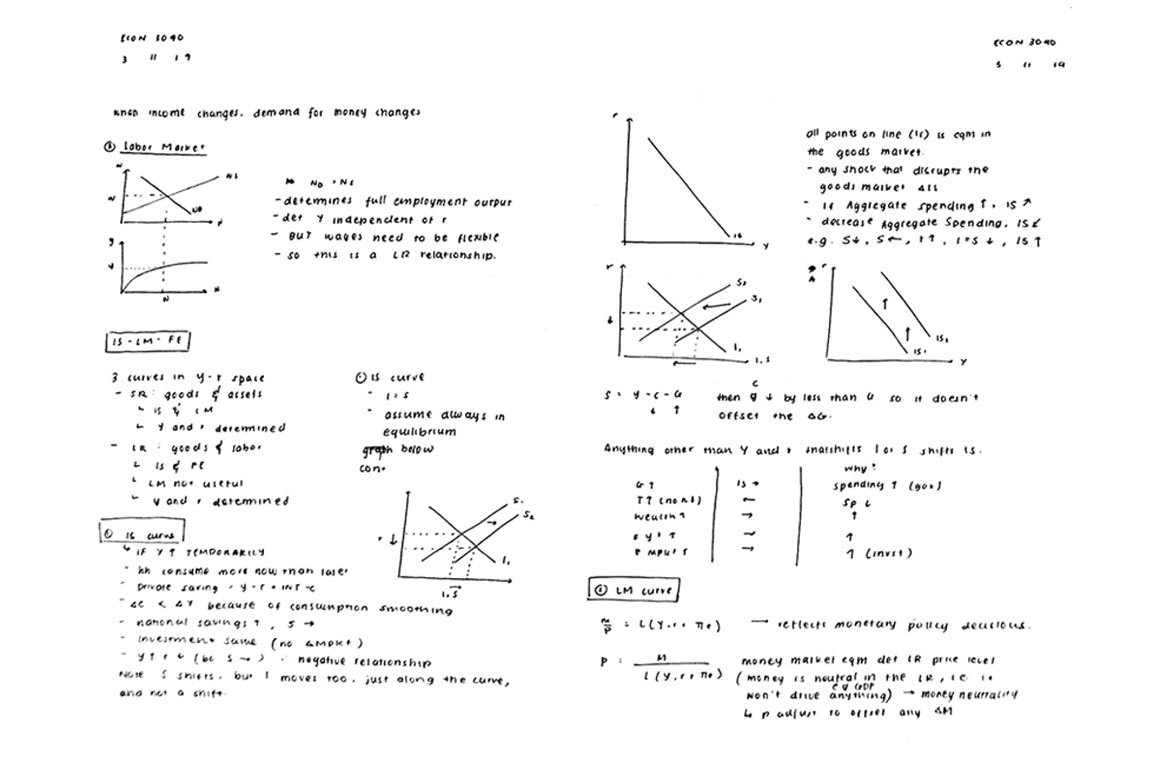
Slides (e.g. Macroeconomics)
Macroeconomics is a class in which you should be able to intuitively understand a lot of concepts but also remembera lot of things. Because of this, I’ve tailored my note-taking method and habits to achieve that goal.
I write my notes by hand because handwritingis more effective in committing things to memory.
As for what I actually do - and this is what I’ve done for other classes in which the professor/lecturer uses slides:
Read/skim over the slide.
Read each bullet point as the professor goes through them.
Copy it down if it’s straightforward or write it down in a structure and diction that I understand better (not necessarily in my own words - sometimes it’s just restructuring, e.g. splitting things up or joining different bullet points together).
Take note of any other important detailsthe professor says about any particular point unless I think it’s intuitive or common sense.
Here’s an example from a Macroeconomics lecture.
Oral Presentation (e.g. Anthropology)
During classes in which the professor just speaks and doesn’t use much visual material, I listen before I write instead of attempting to write down every single detail mentioned.
Also, I typeup my notes instead of handwriting them since the exams are all open-book so I don’t really have to commit things to memory.
Here’s what I do:
Listen for a cue that tells you what this particular part of the lecture will be about (and write it as a heading).
Write down main ideas and their supporting facts/details. If the facts/details come before the main ideas, then I’d usually draw an arrow.
Write down ideas and details from readingsin their own section/subsection.
Sometimes, my professor also shows short clipsin class, in which case I’d write down the messagethat I think the clip was meant to convey, as well as things that the professor points out that I didn’t think of on my own.
I’d also look up concepts/ideas/people/events (in real time) that are important to my understanding of the lecture material.
Here’s an example of a Google Docs document from an Anthropology lecture.
Demonstrations and Sample Problems (e.g. Computer Science)
Classes in which the lecture is mainly going through demos and problems are kind of tricky, because you want to know and understand what the professor is doing, but you also don’t want to be writing down every single step that’s being executed. Here’s what I’ve found to be the most effective so far:
If there are any, I import the slides/handoutontoOneNoteandannotate directly on the slide. If not, I just write down things like definitions, important concepts, and syntax-related things.
I focus on understandingwhat the professor’s doing with the demo or problem.
I then summarize the steps they took and
Write down commentsand points they brought up, e.g. common errors, desirable habits/practices.
Also, these kinds of classes are usually classes in which you’d learn better when you actually do problems yourself, so I definitely learn more when I do assignments and labs than when I’m in class.
Here’s an example from a Web Programming lecture.
Here’s one from an Object Oriented Programming and Data Structures class. I often draw things to help me visualize the general points.
Rewritten Notes
My rewritten notes have definitely changed a lot since high school. Since most of my classes don’t require a lot of memorization, I organize my notes in such a way that they’d be easy to index or find information from. Here are some of the ways I do that:
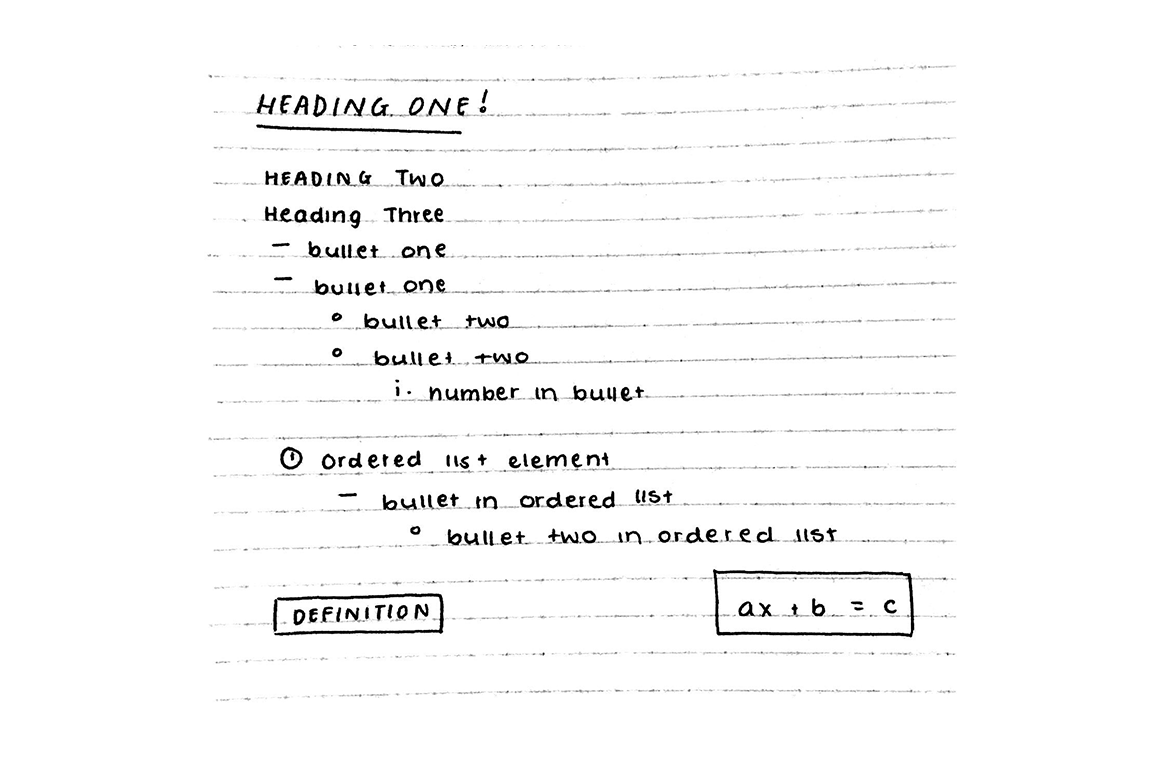
Establishing a Visual Hierarchy
Having a well-defined hierarchy helps me flow through my notes really well as i read them. It helps me organize information like a mind map without actually making a mind map - I know the big topics and their subtopics and sub-subtopics and details … basically it’s easier to see how these ideas fit together.
But why don’t I just make mind-maps? See, the thing is, a lot of my notes require sequential or linear thinking, e.g. in macroeconomics it might be the sequence of events following a change in the economy, or in computer science it might be a general algorithm for solving a certain type of problem, or it might be proving or deriving a certain equation. These sorts of things just generally don’t work well with mind maps. Instead, establishing a visual hierarchy in my notes helps me organize different ideas while retaining the linear nature of the information.
Here’s what the hierarchy looks like.
Here is an example from my Web Programming class, which is a purely project-based class, so no prelims or exams. As you can see, I draw rectangles around important terminology so that I can easily find them while I’m working on a project. I also include examples from in-class activities as well as notes on syntax so I have an idea of how to implement certain things. These examples and notes are further grouped by terminology/concept.
Structuring Them for Easier Flow
My syllabi for my college courses are nowhere near as detailed as the syllabi for my high school courses - those of you who take/have taken Cambridge exams would know. In college, my syllabi are only lists of topics and not what you’re expected to know for each topic. Because of this, I have to find a way to arrange information so that I can achieve the most comprehensive and cohesive understanding of that topic, i.e. so that the flow of my notes is similar to the flow of my thinking.
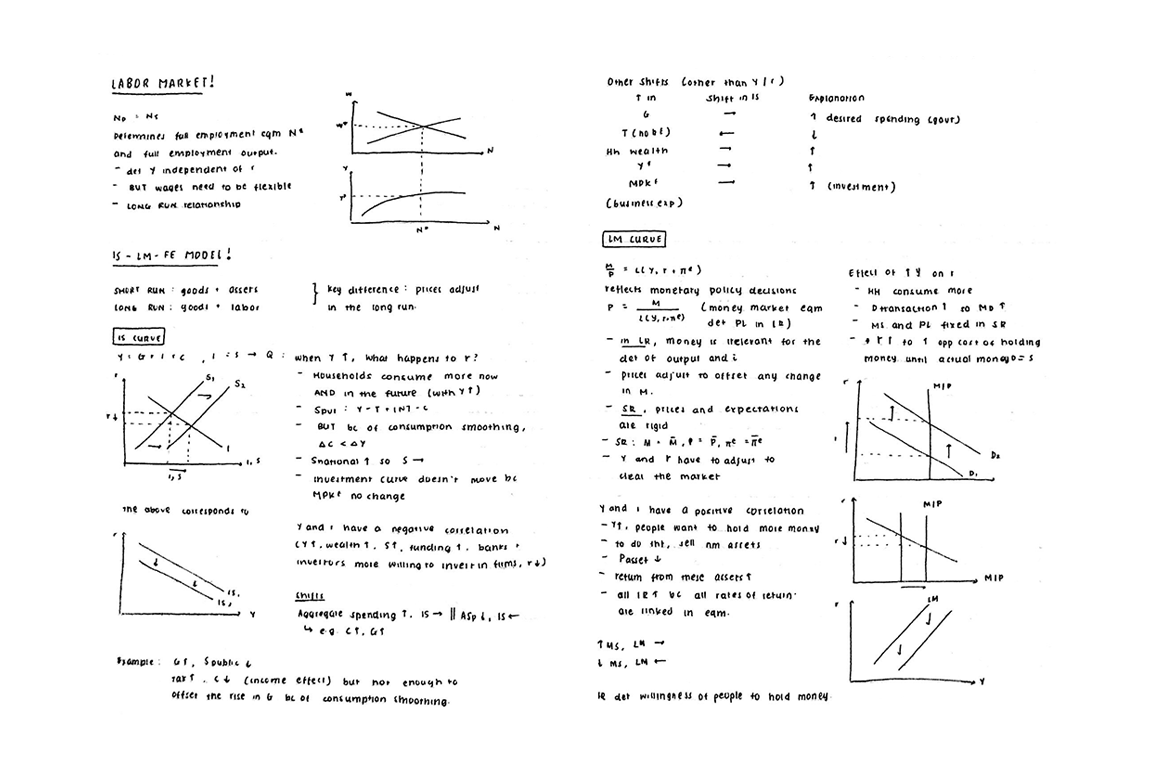
For example, in my economics notebook, I like to have the details first (e.g. the separate markets: the goods market, the assets market, and the labor market) and then the big picture later (IS-LM-FE). Some people prefer the other way around - seeing the big picture and then going into the details - which I can understand and have done myself for certain topics.
Making Use of Proximity and Spacing
I very much dislike notes without good use of spacing and grouping things together. Keeping related ideas in visual proximity helps your brain (or at least mine) organizethis information. It’s also a lot easier to find things andvisualize your notes when they’re not just a huge chunk of text.
One thing I should probably mention is that I don’t use colored pens anymore because it just takes a lot of time to switch pens and think of a color palette. I also don’t have much use for it. In the past, I used color to help me memorize and group things in different categories, but now, I’ve found that there aren’t a whole lot of categories I need to keep track of, and when I do, I can do so with just one pen but changing the style of the text.
And that’s what my note-taking system currently looks like. It’s working well so far, but I still think there are other things I could try out that might be a better fit.
So yeah, hope this was helpful, and as always, feel free to drop an ask if you have any questions, or even if you have any suggestions or would like to share your note-taking system. Have an awesome week!
I’ve been asked about how I take reading notes so here is a quick rundown. These notes are for history, but the process is _about the same _regardless of the text, but if you would like to see variations (for linguistics or government, for example), just let me know! Also, if you would like to know how I do lecture notes or how I review for tests, just shoot me ask. I hope this was helpful!
Personally, this is the most effective one for me. All you need is a blank piece of paper. Pick a sub-topic that you are doing e.g in biology a topic could be immune system and the sub-topic could be antibodies and antigens. If you want you can create some questions for each sub-topic and on your blank piece of paper, using questions as a guide, write everything you know about that sub-topic without your notes. After get your notes out and check and correct with a different colour pen. Watch this video to get a better understanding
2. Flashcards
I recommend you use written flashcards, unless you have vocab or definitions in which case digital ones like quizlet is fine. You should have questions on one side and your answers on another - i’ve heard people say the answer shouldn’t be long but i find that the more detailed it is the higher marks you score in the exam - of course summarise don’t just copy from a textbook or there is no point in doing this. When you test yourself try to do something else other than reading, for example write the answer down and then check and correct.
3. Spaced intervals
No point cramming for an exam. Yes it might have got you an A* in GCSE or other lower level exams but it’s certainly not going to get you an A* for a-levels or other higher exams. Space your learning out and if you can try and revise everyday, even if somedays are just for half an hour, DO IT! It will help you in the long term. Don’t revise one subject/unit for a whole day, space it out. For example don’t revise like this: AABBCC, revise like this instead: ABCBCA or something along those lines.
4. Mind maps
My favourite revision source!!! For some reason in an exam ( i only use mind maps for essay based subjects) i can remember where i put each point on my mind map which helps me write my essays and retrieve my information more in the long term! Don’t make it boring by trying to be ‘minimal’ - ADD COLOUR !!! But to stay within limits, too many colours can make it look overwhelming and confusing !
5. Teaching someone else
Either teach your younger siblings or pretend you are teaching to an imaginary class - while it may seem crazy it works, trust me. Use a whiteboard to help you illustrate your ideas! This method will help you identify any gaps in your knowledge and you’ll truly see if you know something well enough to explain it. If you cannot explain it to a six year old then you truly have not got the grasp of it, as Albert Einstein says!
6. past papers
Honestly, this should be the last thing for your revision, unless you have not left enough time to revise all the content and you are running out of time then past papers should be the first thing you do. Do these properly, don’t do it just to see what gaps you have in your knowledge- genuinely do it as if it is a real exam. This will help you see how well you can apply the content you have memorised for an exam. It will also get you familiar with the mark scheme which will help you get as close as full marks !!!
because this is such a cool resource and education is so expensive i thought i’d share this
edX is a website that’s partnered with a huge number of universities worldwide to offer online courses on a huge range of subjects. you know what makes this even more exciting? a huge number of these courses are free.
you can take university level courses, basic courses, interest courses, business courses. you can take courses on superheroes or calligraphy or antarctica. for free. run by top level universities (the founders are MIT and harvard) and top level academics. even the ones that do cost money aren’t all that expensive (the first one i found was 300 bucks. compare that to how much a university course is, and it’s a huge saving).
they’re in several languages, depending on the university offering them as well, not just english.
so yeah. wanna learn something fun? wanna get something to boost your cv? wanna accelerate your current education?
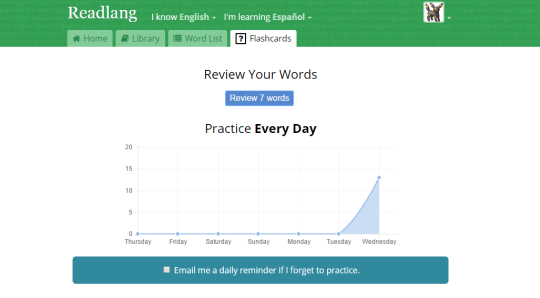
this is ReadLang. it is a cute little website that gives you all kinds of texts to read in your learning language.
when you sign in, you go to a dashboard that shares your progress so far. because i have just joined this website today, i’m still working on the opening progress page.
right now, i’m working on finding cool stuff to read in spanish. ReadLang will give you texts in your target language at the level and word count you want! check it out, it is pretty cool.
don’t know a word? click it! ReadLang will define it for you. free accounts will let you get 10 translations per day, but paid accounts ($5 per month) can get unlimited translations per day. you’ll be able to see your translations here:
lastly, there are flashcards. this is a really useful feature. it even charts the amount of studying you did each day.
i’m definitely adding this to my favorite list for online language resources. reading is an excellent way of studying a new language, and ReadLang makes it easier to do just that.
a lot of this stuff you learn naturally but it’s nice to know about it beforehand. if you’re barely learning hangul then don’t worry about it tbh! it’s just a reference for some of the rules in case there’s a word with pronunciation that you don’t understand
Disclaimer: I haven’t read them all, but I wish I had! And the more linguistic books may be centred around the English language since they are in English. I’ll do a Spanish one too, and possibly a French one.
have 3 achievable goals a day: having a laundry list of things to do everyday is super unrealistic, and you just end up feeling bad about yourself because you didn’t accomplish your goals for the day.
leave your sundays open: i love sundays because they’re my day to chill out and catch up on school work that i wasn’t able to finish during the week.
recognize when you’re at your emotional limits:forcing yourself to get work done when you are unable to comprehend your study material does not benefit anyone.
learn how to say no: people will ask you for your time and it will stretch you to the limit, whether it be at your job, in your extracurriculars, or in your personal life. know when to step back and say no.
take care of yourself physically: take breaks, go for walks, shower regularly, get enough sleep, eat healthy, see your friends
celebrate your accomplishments: go out to eat with friends after a big exam, indulge in a night off after a busy week with some netflix and wine
make a study plan beforehand:it can be daunting to see how much work you need to put in to a class or task beforehand, but this allows you to spread your work evenly so you don’t become overwhelmed.
learn how to ask for help: it is very rare that people make it through school, whether it be high school or university or any graduate program, without needing the advice of others or just a kind soul to vent to. find that person.
never forget your hobbies: you will need things that keep you sane. if you love to play music, write, play volleyball, or cook, make you sure you don’t lose these things. they will become your escape when times get tough.
log off from time to time:it is exhausting to be constantly connected to social media and your email. just physically disconnecting from these for a night to take care of yourself can really help you clear your mind.
In spirit work, we often connect with the spirits that have crossed over and are present in the physical world. However, there are also ways to cross over into the spirit world and connect with spirits in their home environment.
Pathworking
As I mentioned in a previous post, a pathworking is a specific type of meditation where you go on a psychic journey, but are still anchored to your physical body. It’s sort of like dipping your toes into the spirit world.
There are two important elements to a pathworking: a clear entrance/exit point and a way to retrace your steps. Pathworking journeys are typically cyclical — there is both a journey out and a return where you go back the way you came. This makes it easier to fully return your consciousness to your body, and failing to do so can cause you to feel disoriented upon the return.
Your entry/exit point can be absolutely anything, but common examples include a door, a gateway, a tree (or sometimes The World Tree), a cave/tunnel, or a natural landmark like a beach or mountaintop. What’s important is that it’s recognizable and easy to find your way back to.
If you want to try pathworking, make a rough “road map” of your journey beforehand. This doesn’t have to be super specific, but it should contain the following: a goal for the pathworking (such as to connect with a certain spirit), an entry/exit point, and a general idea for the route you’re going to take. If you’re worried about getting lost, author Thea Sabin recommends using “the Theseus trick.” Like in the myth of Theseus and the Minotaur, you can tie a golden thread or rope to your entry point and the other end to your astral body. If you get lost, you can follow the thread back.
Pathworking is fairly beginner friendly, and I highly, highly, highly recommend starting with pathworking and becoming comfortable with this method before trying astral travel. Even for more advanced witches, pathworking is often a better option than astral travel because it’s less involved and requires a little bit less effort. I personally prefer pathworking for most situations.
Performing a Pathworking
Before you begin, establish a clear goal for your pathworking and write out a rough “road map.” At the very least, you should know what your purpose is, where your entry point is, and how to find your way back.
Begin in a dark, quiet room. Cleanse the room by burning incense, diffusing or spraying essential oils, or using a ritual broom to sweep out old energy.
Find a comfortable place to sit or lie down and begin meditating. You may want to play meditation music, practice breathing techniques, or use some other method to help you reach a meditative state.
Once you reach a meditative state (you should know what this feels like if you have experience with meditation), see yourself standing at your entry point. This is your entrance to the astral realm.
Set out on your pathworking.
When you are ready to leave the astral realm, you will need to find your way back to your entry point. Once you reach your entry point, it should be fairly easy to return to your body.
Once you’re fully present in your physical body, use your favorite method to ground yourself.
Write down everything you experienced during your pathworking in a journal.
Astral Travel
If pathworking is dipping your toes into the spirit world, astral travel is diving in the deep end. Also called spirit flight and hedge riding, astral travel includes actually sending your soul/consciousness out of your body and into the spirit world. As you might guess, this is more complicated and requires more effort than pathworking. For this reason, astral travel is not beginner-friendly. If you are completely new to meditation, witchcraft, and spirit work, it’s best to learn to pathwork before you attempt astral travel.
A word of warning: you may want to avoid astral travel at times when you’re in a very vulnerable or volatile emotional state. Some days you just aren’t up for it, and that’s okay. On those days, a pathworking or another form of spirit work may be a better option.
Triggering Spirit Flight
In astral travel, a trigger of some kind is used to help disconnect the soul from the physical body. Common triggers include drumming, special music, shaking a rattle, chanting, and dancing.
You can find shamanic drumming tracks on YouTube that can help you achieve astral travel. If you find that repetitive motion helps you trance out, you may look into getting a small drum or rattle to play.
Animal Guides
In many cultures, those who travel into the spirit world do so with the guidance and protection of an animal spirit. From the Norse fylgja, to the shamanic power animal, to the witch’s familiar, history is full of examples of these types of guides.
Before you begin astral travel, do a pathworking to meet your animal guide. It’s important to note that you aren’t choosing an animal guide — only meeting one that has always been with you. Your guide may be an animal that you like or identify with, or it may not. When I first began experimenting with astral travel, my guide was a coyote — an animal I had never identified with before, but who I learned was deeply connected to my inner self.
It’s important to always have your animal guide with you when going on astral journeys, as they are an important source of protection and power. They may also literally guide you to the things you need to see and the spirits you need to meet.
Flying Ointments
Historical accounts describe witches using “flying ointment” to help them achieve spirit flight. These traditional flying ointments contained toxic and/or hallucinogenic plants like belladonna, datura, henbane, mandrake, and opium poppies. For obvious reasons, most modern witches do not use these herbs.
Please do not try to create your own flying ointment with poisonous plants. If you’re a true traditionalist and feel like you just have to try a historically accurate flying ointment, Bane Folk Apothecary sells several. Bane Folk is run by Sarah Anne Lawless, a kickass witch who knows her stuff and produces safe, medicinal products inspired by traditional flying ointment formulas. I am usually very pro-DIY, especially when it comes to witchcraft, but this is one case where it really is best to defer to a professional.
To create a modern, non-toxic flying ointment: heat eight ounces (or one cup) of poppy seed oil over low heat on the stove. Once the oil is warm, add 2 ounces (or ¼ cup) of beeswax into the oil. (Use carnauba wax for a vegan alternative.) Take the mixture off the heat, and allow it to cool off a bit. Once it has cooled (but before it’s begun to solidify), add nine drops each of mugwort essential oil, star anise essential oil, and peppermint essential oil. Pour the mixture into a mason jar and seal tightly. To extend your ointment’s shelf life, add a few drops of Vitamin E oil and store in the refrigerator. If you don’t have access to essential oils or prefer a more traditional method, you can buy dry herbs and infuse them into your oil instead — to do this, crush up 2.5 ounces (or 1/3 cup) each of dried mugwort, star anise, and peppermint and add them to a mason jar; add enough oil to the jar to cover the herbs completely, with about an inch of oil above them; seal the jar and place it in a sunny window for 2-3 weeks to infuse; and finally, strain the herbs out of the oil with a mesh sieve or a cheesecloth. You can then add your Vitamin E oil and beeswax to create an ointment.
This modern recipe does not contain hallucinogens, but it does contain plants that are commonly used in magic to increase psychic abilities and aid in astral travel. You can say an incantation over this ointment while making it to add some extra magical potency. Applying the flying ointment can also become a sort of ritual that prepares you for spirit flight by helping you slip into a more spiritual head space.
Performing Astral Travel/Spirit Flight
Before you begin, know why you are journeying to the spirit world. You should always have a clear goal for your astral journeys.
Begin in a dark, quiet room. Cleanse the room by burning incense (mugwort incense aids in astral travel), diffusing or spraying essential oils, or using a ritual broom to sweep out old energy.
Use your favorite method to ground yourself.
If you are choosing to use a flying ointment, rub it on your skin now.
Hold a protective item in one of your hands. I like physical items for protection during spirit flight, because they can ground you and help you find your way back to your body. Examples of protective items include a sprig of rue, a piece of iron, or a protective crystal like black tourmaline. If you ever feel scared or uncomfortable during your journey, you can bring this object into the astral realm to protect you. It will also keep your body safe while your consciousness is occupied.
Start up your trigger, whether this is drumming, rattling, dancing, etc.
Allow yourself to drift into a trance state, and then to disconnect from your body.
Call your animal guide to you.
Set out on your journey in the spirit world.
When you are ready, feel yourself returning to your physical body. Allow yourself to come back slowly — don’t rush it.
Ground yourself. One good way to ground after astral travel is by eating a snack.
Write down your experiences in a journal.
Resources:
Wicca for Beginners by Thea Sabin
Southern Cunning: Folkloric Witchcraft in the American South by Aaron Oberon
Hedge Riding by Harmonia Saille
“How to Make Herb-Infused Oils for Culinary & Body Care Use” and “How to Make Herbal Salves” from the Mountain Rose Herbs blog
I wish that ao3 had an option to filter warnings (and tbh certain authors) out like I will never ever want to read it and just seeing it puts me off so much that often I end up closing my browser because that content upsets me so much lmao
There is a way to do this but I can’t recall how to do it. it’s something you type into the box for “other filters” or something, I don’t remember. who knows??
It’s not a great option, and I don’t know if you can sort out authors that way, but it’s better than nothing if someone can reblog this with how to do it!
Alrighty friends! It takes some specificity, but you can do this. Let me show you how!
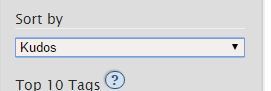
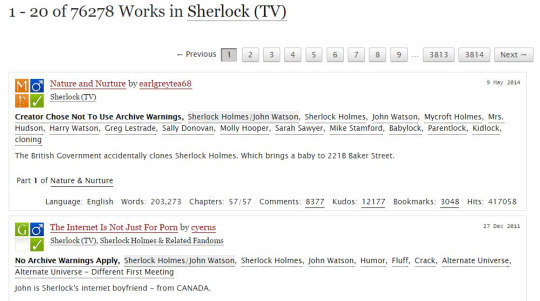
So I started with going to the Sherlock (TV) section of Ao3. On the right we find this lovely section! ((I know I’m going over things you already probably know, but I figure this post may go to new Ao3 users, so bear with me.))
Underneath this, I chose sort by Kudos, because that’s a quick way to find most popular fics, for the sake of this demonstration.
With those filters on, we end up with this being our first two results:
As you can see, we have Nature and Nurture by earlgreytea68, and The Internet Is Not Just For Porn by cyerus. So what if I am utterly sick of seeing earlgreytea68 on my list? Let’s pretend I’ve read all their fics, or that I just don’t like her, or whatever. I want this author out. I go to this section on the right:
In “Search within results” I type earlgreytea68 into the bar, with a minus sign in front. This gives me the following page, upon hitting the sort and filter button:
There goes earlgreytea68! But now I’ve decided that Crack is just not my thing, I’m sick of that, too, for heaven’s sake, I want something reasonable in my gay slash fanfiction about detectives that solve crimes about glowing dogs and irish megalomaniacs. Heaven forbid this get ridiculous.
Well, then I add this to my search:
Which gets rid of everything with that tag. My results are now:
Performance in a Leading Role is now my first result!
You can do this as many times as you want; the biggest problem I have is trying to filter out multi-worded tags. For example, “Secret Relationship” is hard to filter. Better to go with authors you dislike or with words like “DubCon”.
I hope this helps! Also remember that googling site:archiveofourown.org and then adding search terms will mean google searches Ao3 for you, and sometimes that works far better.
Good luck!
An excellent in-depth guide! Thank you!!
omg changed my whole ao3 rarepair game
An excellent guide to filtering on AO3!
You can filter out phrases by enclosing them in quotes. For example, if ABO and Hydra Trash Party are not your things, try:
-“alpha/beta/omega dynamics” -”hydra trash party”
I have more advice!
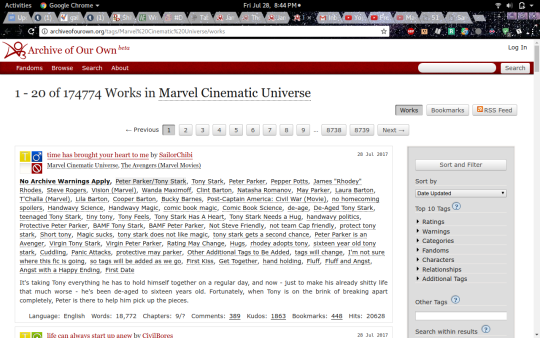
Say, you’re in your random fandom- I went with the Marvel Cinematic Universe, since I’ve been reading Iron Man stuff recently. Tony Stark is awesome.
But anyway, you’re on the page, and you see that there are 174,774 works! That is way too many for a casual afternoon’s browsing.
And you see that the first one is Peter Parker/Tony Stark and that is not your jam. It doesn’t work for you, or it squicks you, whatever. Wouldn’t life be easier if you could browse without seeing that pairing (or whatever pairing you don’t like)? You can!
First, click on that pairing tag(You may want to open this in another tab, actually.):
and it’ll take you to the page for that pairing tag. Click this button:
and then look at the address bar! The actual page is unimportant. Copy the numbers located here:
and go back to the original search page! Down on the side, in the same place you can get rid of other tags, type -relationship_ids:”the number you just copied”
Then hit ‘sort and filter’ annnd… magic!
The fics with that pairing are gone! You can also do multiple pairings, get rid of any tags you don’t like, and sort it by date or length or kudos, or whatever.
Enjoy.
I’d just like to add that these sorts of search modifiers ALSO WORK IN GOOGLE AND MOST RESEARCH DATABASES.
The more you know.
Just a quick reminder that AO3 uses Luceneas a search and index engine.
That means you can pretty much use all the Lucene Query Syntax in the “Seach within result” field.
I don’t think AO3 indexes the whole fic for searching but definitely it’s meta data. Combined with Lucenes awesome query syntax you can do pretty much every search you heart desires.
Addtional Lucene Query Syntax that has not been mentioned yet and you might find useful:
Wildcard Searches
You can use wildcard searches within single terms. For a single character wildcard search use the “?” symbol. For a multiple character wildcard search use the “*” symbol.
AND/OR
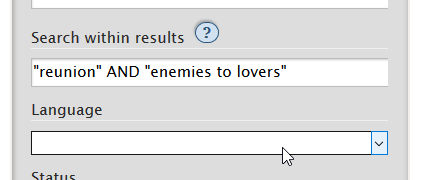
Lucene allows you to combin terms through logic operators. You’re looking for fics that are either “reunion” or“enemies to lovers”?
Just put in >“reunion” OR “enemies to lovers”< into the field
and you end up with all the stories that are either or but not both.
But wait, now you’re looking for fics that are both “reunion” and“enemies to lovers” at the same time? Now worries Lucene got you covered.
Just change it into >“"reunion” AND “enemies to lovers”“<
and you’ll get all the fics that mention both “reunion” and “enemies to lovers” somewhere in their meta data (note: it’s not just tags. It’s also title, summary …)
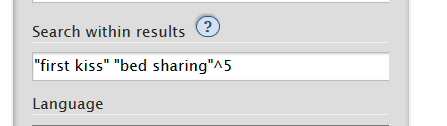
Boosting
You can also boost specific terms when doing a multi term search.
You can use the “^” Operator followed by a number to boost a specific term.
Say you’re interested in fics that are either “first kiss” or “bed sharing” but you’re much more interested in “bed sharing” fics and feel they are more relevant.
You can use the search >“first kiss” “bed sharing”^5<
to manipulate the order of your results in a matter that the score of every fic that contains beg sharing is multiplied by 5. Therefore all fics containing that term are given priority and shown at the top of the list.
You can also combine all of the above, target specifc fields (that’s what you did with the “relationsship_id:xxx”) and many more things.
Had a revelation recently and thought it might help other people too.
There is absolutely NO shame in having a ton of projects on the go and switching between or even dropping them on a whim.
Hobbies are meant to be FUN.
You can have 20 writing projects, or knitting, or whatever your thing is, and putting them down for a bit or abandoning them is a-okay.
I personally would never think that someone who started playing a video game and then decided to play another before it was finished was a quitter, so why am I so judgemental towards myself?
Doing your hobbies in a way that brings you joy isn’t selfish or weak, it’s…literally the whole point of them. Go nuts!
♡Take the longest section of branch and loop it around itself to make a circle. Secure the two ends with a strong, thin string (not plastic string though!)
♡Loop some twine around the entirety of the circle
♡Secure the twine so that its wrapped tightly, you do not want it to unravel!
♡Tuck new pieces of pine around the ring, making sure to weave the entire branches through the wreath
♡Go over the additional pine that you added with one more loop of twine
♡Hang it on your door or wall or wear it as a crown as in the pagan holidays of yule and Saturnalia!
◇There are many ways to decorate a Yule Wreaths, be creative and explore!◇
Make Seed Covered Apples For Birds:
♡Dab apple slices (halves) with a paper towel to dry
♡Spread a layer of peanut butter on your apple slices
♡Pour some bird seed onto a plate and dip the apple slices, peanut butter side down, into the seeds
♡Thread a tapestry needle with yarn or string and push it through the apples near the top
◇Place/hang them in your garden or somewhere outdoors!◇