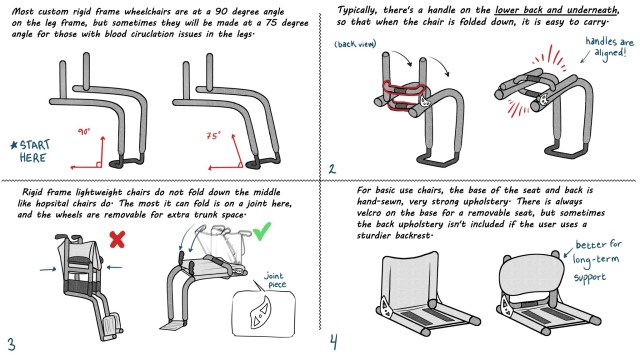
aaand it’s finished! An artist’s guide to custom rigid frame wheelchairs! This is completely free to use, reference, and save. Reblogs are welcome but please do not repost without permission and credit. Have fun, lovelies!
Okay so i got a few notes on how i go about Environments/Landscapes…so i’ll share a method thats easy to work with….bare with me its been a little while since ive drawn them Lol
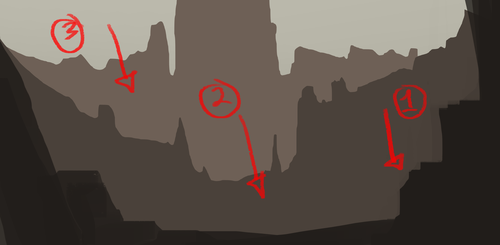
First thing you want to start of with in your gradient background…use what ever is your preference. Depends on the setting, ima do some type of desert/dusty place.
You’ll learn that the Lasso tool is gonna be your bae when it comes to environments…that and its pretty useful. Now your going to be working in three tones, 1.Dark 2.Mid 3.Light and it will always be the darkest at the front fading to light towards the back…make sense? So you will have three layers for each one to make your life easier and Lock those layers so you will only color within that area. Make sure the dark layer is on top.
Here is where the fun kicks in…we add our dets, try to stay with each tone and dont end up making it all muddy so you cant distinguish each one. Now you can go about this any way you please, you can paint it all in with one brush ( for some reason people get anal about shit like that, thinking there great for using one brush…i think if you got tools use em if you know how to do it right.) Or you can use custom brushes…since this is a tut ill mostly use custom brushes to slap stuff around. Its up to you really, also use the lasso tool like i said its your bae.
The lasso can help define things better for you, so i wanted to add a structure type on the third layer. If you want to give an effect that the selection ive made is in front of the background right click your selection and invert it, add some lighting around the edges…only a little though you dont want to over do it.
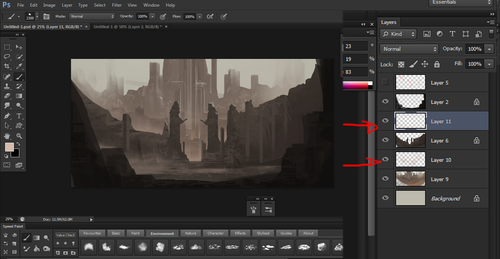
Also if you’ve done something on a layer you dont want to mess up or paint on what you can do is create a clipping mask on that layer. Its kinda like locking the layer to that one so you dont go outside of the layer or ruin what you worked on. Make a new layer above the one you wish to attach it to and right click the newlayer, a menu will pop up, your looking for clipping mask. Once you clicked it the layer should look like what ive circled.
Once your done working on each layer we are gonna put in some mist effect, this is something that helps separate each section. So make a new layer between each of your three as shown in the image. Like i said you can use what ever method you like, i just use a soft brush or cloud/mist brush to get what i want.
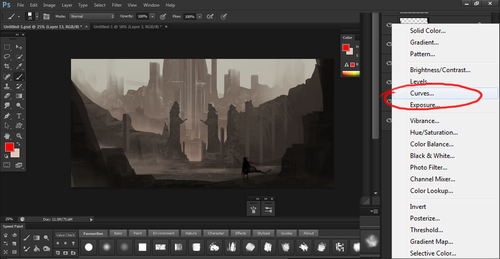
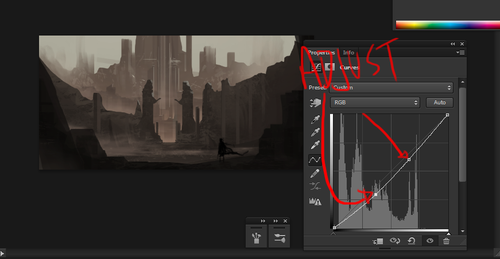
Now we are going to add some definition to the image a good one to use is Curves. You can find this where your layer menu is, at the bottom you’ll find it, ive circled what your looking for. On the third image is what will appear when you click curves, all you need to do is drag the little square and you’ll see some magic happen. So adjust it to your preference. If you want you can also mess with brightness/contrast too. ALSO i would recommend adding a person in the image, it gives you an idea of the scale your environment is.
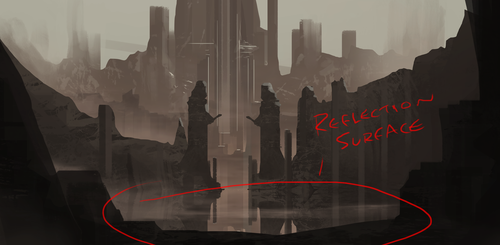
I was going to end it there but hey, ill show one last thing…its pretty simple. and that is some water reflection, we are going to turn the middle into water instead cause its a little boring right now. I merged all layers but the first one, you then want to make a selection and copy/paste. Free transform in the shortcut is ctrl T and do a vertical flip on it then adjust so its mirroring the top.
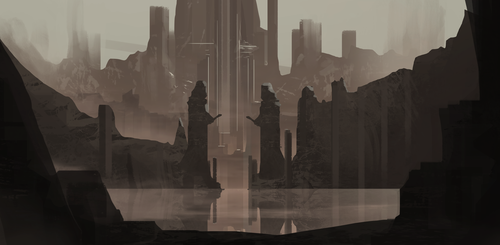
Now make a clipping mask like i explained earlier on the reflected surface and use the radiant tool…i think its called that lol it gives it more of a water surface like you see. For the image below it i used a custom brush which creates a water effect, aaaaaaaaaand bam you got you water now covering the area…easy huh.
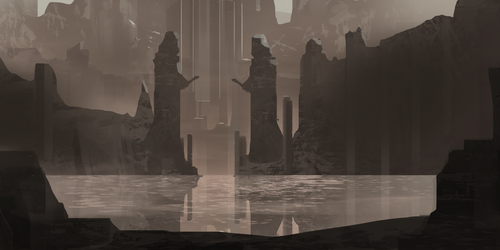
And so this concludes the Tutorial and you have the end result. Hopefully that gave some tips on how to approach landscapes…they can be confusing sometimes on where to start. Enjoy and let me know if it was useful or not :P
As a follow up to our Making Worbla Smooth Experiment, here is the detailed write-up regarding the methods used in that experiment.
Making Worbla Smooth
There are many methods for making Worbla smooth so I decided to do a test run myself based on the primary methods others have used. The three main ways of covering Worbla have been using Gesso, Plasti-Dip, or Wood Glue. This experiment only covers Gesso with Mod Podge acrylic sealerorGesso with Plasti-dip. I didn’t have Wood Glue available during the time of conducting the test so there will be another part to this series that will include a comparison using Wood Glue.
Method
I used 8 layers of Golden Sandable Hard Gesso and 150 Grit Sandpaper. I prefer this Gesso over any clear Gesso as you can actually see the streaks so that when you sand it, you can see the Worbla getting smoother (pictures 3 & 4). In addition, the sandable Gesso has additives that makes it thicker so that you don’t have to do as many layers or as much sanding to make it look good. Yay for that!
You’ll notice I didn’t do a good enough job of sanding so you can still see some streaks in the forth image. If I were to do this again, I would do 6 layers, sand with 150 grit, and then add another 4 layers, then sand again with 150 grit to get a smoother finish (instead of just 8 layers straight). I tried sanding only 4 layers in and unfortunately, I exposed the Worbla, so 6 layers of Gesso is the very minimum in guarding against Worbla exposure. Also, it’s very important that each layer of Gesso dries completely before you put on the next. Otherwise, if you start sanding, the Gesso will chip and take, along with it, all the layers underneath. In picture 4, you will notice this happened on the edges of the Gesso which is why the Worbla is exposed there.
Results
Picture one (left) shows the top piece which is Worbla painted without any additional work. The bottom piece is 8 layers of Gesso, sandpaper, one layer of Mod Podge acrylic sealant, and then one layer of Gold Metallic Paint.
Picture two (right) shows the top piece which is Worbla painted without any additional work. The bottom piece shows Worbla with 8 layers of Gesso, sandpaper, 2 layers of Plasti-Dip, and one layer of Gold Metallic Paint (Rustoleum brand).
Conclusion: I was surprised that the piece with the Mod Podge sealant looks smoother than the one with the Plasti-dip! I think the Plasti-dip made the items look more foam-like than I anticipated. It seems as though the Plasti-dip reacts oddly to Worbla.
Stay tuned when I try this experiment with Wood Glue.
Michele Carragher, the head embroider on Game of Thrones, made this awesome tutorial to show how she created the dragonscale fabric that appears on several of Daenarys’ costumes in S3 and S4.
Ms. Carragher says that the dragonscale fabric was created because “In season 3 the Costume Designer Michele Clapton wanted a Dragonscale like textured embroidery that starts to emerge on three of Daenery’s costumes, which becomes heavier and more pronounced, growing and evolving as the season progresses” (Carragher).
In stages 9-11 of the tutorial we see how the textile evolves from lightly to heavily embellished. This progression is meant to illustrate Daenarys’ personal growth and the growth of her dragons (source).
hey guys :+) tysm for being so patient w/ me !! I finally made a speed edit / quick tutorial thingy so lmk what y’all think !! i haven’t video edited in awhile so i’m pretty rusty so sorry in advance there are some mistakes !! i’ll get better as time goes on :+) i hope y’all enjoy + if you have any questions, feel free to send me a msg!!! happy editing !!!
This is a great tutorial!!! As @diaemyung said in another ask, always use your own photo for this process, so you’re sure you have the rights to use it!!
⏰ Timing gives that extra pizazz a live performance. Pairing with your character’s motions, you’ll no doubt do awesome on that stage!
⚠Disclaimer: This is not in any way a rule of thumb. Nor does anyone have to do these. Some of the listed below may be done a different way. This is only meant as tips or tricks. In the end this should be about the player having fun and expressing their own styles. ⚠ ✔ Timing Google spreadsheets are honestly the best place to store and time out your songs. It also saves as you work too! You can also make rows and columns for each performer. There are other programs such as word docs or note pads to use. Just keep in mind things like quote marks do not transfer over very well for actions from those.
There are a few versions of an already set up timing spreadsheet going around in the performing community that can help with timers. It does all the math for you when you plug in the lyrics. This post will not be linking it as the original creator should get the credit for making it. There are a great deal of those in the performing community on Balmung that may be able to link their version to you or you may make your own. (Sorry for the tease of information there.)
✔ It is better to time songs out in cytu as it may be off a few seconds if timed through another music service due to their commercials or ads.
✔ When venues bring traffic to a song on Youtube it brings attention to it. If it is not an official video it may be taken down with copyright issues. So choose your link wisely! Or make sure to have another version handy.
✔ There are sites out there that can give you the Lyrics and a starting place. You can google ‘lyrics, song name, by who’ to find them. Such as ‘genius’ or another site. More Lyric tips to come in another post!
Start your music. ✔ When the lyrics start, that is your #1 macro. Example: The singer starts singing at 0:06 in the song for the first line. The next line of words start at 0:08. That would mean that there was a count of two between the lines. So a <wait.2> would go after the first line before sending the next line out. /y ♪ ”Singing.” <wait.2> /y ♪ ”More singing.”
✔ /wait # or <wait.#> You can place a pause between lines with a ‘/wait #’ when they send out. You can also use <waits.#> at the end of any speech or /emote motion to save line space in a macro. /y ♪ ”Singing.” /wait 2 /songbird /y ♪ ”More singing.” Or /y ♪ ”Singing.” <wait.2> /songbird /y ♪ ”More singing.”
✔ The lowest and safest wait is a <wait.2>. You can do half sec counts, such as <wait.1.5>, however keep in mind that the game has its own ticks that factor in loading what is the area. So it will sometimes round up or down on your half waits. You also have to look at your connection and how it lags. Anything below a wait of 1.5 also has a chance of not going off at all if it’s the same type. The game will consider it as spam if it executes too fast. There is a way around that, which is alternating between the type of msg a macro sends out. Many songs using a <wait.1> have been done, but alternating between /yell between more than one singer or alternating with /yell and /say.
✔ Placing wait timers after some /emote motions, speech lines, or actions can also interact differently on where they are placed. If you divide the waits up between lyric lines, motions or actions, (Yes, doing math.) you can add seamless visuals in your movements. This is so your character is not standing still in your performance and smoothly moves into the next motion or macro instead of snapping. (Example note: A <wait.4> is half of a /tdance, <wait.8> is the whole /tdance motion.)
✔ On the last line of each macro, you want to take out the <wait> timer. This can sometimes clip into the next macro and not allow it to go off right.
Cool Downs ✔ /cd 5 <wait.6> or /cooldown 5 <wait.6> Cool down timers are the best way to get more than one performer on the same page. We do not all have the same connections. The PC or console you are on, the game, your internet or location can give lag. So using this as an alarm for the next macro helps. If you get distracted easily or space out enjoying your own song, it can keep you on track for solos too.
Always add on one more <wait> count than what the CD is, as ‘start’ is one count. Five is the lowest you can go, but you can go higher! So the five would have a <wait.6>, a six would be <wait.7> and so forth. When the ‘cha-ching!’ in the start lock sounds off, press the next macro.
Stay Lucky! We hope this is helpful and adds to your fun! There are other posts about getting your character ready to perform, picking music, macros, timing, lyrics, and motions. There is so much more things to share!


 Makeup Tutorial https://www.youtube.com/watch?v=wvxv2XHzNKI&f")


 tysm for being so patient w/ me !! I finally made a speed edit / quick tutorial")


