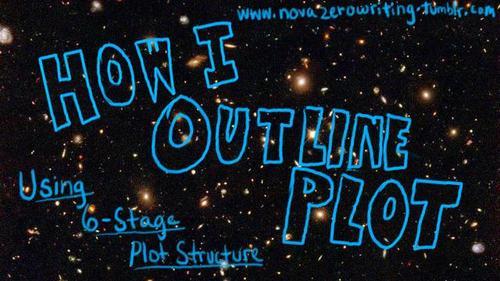
Most writers dread outlining their stories. I don’t really know why. For every good book I’ve written, there’s been a nice, meaty outline. An outline consolidates every detail of your story and keeps it in a place where you can easily see the transition between scenes, chapters, and acts. My personal method has only 5 steps.
1. Create a synopsis for your story. Or just write down what you kinda want to happen. It can be pretty rough.
2. Create a table in your document. I’m using Microsoft Word 2007.
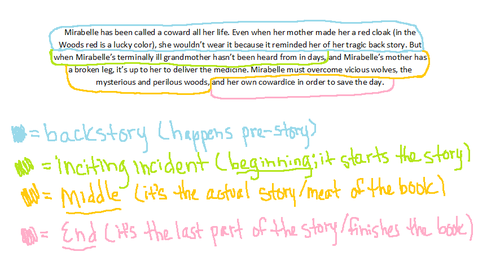
3. In a fresh document, divide your story into three acts:beginning,middle,end. (If you’re using the 6-Stage Plot Structure, assign the parts their names.) Here, I broke it into four sections but there shouldn’t be very much back story in your actual book at all.
4. Decide what happens in your story to start it (Mirabelle leaving her house), and put that in the first square of your table (the top square circled in green.) What happens after that? That second thing (Mirabelle hesitates) goes in the second square, (the bottom square circled in green). Pretty simple.
5. Continue filling in the squares with whatever material you have. You have gaps? No problem. You’ve got entire chapters missing? No problem. When you create a synopsis, or write your goals for a story, you tend to figure out your plot as you go. It’s normal to have gaps after that, too—filling in character sheets or just a good, ponderous shower can unlock the mystic gaps of your plot. Whenever you think of something, WRITE IT DOWN.
And there you have it! Your book is outlined, and you have a temporary synopsis, too. I’m not kidding about writing down every idea you have, by the way. Whether you think it’s stupid or not, it could save your book’s life when chapter nine is just a glaring, blank space with nothing to say.
I hope this was comprehensive, but if you have any questions let me know!
Trust your instincts. If something’s not working, it’s not working.
If all else fails, hack off the last half a page and build something else on top of the bloody stump. It can hurt to restart, but writing yourself into corners is like, half of writing.
– This subject has been highly requested and I get a lot of questions around it. Most romance writers have experience toying with this dynamic in character relationships, so I figured I’d create a guide for those who love the delicious tension of a will-they-won’t-they relationship, because they’re difficult to do correctly, and when they’re not done right, it can throw a whole story down the drain.
Make sure it’s not too… convenient. It’s bad technique to build and build onto tension just to provide an easy, clean-wrapped resolution that makes the conflict seem insignificant. If people are hesitant to get together or stay together, there is a good reason, and that shouldn’t be glossed over by the ending.
When They Don’t End Up Together
Make your reader see that this isn’t a tragedy. If two people don’t end up together, there’s a reason, and it’s a valid one, and just because two couples really like each other or even love each other, doesn’t mean they’re right for each other, and at some point both of them will know that and let that stand. The message shouldn’t be “salvage every potential relationship because if you don’t your life is over”, it should be “some relationships just aren’t right, and love is a choice, not a feeling”.
When The Issue Is Constant Conflict
Constant conflict is a bad sign. Occasional disagreements and arguments are okay, and healthy in most cases, but they should always be resolved peacefully. If a couple can never seem to do that, and that’s the purpose for repetitive breaking up/getting back together, then they probably aren’t right for each other. Please don’t send a message to your readers that couples that constantly fight to the point of deciding they would rather be with someone else than work through it ever ends in a healthy and satisfying way for either party.
When The Issue Is Lack of Communication
Lack of communication is applicable to most will-they-won’t-they relationships, and most relationship tension in general, but I want to specifically mention this because it’s not only lack of communication about initial feelings, but the lack of communication about how the relationship is going, what each partner wants out of the relationship, and what each partner does and does not enjoy in a relationship. These can all cause repetitive breakups because they seem more ambiguous a problem in the moment, and usually cause the “I just don’t think this relationship feels right”, which a character can forget easily once the relationship is over, making them return to their old partner immediately.
When The Issue Is An Existing Dynamic
(The specific request I’m addressing mentioned friends-with-benefits, but this is an SFW blog so I’ll be answering this generally; but yes that is what this section is.) If two characters have an unusual relationship, such as being best friends, which prevents them from trying to level up the relationship out of fear, this provides so many opportunities to build tension from the very beginning. Use this to your advantage, but be original with it. This is an extremely popular trope, and can put off an audience immediately if it shows signs of being completely cliche.
Pacing The Tension To Be Endearing Rather Than Stupid
The tension needs to be built up steadily, but it needs to be reasonable and each instance where the tension is demonstrated needs to be reasonable and fit into the context of each scene. If you avoid thinking about how your tension will come across, more likely than not, it will feel dumb and unnecessary rather than endearing.
Common Struggles
~ effectively writing moments of interrupted tension… Do it at the near-boiling point. This should be the climax of the tension, where they’re right near getting to the point of understanding each other, and they’re finally about to get together and someone or something, even themselves, gets in the way and brings them back to square one.
~ Balancing tension between characters… Moments of tension should be balanced with moments of genuine enjoyment of each other’s company. A lot of tension will be somewhat uncomfortable for the characters, and therefore uncomfortable for the reader, and you need to break that up with fluffy, romantic moments or it will be.. awkward.
~ At what point does tension become irritating rather than entertaining?… When the reasons for the tension become illogical or repetitive. If you’v written the same “we’re two loners at a party” scene three times with no variance in events, that’s irritating to the reader. New and unusual sources of tension through exciting instances of action and reaction between the characters that builds to a near boiling point where the reader and the characters share a longing for some resolution (due to genuine investment in the relationship growing) is entertaining.
~ Avoiding predictability while keeping the trajectory… You can keep your story exciting and on the same track by using subplots to introduce conflicts that draw the reader’s attention away from the way the relationship is growing before delivering a major twist that affects, but doesn’t halt or change the way in which the relationship is growing.
~ Not making the characters’ reluctance unreasonable… Each character should have personal and logical reasons for avoiding addressing their feelings that the reader can empathize with and understand. It’s as simple as that.
~ Will-they-won’t they that spans large periods of time… If the will-they-won’t-they surrounds a relationship that spans huge amounts of time (such as one that is spanned over 50+ years) can be depicted very well as long as you choose the moments and events that you include in the actual storytelling very wisely, and sparingly. There should be a balance of events told from the present moment where the tension is at a near boiling point, and events that establish how the relationship has grown and continues to, and why it took so long to do so.
I know that the primary audience of these articles write stories for young adults or a little bit older, and I don’t want to be preachy and tell you what you should and should not convey in your story. However, I want to remind all writers that no matter who your audience is, the manner in which you convey things does impact each individual readers’ mindset and views in some way.
Please be aware of the way your story frames things like potential abuse, unhealthy behavior, and toxic relationships, because it’s not the presence of these things that is harmful; it’s the way you frame them, glorify them, or romanticize them.
If you enjoy my blog and wish for it to continue being updated frequently and for me to continue putting my energy toward answering your questions, please consider Buying Me A Coffee, or pledging your support on Patreon.
With NaNoWriMo around the corner, I thought I might show you how I plotted my novel.
This is the story structure I used:
0% inciting incident
0%-20%introduction in the world, ends with a point of no return
20% first plot point: the hero receives his marching orders
20%-50% response to the first plot point
35% first pinch point: reminder of the nature of the antagonistic force
50% midpoint: big fat plot twist that changes the hero’s AND reader’s experience
50%-80% attack: the stakes are higher now
65% second pinch point: again reminding the reader of the antagonistic forces at hand
80% second plot point: the final injection of new information into the story to give the hero everything she needs to become the primary catalyst in the story’s conclusion (no new information past this point)
80%-100% resolution + final conflict + return home
I didn’t make this up. I think it’s by Larry Brooks, if The Internet informs me correctly. Fun Fact: once you pay attention to it, you’ll see this structure everywhere. Just take a look at any Harry Potter book, for example.
These points are the “bones” of my story. Next, I decided what “flesh” to put on them.
I simply made a list of things I like to read about:
Books about books and libraries
Magic
Quirky characters
Intelligent, fast-paced and sometimes silly
So, I combined this list and the structure points into a story that makes sense. Because I don’t want to spoil my plot / I am still to shy about my wip, I will make up a new plot for this post, so I can show you.
0%: The hero does something magical without knowing how she did it. She discards it, because everybody knows it can’t have been real.
0%-20%: We see the daily life of the hero: she is unhappy because all she wants to do is read, but she is not allowed to. She reads in the dead of night and is punished for it by her evil stepcousin. She finds a book on magic.
20% It all clicks together: she can do magic!
20%-50% The daily life for the hero changes. Instead of reading all night, she practices magic. She now loves books even more. She has little victories over her evil stepcousin, but hasn’t won yet.
35% The evil stepcousin finds out that she can do magic and takes away the magic book.
50% She discovers she can do magic without the book.
50%-80% The hero is not the only one who is bullied by the evil stepcousin. Her younger cousin is a victim as well, and he doesn’t have magic to defend himself. The stakes are raised, this is bigger than herself now. The younger cousin also wants to read, so they have several bonding moments over reading.
65% The evil stepcousin hurts the younger cousin, he’s in a coma now.
80% The hero discovers the evil stepcousin could do all these evil things because he knows magic too.
80%-100% The hero confronts the evil stepcousin, fights him off, nearly loses but wins in the end. He gives up and releases his power over the younger cousin who wakes up from the coma.
It’s not the most genius plot ever, but I literally made this up in minutes. So can you! And imagine the genius plot you can come up with if you spend more than a few minutes on it.
Then I calculated how many scenes I need in which part of the story. My wip is a YA or 12+ book, so I want it to contain about 75,000 words in total. I want my scenes to be around 1,000 words long to keep it snappy, so I need 75 scenes.
Scene number 1 (0%) is the inciting incident, scene number 15 (20%) is the first plot point, scene number 26 (35%) is the first pinch point, scene number 37 (50%) is the midpoint, scene number 49 (65%) is the second pinch point, scene number 60 (80%) is the second plot point and scene 75 (100%) is the last scene.
Some sidenotes on the 1,000-word scenes:
That’s more of a vague rule of thumb than a strict rule. If your scene needs to be longer or shorter, make it longer or shorter of course. My wip has some 2,300-word scenes as well.
Having 1,000-word scenes does not mean I have 1,000-word chapters, that would be really short. I will divide my novel into chapters after I’m finished writing my first draft.
For NaNoWriMo, maybe you could write scenes of 1,667 words, so you do one scene per day. A 50,000-word novel has 30 scenes of 1,667 words. Inciting incident is at scene 1, first plot point at scene 6, first pinch point at scene 11, midpoint at scene 15, second pinch point at scene 20, second plot point at scene 24 and scene 30 is your last scene. That’s just an idea, you got to see what works for you.
Then I made up in one sentence what will happen in every scene. For example: “They meet the dragon and he sends them on a sidequest.” Now my outline consists of 75 one-sentence scenes. This way, I prevent the problem of the sagging middle and other pacing problems and I still get to surprise myself when writing.
And that’s my first draft! I hope everything is clear. Feel free to ask me questions if it isn’t.
I’m gonna tag a few people I admire, who I hope are interested. If you aren’t, feel free to ignore me, or message me to take you off my tag list. If you would like to be added to my writing advice tag list, let me know.
Even without taking their backstory into account, your characters’ friendship in the present should be believable enough to allow your readers to root for them.
1. Both ways
This is the number one rule for the friendship to be healthy and believable - affection, communication, help, and everything else should go both ways. You can’t have one character always asking for help and the other always helping while never getting anything in return, or a character always showing affection while the other never reciprocating it - the friendship needs to go both ways.
2. Similar or different
Friends can either be very similar or different, and both are interesting to write about! If they’re similar, they will usually get along pretty well. However, it also leads to the potential of more bickering with each other, since their personalities will clash. Just imagine two equally stubborn or talkative characters in a disagreement
If they’re different, they’ll be able to complement each other well (eg. the troublemaker and responsible one). However, you will still need to give them a common similarity to bond over. Maybe it’s a shared hobby or favorite animal!
3. Communication and trust
Friends can either be all giggly and soft around each other or bicker 24/7, depending on their friendship dynamic and the personalities of the characters. However, a constant thing to keep in a healthy friendship is the ability to trust and communicate with each other.
Friends should trust each other, not leaving each other for a love interest or some whack reason. They should also know the best ways to communicate with each other. Even with friends who bicker a lot, the arguments should be playful. They should always know and avoid the topics that are off limits and would truly hurt the other.
4. Flesh them out individually
Most of the time, there’s only one main character in the friend group, and the rest only act as their friend and nothing more. They don’t have any other role in the story besides being the main character’s friend.
While you can’t always dive into the backstory and depth of the other characters, especially if your story is only from one pov, you should still fully flesh them out. Give then strengths, weaknesses, hobbies, goals, quirks, etc. Make sure that everyone in their friend group are their own person, not just a supporting character for someone else.
5. Reason to stick together
Your character will meet so many people throughout their life, but they can’t keep in touch with all of them. Chances are, they’ll “abandon” old friends for new ones they just met. If you want to write a long-lasting friendship, you’ll need to find that key reason why they choose to stick together despite their hardships.
Maybe they ever saved each other’s lives in the past? Or maybe they live close to each other, so it’s easier to maintain their friendship. There are lots of possibilities!
Note: Take advice with a grain of salt. These are supposed to be educational, inspirational, and/or motivational. If you have any corrections, requests, suggestions, or anything really, shoot an ask! or a submission! or a DM!
To the people who were tagged, let me know if you’re uncomfortable having your post and/or blog mentioned here and I’ll make edits ASAP.
If you’re writing something that involves an aspect of life that you have not experienced, you obviously have to do research on it. You have to find other examples of it in order to accurately incorporate it into your story realistically.
But don’t just look at professional write ups. Don’t stop at wikepedia or webMD. Look up first person accounts.
I wrote a fic once where a character has frequent seizures. Naturally, I was all over the wikipedia page for seizures, the related pages, other medical websites, etc.
But I also looked at Yahoo asks where people where asking more obscure questions, sometimes asked by people who were experiencing seizures, sometimes answered by people who have had seizures.
I looked to YouTube. Found a few individual videos of people detailing how their seizures usually played out. So found a few channels that were mostly dedicated to displaying the daily habits of someone who was epileptic.
I looked at blogs and articles written by people who have had seizures regularly for as long as they can remember. But I also read the frantic posts from people who were newly diagnosed or had only had one and were worried about another.
When I wrote that fic, I got a comment from someone saying that I had touched upon aspects of movement disorders that they had never seen portrayed in media and that they had found representation in my art that they just never had before. And I think it’s because of the details. The little things.
The wiki page for seizures tells you the technicalities of it all, the terminology. It tells you what can cause them and what the symptoms are. It tells you how to deal with them, how to prevent them.
But it doesn’t tell you how some people with seizures are wary of holding sharp objects or hot liquids. It doesn’t tell you how epileptics feel when they’ve just found out that they’re prone to fits. It doesn’t tell you how their friends and family react to the news.
This applies to any and all writing. And any and all subjects. Disabilities. Sexualities. Ethnicities. Cultures. Professions. Hobbies. Traumas. If you haven’t experienced something first hand, talk to people that have. Listen to people that have. Don’t stop at the scholarly sources. They don’t always have all that you need.
I … LOVE reading the replies and tags for this post! I’m happy that, out of all my posts, this is the one that’s blown up so quickly.
I love the people who are a part of a minority, that are gushing about their favorite fics or books that seem to have done this and offer proper representation.
I love the people who are bringing up the toxic mindset that is very popular on tumblr, the “you can’t write about it if you haven’t lived it” ideology that makes writers feel guilty for providing representation.
Iespecially love the people who are mentioning how they should start doing this. I love the people who are probably young or inexperienced writers that are seeing this and thinking of doing this for the first time. I love that there are people who read this and then think to better their writing because of it.
Try changing your word document page background to black or brown and your font color to white or pink if your eyes hurt from looking too long at a bright screen when writing.
It is very important that the language in your novel reflects the time and place in which the story is set.
For example, my story is set in Italy. My characters would never “ride shotgun”, a term coined in US in the early 1900s referring to riding alongside the driver with a shotgun to gun bandits.
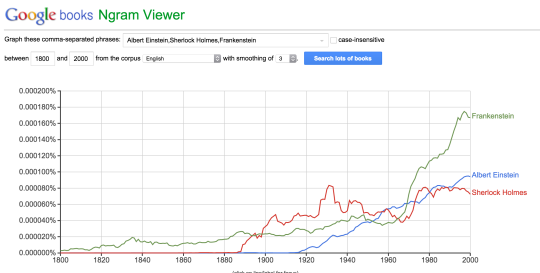
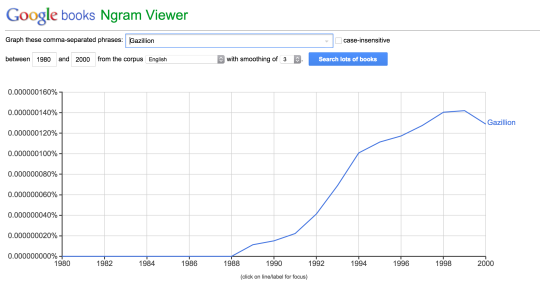
Do your research! A free tool that I found to be very useful is Ngram Viewer.
You can type any word and see when it started appearing in books. For example…one of my characters was going to say “gazillion” (I write YA) in 1994. Was “gazillion” used back then?
And the answer is…YES! It started trending in 1988 and was quite popular in 1994.
Enjoy ^_^
This is really important, especially because language can change in very unexpected ways.
For example, did you know that before 1986 people never said “I need to”?Instead, they were far more likely to say “I ought to”, “I have to”, “I must”, or “I should”.
Don’t believe me?
Anyway, most people won’t notice subtle changes like that. But your reader will notice and be confused when characters in your medieval world use metaphors involving railroads and rockets.
One of the things you can do besides use Google Ngrams is to read books or watch movies written in the time period you want to set your story. The key here is that they can’t just be set in that time period, they have to have been made in that time period.
Also, there’s a Lexicon Valley episode on this very topic which I highly recommend. It’s called Capturing the Past.
SEE ALSO Etymonline. Word origins and when they’re first recorded. So, say I wanted to find out when a “coffee break” became a thing – around the 1950s, as seen in magazine adverts – or characters might talk about more genrallly “taking a break” from the 1860s…
People talk a lot about how reading is necessary for writing, but when you really want to improve your writing, it’s important to go beyond just simple reading. Here are some things to do when reading:
Note how they begin and end the story. There are a ton of rather contradictory pieces of advice about starting stories, so see how they do it in the stories you enjoy. Don’t only look at the most popular stories, but look at your more obscure favorites.
See what strikes you. Is it fast or complicated scenes with a lot of emotions? Is it stark lines? Pithy dialogue? What do you remember the next day?
Pay attention to different styles. It’s not just whether they use past or present tense, first or third person. It’s whether the writing is more neutral or deeper inside character’s heads. Do they use italics? Parentheses? Other interesting stylistic choices? Take the ones you like and try them out in your own writing. See what works and what doesn’t.
Keep track of how they deal with other characters. Do we see a lot of secondary character each for very brief periods of time or are there a couple that show up a lot? How much information do we get about secondary characters? Do they have their own plots or do their plots revolve entirely around the main characters?
Count how many plots there are. Is there just one main plot or are there multiple subplots? Are the storylines mostly plot-based or character-based?
Pay attention to what you don’t like. If you don’t like what’s going on in a book or even just a scene, note what it is. Does the dialogue feel awkward? Are the characters inconsistent? Does the plot feel too convenient or cobbled together? Does the wording just feel off? See if you can spot those issues in your own writing, especially when reading a completed draft or beginning a later draft.
(Great advice! I wanted to tack on other things I look for when reading)
Pay attention to how they introduce characters. Very rarely will it be all at once, and I guarantee the author went over the intro of each major character again and again while editing, so I always like paying extra close attention! Did the intro endear you to the character? Make you dislike them? How did the author impart that emotion?
Note instances of worldbuilding/info dumps, especially parts that don’t seem like worldbuilding/info dumps. Maybe the character mentions something offhand about a location you’ll see five chapters later. Maybe the internal dialogue makes a comparison to the character’s childhood. Was the information effective or did it leave you wanting more? Make note of anything that made you go, “ooh, neat!”
After you finish the story, try to find foreshadowing that you missed the first time through! It can be as simple as skimming and looking for phrases you know are important after finishing the story. Most authors add foreshadowing in the editing stage, so I tend to ponder how the story would read before they added it. Ninety-nine percent of the time, the story seems more magical for it and it’s just nice to appreciate.
What plot structures could the story fit into? We all know about the three arc stories, hero’s journey, etc. Sometimes stories can fit into more than one category. During the read and after, keep it in the back of your mind. Can you predict where the climax of the story will hit? Is it man v man or man v nature? Does the predictability (or lack thereof) add to or take away from the story?
Caring for natural (curly) hair in a setting with no access to modern hair products
So it’s the apocalypse. Your curly-haired character is on the run. They find themselves on an adventure in a fantasy world. It’s a castaway story. Or the whatever-eth century and they’re in an environment that doesn’t exactly accommodate curly, coily haired types.
Either way, manufactured hair products are far and few between, or they’re simply not made for afro hair. Considering how your Black character handles their hair in this environment makes their circumstances more realistic and relatable.
Topics Featured in this Guide:
Hair Products found in Natural Environment
Hair Oils - Benefits and How To Extract
Protective Hair Techniques & Styles
Curly Hair Types & Hair Needs
Hair Routine Samples
Hair Straightening
FAQ
There is a writing takeaway at the end of each topic.
Brief descriptions provided after images. Contact me for fully accessible version.
Hair Products found in Natural Environment
Consider the essential needs of afro hair: water and fat.
Water(or liquid) is essential for nourishing the hair.
Fat(hair oils, creams, butters) is essential for both growth and protection.
Many curly-haired folks already use natural resources and plants to care for their hair - aka DIY hair-care. So characters concocting their own products should not be a strange concept. (I personally buy most of my natural hair products, and create my own hair masks, protein treatments, and oil blends.)
What they could use would depend on environment, time, and availability.
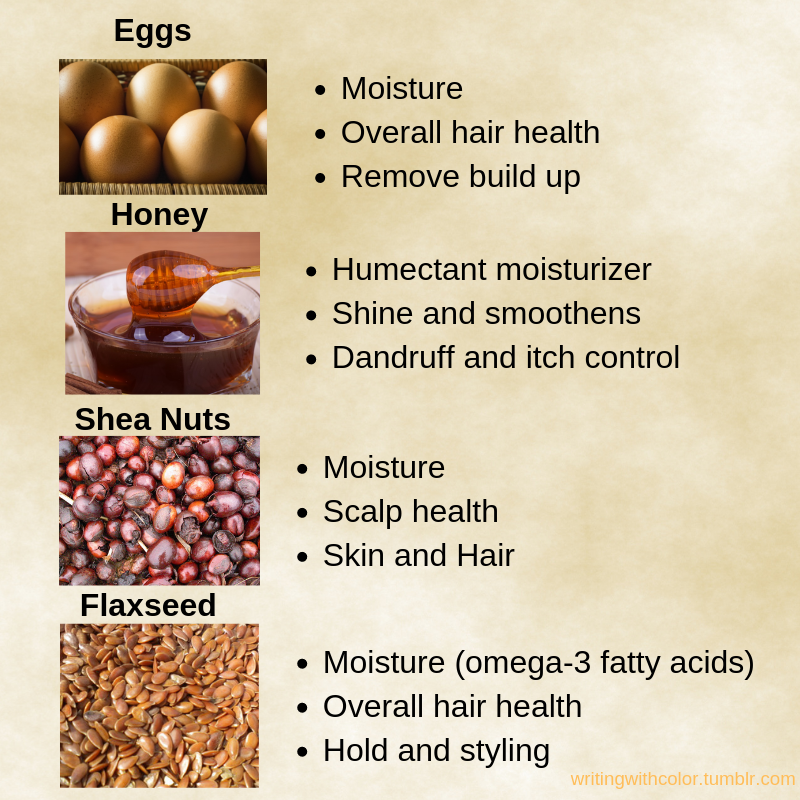
Hair Healthy Produce
Coconut- The all-purpose hair aid with multi forms, from oil to solid cream. Hardens in cold weather; best not to use when environment has freezing temps. Banana - Typically removed after use (hair masks, conditioners) Avocado - Applied as hair products, masks, and oils. Strawberry - Mashed and applied directly to hair or mixed with oils.
Hair Healthy Proteins, Plants, Fats
Eggs - Hardens when dry. Strong odor. Removed after use. (protein masks) Honey - Pulls moisture from air into hair - avoid during the dry winter! Shea Nuts - Made into shea butter. All-purpose hair and body care. Flaxseed -Gel made by boiling & straining flax seeds. Many DIY videos online.
Hair Healthy Herbs and Flora
Hibiscus- Sebaceous = oil-producing gland. Flowers crushed into paste or oil. Peppermint- Can rub out oil from leaves. Often used in oil form on scalp. Lavender - Often used as an oil directly applied to the scalp, or brewed as tea. Rosemary - Often combined with olive oil in use with hair; can be used alone.
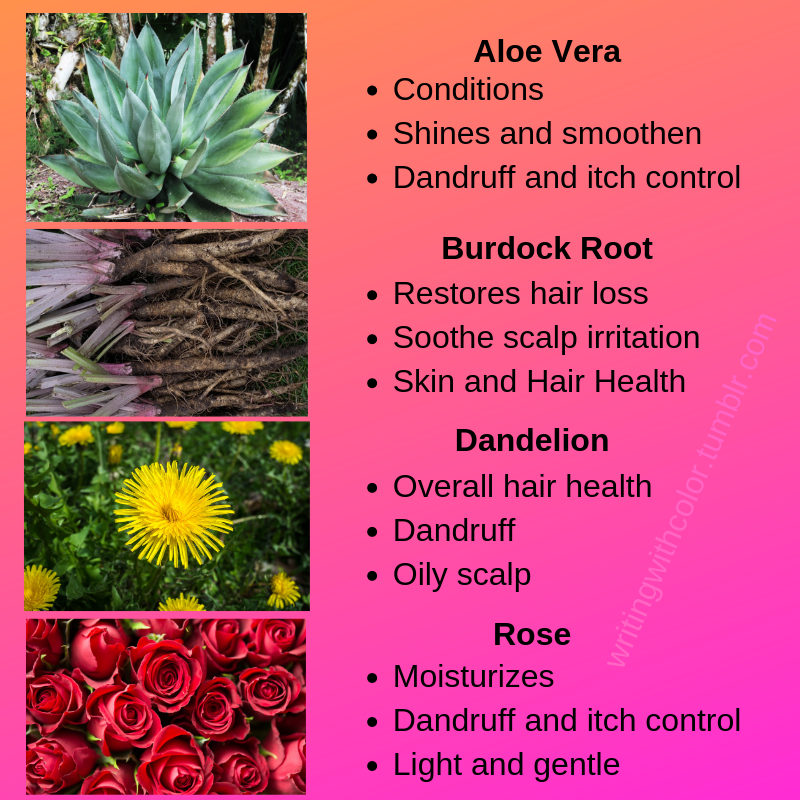
More Hair Healthy Herbs and Flora
Aloe Vera - Succulent. Can extract sap directly from leaf and apply like gel. Burdock - Contains essential fatty acids and phytosterol compounds. Dandelion - Can use the roots, stems, leaves and sap for hair and skin. Rose - Common use is rose water: steep roses in boiling water to create.
Hair Healthy Products (rare or require effort to make/find)
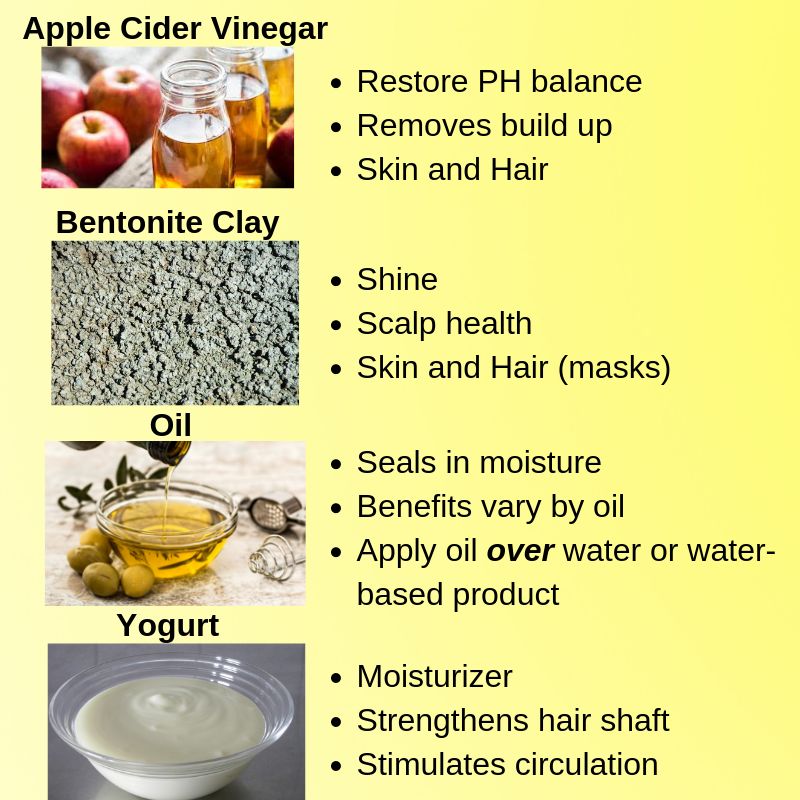
Apple Cider Vinegar (ACV)- Diluted before use and often washed out after. Bentonite Clay - Aged volcanic ash. Combined with ACV for best activation. Oils - Key component for sealing moisture. See the next discussion. Yogurt - Base of many DIY hair products like masks and deep conditioners.
Oils for Hair
Oil is a key component to afro hair care. It nourishes and seals in moisture. Let’s discuss common hair oils and extraction methods that could, more likely, be done using homemade or historical equipment.
Oil Extraction
If oils aren’t readily available to purchase, the person would need to find or create tools to either extract the oil via pressing or heat the nuts or seeds. Consider the basic tools that have been around since ancient times. For example, the mortar and pestle. What creative use can be made out of existing tools in the person’s environment?
Hair Oils and Benefits (by potential ease to extract.)
FYI:These aren’t the only methods or necessarily professional means of extraction. I also left off hair-healthy oils that seemed complicated to extract without high-grade equipment. So, this isn’t an all-inclusive list of oil or methods.
Natural Hair Product Creation
So what exactly would your character create? Here’s some natural hair products and potential main ingredients. May be used alone or combined.
Leave-in moisturizers: Plain water, coconut water, rose water
DIY Recipe Search: Try keywords like “DIY natural hair” + “curly hair” “Afro hair” or search all natural hair products and read over the ingredient list. Try small home business and independent sellers (Like etsy)
Most homemade products last everywhere from a few days - weeks
Extend the life of spoil-prone products via the cooling system in the work.
Honey does not spoil. Be mindful if it’s mixed with spoil-prone ingredients.
Oils can usually be kept at room temperature and last a long time.
Keeping a small bit of ready made supply may prove time-efficient. If impossible, they may opt to use products that don’t require much time and effort, and are worth their time to make in small batches or to potentially dispose of after.
Writing Takeaway - Natural Product/Oils Creation
With just the above compounds, I can see creative naturals being able to create styling products and moisturizing leave-ins, shampoos, conditioners and hair masks.
Do consider the following:
How simple or complex can their regimen be?
Would they rely more on protective hair styles in their situation?
What is the natural environment: what products are accessible?
How will they store products or must they make a new batch each use?
Can items be purchased by craftsmen or found in abandoned locations?
Can they afford to use edible plants if food is scarce? Food scraps and non-edible plants (like the flora) might be what they rely on.
What are their specific hair care needs? -Discussion on this later-
Natural Hair and Styling
LOC Method as base style
Moisture, sealing in the moisture, and protection are the basic needs for natural hair. The Liquid, Oil, and Cream (LOC) Method, or a variation of the steps, fulfills those basic needs. It can be treated as both a care routine and a style in itself. Personally, if my hair is not in a protective style, I use it every week.
Liquid - Liquid opens hair cuticles to allow moisture to enter hair strands.
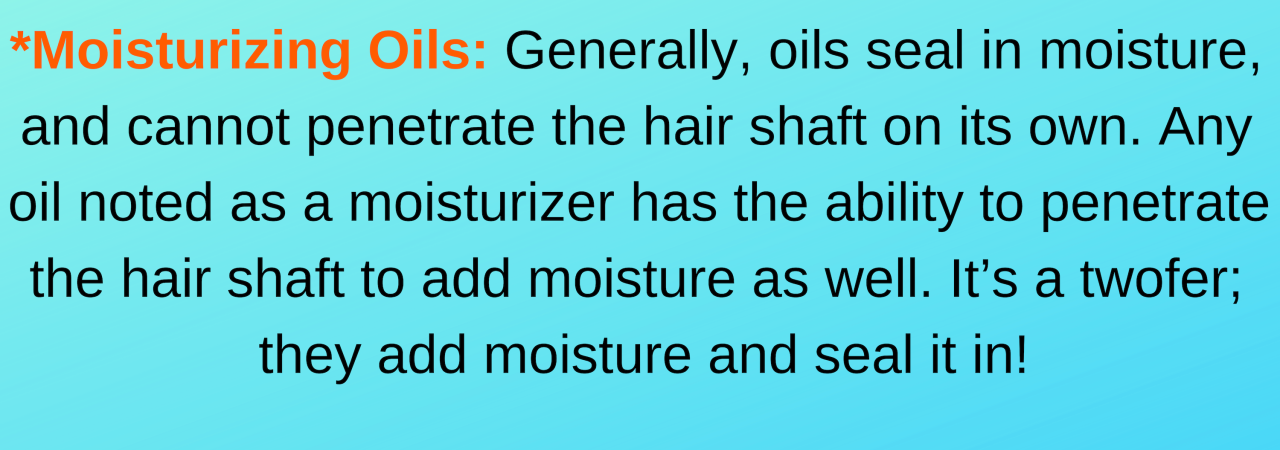
Oil - Once cuticles are opened, the oil penetrates hair & seals in moisture.
Cream - Cream further locks in the moisture, and can be used as a styling agent as well to shape and define curls.
Should you use the “LOC method” by name in your work?
A modern setting? Sure. But don’t assume readers know what it means.
A fantasy setting? Probably not, unless earth and its terms carry over.
Protective hairstyles protect the hair by tucking ends away from the elements. For example, heat, air, hand and fabric manipulation. While not forever solutions (except maybe locs which are a permanent style) there’s many benefits to your character’s wearing them.
Benefits:
Hair growth retention
Saves time styling hair
Helps prevent damage and keep hair healthy
Ideal for any natural (the best style itself may depend on hair type)
Lessens hair’s need and dependence on moisture and hair products
Eliminates some hair maintenance activities (such as detangling)
Considerations:
Hair more difficult to wash and dry thoroughly.
Dryness (unable to access all tucked away hair to moisturize)
Styles kept in too long accumulates dead skin and product build up.
Uninstalling styles can be time consuming, and should be done gently.
Style gets frizzy from growth overtime and/or getting soaked in water.
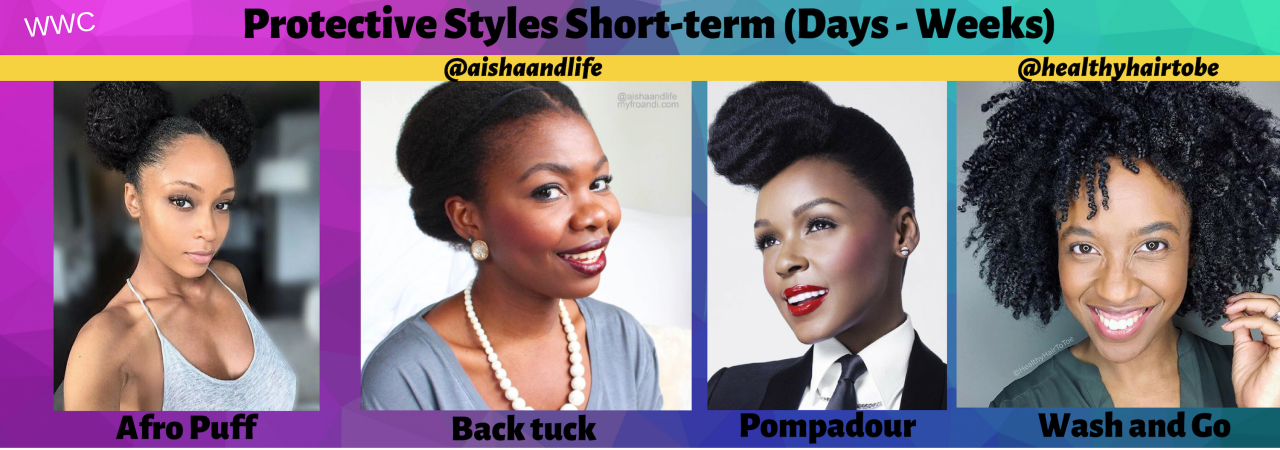
Protective Styles Short-term (lasting days to weeks)
Afro puff(s) or bun(s)
Back Tuck or Roll and Tuck
Bantu knots
French roll
Pompadour
Roller set
Two-strand twists
Wash and go (low manipulation style)
Shaved(lower maintenance, but not an overnight decision)
Protective Styles Long-term (lasting weeks to months+)
Braids(endless styles and patterns. Typically smaller braids last longer)
Cornrows
Dreadlocks/locs(permanent style, research the hair care)
Extensions
Flat Twists /Twists
Head wraps and hats (endless wrapping styles, colors and patterns!)
Wigs(unless glued, hair maintained underneath or often put in braids)
Writing Takeaway - Protective Hairstyles
Protective styles are an amazing way to protect the character’s hair and would very likely be the go-to for any natural in an uncertain or fast-paced environment. Just in everyday life they’re highly worn so it would especially be the case! Just remember the character needs to eventually undo whatever protective style they have installed to do some hair maintenance (washing, detangling, etc) and give their strands a rest. Also, even hair in protective styles need some attention.
Curly Hair Type and Associated Needs
Determining your hair type is important to knowing its needs. Certain ingredients work best for certain hair types. However everyone is unique and there are more factors to consider than just curl pattern (Also, most curly folks cross into a mix of hair types). There is hair thickness (width&density) and how much moisture and product your hair absorbs (porosity) to consider as well.
I will only cover curl pattern and the commonly associated needs here. To learn more about porosity, width, and density check out the FAQ under the read more.
naturallycurly.com is a great resource and is the source for the images, terms, and information provided below.
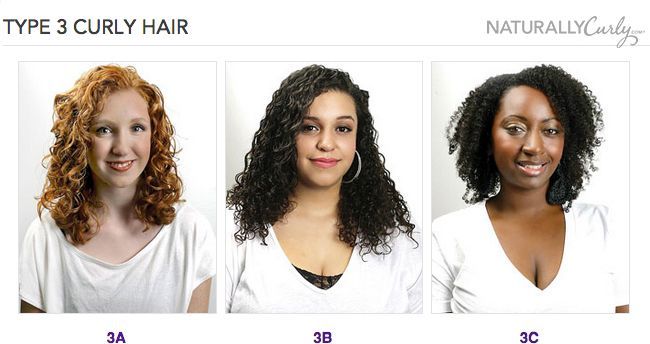
Curly Twirly (3A)
Defined loopy “S” pattern. Curls well defined and springy. Big, loose and shiny. Size: Sidewalk chalk size. Best Products: Gels and creams with light moisture and curl definition.
Curly Spirally (3B)
Well-defined, springy copious curls that range from bouncy ringlets to tight corkscrews. Size:Sharpie size. Best Products: Gels and styling creams with extra moisture and frizz control.
Curly Kinky (3C)
Voluminous, tight corkscrew curls. Either kinky or very tightly curled, with lots of strands densely packed together. The very tight curls are usually fine in texture. Size:Pencil. Best Products: Styling creams, butters, and oils. Needs gentle care.
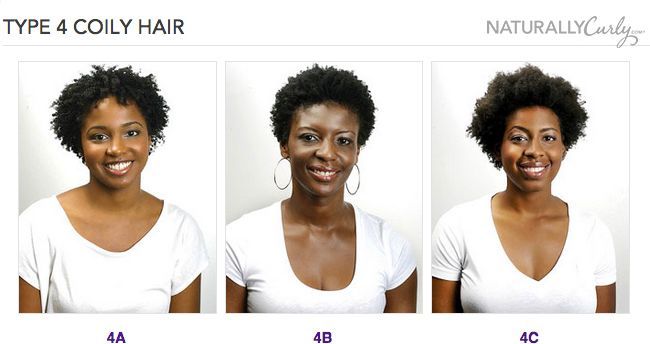
Coily Springy (4A)
Well-defined “S” Pattern. Tight, coily, and the most fragile curls. Size:Crochet Needle or smaller.
4A Best Products & Tips: Styling creams, butters, and oils.
Clarify scalp with tea tree or jojoba oil during washes
This hair needs extra moisture and tender care
Be gentle when handling and detangling hair to avoid stress & breakage
Use thick moisturizers like mango and shea butters to maximize styles
While hair type is just the start of all the intricacies of natural hair needs, it’s definitely agood start. There are other important parts to consider for real life naturals, but going off from hair type and the commonly associated needs should be enough for a story. (But read the FAQ under the read more to keep learning)
Do not get lost in the details, especially for a story that won’t need to cover tons of it. Learn enough to know what you’re talking about and can describe hair care accurately for situations that would affect hair.
Writing Takeaway - Overall:
You don’t have to be lavish in detail, but acknowledging how hair is handled here and there or in a dedicated section is thoughtful and satisfying to see included. It’s also a neutral way to show race without the use of micro-aggressions or racism. Finding the time and means for proper hair care would be a part of their life and potentially a stumbling block on the adventure, so mentioning how hair is handled during these circumstances is a fine idea.
It’s also a great means for representation.
–Mod Colette
Additional Info:
The following information will be nestled under the read more:
Hair Routine Samples - One super simple and one complex hair routine
Hair Straightening - Not ideal to maintain in survival situations, but also was a means of survival and daily living during some historical contexts
FAQ - Would any of this matter during the apocalypse? And what about natural products that attract bugs? Plus more.