Vtubers are “an online entertainer who use a virtual avatar generated using computer graphics and motion capture software or technology. A digital trend that originated in Japan in the mid-2010s, a majority of VTubers are Japanese-speaking YouTubers or live streamers who use anime-inspired avatar designs. By 2020, there were more than 10,000 active VTubers” (Wikipedia)
Important Terms
Live 2D or L2D - the model that is moving on screen
Model or PNG - the character reference art for what will become the rigged L2D
Mama, Papa, & Parents - terms for your png artist and your rig artist (terms are fluid, though typically the rigmaster is typically the “papa” while the png artist is typically the “mama”)
Debut - The stream or day in which the Vtuber presents themselves and their model
Hololive - an agency for Vtubers
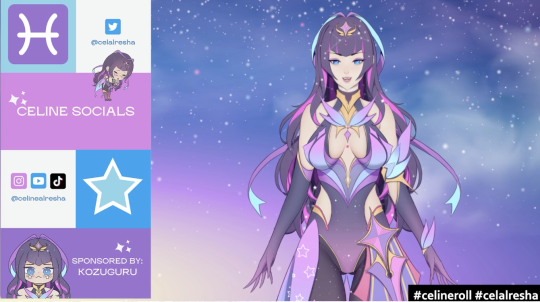
Background - the background of your character (think of it like the desktop behind apps on your computer)
Overlays - Goes over your background and stream that include socials, and other blocks to provide information
Lore - the backstory of your characters
Assets - are the things that pop on screen to fit alerts and such (like a gif that comes up every now and then)
How to Get a Model
1. Commission a PNG artist. V-tubing means you need different pieces for art reference–something like 126 would be pretty good to start but some models have more and some have less. (The model our host, Celine, uses in this panel is in the 120s range.) It’s expensive for reference sheets but worth it to make the process easy later on in the rigging process.
2. Your model’s base art needs to be:
PNG/PSD/WAV
Not pixelated or blurry
2000x2000 pixels, 150-300 dpi is good
3. Preparing the character: Each moving part must be separated, and everything underneath it must be filled in (no holes) so that it’s whole. Multiply and Opacity are okay. 72-150/300 is pretty standard.
4. Next you need a program to rig your model. Live2D Cubism is probably the best program for making a rigged model and is a current industry standard. Link: https://www.live2d.com/en/
5. Remember that rigging your model to move with you will require a lot of space on your computer. Computer Specs to meet this requirement may include:
Intel core i5 CPO
OpenGL33
4GB Ram (8gb recommended)
400 MB hard disk space
Set-up and PSD Import
1. Step-by-step set-up:
File > New > Model
File > Canvas Settings > Pixels match PSD
Drag PSD into Live 2D
“Untitled Model (model)” > OK > Add layers as new Art Mesh
Wait, Character will Import
Press Control + A > Move Character into Place
Hold Shift to scale Character as needed
2. Keeping Organized
Create Working Folder for model,
Save PSD to this folder
Save often!
3. Workspace Folders
Part (aka Body parts) = photoshop layers
Inspector: Information for selected part
Deformer
Parameter
4. Character Setup
Move body parts into Live 2D folders, examples:
brow> Brow
arm > Body
eye parts > eyes
THEN download Live 2D models for help
5. Adjust Drawing
Draw order = number system for editing layer order
+500 = layer above/in-front
-500 = layer below / behind
Edit as needed
6. Apply Clipping ID
Clipping Masks - Layers used to mask out (hide) other layers
Select part to use as mask
Control + C (copy) ID Name in Inspector
Select part to mask out
Control + V (paste) ID name into the “Clipping ID” in inspector
Press Enter of click off
Use only a few Masks for eye parts, mouth parts, etc.
7. Generate Texture Atlas
Texture Atlas - texture file needed for export
Control + A (select all)
Control + T (Texture Atlas) or Select “Edit Texture Atlas”
Fit all body parts onto 1 texture file at scale 100%
Smaller the scale % = blurrier image
8. Add Mesh
Mesh - Warp a layer and make your character move
(1) Control + A (select all) > click automatic mesh generator
Edit Mesh manually
9. Add Deformers
Deformers - deform and create the illusion of movement
2 types of deformers
Warp deformers
Rotation deformers (joints)
Select Body Part(s) > Create Warp/Rotation Deformer > Rename Deformer
Hierarchies and Parenting
Parent/Child Relationships in Rigging = parent objects tells child objects what to do. Example: 1. Shoulder (parent) to Arm (child) 2. Shoulder Rotator (Parent) to Arm Warp (Child)
1. Make your Character Move with Parameter
Add key forms to rig your character
Green key forms record your movements
Keyform numbers determine how long it’s going to take to perform an action
X=left to right
Y = down to up
Z = left to right (rotate)
2. Make folders to organize different parts of the body
Face: Angle xyz
Body: Body xyz
Brow: Brown position, angle, form
Eye: Eye open, eye smile (blink)
Eyeball: Eyeball xy (where I look)
To Be a Vtuber - Resources:
Vtuber Studio
OBS Studio
Webcam (iPhones and Mac products work for this)
You need a computer that can handle the amount of data used for streaming/recording.