“One of the most enjoyable aspects of recreating the British Redcoat of the French and Indian War is the process of researching, designing and producing items of kit and equipment. After reading an excellent article published by the people at Fort Ticonderoga on replicating uniforms for their detachment of the 60th foot I thought it might be of interest to share the process behind the production of a replica British soldier’s cartridge pouch and strap. Hopefully this will help illustrate some of the effort that goes into building an accurate impression and may be helpful to anyone looking to embark on a similar project as well as providing an insight into some of the decisions and compromises that go into a historical reproduction.
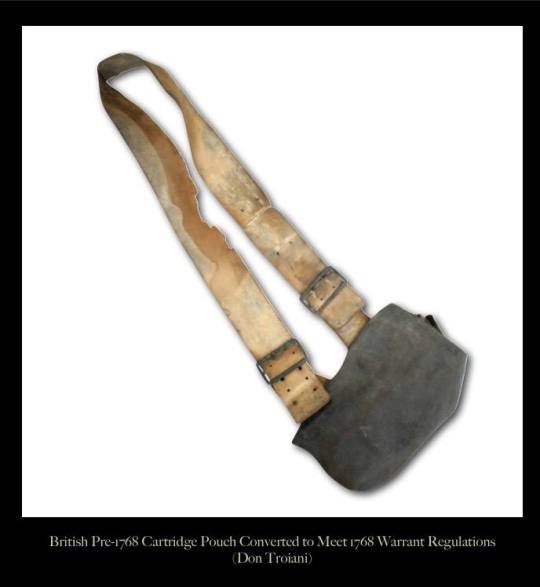
Before getting into the design of this particular pouch it is worth looking briefly at the equivalents used by British troops earlier in the eighteenth century. One of the key historical sources of the period, ‘Representation of the cloathing of his majesty’s household’ of 1742 suggests that at the time of writing soldiers carried their ammunition in pouches of several different types, some entirely made of buff coloured leather, others with buff bodies and black flaps whilst others are all of black leather. Later sources such as the sketches of Paul Sandby and paintings of David Morier suggest that by the 1750s pouches were predominantly black. These illustrations also show a wide strap with three brass ‘double d’ buckles to allow for adjustment. Among these sources there seems to be a degree of variation in size and shape, this may be explained by the purchasing system of the period. Unlike today when military equipment is ordered in huge quantities for distribution throughout the service, in the eighteenth century much of a soldiers uniform and equipment was ordered by the commander of his regiment from local suppliers, often without a single government pattern to work from. This is reflected in the fact that surviving examples show significant variation whilst conforming to the same basic shape. Thus our starting point for this pouch was that it should be black leather with a buff leather strap using double d buckles.”
“The next step was to look at surviving examples of British cartridge pouches, there are a number of these with particularly good examples in the military museum in York. Unfortunately the odds of being able to get hold of this pouch to take measurements etc were pretty low. Another pouch that was particularly interesting is in the collection of noted artist Don Troiani, I was lucky enough to haveaccess to a set of measurements and schematics from somebody who was able to handle the pouch as well as a number of photographs and illustrations. Based on this I decided that the Troiani pouch would be the basis for this project but with a few modifications; the flap would need to be longer to reflect the pouch as it might have appeared before being trimmed down and I wanted to use a wider shoulder belt. This latter decision is, I’m afraid, a bit of a ‘reenactorism’ but is based on the fact that the original’s 2 ¾ inch strap seems fairly unusual and I wanted the final product to reflect the more common, wider, straps in the artwork of Sandby and Morier.”
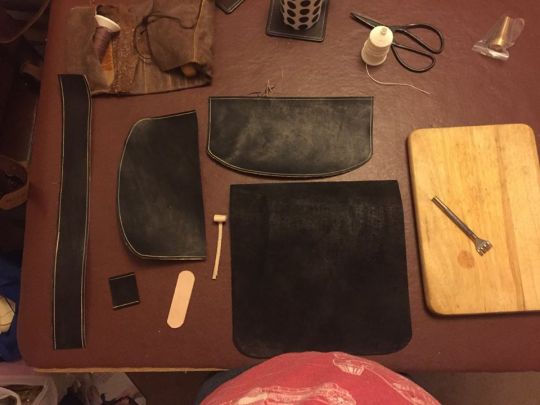
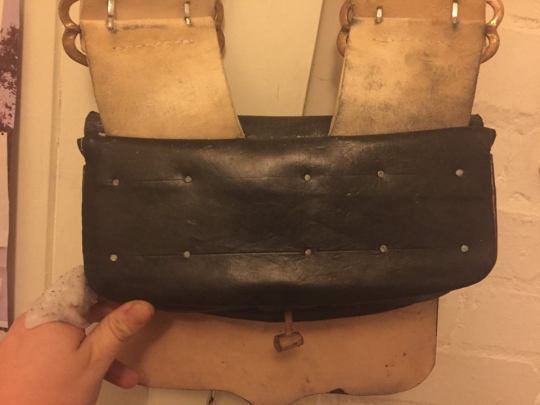
“Construction of the pouch body was relatively simple, it is in three pieces (back, bottom/sides and front) with the back being slightly larger than the front. A small reenforcing panel sits at the bottom and protects the leather button. These were all dyed back and then stitched inside out before being turned so that the dyed side is outermost. From past experience I tend to think that it is best to start stitching pouches like this from the bottom centre and work towards the ends, this allows you to put the re-enforcing panel and button in the correct place and gives the best alignment of the three pieces. For the sake of simplicity all stitching was with neutral linen thread waxed with beeswax with a spacing of 5 stitches per inch (used for the body of the original).”
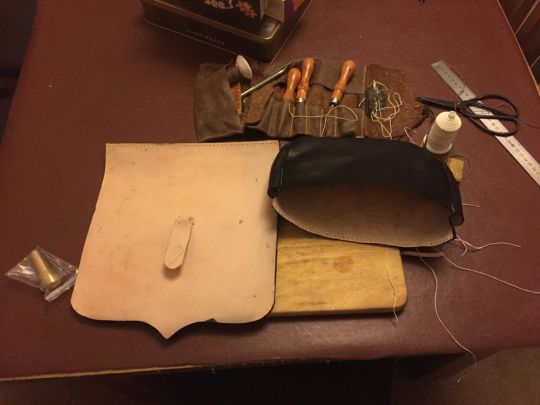
“The flap was then stitched to the back of the pouch with the two ends of the strap sandwiched between them. The strap ends are 4 inches long and were fitted so that each sits at an angle (20 degrees off perpendicular to the top of the pouch) to allow the pouch to hang better. The shoulder strap itself was made in two pieces to allow for adjustment. Once this was complete the whole pouch was treated with a 50/50 mix of beeswax and neatsfoot oil which softens and waterproofs the leather.”
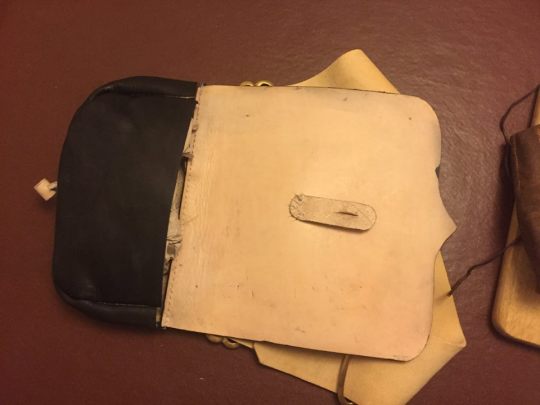
“The next step is to build the block for the inside; this was tricky as the instructions available were rather vague however I began by cutting a 11 x 2 x 3 ½ inch block and drilling out 21 holes of ¾ inch diameter in two rows. Drilling to a depth of 3 inches was challenging but the easiest method I found was to drill a small pilot hole, then follow by drilling to a depth of 2 ½ inches with a flat bit and then boring the last ½ inch with a forstner bit to create a smooth bottom. The block is a very tight fit and so the bag body was soaked with warm water to encourage it to stretch when the block was fitted. The block is held in place with 5 pairs of nails at the back and one pair on each side, the back nails also holding the small internal flap in place.”
“The next step is to build the block for the inside; this was tricky as the instructions available were rather vague however I began by cutting a 11 x 2 x 3 ½ inch block and drilling out 21 holes of ¾ inch diameter in two rows. Drilling to a depth of 3 inches was challenging but the easiest method I found was to drill a small pilot hole, then follow by drilling to a depth of 2 ½ inches with a flat bit and then boring the last ½ inch with a forstner bit to create a smooth bottom. The block is a very tight fit and so the bag body was soaked with warm water to encourage it to stretch when the block was fitted. The block is held in place with 5 pairs of nails at the back and one pair on each side, the back nails also holding the small internal flap in place.”
“Overall this was a very satisfying project however there are a number of areas to improve next time. I used the strap measurements from the original pouch which has produced a rather short strap (I am however a rather short person), I will probably look to replace the strap with a longer one at some point in the near future and would encourage others to do the same. My original measurements also suggested using a rectangle 2 inches by 18 inches for the side/bottom piece, normally I would have cut a longer piece and then trimmed it to size when the three pieces were stitched together, this time I trusted the instructions which meant that the piece was a little short which meant trimming the front of the bag by a few millimetres. I would also consider making the block slightly smaller to make it easier to fit to the bag.
The final product is a prototype of a pouch that fits with the period illustrations available and is a close (although not perfect) replica of an original pouch. There are a number of areas to improve on next time in terms of construction and quality of finish however this is a perfectly usable item that will be used by one of our members in the coming season. Thank you for reading, we welcome any comments and will be happy to answer any questions you may have. Special thanks go to Rick Seidemann of the 55th Regt, compy of Light Infantry. and to Mike Redgate of SJ SJ-SeamstressandLace Wars for their advice and help during this project.”
Brothers in Arms, by Don Aker. Louisbourg was perhaps the event of the Seven Years War in North America I knew least about prior to reading this book, so I learned a lot from it.
For the majority of the story you think you know how it’s going to end, so the actual ending is a surprise (unless you are already familiar with the history). However, an interlude in the middle does spoil some of the plot.