#diy ideas


Elegant African prints fabrics and exotic colours of tulle/mesh would be a killer princess-like combo for a dress or skirt. A glamorous idea (don’t you think?), guaranteed to turn heads. For posher parties, nothing speaks glamour like the tulle dress or skirt. You too can style your tulle dress/skirt to suit you; The full tulle, the pleated, or underneath an already made Ankara dress/skirt. Whatever rocks your boat this DIY project is prepared specially to create a new style for you and guess what? it’s a great style for the kids too (your little girl can step out looking like a princess too)

For this DIY Tulle Skirt, you will need:
• Tulle (see below to calculate how much)
• Lining fabric ( I recommend knit so it can stretch over your hips and so you don’t have to hem it. (Be “efficient.”)
• Elastic band ( I love the black one)
• Thread
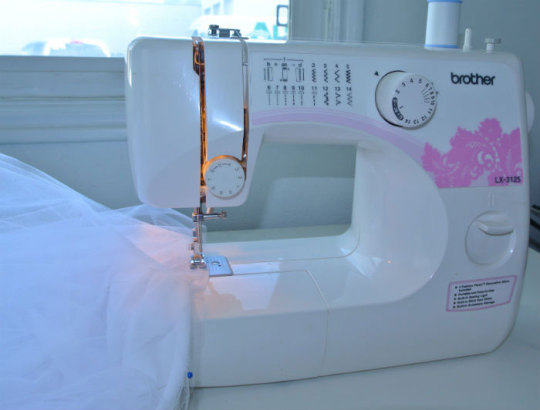
• Sewing machine
• Measuring tape
• Rotary Cutter (seriously makes it soooo much easier than scissors)
• Cutting mat
• Paper/butcher paper to create a pattern.
The Sewing Basics:
The first thing that really confuses you is that a lot of tutorials say to measure where you want the skirt to sit on your waist and use that as the circumference. We think that using this measurement would make it impossible to pull the skirt over my hips as your hip circumference is larger. Even though we’re not exactly sure why it’s not a problem, but Kara was able to pull the skirt easily over my hips even though the circumference was technically smaller than my hip circumference. This is probably due to the give the tulle has, and the fact that our bodies is not a perfect circles. Knowing this, you can go ahead and cut your tulle out to match your natural waist. You will want to make sure your lining is a little stretchy too so it can easily glide past your hips. Don’t be discouraged if after you cut your skirt, it seems too big. The elastic band will take care of that for you.
If you are worried and would prefer the mathematical details, brace yourselves as Kara give you details in full.
The math:
I don’t want to overwhelm you with math, but using the equation Circumference = 2 x pi x radius, we can pretty much figure out everything we need to. Basically, you just need to divide your waist by 6.28. So if your waist is 28 inches (this is a random number), your radius would be 4.45 inches, or I would round to 4 and a half inches.

How much fabric do you need for the tulle skirt and what bolt width?
Add your desired length to your radius and multiply by 2. This is how wide you’ll need to get your fabric, and how many yards you’ll need for each layer.
Let’s say your waist is 28 inches, and you want your skirt to be 22 inches long. You’re waist radius is 4.5.
22 (length) +4.5 (radius) = 26.5 inches
Multiply by 2 (to get circle diameter)
26.5 x 2 = 53 inches
You’ll tulle will need to be at least 53 inches wide. You’ll need just over a yard and a half of it for each layer. So if you wanted 3 layers of tulle, you would most likely buy from the 54 inch wide bolt and get about 4 and a half yards. (One yard is 36 inches)
If your diameter is more than 54 inches, buy from a 108 inch wide bolt.
Note: Multiply your diameter by the number of layers you want, then divide it by 36 to get how many yards you’ll need. I like buying by the bolt because it’s significantly cheaper per a yard and gives you room for error.
Use your radius, we’ll use 4.5 inches for an example, to create a pattern for cutting your center circle. Place a measuring tape on the corner of a piece of paper and mark 4 and a half inches all the way around. The dots below show the markings if you were doing 6 and a half inches around.

Cut along your dots and use this as the pattern for cutting out your fabric. Be sure to double fold your fabric so you cut a complete circle each time.

Decide what length you want the skirt to be. Use this number and measure from the inside circle out, marking around the fabric so you know where to cut. This will be similar to how you measured and cut the inside circle, except that you’ll need to move you measuring tape along to curve of the inside circle instead of keeping it fixed in the corner.
Once your lining and all your tulle has been cut, carefully stack and pin them. You’ll now baste them together at the waist. I recommend doing between 3-5 layers of tulle. I only did three and it was a little difficult to keep them lined up properly when you baste them, so you may want to do two layers at a time, then baste them all together.


Now wear and enjoy it!
NOTE: The second time Kara made this skirt she basted one layer of tulle to the lining at a time. There will likely be discrepancies in the sizing. By doing one layer at a time, you can add a pleat to the layer of tulle if it ends up wider than the lining. This is nearly impossible to do if you do more than one layer at once.
This site makes it super easy: http://byhandlondon.com/pages/circle-skirt-app


Below is a video following a similar format for the ankara tulle skirt.
https://youtu.be/qXl1CDlHMW4
Click to Post

Elegant African prints fabrics and exotic colours of tulle/mesh would be a killer princess-like combo for a dress or skirt. A glamorous idea (don’t you think?), guaranteed to turn heads. For posher parties, nothing speaks glamour like the tulle dress or skirt. You too can style your tulle dress/skirt to suit you; The full tulle, the pleated, or underneath an already made Ankara dress/skirt. Whatever rocks your boat this DIY project is prepared specially to create a new style for you and guess what? it’s a great style for the kids too (your little girl can step out looking like a princess too)

For this DIY Tulle Skirt, you will need:
• Tulle (see below to calculate how much)
• Lining fabric ( I recommend knit so it can stretch over your hips and so you don’t have to hem it. (Be “efficient.”)
• Elastic band ( I love the black one)
• Thread
• Sewing machine
• Measuring tape
• Rotary Cutter (seriously makes it soooo much easier than scissors)
• Cutting mat
• Paper/butcher paper to create a pattern.
The Sewing Basics:
The first thing that really confuses you is that a lot of tutorials say to measure where you want the skirt to sit on your waist and use that as the circumference. We think that using this measurement would make it impossible to pull the skirt over my hips as your hip circumference is larger. Even though we’re not exactly sure why it’s not a problem, but Kara was able to pull the skirt easily over my hips even though the circumference was technically smaller than my hip circumference. This is probably due to the give the tulle has, and the fact that our bodies is not a perfect circles. Knowing this, you can go ahead and cut your tulle out to match your natural waist. You will want to make sure your lining is a little stretchy too so it can easily glide past your hips. Don’t be discouraged if after you cut your skirt, it seems too big. The elastic band will take care of that for you.
If you are worried and would prefer the mathematical details, brace yourselves as Kara give you details in full.
The math:
I don’t want to overwhelm you with math, but using the equation Circumference = 2 x pi x radius, we can pretty much figure out everything we need to. Basically, you just need to divide your waist by 6.28. So if your waist is 28 inches (this is a random number), your radius would be 4.45 inches, or I would round to 4 and a half inches.

How much fabric do you need for the tulle skirt and what bolt width?
Add your desired length to your radius and multiply by 2. This is how wide you’ll need to get your fabric, and how many yards you’ll need for each layer.
Let’s say your waist is 28 inches, and you want your skirt to be 22 inches long. You’re waist radius is 4.5.
22 (length) +4.5 (radius) = 26.5 inches
Multiply by 2 (to get circle diameter)
26.5 x 2 = 53 inches
You’ll tulle will need to be at least 53 inches wide. You’ll need just over a yard and a half of it for each layer. So if you wanted 3 layers of tulle, you would most likely buy from the 54 inch wide bolt and get about 4 and a half yards. (One yard is 36 inches)
If your diameter is more than 54 inches, buy from a 108 inch wide bolt.
Note: Multiply your diameter by the number of layers you want, then divide it by 36 to get how many yards you’ll need. I like buying by the bolt because it’s significantly cheaper per a yard and gives you room for error.
Use your radius, we’ll use 4.5 inches for an example, to create a pattern for cutting your center circle. Place a measuring tape on the corner of a piece of paper and mark 4 and a half inches all the way around. The dots below show the markings if you were doing 6 and a half inches around.
Cut along your dots and use this as the pattern for cutting out your fabric. Be sure to double fold your fabric so you cut a complete circle each time.
Decide what length you want the skirt to be. Use this number and measure from the inside circle out, marking around the fabric so you know where to cut. This will be similar to how you measured and cut the inside circle, except that you’ll need to move you measuring tape along to curve of the inside circle instead of keeping it fixed in the corner.
Once your lining and all your tulle has been cut, carefully stack and pin them. You’ll now baste them together at the waist. I recommend doing between 3-5 layers of tulle. I only did three and it was a little difficult to keep them lined up properly when you baste them, so you may want to do two layers at a time, then baste them all together.

Now wear and enjoy it!
NOTE: The second time Kara made this skirt she basted one layer of tulle to the lining at a time. There will likely be discrepancies in the sizing. By doing one layer at a time, you can add a pleat to the layer of tulle if it ends up wider than the lining. This is nearly impossible to do if you do more than one layer at once.
This site makes it super easy: http://byhandlondon.com/pages/circle-skirt-app


Below is a video following a similar format for the ankara tulle skirt.
https://youtu.be/qXl1CDlHMW4
Click to Post

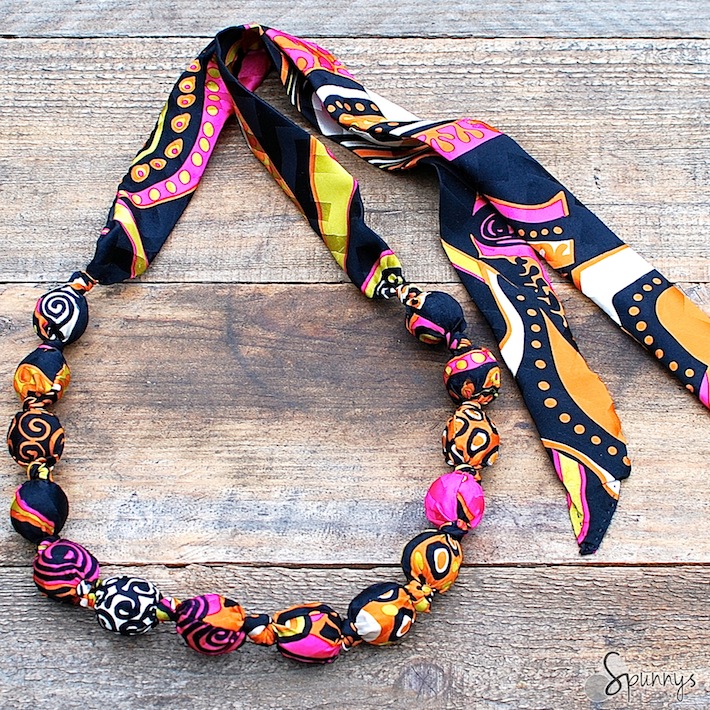
Fabric covered bead necklace – DIY tutorial
Hello lovelies. Its another Saturday and DIY projects are back!! for the enthusiastic and creatives out there here’s a well edited stream for your consumption. something you can rock this weekend. Ready?!!
Fabric covered bead necklaces
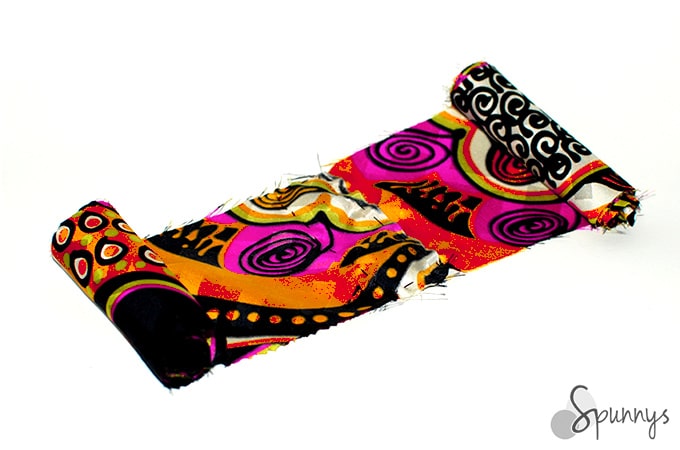
Yes, they are trendy and we’re sure you want to make my own. So head to a fabric store to buy a small piece of silky fabric (Hell yes to Ankara or any African print fabric) and here is the result.
To make the necklace lightweight and comfortable to wear, I used spun cotton balls (lightweight craft balls made of paper). I thought wooden beads would be too heavy and polystyrene balls would be too messy.
I am very happy with the way the necklace turned out. It looks great and feels comfortable around the neck.
It did take me longer than planned to make the necklace but that’s because I didn’t have a sewing machine.

Materials
14 spun cotton balls, 1.18″ diameter (30mm).
A 4.5″ x 90″ strip of silk fabric. At the store, the fabric I chose came on a 45″ wide bolt. So I asked for a foot of it which gave me what I needed plus a little extra.
Needle and some extra strong thread. Or a sewing machine. (I wish I had one)
A long ruler, pencil, scissors, or craft knife, paper clip.
Directions
Step 1: Cut a long and narrow strip of fabric (4.5 inches x 7.5 feet)
At the fabric store, you probably will not find a piece of fabric that is 7.5 feet long. Fabric comes on bolts and bolts are typically 36″, 44″-45″, or 54″ wide. So you may have to sew two pieces of fabric together.
The fabric I bought came on a 45″ wide bolt. So I ended up having to sew two long and narrow strips of fabric together to achieve the required length.
To cut the fabric, I used a long ruler and a craft knife over a piece of plywood. I cut two strips, each measuring 4.5″x 45″. It’s ok to use a pair of scissors if you don’t want to mess with a sharp knife. The cut doesn’t have to be exactly straight.
Before sewing the 2 strips together, I overlapped them by about an inch.
Step 2: Fold the strip of fabric into a tube shape
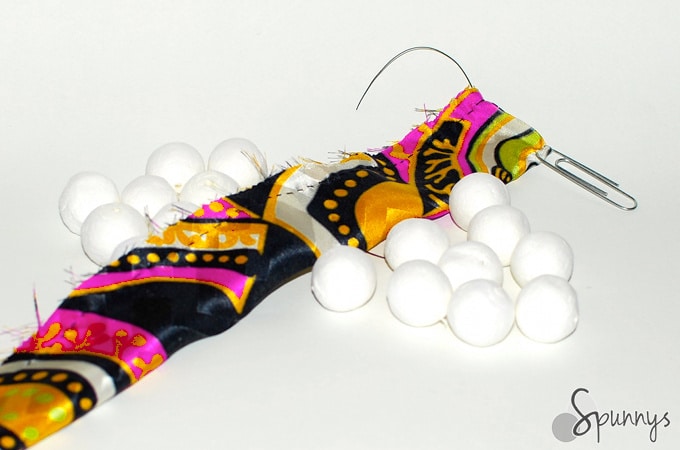
Fold the long piece of fabric in half lengthwise and sew the long edges together. Try to sew small stitches for a more secure seam. This is easy to accomplish but time consuming without a sewing machine.
VERY IMPORTANT: For now, the “good” side of the fabric goes inside the tube. We will turn the tube inside out once the sewing is done.
Once done with sewing, turn the tube inside out with a loop turner or a paper clip.
The paper clip method: Start by solidly anchoring the paper clip to one end of the tube (it’s ok to poke a hole in the fabric with the paper clip). Then, just slide the clip through the tube from one end to the other. The tube will turn inside out very easily.
Step 3: Slide in the spun cotton balls and tie the knots
Tie the first knot where you sewed the two strips of fabric together (to hide the stitches).
Slide a ball down one end of the tube until it reaches the middle of the necklace. Twist the fabric to push the ball as close to the middle as possible and tie a simple knot.
Slide a second ball down the other end of the tube, twist the fabric and tie a new knot.
Do the same with all the balls or until the desired necklace length has been reached.
Step 4: The finishing touches

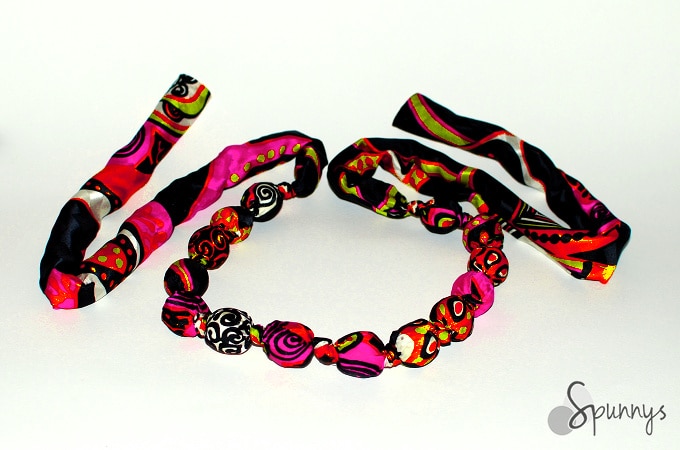
For the endings to look nice, fold the fabric to create a 45 degree angle. Sew along the edges.
Iron your fabric covered bead necklace on low heat to remove all the wrinkles. THIS IS IT!
A beautiful fabric covered hand knotted bead necklace
I hope you enjoyed this tutorial. As always, if you have any questions, do not hesitate to get in touch. Happy crafting!
Courtesy: https://www.pinterest.com/source/spunnys.stfi.re
Edited by: Samantha Equere.
Click to Post

Fabric covered bead necklace – DIY tutorial
Hello lovelies. Its another Saturday and DIY projects are back!! for the enthusiastic and creatives out there here’s a well edited stream for your consumption. something you can rock this weekend. Ready?!!
Fabric covered bead necklaces
Yes, they are trendy and we’re sure you want to make my own. So head to a fabric store to buy a small piece of silky fabric (Hell yes to Ankara or any African print fabric) and here is the result.
To make the necklace lightweight and comfortable to wear, I used spun cotton balls (lightweight craft balls made of paper). I thought wooden beads would be too heavy and polystyrene balls would be too messy.
I am very happy with the way the necklace turned out. It looks great and feels comfortable around the neck.
It did take me longer than planned to make the necklace but that’s because I didn’t have a sewing machine.
Materials
14 spun cotton balls, 1.18″ diameter (30mm).
A 4.5″ x 90″ strip of silk fabric. At the store, the fabric I chose came on a 45″ wide bolt. So I asked for a foot of it which gave me what I needed plus a little extra.
Needle and some extra strong thread. Or a sewing machine. (I wish I had one)
A long ruler, pencil, scissors, or craft knife, paper clip.
Directions
Step 1: Cut a long and narrow strip of fabric (4.5 inches x 7.5 feet)
At the fabric store, you probably will not find a piece of fabric that is 7.5 feet long. Fabric comes on bolts and bolts are typically 36″, 44″-45″, or 54″ wide. So you may have to sew two pieces of fabric together.
The fabric I bought came on a 45″ wide bolt. So I ended up having to sew two long and narrow strips of fabric together to achieve the required length.
To cut the fabric, I used a long ruler and a craft knife over a piece of plywood. I cut two strips, each measuring 4.5″x 45″. It’s ok to use a pair of scissors if you don’t want to mess with a sharp knife. The cut doesn’t have to be exactly straight.
Before sewing the 2 strips together, I overlapped them by about an inch.
Step 2: Fold the strip of fabric into a tube shape
Fold the long piece of fabric in half lengthwise and sew the long edges together. Try to sew small stitches for a more secure seam. This is easy to accomplish but time consuming without a sewing machine.
VERY IMPORTANT: For now, the “good” side of the fabric goes inside the tube. We will turn the tube inside out once the sewing is done.
Once done with sewing, turn the tube inside out with a loop turner or a paper clip.
The paper clip method: Start by solidly anchoring the paper clip to one end of the tube (it’s ok to poke a hole in the fabric with the paper clip). Then, just slide the clip through the tube from one end to the other. The tube will turn inside out very easily.
Step 3: Slide in the spun cotton balls and tie the knots
Tie the first knot where you sewed the two strips of fabric together (to hide the stitches).
Slide a ball down one end of the tube until it reaches the middle of the necklace. Twist the fabric to push the ball as close to the middle as possible and tie a simple knot.
Slide a second ball down the other end of the tube, twist the fabric and tie a new knot.
Do the same with all the balls or until the desired necklace length has been reached.
Step 4: The finishing touches
For the endings to look nice, fold the fabric to create a 45 degree angle. Sew along the edges.
Iron your fabric covered bead necklace on low heat to remove all the wrinkles. THIS IS IT!
A beautiful fabric covered hand knotted bead necklace
I hope you enjoyed this tutorial. As always, if you have any questions, do not hesitate to get in touch. Happy crafting!
Courtesy: https://www.pinterest.com/source/spunnys.stfi.re
Edited by: Samantha Equere.
Click to Post
Phrasing of a protection spell, that might be helpful to others - or perhaps useful as template.
“This [item] is for protection. It will protect this space. It will protect this property. It will protect the people who live here. It will protect the people who are welcome here. It will protect the animals that live here. It will protect the animals that exist here. It will protect.”