Bringing healthy food to the table, especially for the growing children, has never been this easy. We soak the seeds the first day for 24 hours. Then every morning and evening we fill the jars with water to do a shake and rinse. So, simply fill the jars, shake and pour the water out. once you’ve shaken the water out of the jars simply lay the jars on their side next to the sink. Keep them close and convenient. In six days you’ll have jars full of clean and organic sprouts for salads and sides. The nutritional value is exponentially higher when the beans open and the taproot grows. This is a great solution for anybody who feels they are too busy to grow their own healthy foods. With simple old-school methods no one has excuses and there is no light required. Moreover, the sweet and crunchy experience usually wins over the children.
From our experience, if you have an active lifestyle and need easily digestible foods that translate into quick and clean energy, this is definitely a route for you guys to explore.
I hope this message finds you guys excited about getting ready for the spring time.
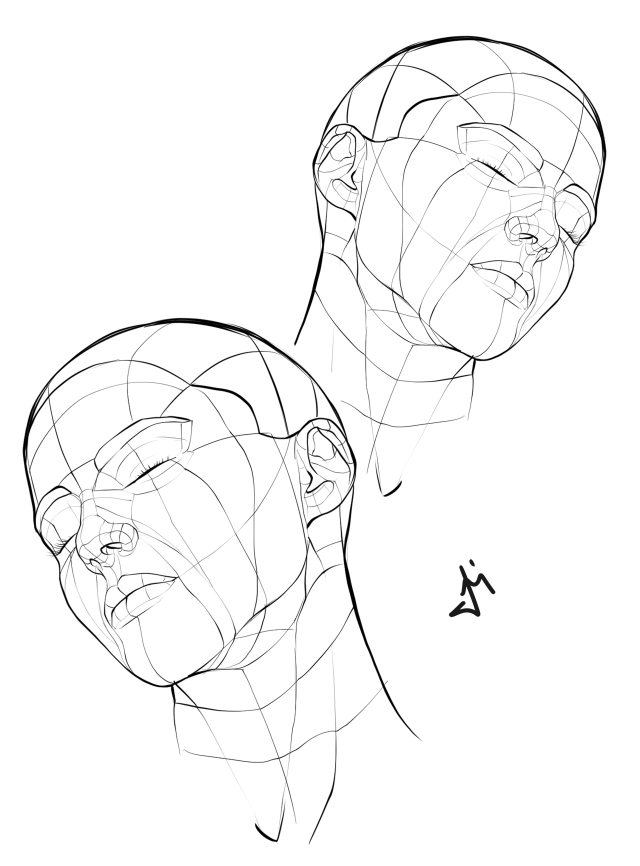
My drawing references are free for you to use for your art at www.posemuse.com. I’ve compiled them into books in multiple formats. pdf, zip, paperback, kindle, epub, mobi, lrf, pdb, and html.
Can you believe the main components of this DIY Steampunk Skull cost only $2 from the Dollar Store? And the eyes light up?
Follow EPBOT’s extremely detailed tutorial to see how Jen created this DIY Steampunk Skull. And how did the skull look before Jen did a makeover? See below.
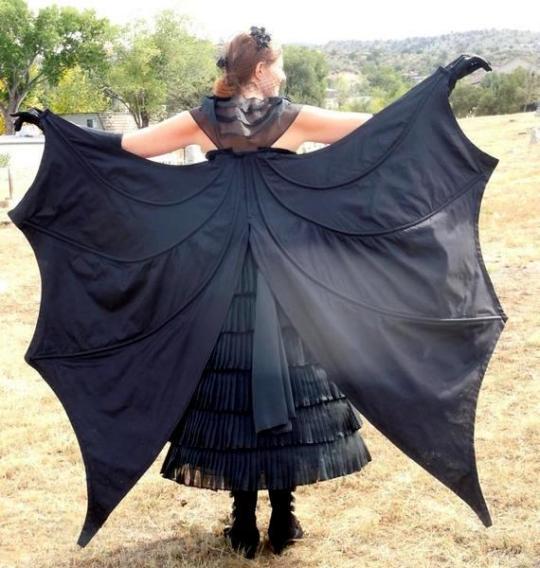
Updated Post on the DIY Bat Dress Pattern from EvaDress
Updated 2019
All photos in the main collage are by Cynthia DeGrand here. They can be found on EvaDress’ Blog here.
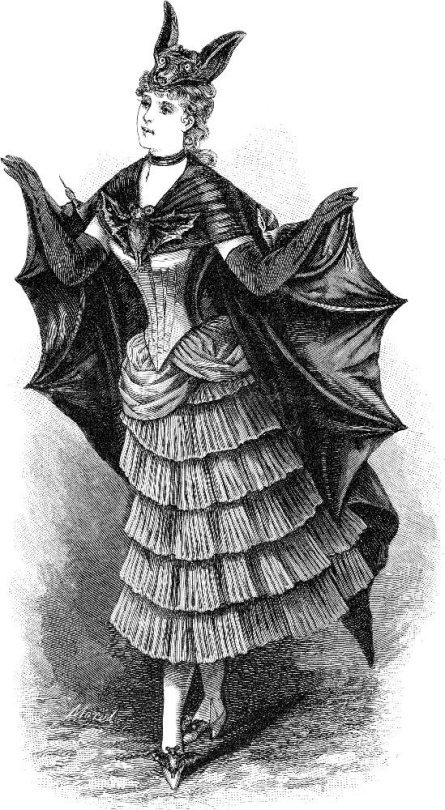
This is an advanced sewing project from EvaDress. The Bat Dress was inspired by the illustration Travestissement Chauve-Sourisin in La mode Illustrée, Journal de la Famille,1887 below.
About the EvaDress Pattern
The $28 pattern by EvaDress can be bought at evadress.com here. You can also buy the Bat Dress Pattern on myshopify.com here.
The 21 piece pattern includes:
pieces for the wings
corset bodice
flounced skirt
gloves
polonaise
fichu
The dress comes in the following sizes:
Size set A: 33" to 39" bust, 22" to 28" waist, 33" to 37" hip
Size set B: 41" to 45" bust, 28" to 34" waist, 39" to 43" hip
You can find a post on making the Bat Dress Gloves here.
The Bat Dress Crinoline Progress is detailed on EvaDress Blog here.
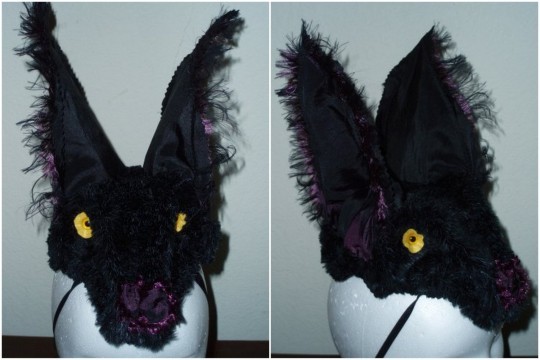
EvaDress’ daughter made the Bat Bust Ornamentation using paper and fabric mâché.
Other Bat Dresses
Sewing to Distraction has an entire post dedicated to her experience sewing the EvaDress Bat Dress here.
For another interpretation of the Bat Dress, check out Darling and Dash’sposthere.The Bat Headpiece was made from, “Black striped netting over the shoulder drape gathered and pinned to front with furry bat.”
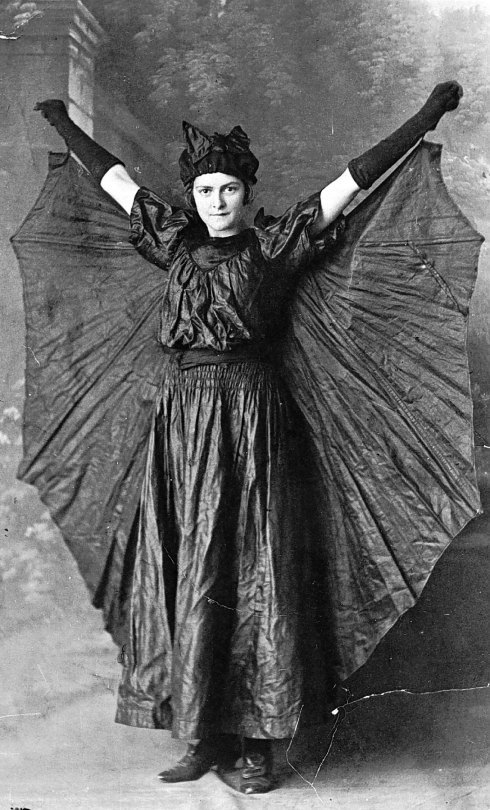
Bat Dress Background
There is an excellent post on Victorian Bat Dresses on Cogpunk Steamscribe here, titled:The Victorian Batgirl: a Steampunk Feminist Perspective
Below is a Victorian German photograph of a “Bat Woman” costume found here.
Another Bat Costume photograph is from the Museum Victoria here.
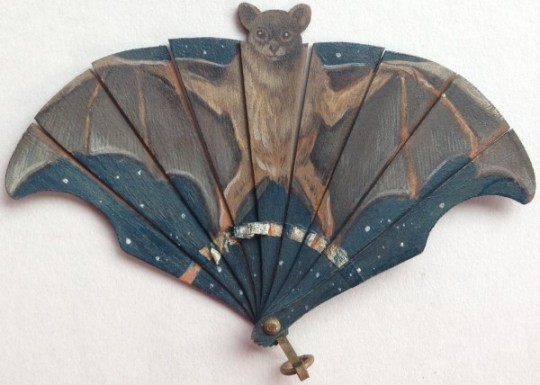
Lastly, check out this Bat Fan from the 1900s that sold at auction.
“Hand painted, exceptionally rare miniature bat fan. On thin shaved wood. One of the most unusual items we have seen. Wingspan 3.5 inches. Circa 1900.”
After trying to use flexible magnetic strip / tape to magnetize, I decided to spring for the special neodymium magnets and I am very happy with the results. I didn’t sand or cut any part of the brushes. The hot glue works well as a base if the magnets aren’t too big or strong.
This design is great for people who wash their brushes often. I didn’t want to put my brushes in a jar because my room gets dusty quickly and I don’t want the dust on my brushes. I cringe a little every time I see people store their brushes in a jar. I used to put them in a drawer but they were overcrowded. I am downsizng my collection so it will take up less space.
One of the downsides is that I can’t magnetize my small brushes, but I don’t mind that at all. This project is not good for people who have a ton of brushes they actually use. I keep my unused brushes seperately and spot clean my brushes often.
The cost for this tutorial was close to the price of buying a base from pony effects. I hadn’t calculated that before hand. After trying the project I can safely say that the base is up to you and that hot gluing magnets to the end of my brushes was very easy.
Post your project! I want to see what other people come up with.
Materials: Hot glue gun - plus glue, low temp worked well for me. High temp might damage the magnets, not too sure. $7 Neodymium magnets - not, ceramic magnets, found at hardware stores, home depot, I got the smallest size and they’re perfect. The bigger ones might be too powerful. $4 Steel plate - acts a magnetized surface. galvanized, 1 square foot , 28 gauge (smaller # means thick, large # means thin) at home depot $8 Tin snips - big scissors that cuts thin metal. A good investment if magnetizing other stuff with remaining materials. Hardware stores, harbor freight tools $12 ?I got these a while ago. guage Large filer or sandpaper - something to sand the sharp edges after cutting. This is important. Wooden box - the easiest base for this project. This was perfect because it fit my brushes and the steel plate. You can get creative as long as its not a cardboard box. $8 Pliers - for bending the edges to fit the box. Everyone should already have pliers. Small screwdriver - placing the magnets on straight was difficult. I used a small screwdriver to help place the magnet onto the glop of glue.
This was so easy. I was surprised that I hadn’t seen more tutorials in this. To reposition the magnets, I used the remaining neodymium magnets to pull off the one on the brush.
Other tips: - work quickly with hot glue - allow glue to dry before testing - Do not place brushes too close together. -neodymium magnets are powerful. They must be slid off each other rather than pulled off.
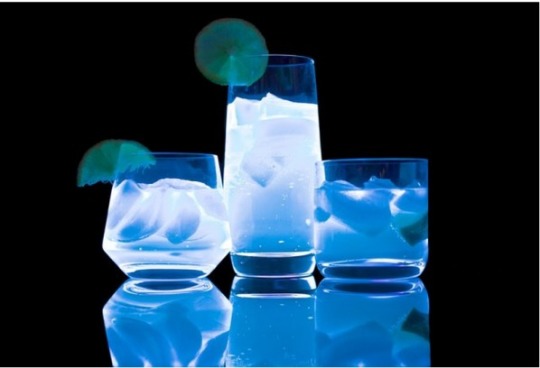
Did you know that tonic water naturally glows under black light? All you need to do is to install black lights around your home. Another decorative glowing trick is to break open a highlighter pen, put the tip inside a bowl of water to allow the highlighter ink to mix in. Then pour the water into any type of container you want to “light up”. DO NOT DRINK HIGHLIGHTER INK.
#2 Sterro Hack
If you don’t have a sound system to play dance tunes, simply make one by cutting a notch in a toilet paper roll and slipping your phone inside. Another idea is to drop your phone into a glass or bowl for the same effect, it’s an amazing way to amplify sound… not to mention it’s ultra clever.
#3 Chill Beverages With Berries
You can avoid diluting drinks and “pretty” them up by replacing ice cubes with frozen berries. It’s not only attractive and colorful, but will lend drinks an extra yummy flavor.
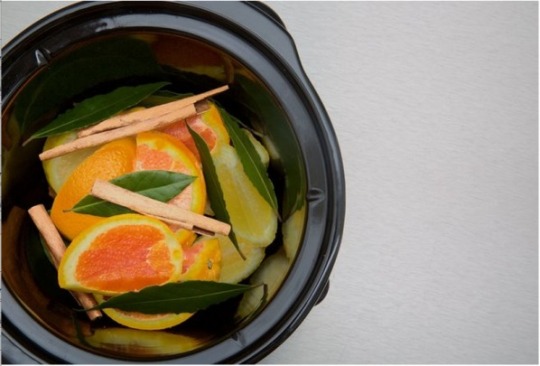
#4 DIY Potpourri
Unlike the synthetic store-bought stuff, this is completely natural and won’t make your place smell like a doctor’s office. Just throw some fruit into a slow cooker, and then add bay leaves cloves and cinnamon. What type of fruit? Lemons, apples, oranges will all work stellar!
#5 Trick Wine Opener
If you can’t find the corkscrew, but have an power drill… no problem! Also doesn’t uncorking wine this way look more suave than the other trick of beating the back of the bottle with the heel of your shoe?
#6 DIY Disco Lights
Transform your Xmas lights into a disco celebration by cutting a hole in the bottom of some Solos and placing them over the bulbs like lampshades!
#7 Preserve Good Scotch
Here’s a solution for when you’ve got a super expensive and special scotch tucked away at the bar, but a friend would like to have some. It would be awkward to say “no”, but you can polish the rim of his glass with a napkin and bit of scotch on it. The glass will smell of strong scotch, as you pour him a watered down version.
I made this scarf as a Christmas present. It didn’t take me long to sew it and I’m pretty happy with it. It has a lot less mistakes than my last project.
I made the skirt of this outfit. It took me forever to make this skirt due to unrealistic expectations and finding time to sew. Originally, this was supposed to be a 2-piece outfit. It was going to have a matching crop top and a skirt. I started working on the top, and I quickly realized I do not have the skill/experience to finish this. I was never really taught to sew. I’m learning to sew from YouTube videos and Tumblr. I was disappointed that I could not finish my vision for this fabric. I stopped sewing the top, and I adjusted my vision for this project to my experience level. I’m really happy and proud of myself with the outcome of this skirt.
There are so many beginner mistakes that I made like taking into account how long this project will take, having correct measurements, sewing correctly, having the inside/outside of the fabric match, being patient, the type of fabric I need, and how to sew accordingly to the type of fabric. So many mistakes.
My problem was that I thought I could just sit at a sewing machine and whip something beautiful in 2.2 seconds. I learned that sewing is going to take time and I can’t have high expectations for myself especially since I don’t have the skills yet. However, I really enjoyed sewing. I’m currently looking for another inspiration. I might go back and correct my mistakes or I’ll leave this skirt as it is, as memory of my first sewing project.
I wanted a box to store things but I did not want to go out and buy an expensive organizer. I searched my house and found a nice box and extra fabric. This box is simple to make and cute. The most important benefit is that it was cheap and fun to make.
Supplies:
· Fabric of your choice *make sure it’s big enough to cover your box*
I got this nice Rhodia box (with 4 notepads and 2 pencils) last year and had the idea to use it to store paper. I cut down some paper to size and now have 10 sheets each of the colored pencil, Bristol board, and toned grey paper :) next up is watercolor paper! I used strips of paper to make dividers so it’s easy to get to each kind of paper. I’m in love


 last year and had the idea to use it to s")
 last year and had the idea to use it to s")
 last year and had the idea to use it to s")
 last year and had the idea to use it to s")
)")