ACON3D reached out to me for a collaboration, and I used it as an excuse to draw my and @eggdrawsthings‘ Star Wars OCs! I’ve been chipping away at this for the better part of a month, and despite the struggles, I’m pretty happy with how it came out! ^_^
Having used SketchUp for both my professional and personal work, I’m a HUGE advocate of using 3D to streamline my workflow. Utilizing pre-made models instead of making them from scratch is a game-changer!
Extensive notes on my process below the cut.
Default 3D Model:
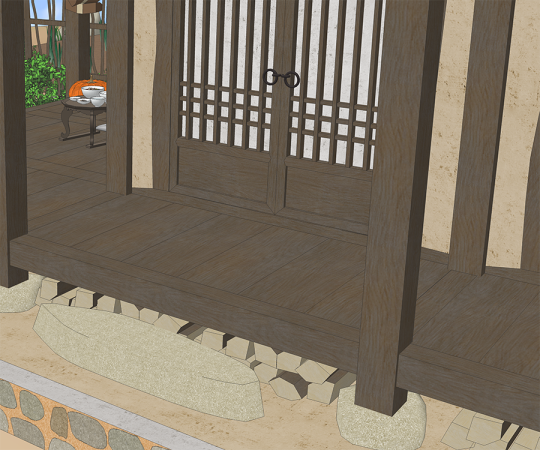
For this collab, I was to use one of the many 3D model resources sold by ACON3D to create an illustration. I chose the Joseon Dynasty - Thatched House by Team Truffle. The render below is just a fragment of the lovingly crafted set design - I recommend searching it up! (I’d provide a link, but Tumblr’s external link policy might nuke this post from search results if I do)
Customizing the Model:
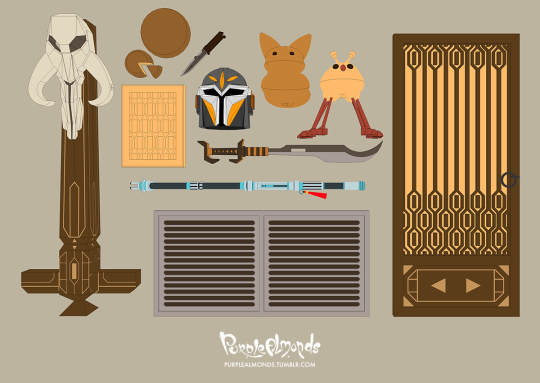
Modified and added some props to make the scene more thematically Star Wars.
From top left to right:
Building Column - Altered the shape and added motifs inspired by Mandalorian architecture. Mythosaur skull mounted on top is also modeled from scratch!
Uj Cake - Surprisingly few images of this snack despite it being mentioned in many fanworks - I think I used a photo off of Wookiepedia as reference for this.
Cutting Board - Pretty straightforward - a cutting board for the cake to sit on top of. It’s not visible in the final render, but I leveraged the kar’ta motif as a fancy inlaid pattern.
Vibroblade - Basically a replica of Din Djarin’s, though much of its design isn’t visible in the final render.
Buy’ce - This was my first time modeling a helmet in SketchUp, much less a buy’ce. Geometry is a hot mess, but it got the job done.
Xing’s Beskad - Referencing my Mando OC’s weapon of choice. Overall design’s taken straight from the beskad’s blade shape, guard, and grip – though I tried to give it more of a katana-like aesthetic.
Tooka - Or rather, a limb-less and tail-less tooka. By far the most primitive of the models, but I just needed it as a placeholder which I would draw details on top of.
Voorpak - This space chinchilla was…hmm. There were discrepancies between the creature’s original concept in The Wildlife of Star Wars: A field guide (small and 8-legged) and its first appearance in The Bad Batch (dog-sized and 6-legged). Needless to say, I was a tad irritated to find out I modeled and posed two extra legs before realizing they were extraneous.
Phong’s Saber Staff - Probably one of the more complex props in this spread, but Jamie’s detailed reference sheet sped up the modeling process considerably.
Vent Covers - Replacing some of the floor boards in the foreground to give this set a more sci-fi vibe.
Door - Once again, customized the screen design and panel patterning after Mandalorian motifs. This and the column will be the two biggest alterations to the set, so I took extra care to get the designs just right.
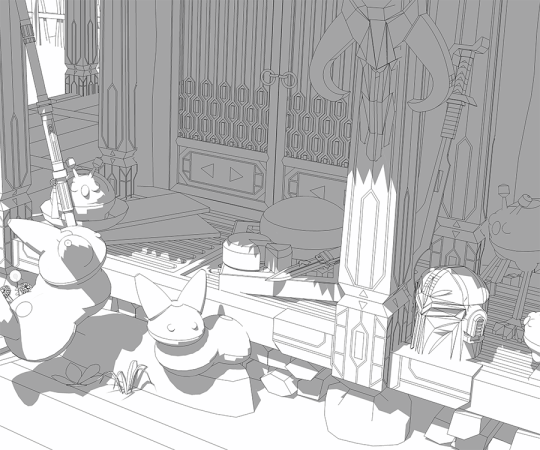
And this is what the props look like on set. Colors turned off so the lighting (which I later scrapped) is clearly defined.
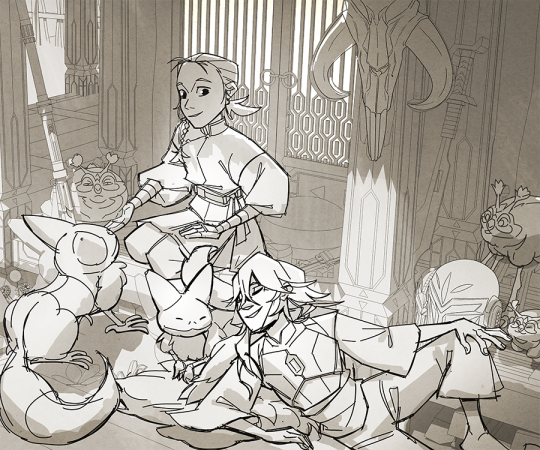
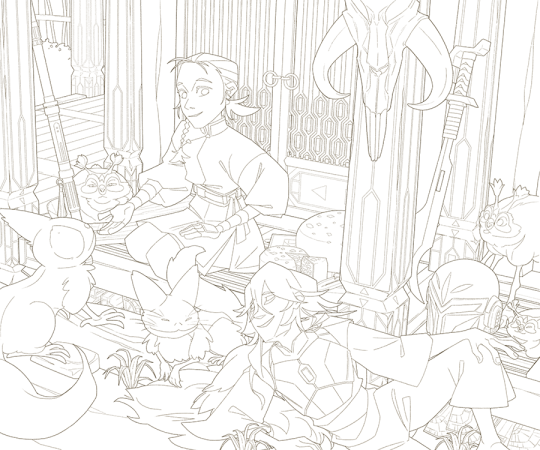
Sketch:
Now’s the bit that I finallyadd the characters and creatures into the composition! For this one, I did have a vague idea of what I wanted out of it story-wise – some kind of low key scene with Phong and Xing hanging out at the latter’s dwelling. To help sell the casual vibes, I had Xing dressed only in his cuirass and blacks. Definitely not because I was struggling to draw his armor. Perish the thought!
Ink:
Ah yes, the cleanup stage. Arguably the most crucial, time-consuming, boring, yet satisfying part of this process. While much of this work is retracing what’s already been drawn, the concise line art eliminates much guesswork in the next steps. The goal here is to have a clean blueprint, so I don’t have dedicate bandwidth to fixing errors in anatomy, prop position, etc.
I try to keep element of this comp well organized. For instance, Phong’s face alone has layers for their eyelash, iris, bottom eyelid, eyebrow, nose, mouth, bangs, braid, ponytail, hair ties, ear, and face - all clustered into a group, which is then clustered within a bigger group containing the remaining parts of their body. Definitely overkill, but I like running a tight ship for pieces I can take my time with!
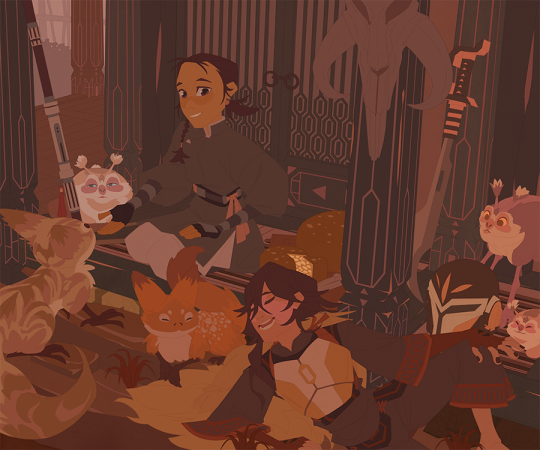
Color Flats:
Full disclosure: the color flats shown here are a lie. I didn’t land on these colors on my first try; it took innumerable rounds of trial and error. Color palette iterations ran the full gamut from monotonously drab to eye-searingly vibrant then back again. Lighting changed from high noon to overcast to night time in quick succession. Certain elements were individually altered to pop out more, then on second viewing, dialed back because they popped out too much. The colors you see below a grudging compromise of all the directions which it was pulled:
This GIF below is a more honest depiction of the utter chaos which was the evolution of this illustration’s identity crisis:
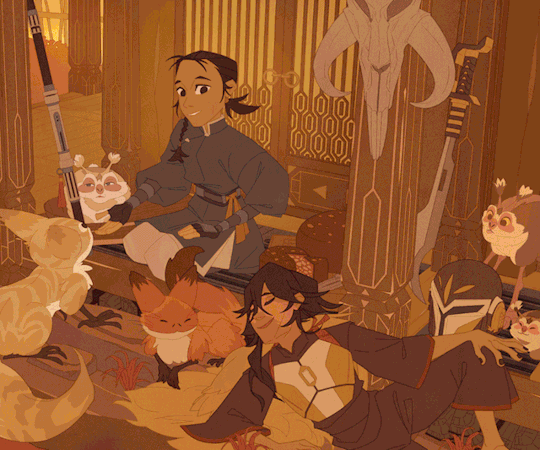
Shading:
I suppose after that GIF showing these next steps is bit of a moot point, but here we are anyways! I used Brightness/Contrast adjustment layers to start lighting the color flats. I start out with the polygonal lasso tool to block out the big shadow shapes, then go back with a textured brush to soften edges where necessary.
At this point, my layer count was going upwards of 900+ and file size at over 1GB. If I so much as turned off a layer, my computer threatens to have a meltdown. So consolidated these lighting layers by making them universal - one layer for darks, another for contact shadows, etc.
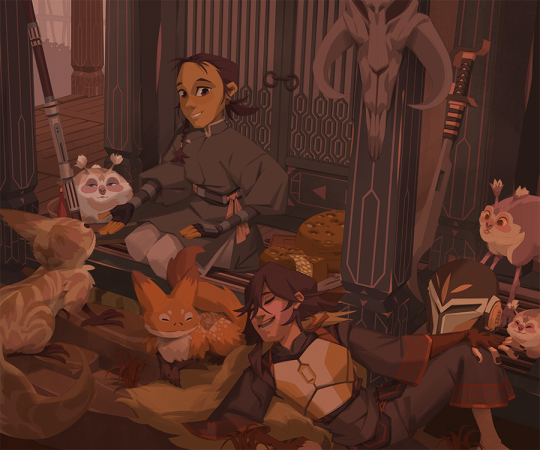
Final Render:
I guess this is where the magic happens? Textures, material renders, secondary & tertiary lights, atmosphere, etc. all kind of just happen at once. It’s a lot of stuff to describe in blow-by-blow accounts, and I’ve rewritten this several times already because Tumblr keeps prematurely closing out my unsaved drafts, so I’m gonna leave it at that!