#nell sims


Dress N3hq compatiblebase game compatible10 swatchesedit of EA’s meshesall lod")
Dress N3hq compatiblebase game compatible10 swatchesedit of EA’s meshesall lod")
Dress N3hq compatiblebase game compatible10 swatchesedit of EA’s meshesall lod")
Dress N3hq compatiblebase game compatible10 swatchesedit of EA’s meshesall lod")
Dress N3hq compatiblebase game compatible10 swatchesedit of EA’s meshesall lod")
Dress N3hq compatiblebase game compatible10 swatchesedit of EA’s meshesall lod")
Dress N3hq compatiblebase game compatible10 swatchesedit of EA’s meshesall lod")
Child Dresses (+Bonus)
Dress N3
- hq compatible
- base game compatible
- 10 swatches
- edit of EA’s meshes
- all lods
- specular/shadow/normal maps
- lod0 polycount: 5435
- proper tags
Dress N4
- hq compatible
- base game compatible
- 12 swatches
- edit of EA’s meshes
- all lods
- specular/shadow/normal maps
- lod0 polycount: 4190
- proper tags
Dress N5
- hq compatible
- base game compatible
- 10 swatches
- edit of EA’s mesh
- all lods
- specular/shadow/normal maps
- lod0 polycount: 4562
- proper tags
Child Oxfords (Bonus)
- hq compatible
- base game compatible
- 15 swatches
- available for all genders
- conversion from adult (base game)
- all lods
- specular/normal maps
- lod0 polycount: 616
- proper tags

Download:patreon (free) | sfs
Thanks to mothz & trillyke for the patterns (1/2/3)
Post link


Child Clothes Set
T-Shirt
- hq compatible
- base game compatible
- 15 swatches
- available for all genders
- recolor of EA’s mesh
- all lods
- specular/shadow/normal maps
- lod0 polycount: 3282
- proper tags
Jeans Shorts
- hq compatible
- base game compatible
- 12 swatches (+ ripped version)
- available for all genders
- edit of EA’s meshes
- all lods
- specular/shadow/normal maps
- lod0 polycount: 1000
- proper tags
Sport Pants
- hq compatible
- base game compatible
- 12 swatches
- available for all genders
- edit of EA’s mesh
- all lods
- specular/shadow/normal maps
- lod0 polycount: 1026
- proper tags

Download:patreon (free) | sfs
Previews were done with HQ
Post link


Best Friends Poses
ENG:
- 7 child couple poses
- “all in one” included
RU:
- 7 детских парных поз
- “все в одной” включены

Download:patreon (free) / sfs
Recommended mods/Рекомендуемые моды:
Pose Player/Teleport Any Sim/T.O.O.L.
Post link
Coffee PosesENG:10 single poses and 5 couple poses“all in one” includedRU")
Coffee PosesENG:10 single poses and 5 couple poses“all in one” includedRU")
Coffee PosesENG:10 single poses and 5 couple poses“all in one” includedRU")
Coffee Poses (+ Coffee Acc)
Coffee Poses
ENG:
- 10 single poses and 5 couple poses
- “all in one” included
RU:
- 10 одиночных поз и 5 парных
- “все в одной” включены
Coffee Acc
- hq compatible
- base game compatible
- 20 swatches
- necklace and bracelet categories
- new mesh from scratch
- all lods
- specular map
- lod0 polycount: 380
- proper tags

Download:patreon (free) /sfs
Recommended mods/Рекомендуемые моды:
Pose Player/Teleport Any Sim/T.O.O.L.
Post link


Female Model Pose Pack N4
ENG:
- 20 female poses
- ingame and cas
- “all in one” included
- cas traits: art loverandhigh maintenance
RU:
- 20 женских поз
- для режима жизни и для КАС
- “все в одной” включены
- черты характера: искусствовед и высокие запросы

Download:patreon (free) / sfs
Recommended mods/Рекомендуемые моды:
Pose Player/Teleport Any Sim/T.O.O.L.
Used CC: Hair1/2/Whiskers/Dress/Stockings/Shoes
Post link


Male sim without name №34
Game Version:1.80.69.1030
Download + CC List
Note: A little gift for New Year. Only first pic is edited, others ones from CAS. Be aware, If you use height sliders this man will be pretty tall in game! I also added face scars in the post, because I was too lazy to post them separately. Hope you enjoy the guy in your game! Happy New Year!
Post link


Christmas Set 2021
Deer Horns
- hq compatible
- base game compatible
- 12 swatches
- available for all genders and all ages
- new mesh from scratch
- all lods
- specular and emission maps
- lod0 polycount: 940
- proper tags
Stars Blush
- hq compatible
- base game compatible
- make up sliders compatible
- 15 swatches
- available for all genders and all ages
- overlay and non-overlay versions
- specular map
- proper tags
Tights
- hq compatible
- base game compatible
- 15 swatches
- available for all genders and all ages
- specular and no specular versions
- edit of EA’s textures
- specular map
- proper tags

Download:patreon (free) | sfs
Previews were done with HQ
Merry Christmas and Happy New Year!
Post link


Female Ripped Jackethq compatiblebase game compatible15 swatches")
Female Ripped Jackethq compatiblebase game compatible15 swatches")
Female Ripped Jackethq compatiblebase game compatible15 swatches")
Female Ripped Jackethq compatiblebase game compatible15 swatches")
Female Ripped Jacket (+ Acc T-Shirt)
Female Ripped Jacket
- hq compatible
- base game compatible
- 15 swatches
- female only
- edit of EA’s mesh
- all lods
- specular/shadow/normal maps
- lod0 polycount: 3838
- proper tags
Acc T-Shirt
- hq compatible
- base game compatible
- 15 swatches
- gloves/tights/socks categories
- long and crop versions
- edit of EA’s textures
- specular/shadow maps
- proper tags

Download:patreon (free) | sfs
Previews were done with HQ
Post link


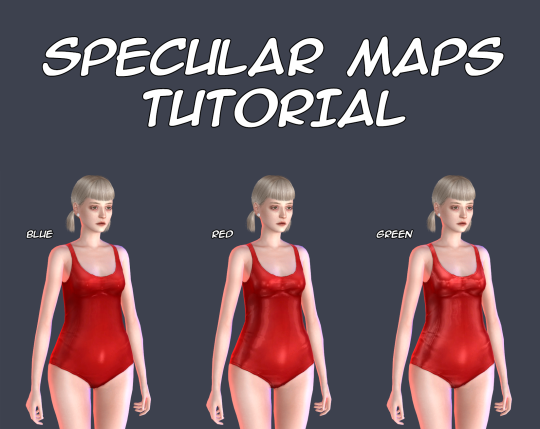
There is no so many information about these maps and most of this information is too difficult for my understanding, so I decided to make my own tutorial about them.
This tutorial shows you how to make your own specular maps from scratch without using EA’s maps as a base. You can read it under the cut.
Note: English isn’t my native language and I’m pretty bad in writing in it, so sorry for any mistakes. Still hope this tutorial will be understandable for you.
First of all I recommend you to check out this tutorialfor specular maps. It’s for build CC and it’s in Russian (still can translate it with google), but it has some nice examples. It also helps me a lot to understand the process.
That you need? Any image editor that supports dds format and alpha channels. In my case it’s Photoshop C6. You also need to download dds plugin for it.
Let’s start!
I’ll be working with this EA’s swimsuit.

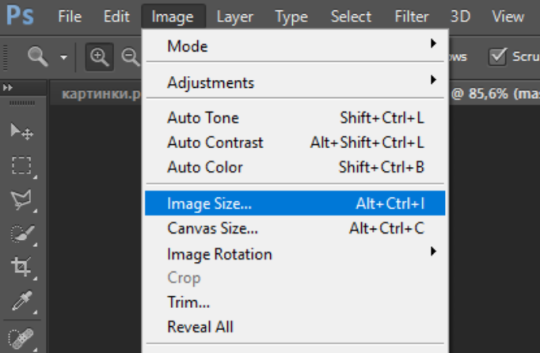
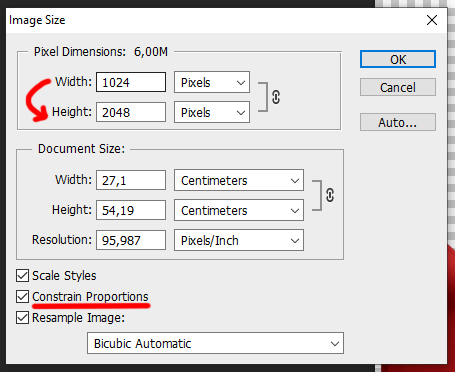
1. Open your texture in Photoshop. For now, we need change image resolution. If you make non-hq texture the size for your normal map should be 512*1024 pixels, if hq then 1024*2048 pixels.
Easy way to doing it is to go to «Image->Image Size», copy the first value and past it in the second. Don’t forget to check out «Costrain Proportions». It should be turn on.
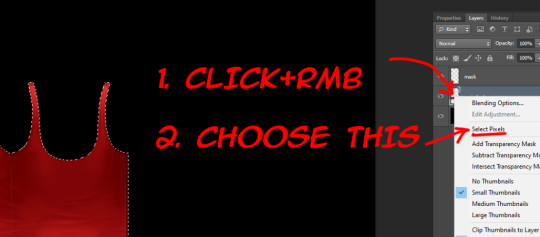
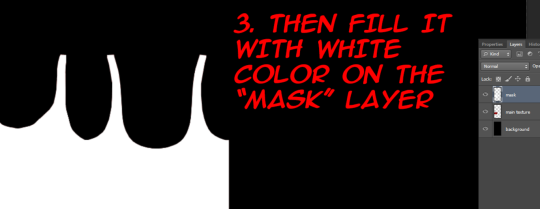
2. Now make new layer under the layer of texture and fill it with black color, lets name it «background» and the texture as «main texture». Then create the another new layer, name it «mask». It should be the plain white copy of the «main texture» like in pics below.
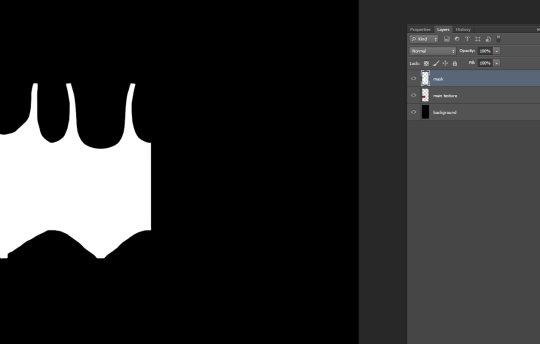
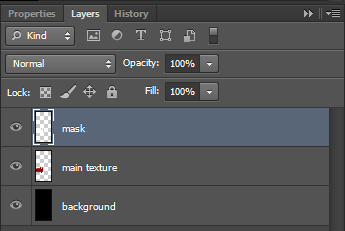
Easy way to doing it in Photoshop:
3. Save the file as psd format. This is our base for the specular maps.
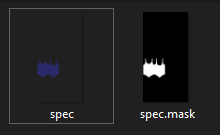
4. At the first we should make mask map. This map is needed for avoiding speculars from others CAS items to overlap your own. Examples can be found here.
Formask map you need to delete «main texture» layer, merge remaining layers in one and save file in dds format. Name it «spec.mask».
The saving settings which I use for dds plugin.
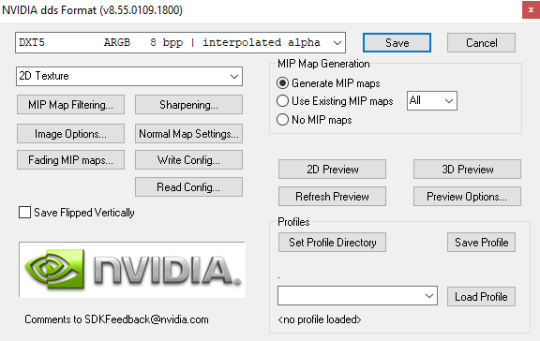
Note: If you want to make your specular map without any shines you need to save your mask map as DXT1 and spec map as DXT5, otherwise your specular maps will be broken in Studio.
5. Close your psd file without saving and open it again. Now we start to make the spec map. It’s responsible for the shine.
There is two ways. You can work with plain texture or with texture itself. The first option is good for clothes with normap maps, the second can be pretty useful for make up, stockings, gloves and ect (the CAS items which can’t have normal maps).
In this tutorial I’ll be working with plain texture.
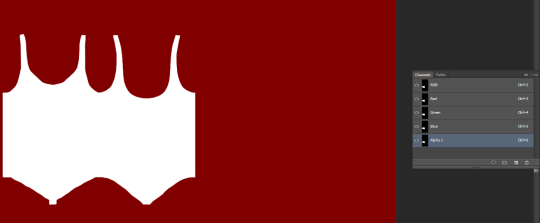
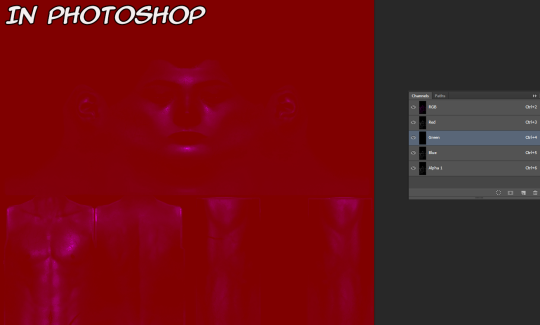
Merge all textures again. Select the layer and copy it (ctrl + A and ctrl + C).
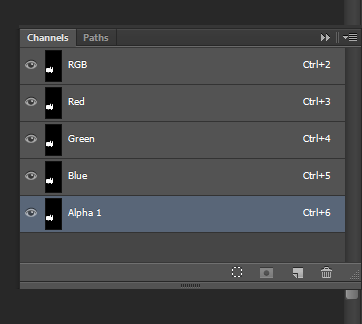
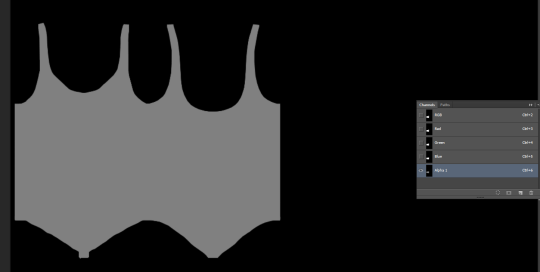
Go to channels and create Alpha channel. Paste your layer in this Alpha channel (ctrl + V).
Should be looking like this.
I will use lighter shades of gray to make the tutorial more obvious. But for my CC I personally use more darker shades to make CC barely shine.
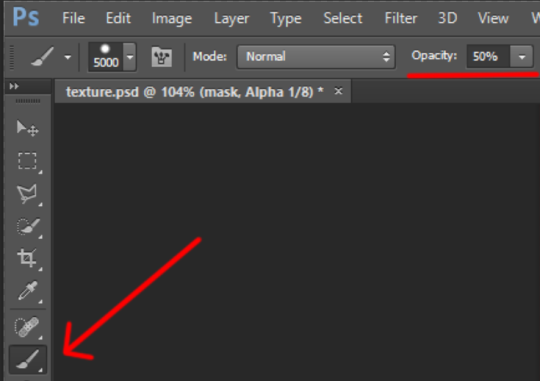
Choose “Brush Tool” with black color and put it’s Opacity to 50%.
Note: You also can use “Paint Bucket Tool” or “Brightness/Contrast”, but they don’t always work fine, so be aware of that.
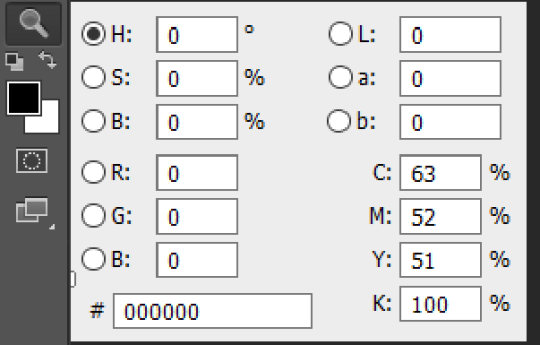
The choosen color should be black! (#000000 color code)
Make the size of brush big enough to color in channels in one touch.
Go to channels. I decided to color in Alpha channel in 50% Opacity.
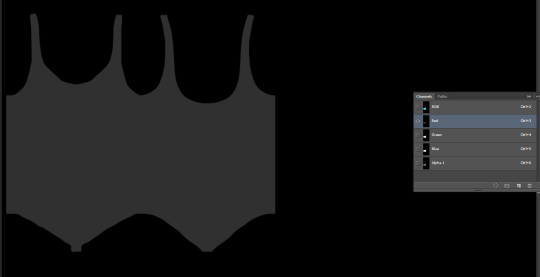
Red channel in 80%. (Put Brush Tool’s Opacity in 80%. Make sure the color is still black.) The same way with Greenchannel.
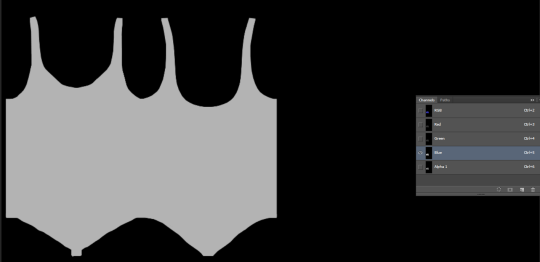
ForBlue chanel I chose 30% Opacity.
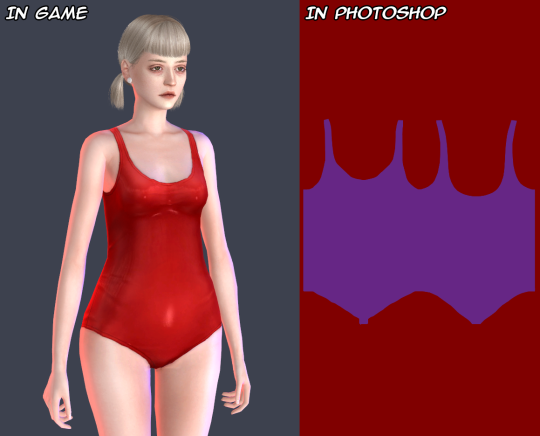
Make all channels visible. The result should be looking something like this. Making different shades of gray in different channels causes the diffent results in game, so I recommed to test this channels more to get more interesting results.
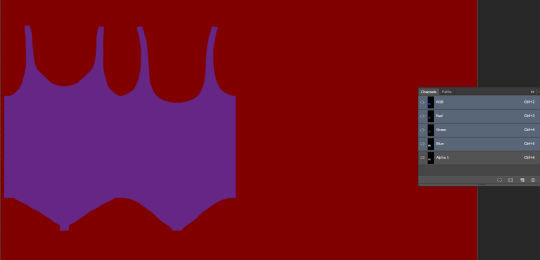
Note:Make shure that the area around your texture is still black while Alpha channel invisible and red while all channels is visible! Otherwise the whole body of your sim and any CC without mask map will be shiny!
6. Save your file as dds format, name it “spec”. You can close your psd file without saving it or saving it as another file, if something goes wrong.
Your specular maps should be lookig like this.
Note: If you name your spec map as “myspecmap”, the mask map also should have the same name, but with “.mask” in the end ( for example: “myspecmap” and “myspecmap.mask”). Otherwise Studio won’t see your specular maps.
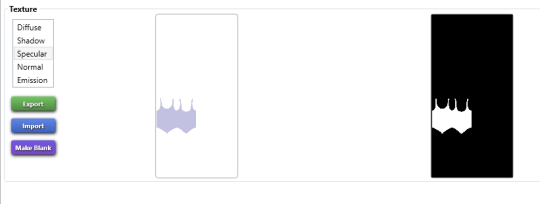
7. Open your CC in Studio and put your specular maps back. Choose one of the files, the other file will be placed there automatically.
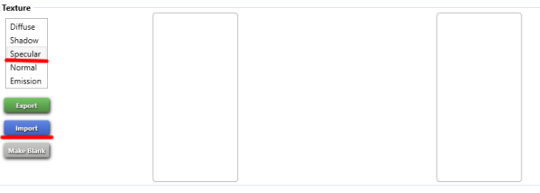
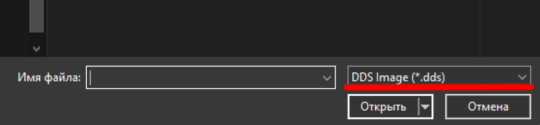
Don’t forget to change to dds format while looking for your maps.
Should be looking like this. The first map is transparent and the second is black and white. It’s important!
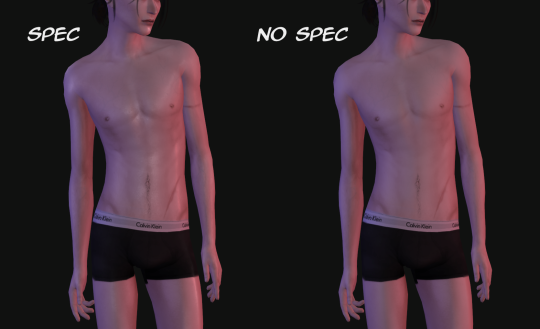
8. Lets check out our maps in game! I also made others specular maps to feel the difference between their effects.
IfBlue channel is lighter than others RGB channels. Result of the tutorial.
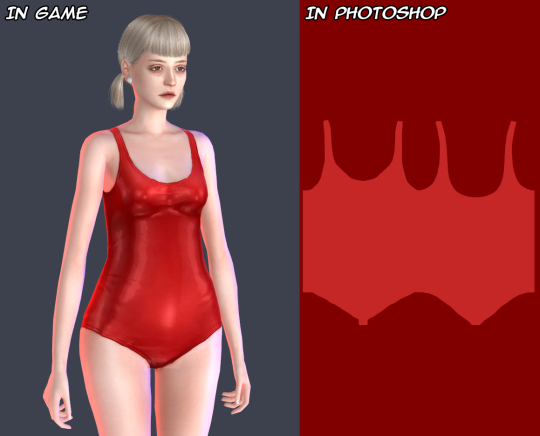
IfRed channel is lighter than others RGB channels.
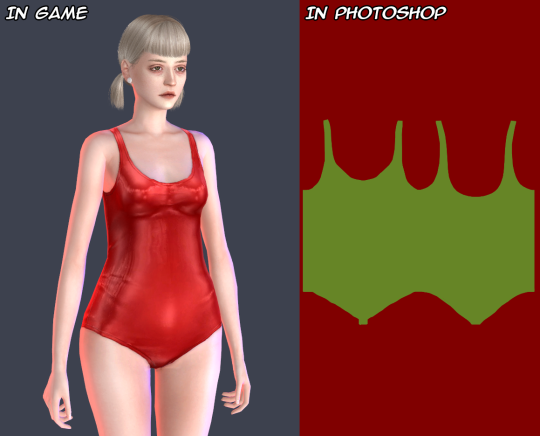
IfGreen channel is lighter than others RGB channels.
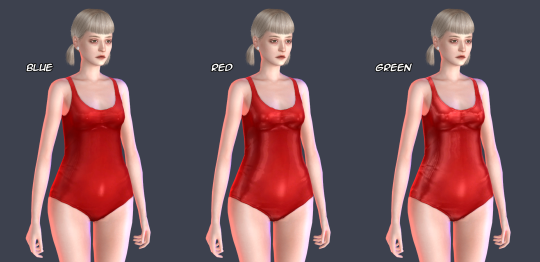
For a better view.
And another example how specular maps can be used. You can make speculars with wet skin vibes for your sim. I used skindetails by obsurus-sims and by me.
Note: Make shure not posting for public such СС and use it only for personal uses or with creator’s permission! Let’s respect the work of others creators!
That’s all! Maybe in future I’ll add more information about specular maps and some tricks. But for now the language barrier still is problem for me :(
Hope it’ll help you somehow! Wish you good luck and inspiration for your future creations!


Female Sport Set
Crop T-Shirt
- hq compatible
- base game compatible
- 15 swatches
- female only
- change the logo in gloves category
- edit of EA’s meshes
- all lods
- specular/shadow/normal maps
- lod0 polycount: 3308
- proper tags
Sport Shorts
- hq compatible
- base game compatible
- 10 swatches
- female only
- retexture of EA’s mesh
- specular/shadow/normal maps
- proper tags

Download:patreon (free) | sfs
Thanks to mothz for the patterns
Previews were done with HQ
Post link


Cutie Shoes & Cutie Socks
Cutie Shoes
- hq compatible
- base game compatible
- 10 swatches
- female only
- edits of EA’s meshes
- all lods
- specular/shadow/normal maps
- lod0 polycount: 718
- proper tags
Cutie Socks
- hq compatible
- base game compatible
- 10 swatches
- available for all genders and all ages
- long and short versions
- shadow map
- proper tags

Download:patreon (free)|sfs
Previews were done with HQ
Post link


- hq compatible- base game compatible- 20 swatches- edits of EA’s me")
- hq compatible- base game compatible- 20 swatches- edits of EA’s me")
- hq compatible- base game compatible- 20 swatches- edits of EA’s me")
Base T-Shirt (Female & Male)
- hq compatible
- base game compatible
- 20 swatches
- edits of EA’s meshes
- all lods
- specular/shadow/normal maps
- lod0 polycount female: 3512
- lod0 polycount male: 3352
- proper tags

Download:patreon (free)|sfs
Previews were done with HQ
Used CC:
Emon:Hat/Hair/Bottom/Bracelet/Earphones/Pose
Post link


Halloween Set 2021
Zombie Dress
- hq compatible
- base game compatiple
- 10 swatches
- fullbody
- female only
- new mesh (edit of EA’s meshes)
- specular and normal maps
- all lods
- lod0 polycount: 4536
- find skeleton feet in shoes category
Witch Dress
- hq compatible
- base game compatible
- 20 swatches
- fullbody
- female only
- new mesh (edit of EA’s meshes)
- specular and normal maps
- all lods
- lod0 polycount: 4864
- normal version of Zombie Dress
Zombie Poses
- 10 poses
-ingame and cas
- “all in one” included
- cas traits: sloband greenfiend (неряха и экоэнтузиаст)

Download:simfileshare/mediafire
Thanks to nitrateforblood brushes andmothz for the patterns (1/2)
Previews were done with HQ
Happy Simblreen!
Used CC: Hat1/2/Earrings/Shoes1/2
Post link


Male Acc Top
- hq compatible
- base game compatible
- available for all genders and all ages (but looks better on males)
- crop and tucked versions
- specular & shadow maps
- 20 swatches
- gloves/tights/socks categories
- proper tags
- edit of EA’s textures

Download:simfileshare/mediafire
Previews were done with HQ
Post link

Pixicat Simple Boots Update
Specular map was changed (it less shiny now). Lods and normal map also were updated. I also properly converted shoes for males.
HQ/BGC/Low Poly/15 swatches/Specular and normal maps/Proper Tags
lod 0 polycount: 1646

Download shoes for males
Download shoes for females
Download shoes for children and toddlers