#nyulibraries

Happy Preservation Week! (Part 5 :)
Hello again, and Happy Preservation Week, everyone!
This is the 5th and final installment of our Preservation Week 2021 blog series, if you missed Part 1,Part 2,Part 3orPart 4, feel free to check them out first!
In our previous post (Part 4), I described the preservation of a set of unexposed Daguerreotype plates and the original wooden box they were issued in. For those objects, I made an (admittedly) complex preservation enclosure that will keep everything safe in storage, but it might be a little confusing to the next person who opens the box. Sometimes it’s hard to make a simple, easy to use preservation enclosure… you find yourself making a series of “simple” decisions that snowball into something complex and baffling!
In this, our final Preservation Week post, I’ll discuss a preservation enclosure that needed to fulfill a lot of different requirements, and the object that it houses is one which I never expected to find in a library! This object is part of the Outpunk Archive at NYU, which contains materials from 1989-1998 relating to Outpunk (both the zine and the queercore music label). While most of the collection consists of papers, photographs, and music recordings, there are also several T-shirts and …a skateboard!

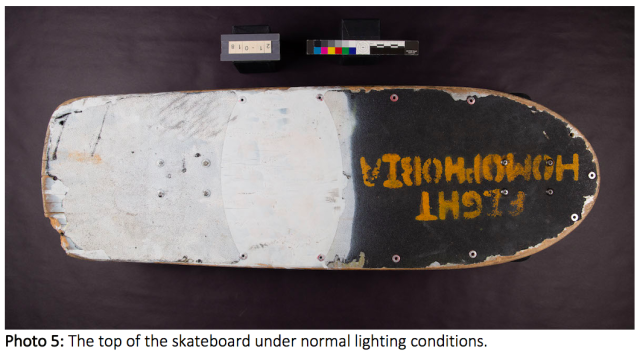
Apparently, a member of the Riot Grrrl movement owned and adorned this skateboard: one half of the top of the board is spray painted white, and the words “FIGHT HOMOPHOBIA” are spray painted in orange on the other half (Photo 1). Lots of stickers, self-adhesive labels and zine-style xeroxed drawings are pasted to the bottom surface of the board (Photo 2). This person probably lived in San Francisco in the late 1990’s, because one drawing asserts that “The Mission Bay Project SUCKS!” (Photo 3).

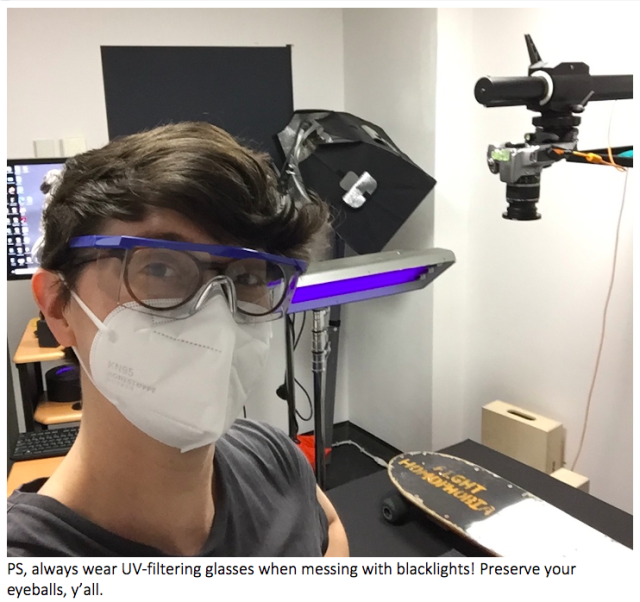
A few of the papers are bright yellow, orange or green, and these glow brightly under UV, suggesting that the papers contain daylight fluorescent pigments (Photo 4). These pigments look unusually bright in sunlight because they absorb UV radiation and reflect it back to the eye as visible light. While we were examining the top of the board under UV, we found yet another message hidden beneath the white paint… at one point, the owner of this skateboard believed that “FASHION IS A SCAM”, but she later decided to paint over this message (Photos 5-6).

So… why the heck was this skateboard in the conservation lab? Well, it’s a lot bulkier than the average library book, and since the wheels work perfectly we couldn’t just leave it on a shelf! We needed to give the skateboard a preservation enclosure to keep it from rolling around in the stacks, or being mistaken for an NYU student’s property. Most of all, we wanted to give the skateboard a preservation enclosure to prevent its minor damage from getting worse: the plywood board is cracked and splintering at one corner, the sandpapery grip tape is flaking off around the edges, and most of the stickers and drawings are torn and/or curling. We briefly discussed whether we should perform a little conservation work to stabilize these parts of the board; in the end, we decided that we didn’t want to obscure evidence of the skateboard’s use, and everything was stable enough to withstand gentle handling. …Some may be thinking, “COME ON, it’s a skateboard! This is ridiculous.” To that I say, it’s part of an archive now! We have to treat it carefully, so it lasts a long time. :)
The library’s curators are interested in showing this skateboard during classes, and it’s possible that the object will be requested frequently in the Special Collections reading rooms. As you may recall, the main purpose of my Daguerreotype enclosure was to keep all of the components safe during storage and transit, but the skateboard’s enclosure needed to fulfill two additional requirements: it needed to be simple enough for anyone to unpack/repack easily, and because the skateboard is double-sided, the enclosure needed to function as a double-sided display mount. Under the supervision of Jessica Pace, Preventive Conservator, I created a simple preservation enclosure that would protect the skateboard and allow the curators to safely display either side.

We started by ordering a custom archival box with a drop-wall, which allows you to remove a bulky object more easily (Photo 7). Because the skateboard is a bit heavy and awkward, I also made a handling tray from cross-laminated sheets of archival corrugated cardboard. This tray (Photo 8) allows you to pull the skateboard out of the box, rather than lifting it. I also adhered strips of corrugated board to the bottom of the tray which adds a little more rigidity and allows for air-flow underneath when the tray is pulled out of the box. We decided it was best to store the skateboard wheels-down, so we had to find a way to prevent it from moving around in the box, or rolling off a table. Jessica thought it would be easiest to create bumpers on either side of the wheels, so I experimented with pieces of “Ethafoam” (low-density polyethylene foam, Photo 7). I cut four narrow strips of Ethafoam, and I wrapped them in a sheet of Tyvek fabric to prevent the foam from shedding bits of plastic inside the box. I used low-melt glue to adhere the foam to the handling tray, and I attached a pair of cotton pull-tabs to either side of the tray, to help people remove it from the box. The foam bumpers not only keep the skateboard stationary, but they can function as a display mount when someone wants to see the underside of the board. You can see the final enclosure in Photos 9-10, below:

Again, this was purely a preservation treatment, because the skateboard is in fairly good condition, despite minor damage. We chose not to repair this damage because it reflects the owner’s use of the skateboard, and the damage is not yet severe enough to threaten the object’s structural integrity. This simple preservation enclosure will prolong the life of the object and allow for conservation treatment in the future, if that becomes necessary. It may seem a little strange to treat this 20-year-old skateboard as though it were an ancient relic! I’ll admit, there were times when it felt a little absurd to apply my book and paper conservation skills to an object that (on the surface) looks like nothing special. If all goes well, however, the skateboard will survive for as long as the Daguerreotype plates or the 16th century parchment book… if so, the skateboard will teach future generations about late 20th century feminism and politics, queer history, punk rock, and alternative transportation!
Thank you so much for reading about our preservation activities at NYU Libraries this week, and thank you for supporting your local libraries!
Happy Preservation Week,
-Cat Stephens
Happy Preservation Week! (Part 4 :)
Hello again, and Happy Preservation Week, everyone!
This is Part 4 of our Preservation Week 2021 blog series. If you missed Part 1,Part 2orPart 3, feel free to check them out first!
In Parts 2 & 3 I described two treatments that illustrate the ways in which conservation and preservation can be applied to old / extremely old library books. Today, I’ll focus mainly on preservation, and why we sometimes choose not to conserve an object.
Last November, I had the opportunity to preserve an unusual piece of photographic history: a small, mid-19th century wooden box containing 24 unexposed Daguerreotype plates (Photos 1-2). The Daguerreotype was invented by Louis Daguerre around 1839, and it was one of the first commercially viable processes that made photography and portraiture more accessible to the general public. Daguerreotypes were commonly produced until about 1860, when they were replaced with less expensive photographic processes, like the Ambrotype and the tintype.

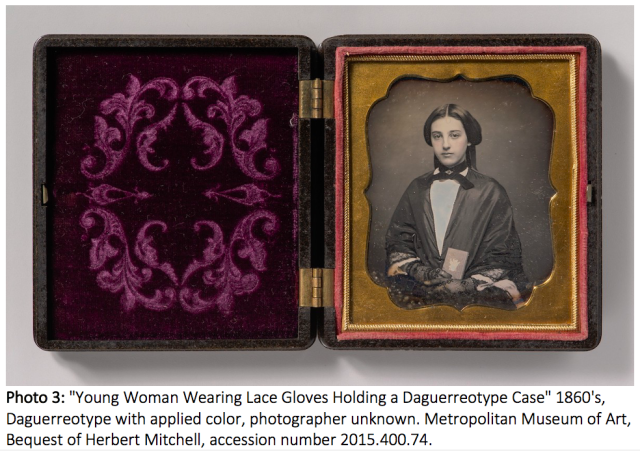
Each Daguerreotype plate is made from a very thin sheet of copper, which is covered with an even thinner layer of highly polished silver (Photo 1). The wooden box that the plates were issued in originally contained 72 plates. The box’s longer walls have 36 vertical channels cut into them, allowing two plates to be inserted into each slot. After a Daguerreotype plate was sensitized, exposed, and developed with mercury fumes, the photograph was immediately packaged inside a small glass-fronted case. An example of a Daguerreotype in its original case (from the Metropolitan Museum of Art) is shown below, in Photo 3. These cases were meant to protect the delicate beads of mercury-silver amalgam that form the image, and, if a relatively tight seal was achieved around the plate, the glass could prevent air pollution from tarnishing the silver.
The unexposed Daguerreotype plates in Photo 1 are exhibiting varying levels of silver tarnish and copper corrosion, because they were stored in their original wooden box for a very long time. The center of each plate is less tarnished than the edges, probably because the center was less exposed to the air. The manufacturer’s box has also seen better days, unfortunately: its lid is missing, and its green paper label is water damaged, suggesting that the box fell victim to a leaking roof or a burst pipe. Worst of all, one of the longer walls is cracked down the middle, and one half of this wall is nearly detached from the floor of the box. Under the supervision of Laura McCann, Conservation Librarian, I designed a preservation enclosure for the Daguerreotype plates and their wooden box. Again, we decided to preserve these 25 objects in their current states, rather than trying to repair their damage.
Our decision to not perform conservation treatments on these objects was motivated by several factors: the tarnish on the silver plates tells an interesting story, and polishing the silver would not only change that story, it would necessitate the removal of some original material. And what would be accomplished by removing the tarnish, other than obscuring historical evidence? It’s unreasonable to expect 150 years old plates to look “new!” Similarly, the wooden box has a broken wall, but what would be accomplished by gluing it back together? The box still wouldn’t be strong enough to protect the Daguerreotype plates on its own, and, of course, its lid is still missing. Lastly, there are always more projects flowing into the lab, so why waste time by over-treating a stable object? Better to protect what already exists.
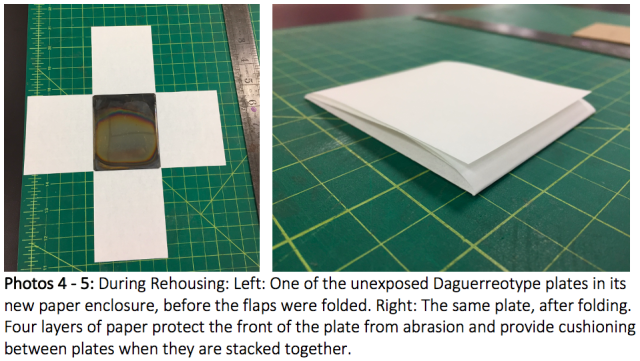
I began by enclosing each of the Daguerreotype plates in a 4-flap paper wrapper to protect the metal surfaces from abrasion and from further exposure to pollutants (Photos 4-5). The paper that I chose is unbuffered, and it passes the “PAT,” or Photographic Activity Test. This is important, because materials that are not PAT-passed might chemically interact with photographs and accelerate their degradation. I selected an archival storage container that was large enough to house both the plates and the wooden box, and I had to consider how everything would be stored inside it. Laura decided that it was safer to store the plates vertically (the same way they had been stored in their wooden box), so I created two small trays to hold them upright. I thought it would be best to divide the metal plates into two groups, which would balance their considerable weight inside the new enclosure… if one side of a box is much heavier than the other, an unsuspecting person might drop it!

The two trays (Photo 6) have a hollow, removable insert which keeps the plates upright in storage, but which can be removed for easier access to the plates. I wrapped the exterior of the wooden box in a piece of Mylar (thin, clear polyester film) and I inserted a piece of flexible foam (Volara) in the back compartment, to hold the broken wall upright (Photo 7). The Mylar will protect the delicate paper label from abrasion, and it supports the broken wall from the outside. Finally, I created a carrying tray with cotton straps, so that the wooden box can easily be lifted out of its archival box. The final enclosure (Photo 8) Looks a little intimidating when you first remove the lid, but its primary purpose is to protect the object from further damage in transit or storage:

This treatment was pure “preservation”; unlike the 19th century publisher’s bindings that I treated, no amount of repair would allow this object to safely return to the stacks all by itself. An enclosure was necessary because of the sheer number of loose components in this object, and because the lidless wooden box is no longer capable of protecting its 24 plates. This enclosure will keep everything together and will keep the objects safe and dust-free in storage, while still leaving the door open for future conservation work!
Thanks for reading, and stay tuned for tomorrow’s final Preservation Week 2021 blog post, where I’ll discuss the preservation of a Riot Grrrl’s skateboard (see photo below!)
-Cat Stephens

Happy Preservation Week! (Part 3 :)
Hello again, and Happy Preservation Week, everyone!
This is Part 3 of our Preservation Week 2021 blog series, if you missed Part 1orPart 2, feel free to check them out first!
Not long after I finished treating my set of 1891 publisher’s bindings (see Part 2), I had the chance to conserve/preserve one of their Renaissance ancestors. The little book shown in Photos 1-2 is a 1541 Latin translation of a text by Aristotle, and its parchment cover is an example of 16th century recycling!

This type of binding is a “limp vellum” laced-in case, and it was made from a sheet of parchment that someone had previously used to sketch architectural columns (see Photos 3-4.)
In Photo 3, if you turn your head sideways, you can see the base of a column near the bottom left corner, and on the right side, near the spine, you can see a drawing of a Corinthian column. These drawings are difficult to see under normal lighting conditions, but the ink (probably iron gall ink) shows up very well under UV. The recycled parchment binding was probably very flexible when the book was bound, but today the cover is stiff and difficult to open. As you can see, it has also detached from the text, and it functions more like a protective folder than a book cover. Apart from this obvious structural problem, the book is in relatively good condition, and I took a minimally-invasive approach to treating it, under the supervision of Lou Di Gennaro, Special Collections Conservator.

I began by adding a few teeny tiny spine linings between the raised bands on the spine of the text block. The book originally had a pair of parchment spine linings, but these are still attached to the parchment text: in Photo 2, a pair of horizontal strips of parchment span the fold in the parchment case. These two strips of parchment were adhered to the back of the text, and this was the main attachment point between the text and the parchment covers. The text could still be handled and read without its original spine linings, but it was more vulnerable to damage (especially because the spine’s loops of sewing thread kept trying to slip off the raised bands!) We decided to apply small strips of Japanese long-fibered kozo paper between the raised bands (Photo 5). I applied these with wheat starch paste (Photo 6) and when they had dried they provided a measure of almost-invisible strength to the spine.

After the spine was consolidated with kozo paper, we considered how to address the binding. It would have been very satisfying to reattach the parchment case to the text… it was clear that this approach would have caused even more damage to the book eventually, though, because of the force that would be required to open it. Fifty or more years ago, conservators might have taken the text apart, washed all of the pages, resewn the book, and given it a brand new parchment cover. In the past, this was considered the best way to preserve a 480-year-old book, but today, most conservators agree that it’s better to preserve these books in their current condition, as much as possible. We decided to leave the parchment cover separate from the text, and to allow it to continue functioning as a protective wrapper. The only difficulty with this decision was that the inside of the parchment cover had several sharp edges that were scratching the outermost pages. Most books have a few blank pages at the beginning and end of the text (“endleaves”), because the first and last pages are very vulnerable to damage. This little book didn’t have any sacrificial endleaves, so we decided to add some (Photos 7-8).

I chose a modern paper of a similar weight and color, and I folded two pieces of it to create a pair of endleaves at both the front and back of the book. Using wheat starch paste, I adhered the folds to the very edge of the first and last pages. The new endleaves look a little too clean when compared to the original paper, but they will protect the first and last pages from abrasion. They can easily be removed from the book later, if another conservator disagrees with this approach, and believe me, there is a long tradition of conservators questioning the decisions of their predecessors! Finally, I created a custom-fit preservation enclosure for the book (Photos 9-10).

This 4-flap wrapper with a rigid outer case will protect the book from light damage, dust, and abrasion, and it’s always better to slap a barcode on the enclosure than on the rare book itself! Additionally, this wrapper will buffer the parchment from fluctuations in temperature and humidity; parchment can shrink or expand quickly, depending on how dry or humid the air is, and over time these cycles of expansion / contraction can weaken the binding. Again, this treatment involved a bit of “conservation” and “preservation.” The physical alterations that I made to the book were minimal, and these changes are more preventive / functional than aesthetic. The preservation enclosure will make the book look a little less pretty on the shelf, but it’s much safer now!
Thanks for reading, and stay tuned for tomorrow’s installment of our Preservation Week 2021 blog series… I’ll discuss the preservation of a set of 24 unexposed Daguerreotype plates and the wooden box that they were purchased in (see photos below!)
-Cat Stephens

Happy Preservation Week! (Part 2 :)
Hello again, and Happy Preservation Week, everyone!
This is Part 2 of our Preservation Week 2021 blog series. If you missed Part 1, feel free to check it out first!
As I mentioned yesterday, “preservation” and “conservation” refer to slightly different activities in libraries and museums, but they both aim to prolong the lives of cultural heritage objects. Often, a conservation treatment can also qualify as a preventive measure (aka preservation), especially when the treatment reunites detached elements or returns a kinetic object (like a rare book) to a functioning state. This return to functionality preserves access to the text, which is especially important for out-of-print books, and those that haven’t been digitized yet. For example, the book shown in the photos below couldn’t be handled or read safely, because parts of it were broken, detached, and in danger of being lost:

This book is an example of a late 19th century publisher’s binding, and unfortunately, these colorful, mass-produced books are usually very fragile today. Publisher’s bindings were made to look attractive without being very expensive, so they were often produced using cheap, poor quality materials. For fragile books like this, damage usually occurs at the spine, because this area absorbs most of the physical stress imparted by reading. The damage shown in these pictures is commonly seen with 19th century publisher’s bindings: the spine cloth is brittle and torn in several places (Photo 1), and the sewing is breaking, resulting in the detachment of several pages (Photo 2). Ironically, this particular book may have been damaged by photocopying or by the process of microfilming, an outdated preservation technique that was popular in libraries until the advent of digital imaging. The simplest way to preserve this book might be to give it a custom-fitted box, which would protect the book from further harm and would hold all of the fragments together. Another way to preserve a book is to repair the damage and restore its function, in other words, to conserve it!

Under the supervision of Dawn Mankowski, Special Collections Conservator, I began conserving this book by carefully removing the book’s original spine lining, a piece of printed waste paper that was probably cut from an 1890’s magazine (Photo 3). This is much easier to do when the spine cloth is already torn! I put this interesting scrap aside, and I strengthened the spine with a new, stronger lining of Japanese long-fibered kozo paper (Photo 3). Next I took the detached pages and resewed them into the book, through the newly-strengthened spine. I then adhered the spine’s original printed waste lining on top of the work I had done, to ensure that none of the book’s original material was lost. Now that the structural work on the spine was finished, I could tackle the main aesthetic problem: the torn spine cloth. I laminated two sheets of kozo paper to make a thicker and stronger sheet, and I toned this laminated sheet dark blue with watered-down acrylics. I gently lifted the cloth away from the board joints and I adhered my blue kozo paper underneath the cloth on one side of the book (Photo 4). After the adhesive was dry, I molded the kozo paper around the curved spine and adhered it underneath the cloth on the other side of the book. I then adhered the original cloth fragments on top of the blue kozo paper, which acts as an invisible bridge underneath the torn cloth. Now the book can be handled and read without fear of exacerbating the old damage.

This was obviously a “conservation” treatment, because it involved a relatively invasive physical intervention to repair prior damage. This treatment has a significant element of “preservation” however, because all of the book’s original material was secured against loss, and the book’s kinetic function was restored, ensuring the preservation of the text. (Of course, another copy of the novel has been digitized and isavailable for free online, but you get the idea!) Throughout this process, I used water-based adhesives like methylcellulose and wheat starch paste, so that my work can be undone or redone by another conservator in the future. In book and paper conservation, we try to avoid synthetic adhesives like polyvinyl acetate (PVAc) as much as possible, because these tenacious glues are very difficult to remove. When we decide to conserve an object, we always strive for “reversibility” (or, more realistically, “re-treatability”) just in case our repairs fail or they cause unexpected harm to an object. Although it’s impossible to completely reverse the damage that occurred to this book over the course of 130 years, I have hopefully prevented the damage from worsening!
Thanks for reading, and stay tuned for tomorrow’s installment of our Preservation Week 2021 blog series: I’ll discuss the conservation/preservation of a book published in 1541, bound in recycled parchment (see photos below!)
-Cat Stephens

Happy Preservation Week! (Part 1 :)
Happy Preservation Week, everyone!
I’m Cat Stephens, an Andrew W. Mellon Fellow studying Library & Archive Conservation at NYU’s Institute of Fine Arts. At the IFA, I’m earning an MA in the History of Art and Archaeology, and an MS in the Conservation of Historic and Artistic Works, specifically in the conservation of books, paper objects, and photographs.

Students in my graduate program have the option to spend their year-long graduate internships almost anywhere in the world, but I chose to stick around and intern at the NYU Libraries’ Barbara Goldsmith Preservation & Conservation Department… In addition to being awesome at their jobs, the conservators here are excellent teachers, and I’ve always been impressed by the range and volume of treatments that they perform every year! Additionally, NYU has done an impressive job of reducing the spread of Covid-19 on campus, and I feel very lucky that my internship was not severely impacted by the University’s precautionary measures. Since September 2020, the library’s preservation staff and I have had the option to work in the library for 2-4 days every week, and we catch up on paperwork during our teleworking days.
Over the last seven months I’ve worked on many treatments that have helped me understand the finer points of library preservation, and I’ll describe four of my favorite preservation/conservation treatments for you over the next four days. These treatments include a 19th century publisher’s binding, a 16th century book bound in recycled parchment, a wooden box full of unexposed Daguerreotype plates, and … a skateboard??

But first, unless you’re a library or museum professional, you may be wondering what Preservation Week is, and how does “preservation” differ from “conservation?” For cultural heritage institutions, Preservation Week is a yearly opportunity to draw public attention to the importance of preserving cultural heritage materials of all kinds. These materials may include modern books, medieval manuscripts, audio/visual materials like VHS tapes and home movies, photographs, scrapbooks, textiles, digital data, paper documents, and metal, wood or glass objects, just to name a few. Many of these materials are held in libraries and museums for public enjoyment, but perhaps many more are sitting in our basements and attics! If you have special things at home that you want to preserve, there are many online resources available to you, and I’ve provided links to some of them at the end of this post.
For conservators and other preservation professionals, Preservation Week is a good time to consider the enormous range of objects that we’re tasked with caring for, and to think about new ways to preserve and conserve them for the next generations. In libraries and museums, “preservation” and “conservation” refer to slightly different activities, but they both contribute to the wellbeing of cultural heritage objects. “Conservation” refers to any physical interventions performed on an object, such as cleaning, making repairs, or compensating for parts that have been lost. A conservation treatment can reduce the stains in a flood-damaged drawing, or it can transform a pile of ceramic sherds back into an ancient vase. “Preservation” usually encompasses the activities performed aroundan object which will minimize the object’s chemical and physical deterioration over time. Preservation activities include the making of enclosures to protect objects from physical harm, dust, or light damage, the management of pests, and the careful control of temperature and humidity in storage facilities. Preservation and conservation are two sides of the same coin, and many argue that “preservation” is the broader term which includes conservation activities. This point of view is often held in libraries, where the objects (usually books) are not just static relics of the past, they are vehicles of information; to access this information, books must be handled, and they must be able perform a kinetic function. For this reason, any conservation treatment that restores functionality to a broken book can also be considered “preservation.” Of course, many old or rare books have been digitized and made available online, but even so, scholars often want to verify and augment their online research by perusing the original book… there’s no digital substitute for the real thing :)
Thanks so much for reading, and stay tuned for tomorrow’s installment of our Preservation Week 2021 blog series, where I’ll discuss the conservation of a novel published in 1891 (photos below!)
-Cat Stephens

Some At-Home* Preservation Resources:
American Institute for Conservation (AIC): “Caring for Your Treasures”
American Library Association: “Saving Your Stuff”
FEMA (Federal Emergency Management Agency): “Salvaging Water-Damaged Family Valuables and Heirlooms” … (Fact Sheets are available in English, Chinese, Vietnamese, Haitian Creole, Portuguese, and Spanish):
Minnesota Historical Society: Preserving “Clothing and Textiles”
National Archives: “How to Preserve Family Archives (Papers and Photographs)”
*But sometimes a problem is so complex that it requires a conservator… AIC’s “Find a Conservator” tool can help!https://www.culturalheritage.org/about-conservation/find-a-conservator

Over the course of the week, the Preservation Department staff have been delighted to share a wide array of films, images, and writing about our current work in celebration of Preservation Week. Last, but not least, we are introducing a brand-new podcast. Hosted by our very own Ben Moskowitz, Tales from the Archives, explores archival collections and the stories behind those collections through the people who work on them.
In this inaugural episode, Ben speaks to colleague Biff McKeldin about his background and work in the Division of Libraries. They discuss Biff’s audio preservation experience, and the particular resonance of the recordings held in the Flaherty Film Seminar Archives held in NYU Special Collections. As today is May Day, it is the perfect moment to celebrate the contributions of one of our longest-standing Preservation Department staff members. Kudos to Ben and Biff and a very special thanks to the Library Lab for the support of this new endeavor!
Listen here: Tales From the Archives, Episode 001
Post link
by Laura Juliano, NYU Graduate Student, Public History and Archives
The Textile Workers Union of America Scrapbooks WAG 249, is a collection in the Tamiment Library at NYU Special Collections. The Textile Workers Union of America (TWUA) was an industrial union of textile workers established through the Congress of Industrial Organizations in 1939 and which merged with the Amalgamated Clothing Workers of America to become the Amalgamated Clothing and Textile Workers Union (ACTWU) in 1976.
Work in the Lab:
During my time in the NYU’s Barbara Goldsmith Preservation & Conservation Department, Book and Paper Conservation Lab, I was part of a project to complete the second step of the TWUA’s iterative process: creating access by opening up the scrapbooks from their bindings and rehousing the material.

Western Union Telegram, 1917; Textile Workers Union of America Scrapbooks, Tamiment Library & Robert F. Wagner Labor Archives, WAG 249 NYU Special Collections.
If a binding is too tight, the text is obscured. To fix this, we removed the bindings, the conservators removed the cloth covers and removed the text block from the board, and then each page was separated from the binding paste by peeling them apart one at a time.

Original bindings of the Scrapbooks; Textile Workers Union of America Scrapbooks, Tamiment Library & Robert F. Wagner Labor Archives, WAG 249 NYU Special Collections.
Once the pages were separated, they were re-foldered and re-housed in archival quality boxes and folders and sent up to ACM for processing. The collection is now more accessible for researchers and is ready for its next step in processing.

Finished product of re-housed material Boxes 1-15; Textile Workers Union of America Scrapbooks, Tamiment Library & Robert F. Wagner Labor Archives, WAG 249 NYU Special Collections.
After the Pandemic:
My time in the lab was cut short due to NYC’s quarantine and the global pandemic that has swept through our city. My hands-on learning was replaced with zoom interviews with conservators and archivists from around the country, discussing iterative processing and how to balance access with preservation at larger institutions. This is access I would never have had if my internship had stayed in the lab.
While the personal interviews and access to top industry professionals has been informative and useful, I am worried about the opportunities I am missing out by being unable to work in the lab, what hands-on experience I could have had if I could still be learning directly from some of the best conservators in the country.
While we wait to see how the pandemic plays out, I am finishing my semester remotely while the Special Collections library handles access and user interface remotely. In this age of remote learning and remote access, what are we missing out on and what are we gaining?