#thepancake1


Creating Poses in Blender 2.8/2.9/3.0 - Rigs & Compatibility Tips for S4S
In our Pose Makers server I notice more and more questions about working in newer Blender versions and how to make poses/animations created in the newer Blender versions compatible for S4S, which until now, only supports the 2.7 series.
Some people would like to use the new features and the more modern & convenient interface. Some people are struggling to get the old 2.7 series to work on their computers.
And since I am sort of in the process of moving to Blender 3.0 (from 2.7) myself, I decided to write down what I understand to be the options, hoping that this will be helpful to someone out there and so that I can refer to this post in the future. Feedback is also welcome, and I will add more info if I learn more.
For convenience, I also re-enabled the textures on the S4S rigs for Blender 2.8/2.9/3.0 and share the prepared rigs below.
Making Poses/Animations Compatible
What S4S can do: According to the S4S download page, only the Blender versions 2.70a and 2.76a (for Windows)/2.70a and 2.78a (for Mac) can be used with S4S. Blender 2.79b, which is the last version from the 2.7 series, is not officially mentioned/linked, but also seems to work (note that earlier iterations of 2.79 can cause issues).
What S4S cannot do: Blender 2.8 and higher versions are not supported by S4S. Thus, poses/animations saved in Blender 2.8 and above are not read correctly when you import the blend file in S4S and will therefore not work in-game when saved that way.
Besides, you also cannot open blend files saved in Blender 2.8 and above in Blender 2.7 to resave them there.
However, there are the following options for a workaround:
1. Copy-Pasting: For transferring poses, the easiest way still, in my opinion, is simply copy-pasting a pose from Blender 2.8/2.9/3.0 to a rig in Blender 2.79, then resaving there:
- Press „A“ in order to select all points on the posed rig in Blender 2.8/2.9/3.0
- Press “Ctrl” + “C” to copy the pose and press “Ctrl” + “V” to paste the pose on the target rig in Blender 2.79. (This only works with 2.79, not with earlier Blender versions.)
- Loc rot the pose and save the blend file in 2.79, then import the blend file in S4S.
2. Appending: In a similar way, you can also use the append function in Blender, which is the more accurate option, in case you need to transfer not only a pose, but constraints and other additional features that are used mainly for animations. However, this option only works when appending blend files saved in Blender 2.8 and 2.9. Blend files saved in 3.0 are no longer recognized by any of the previous Blender versions.
3. Animation tools for Blender 3.0 by thepancake1: The tools let you export clip files directly from Blender which you can then batch import to a package file in S4S – thus bypassing the import function for blend files in S4S! That way the tools also make it possible to transfer scaling to game which is not possible otherwise. Pancake shared an introductory tutorial along with the tools that explains how to create a working pose using the tools. I wrote down some extra tips for poses here. (According to Pancake, the tools will probably also work for Blender 2.93 and maybe even earlier 2.9/2.8 versions. However, the tools are made and tested primarly for 3.0.)
PreparedRigs
Another (cosmetic) issue, when working in Blender 2.8 and above, is that the texture of the S4S rigs is no longer recognized.
You can, however, re-enable the texture with a workaround, which I did now for my own purposes. I’m sharing the rigs below to spare you the same trouble. However, if you’re curious, you can read how to do it here.
I also made some minor practical adjustments to the rigs, mainly:
- Added IK constraints on hands and feet.
- The mesh parts are merged for easier appending (also, otherwise lines would appear on the re-enabled textures wherever the mesh parts intersect).
- Added a version where I combined the 4 adult rigs into one file (Adult Female, Adult Male, Mermaid and Merman – since they all use the same rig). You can switch inbetween them by clicking the eye symbol on the right panel beside the main window.
The rigs are compatible with Blender 2.8, 2.9 and 3.0:
DOWNLOAD(SFS)|DOWNLOAD(Mediafire)
Also, here are the rigs with the same adjustments for Blender 2.7:
DOWNLOAD(SFS)| DOWNLOAD(Mediafire)
Sidenote: You can find all downloadable versions of Blender here.
@thefoxburyinstitute@ts4-poses
Post link

In-game scaling made possible with PancakesnewAnimation Tools for Blender 3.0!
The tools let you export clips directly from Blender 3.0 and bring a lot of cool and helpful features
If you are an animator or a pose creator, make sure to check them out!
Update: After messing around and asking Pancake for advice, I wrote down some extra tips for anyone who’s looking into creating poses with the tools (complimentary to the tutorial Pancake shared with the tool) below the cut.
General:
- [Update: In a newer version there is now a button that does the job ^^] You need to set a special parameter which suppresses lipsync if you want to animate the jaw: In the tool, click “Initialize Events”. Input “0f,x“ where x is a number (for example “0f,3“) in the line that says „Suppress Lypsync Events”. The number corresponds to the duration that the jaw will remain posed. You can derive it by dividing the number of frames you have by 30. For example, for 90 frames, this will be 3.
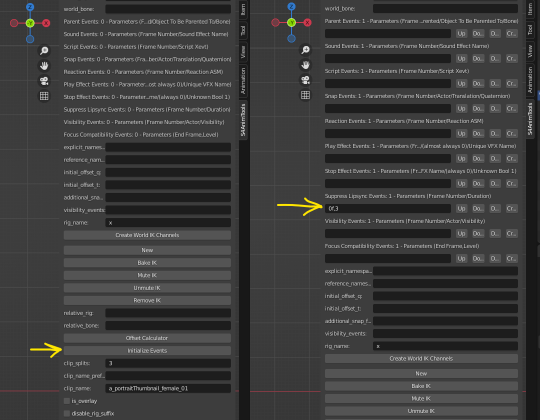

- In general, set clip_splits according to the number of frames you have + 1. As a minimum, set clip_splits = 3 (otherwise the pose will t-pose).
- When you export the clip via “New Export Clip” the current frame will move to the last frame (for clip_splits = 3 the current frame will move from frame = 0 to frame = 2). Go back to the initial frame where you locked the pose if you need to adjust the pose afterwards.
Gallery poses/CAS trait poses:
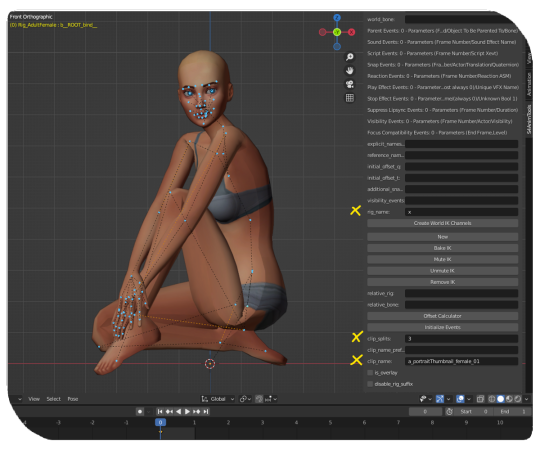
- You need to set the clip_name and the rig_name according to the original file name. For example, for “a_portraitThumbnail_female_01_x” the clipname should be “a_portraitThumbnail_female_01” and the rig_name = “x” (the underscore is added automatically, when you export the clip).
In-game poses:
- If you are creating a group pose, you can differentiate the poses by setting a different rig_namefor each rig. For example, you can use “x” for rig 1 and “y” for rig 2. Select rig 1 to export the clips for rig 1, then select rig 2 to export the clips for rig 2.
- Currently, you can only play poses in game with the option “Pose by Name” from Andrew’s Pose Player. If you want to use the option “Pose by Pack” (and, for example, add thumbnails, descriptions etc.), you can use a workaround like this: Create an empty “clip pack” as usual with S4S. Go to the Warehouse tab and batch import the clips as described in Pancakes tutorial. Then, replace the entries in the lines “ClipName” and “Instance” of your imported clips with entries you find for the automatically generated clips. Delete the automatically generated clips afterwards. If you want to add multiple clips, add them in the “Clips” tab first. Then batch import the clips from Blender 3.0 and repeat the process as described above.
Post link