#georgian gown

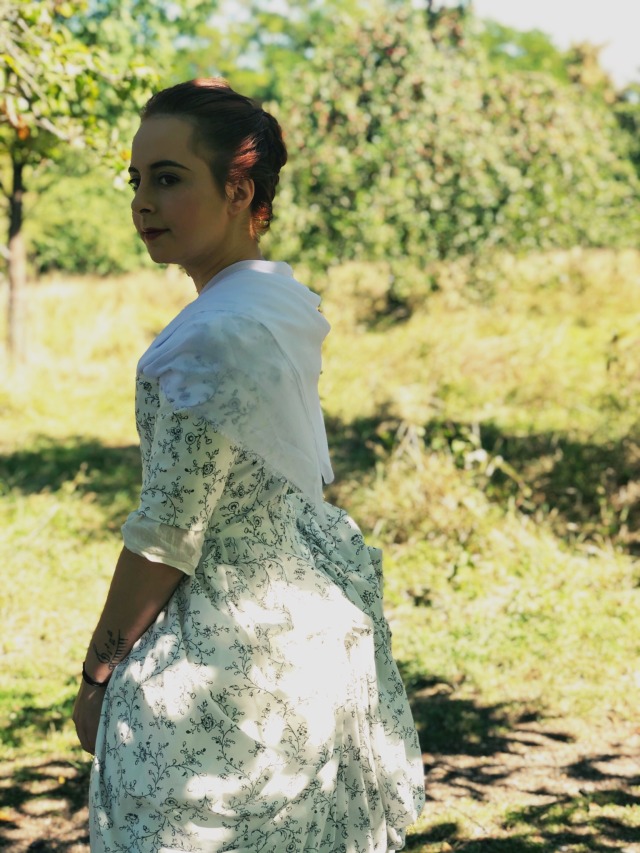
The longest time ago when I finished my Robe à la Polonaise, I promised a photoshoot but then Life™️ happened and I never did. So today I got up the courage to actually venture out into the world and take some photos! We used to come here a lot when I was younger and I totally forgot this place was so beautiful until we went there for a walk a couple of days ago so I had to come back.
So here’s the long overdue photoshoot of me with my dress. Let me tell you it was nerve wracking to go out like that but thankfully nobody said anything… I just got a few stares but oh well, I can’t blame them. I also forgot my cap at home so please ignore my flat hair. Another note about the hairstle though, I actually copied Jenny’s hairstyle from Outlander and I really think it can pass as a “peasant” or lower class style, hair wasn’t super pouffy all the time! And a Robe à la Polonaise would have totally been worn by middle/working class ladies so it’s not completely off. And I need to finally make a bumroll. I keep putting it off but panniers weren’t really worn with this style
Anyways, sorry for all the rambling, here are the photos!


Making a Robe à la Polonaise (Part 4 - final)
Aaand my gown is complete!

I have to admit, I pretty much already finished it on Sunday, but I had some final touches to make which I did today so now I can finally officially say, it is complete.
First of all, if anyone remembers my seams from my other 18th century gown, please forgive me but also know that thanks to this blog, my sewing has gotten so much neater and I love it so much! If I’m sewing just for myself, I usually don’t care about the little things but I think I will now because it makes such a big difference! It looks so much more professional.
But anyways, I left off in my last post with just the bodice finished, so now I had to add the skirt - my favorite and the easiest part. I cut a rectangle of 180cm+110cm (the 110 obviously just depend on your height from the waist down to the floor, but make sure not to forget the undergarments and a pannier/bumroll! It will add a few cm). I cut it out with a very useful technique I learned from watching Bernadette Banner’s videos, which involves pulling out a single thread from the piece of fabric at the point you want to cut it. This way you can cut the straightest line across! I only use it when I have to cut very big panels that aren’t that easy to just measure evenly and draw a line across.
I did it by cutting a tiny bit into the fabric where I’ll pull out the thread and then I used some tweezers to pull out the thread. You have to be really careful and patient, the thread might break a few times especially if you’re doing this for the first time but you’ll get the hang of it!
And then I finished all the seams except for the bottom one.
After that, I measured around my waist to the points in the front where I want the skirt to end as it doesn’t close all the way in the front. Technically you should follow the edges of the bodice but I didn’t think of that so I just measured my waist but it still worked. Now I knew when I would pleat the top edge of the skirt, how small it had to become when pleated. In a weird way, I made tiny pleats of maybe half a cm all the way across and it was close enough to the length I needed it to be, so I left it as it was.

I then secured the pleats by stitching over them. You don’t really have to do this as they’ll be secured enough when you sew them to your bodice but I just didn’t want the mess of having so many pins to take care of that would just be in the way so I just did this real quick.

Afterwards, I pinned the pleated fabric to the bodice right sides facing together and stitched it up to the waist seams. I made a point of not going further because I wanted the front piece of the bodice to lay on top of the front piece of the skirt. I saw that in photos of extant garments so I’m just assuming that’s one way to do it. So I tried to lay the bodice on top of the pleats so I could now stitch the edge of the bodice to that skirt to have it visibly be on top.
The dress was now way too long on me so I folded the bottom over by a few centimeters and finished the seam.

I generally like wide bottom seams. I know it’s not really a thing but I just like them that way!
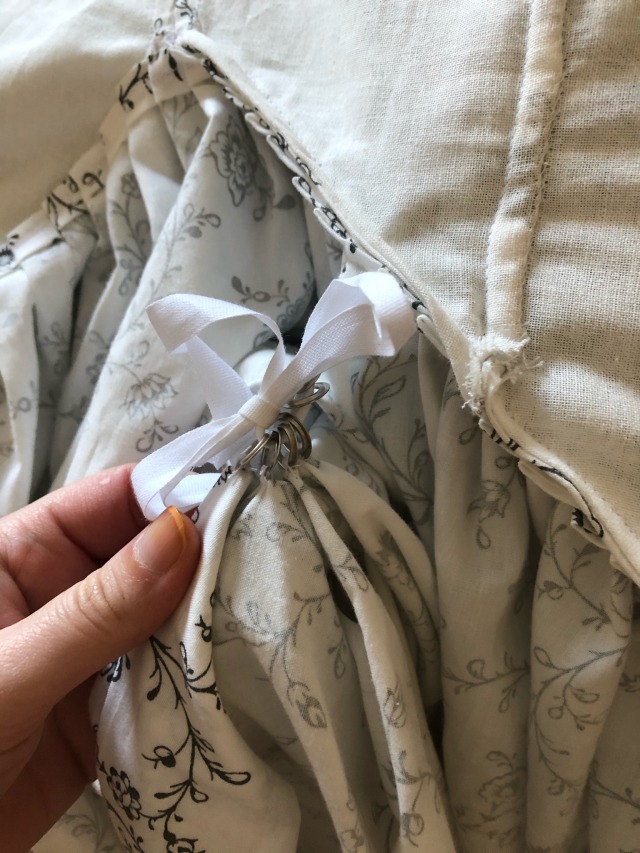
Now came the challenging part. Originally, I’d given up making that one gray gown into a Robe à la Polonaise because I could not figure out how to drape it properly. But thankfully, while I was researching something completely different (that I’ll hopefully make a post about soon, as soon as I can gather enough information about it), I came across an article explaining that they would attach small rings to the underside of the skirt to pull a ribbon through it. I didn’t really find anything that could work, but from making my 1890s corset, I still had some eyelet plates (idk what they’re called), they were a little flat but they would work while I would be looking for something more fitting. So I measured exactly where I wanted to pin the skirt up and sewed six rings to each side, each 19cm apart. Then I put the band through.

Sorry for my orange nail, it stained from dying my hair red)
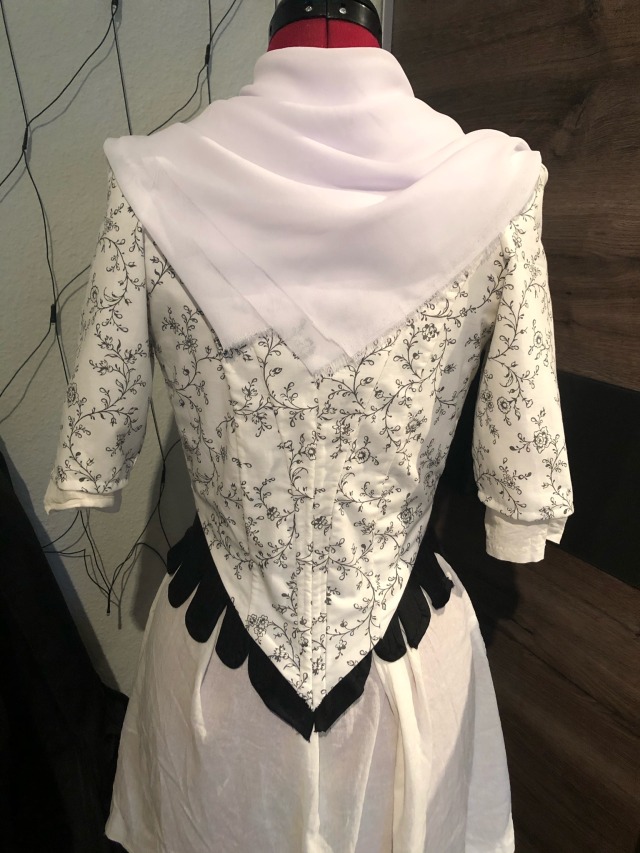
Finally, the hooks at the front of the bodice and I was ready to wear it! To be completely honest, yes, it has some flaws but it still felt like I was wearing something straight out of the movies, or another world. I have to use a fichu, not just because it was actually fashionable back then but also because my stays are a little visible at the neckline. I do have another pair of stays, maybe it works better with those, I haven’t tried them yet.
But anyways, here she is - my ca. 1775 (stays are 1750s) Robe à la Polonaise.


The photoshoot I talked about is going to happen at some point in the future. It’s very hot at the moment and I’m barely venturing out in shorts, I’ll have to wait until it’s more bearable to wear all those layers! (Also, I have to build up the courage to go outside in 1770s wear.)
All in all I’d say that this is definitely my favorite thing I’ve ever made. I’m still so in love with that fabric!
Making a Robe à la Polonaise (Part 3)
After being very nervous about starting to make the sleeves to the point where I dreamt that my grandmother told me they were really easy to do and I was stressing out way too much, I finally made the attempt to make a pattern.
Of course, I couldn’t just use one from the internet because I love making things more difficult for myself. Besides, I still had to fit it and I didn’t feel like doing it, so I just looked at the general shape and tried to use my long forgotten high school geometry skills to figure out how to transfer my measurments into an actual drawing, and surprisingly, after some trial and error, it actually worked!

I then proceeded to make a mock-up and pinned it to the bodice to check if fit and after confirming that it did, I could finally cut it out of my actual fabric and lining. I messed up and cut the lining too short (aka I forgot the seam allowance that I’d decided to make 1 inch (2,5cm) which is much bigger than what I usually do so it does make a difference), but I decided that maybe it would be alright if I could somehow fold the bottom edge of the front facing fabric over the raw edge of the lining and conceal it that way. (Spoiler, it worked!)
Anyways, I sewed the lining to the fabric, right sides facing each other and turned it inside out. Then came the pinning to the bodice…


It took a while to get it right, especially the little pleats at the top, but I finally did and attached it to the bodice by sewing very dangerously close to the edge. I don’t think that would’ve been possible with my old 50s sewing machine! With every project I appreciate my new modern version more and more haha.
So then the sleeves were finally attached to the bodice! For a moment I contemplated whether or not I should fell the inside seams on the sleeves as that’s not really something anyone ever gets to see but I finally decided to just do it, to be honest part of the reason I ended up doing it was so I wouldn’t be embarrassed to post my terrible seams on here! To make hand felling easier, I put a water bottle inside of the sleeve. I don’t know if it really does anything as I didn’t even try it without the bottle, but I saw this tip somewhere a while ago so I just thought it might help.

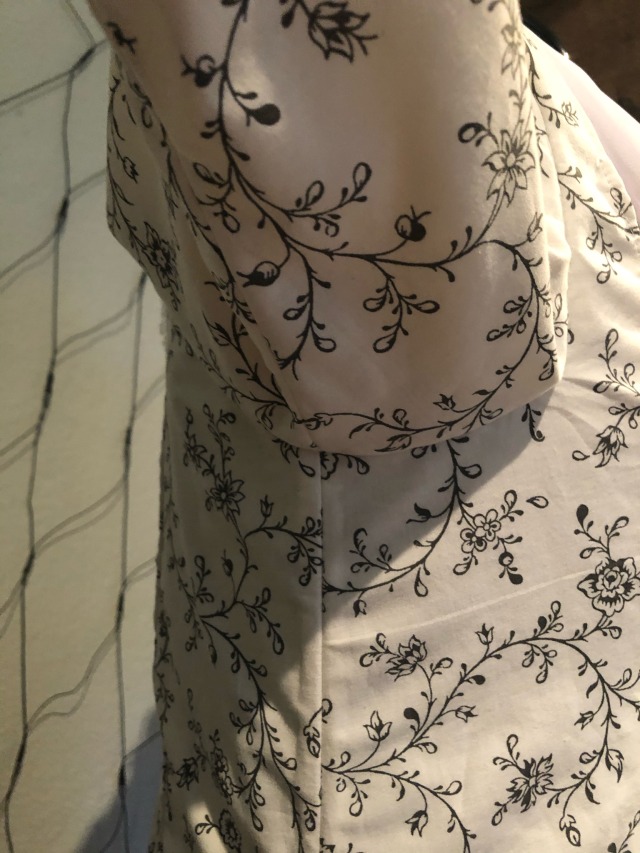
To finally wrap up the day, I finished the bottom sleeve seams by folding the floral fabric over the shorter lining and machine stitched it real quick.
And then, the bodice was complete!


I still have trouble putting it on the mannequin and I might have to change a little bit of the neck line, depending on how it sits on my actual body, but so far I’m very pleased. I’m also super excited because I’m planning on going into the woods and doing a little photoshoot wearing this gown once it’s finished!