#mac plus

Franken-Plus
I have an old Mac Plus that was given to me nearly 25 years ago. For as long as I’ve had it, it has not been a functional computer.
 ALT
ALTOver the years I’ve robbed it for parts for other projects — sometimes rather destructively. One serial port was sawed off in my early teenage years, the other was clearly desoldered much later. The serial chip was removed for my first Z80 homebrew. The 68000 CPU was used for my first 68k homebrew. The oscillator was removed for other homebrew projects. Remaining parts were marked for whether they were generic or proprietary, so I could know whether they would be useful for future projects.
Every part I’ve removed from this board has been functional. When we tested the machine 25 years ago, it did not power on or show any other signs of life. Knowing what I do now, it’s obvious to me that it had a bad analog board, but the logic board was probably still good.
I think it’s time to breathe new life into this abused machine. Luckily, I still have the parts I removed from it.
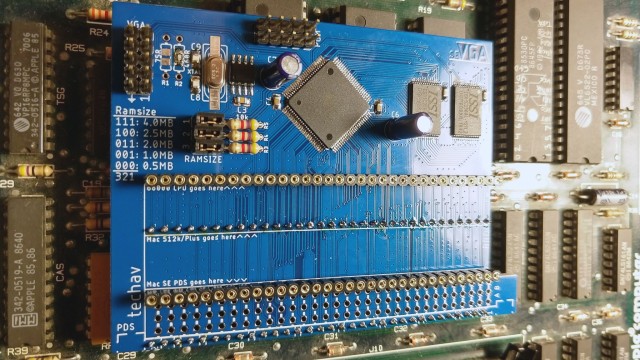
One of the goals of my SE-VGA project is to support older classic Macs that whatever reason no longer have functional CRTs. I of course had this old Plus in mind all along when designing that into the SE-VGA. As soon as I knew the Rev 2 boards were functional, I assembled one with 68000 CPU headers instead of the SE PDS connector.
 ALT
ALTSince the analog board for this Plus is bad, I’ll need some other way to interface with a monitor. The SE-VGA board will allow me to use any VGA monitor in place of the original CRT.
The analog board is also the power supply for the Plus, so I’ll need a new power supply as well.
 ALT
ALT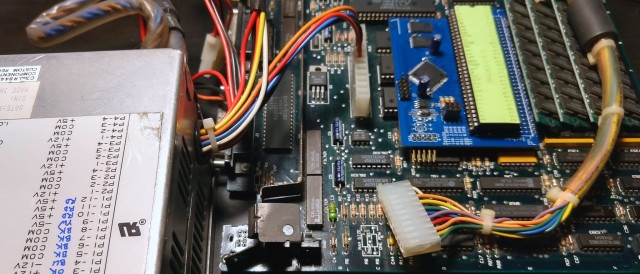 ALT
ALTI have an old XT era power supply with a similar connector to the analog connector on the Plus motherboard. It’s a standard Molex part with removable crimp-on contacts. It was fairly easy to remove all the contacts and rearrange them to match the layout required to power the Plus motherboard.
The board powered on, the SE-VGA output its video, but the Plus was not happy. Every time it powered on, it gave Sad Mac error 02FFFF. This code means it passed the ROM checksum, but it was failing the first RAM test. The FFFF on the error code would indicate that every RAM chip was bad. Since it gave the same error with or without RAM installed, and with known-good RAM installed, the problem is clearly elsewhere.
 ALT
ALTI started by probing the data path between the CPU and RAM. Data was making its way through the buffers, and as best as I could tell RAM and the DRAM control state machine were working properly. So I turned to a disassembly of the ROM to see what it was actually testing.
The first RAM test starts at address $00,0000, writes data, then reads it back. Then it moves to address $00,0001,$00,0002,$00,0004,$00,0008,$00,0010, etc. It’s not really testing the data bus here, it’s testing the address bus, looking for stuck address signals. So I started probing the address multiplexers. Every CPU address signal to the RAM was accounted for except A1.
When the 68000 CPU was removed from this board, the pad for A1 was damaged. A hairline crack separated the pad from its trace. A quick bodge wire, and no more Sad Mac.
The next problem I encountered was an interesting one. The insert disk icon — a floppy disk with a blinking question mark — wasn’t blinking. This time, The Dead Mac Scrolls held the answer: early Macs without a floppy drive connected won’t blink the question mark.
So I pulled an 800k floppy drive from my SE and plugged it in. On power up, the eject motor spun up … and continued spinning.
[Sark] had the answer for this one. There are a few different versions of floppy drives Apple used. They are compatible, but using newer drives in older computers sometimes requires a specific cable (the yellow stripe cable) which cuts pins 9 & 20. One custom cable later, no more constantly-running eject motor, and the question mark blinks as expected.
I don’t currently have any 800k bootable floppy disks, so I ordered a new BlueSCSI. The latest BlueSCSI revision supports the Mac Plus, and indeed booted right up without issue.
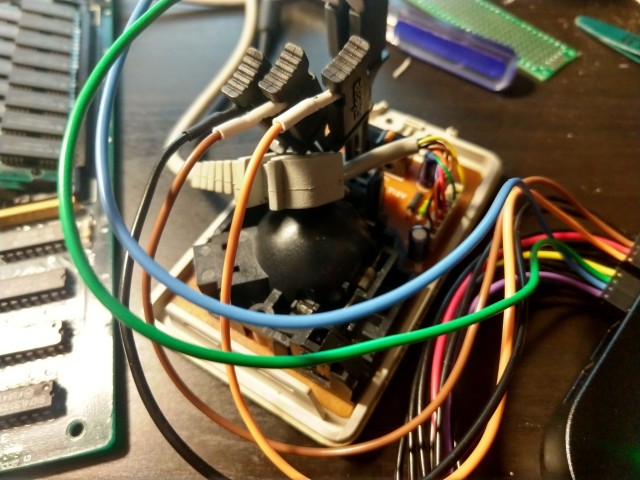
But once booted, the mouse didn’t work. It would only move vertically, not horizontally. Logic analyzer showed the mouse was properly outputting quadrature signals from the rotary encoders, but the computer wasn’t responding to them. Back to the schematics, tracing the signals and sure enough, another broken trace and another bodge wire.
 ALT
ALT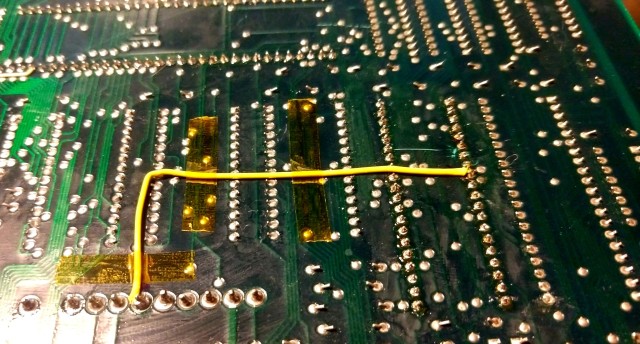 ALT
ALTFinally, there was only one thing left to do — build a keyboard cable. The early Macs used a cable that looks like the handset cable on an old analog telephone, but the keyboard cables were wired straight through instead of crossed like the phone cables. I had to order the proper terminations and tool, but had no problems assembling it.
It was a lot of work, and required pulling together many different parts and pieces, but finally this old Mac Plus lives again.
 ALT
ALTSE-XGA
I’ve been working on the new revision of my SE-VGA project I mentioned previously.
 ALT
ALT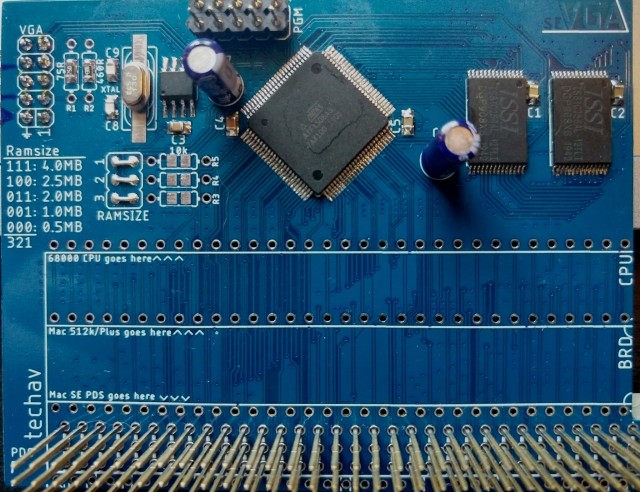 ALT
ALTThese new boards use nearly all surface-mount parts, instead of the through-hole parts used on the first boards. The biggest functional change is the can oscillator has been replaced with a 13MHz crystal and a selectable clock multiplier — this allows a 65MHz pixel clock for running 1024x768@60 resolution (XGA) instead of the 640x480@60 (VGA) from the first boards. The Mac 512x342 resolution can be pixel doubled to fit into an XGA frame, with small black boarders (letterboxing) top and bottom.
I’ve rewritten the logic from scratch. The original logic was overly-complicated and I wasn’t able to adapt it to the new resolution. Of course they means a whole lot of debugging, and brings to fore a problem with moving to small surface-mount components — no place to attach test leads.
 ALT
ALTI soldered some 30ga wire-wrap wire to key signals (in this case the VRAM control signals) so I could watch them with a logic analyzer for debugging. These pins are quite small, no larger than the wire itself. Soldering to them was finicky and took a few attempts. I taped the wires down to prevent them from pulling out while working.
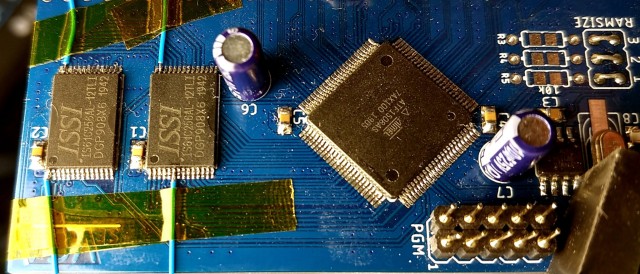
 ALT
ALTAnother big difference with these new boards is they support not just the Mac SE, but also older 68000 Macs as well. Here I’ve assembled one for a Mac Plus and I’m testing its fit around other components on the Mac Plus motherboard.
The logic is coming along well. I’ve encountered many of the same problems I had with writing the VGA logic and had to solve them all over again. At this point it does show the whole frame of video, but I have some random glitches with VRAM writes, and some of my timing is a little off. It is working as a proof of concept though. I should be able to clean up the logic and get it running smoothly.
This project has some interesting firsts for me. It’s the first project I’ve ever designed a second revision and ordered a second round of boards for. It’s also the first project I’ve ever made more than one of. Depending on how things go I might actually do a third board revision to clean up anything I find not working reliably.