Also some of the miniatures I’m working on - they still need to have their covers tooled and finished. Sheep & kidskin (from a fair-trade witch market, do you know how much they want for a kid no one will ask for nowadays? It’s a nightmare!) paper dyed & sewn by hand, cotton endbands by myself.
Also featuring wooden barrels I finished last autumn! I keep spare acorns there :D
Although ‘appointed to be read in churches’ appears on the title-page, a reverend might find this hard to do with this copy.
Complete with its own lectern and chain, this Bible measures just 45mm in height. Its 876 pages were produced using a photolithographic process and the edition was published by David Bryce, one of the most prolific publishers of miniature books who first complete miniature Bible appeared on the market in 1896.
Printed on the title-page verso is a copy of the licence granted to Bryce to publish 100,000 copies of this edition. Each copy came with a small magnifying glass tucked into a flap at the back to assist with reading.
—
The Holy Bible … Glasgow: David Bryce and Son; London: Henry Frowde : Oxford University Press distributor, 1901, Alexander Turnbull Library, Bible Society in New Zealand Collection, RBS BIBLE 1901.
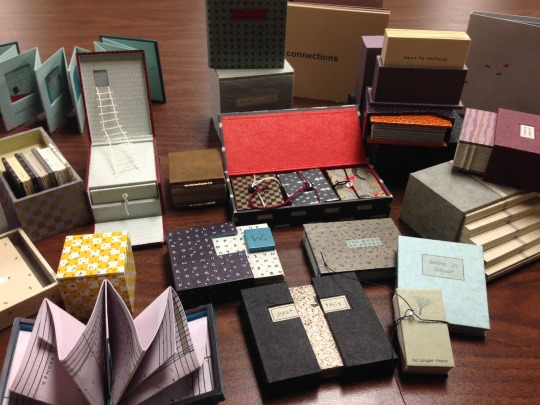
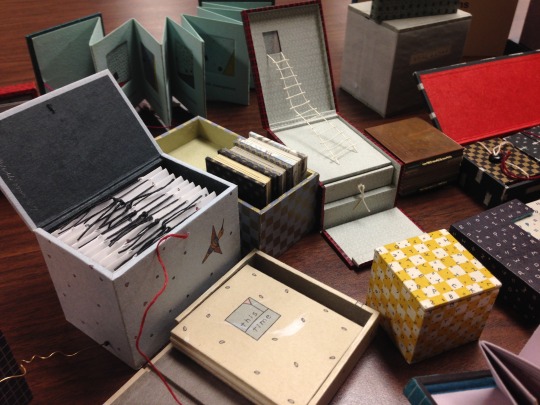
WEIRD FORMAT WEDNESDAY: New Acquisition to the Fine Art Press Collection at the UMN Libraries (a corresponding collection to Gorman Rare Art Books Collection) - Miniature Books created by Jody Williams, 1989-2014
Jody Williams is a local Minneapolis book artist who teaches printmaking and book arts at the Minneapolis College of Art and Design and the Minnesota Center for Book Arts. She has also taught at Columbia College Chicago Center for Book and Paper Arts and the University of Iowa Center for the Book. Her work is in several library and museum collections such as The Walker Art Center, San Francisco Museum of Modern Art, and the Minnesota Historical Society. Williams has received many grants, awards and fellowships throughout her career.
Her limited edition books are printed and bound with different materials and a vast variety of different formats.
See the World’s Largest Atlas plus the State Library’s smallest book.
The State Library holds Australia’s only copyofEarth Platinum - the world’s largest atlas, according to the Guinness World Records, with pages spanning 2.7 metres when opened.
Only31 copies of the 150 kilo, limited edition atlas were released by publisher Millennium House (Sydney) in 2012 – the State Library of NSW holds Australia’s only copy.The atlas’s 128 pages contain 61 pages of maps, 27 images of famous locations (including St.Peter’s Basilica, the Antarctic and Machu Picchu) and a double-page spread of the world’s national flags. Many of the images were made from stitching together 1,000 individual photos, and the largest image has 12,000 photos joined together.
This mammoth book standing at almost two metres tall will be on public display in the Mitchell Library Reading Room from Wednesday 20 December 2017 until Monday 5 February 2018.
Also on display is the smallest book in the Library - the Lord’s Prayerwhich was published by the International Gutenberg Society in 1958. It contains the Lord’s Prayer in seven languages: English, French, German, English (American English), Spanish, Dutch and Swedish. The book is 6 mm x 6 mm (smaller than a fingernail) and every page has been engraved on metal in a type foundry and was not reduced through photographic means. The leaves are hand folded, sewn and bound in leather and decorated with gold stamping on the cover and spine.
Come and visit the Library to have your picture taken with these wonders from the collection.
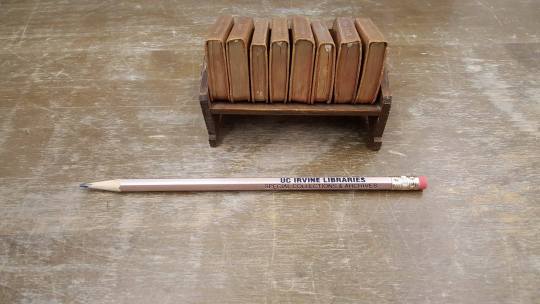
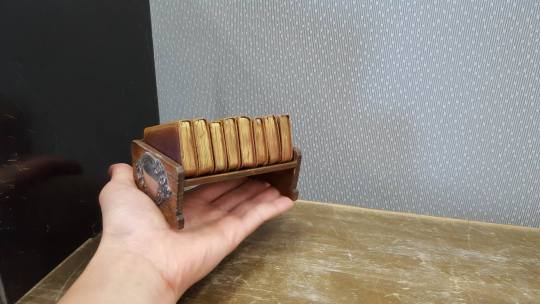
[Miniatures][Shakespeare] A set of eight Shakespeare plays in matching volumes in a special decorated wood case. Cover size is 5.2 cm or 2 1/8 inches. Glasglow: David Bryce, 1904. The plays are a mix of histories, comedies, and tragedies
There is nothing better than when mini books come with their own mini furniture.
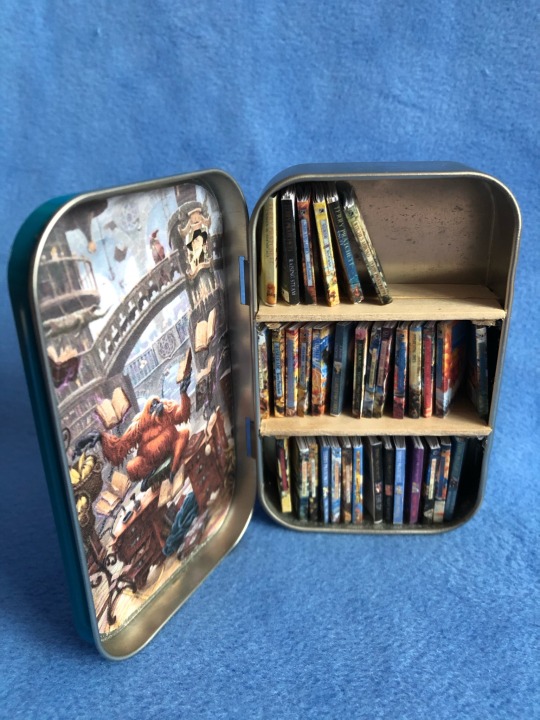
Behold, a library of Terry Pratchett’s Discworld books in an Altoids tin! I originally found this project at this postby@nashiil-and-kiilan, and as they also put up the templates for it I thought I’d try it myself. It turned out pretty neat! I decided to leave out some of the details on the decorations, but I’m still pleased with how it came out.
NOTE from Truebluemeandyou: This post by nashiil-and-kiilan no longer exists. If this blog has moved to a Tumblr name please message me. You can still see a cached view of 2 posts making up this Miniature Library here.
From the post with the above photo:
My miniature Terry Pratchett Discworld novel library!
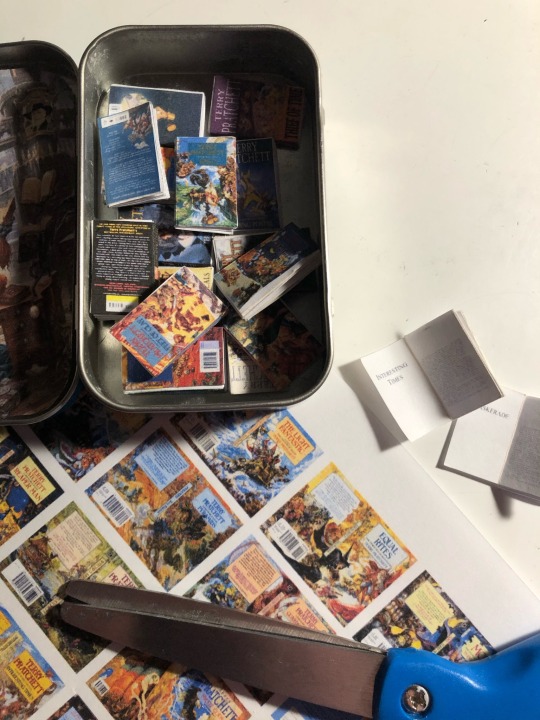
Made from an Altoids tin, Popsicle sticks, cardstock, copy paper, and a whole lot of patience. All of the miniature books open and have real printed pages you can leaf through. And the insidevof the lid has a sort-of-3D scene of the UU Library.
Contains the novels from The Color of Magic, all the way through Raising Steam
Instructions for the Miniature Altoids Tin Discworld Library:
Because quite a few of you have expressed the mighty need to have your own miniature Altoids tin Discworld Library, I am posting my templates and a link to the tutorial I used. Be aware, this will be a looooong post! There are more steps/instruction posted below the templates, along with the link to the video tutorial I used, so make sure you read through the entire post. Have fun making your tiny libraries!
Step 1: Gather your supplies!
You will need:
A large Altoids mint tin, cardstock, copy paper, a glue stick, an X-acto/craft knife, jumbo popsicle/craft sticks, a brown or dark tan alcohol art marker (or any brown marker), brown cardstock (or construction paper), a metal ruler (or a regular one if that is all you have), a pair of scissors.
Step 2: Measure and Cut
Measure the width of the inside you your tin, and use the craft/x-acto knife to cut your jumbo popsicle sticks to the length you need (you will need to make several cuts to get through the wood). Use the ruler as a guide to help you make a straight cut in the wood. Next, measure the depth of the tin and cut your ‘shelf’ to match so it will fit.
If you want to line the inside of the tin with popsicle sticks, measure the longest sides from the points just before where it starts to curve, and repeat for the top and bottom sides. To line the curved corners, cut a short length of craft stick(I did not get any measurements. I just eyeballed it and cut, desperately hoping they would fit) and score it in three to four equal sections. Do not cut all the way through. You are creating a simple (and fragile) joint. Gently bend the stick to curve it and press it into the corner. If it doesn’t fit, carefully pull it back out and trim the ends.
Use the marker to stain the ‘shelves’ (and side, corner, and top pieces, if you choose the all wood option). Trace your tin onto the brown cardstock/craft paper/construction paper and cut out the ‘back’ of the book shelf. Use your marker to draw woodgrain patterns on the paper.
If you are lining the sides with paper, measure the depth of the tin, and cut a strip of paper from your brown cardstock/craft paper/construction paper. Don’t worry if it is too long. You can trim it to fit later.
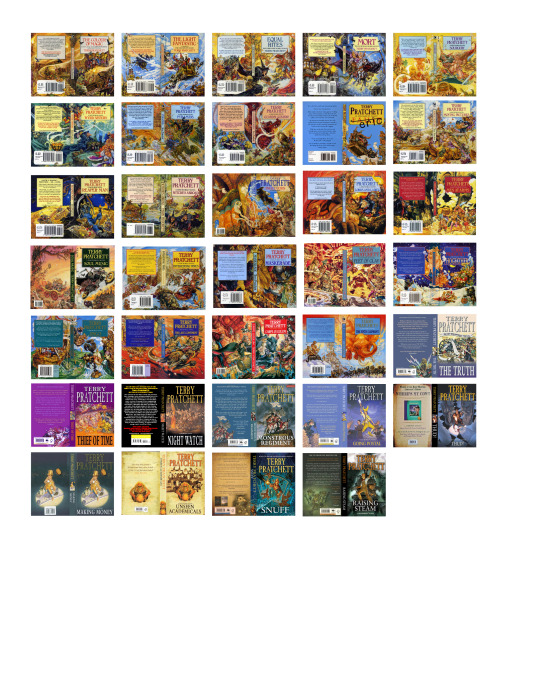
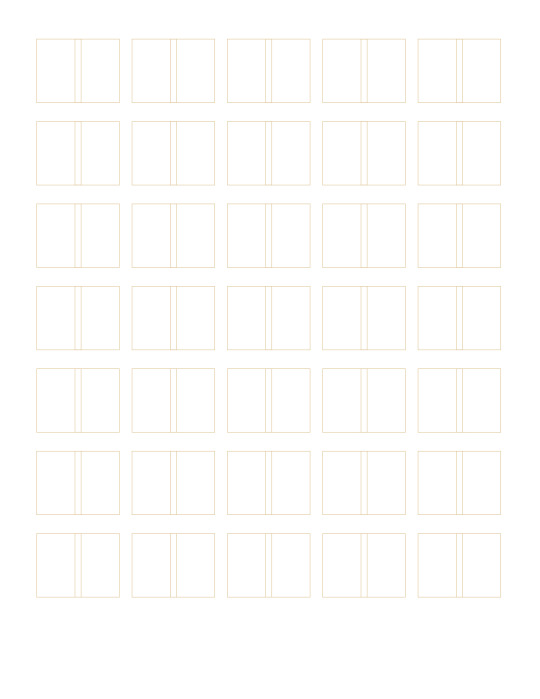
Step 3: Print and cut out the following images and templates (they should print out as a full page size)
Book Cover Images:
Book Cover Guides: (These will be glued to the back of the covers and serve as a guide on where to score for folding)
Book pages: (There are 9 pages. Make sure you print all of them!)
Finally, the scene for the lid! You should only need three total for the 3D scene, but if you are like me, you will probably mess one or two up, so I put in some extras! Decide which parts of the scene you would like to use for the background, middle ground, and foreground, then use your craft knife to remove the parts you don’t need from the fore and middle ground.
Step 4: Go to We Love Miniatures on YouTube, and watch the tutorial. It will walk you through how to assemble the books.
Step 5: Assembly of 3D Scene:
Use small strips of paper folded in half, then in half again, as spacers to glue between your scene pieces. You will have to experiment with the size and length of the strips as I didn’t get any measurements as I put my scene together.
Step 6: Assembling bookcase/shelves:
If you are using paper to line the sides, take the paper strip liner you cut earlier and glue the strip all the way around the inside edges, trimming the end if necessary. Next glue your shelf back to the back of the tin.
If you are using craft sticks to line the sides, glue your self back in first, then place your wood liners. If you cut the shelves to the right width, you should not need glue as they should just snap in place with the slight lip on the tin holding them in.
Next place your shelves in. They should fit snug, but not make the sides of the tin bulge out. If they do, just trim the edges a little. If they are too loose, you will have to make new ones. Do not feel bad if this happens. I had to cut three sets of shelves before I got them to fit properly!
You can glue the library scene to inside of the lid, though be aware that you will not be able to close the lid without damaging the scene.
If anyone has any questions, please feel free to reblog with you question, or shoot me a message. Now we can all meet in L-Space!