Also some of the miniatures I’m working on - they still need to have their covers tooled and finished. Sheep & kidskin (from a fair-trade witch market, do you know how much they want for a kid no one will ask for nowadays? It’s a nightmare!) paper dyed & sewn by hand, cotton endbands by myself.
Also featuring wooden barrels I finished last autumn! I keep spare acorns there :D
And here are the finished tassets attached to the cuirass!
(For those of you who missed the beginning of the story: the thigh guards are not a component of Geralt’s S2 armor in the show, I created them from scratch to help offset how extraordinarily top-heavy that costume is, visually.)
And I think they are actually going to make a strong positive impact on the overall look – Matteo’s wearing the wrong pants so it looks kind of odd right now, but I think once the rest of the costume gets piled on, the tassets are going to give it a much better balance. :)
So I got a commission request for Barriss Offee’s belt, from Star Wars, to which I said, “…who?” and promptly googled it. And then I said yes, because it’s totally in my wheelhouse. But the tooling on it was more interesting than what I usually do, so let’s look at the steps involved.
Starting with a screencap for reference:
Import it into Inkscape, clean up the pattern with vectors:
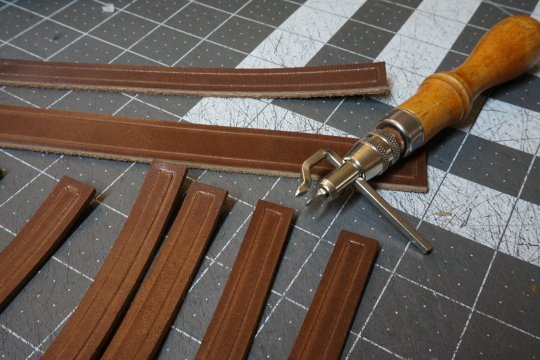
It is going to be attached to the front of a buckle blank to make it a functional buckle, and the reference pic turned out to be a perfect fit for the larger one. So trace your 4 1/8″ x 2 3/4″ rectangle onto the thickest veg-tan leather you’ve got (I used 10 oz):
Cut it out and clip the corners:
Apply duct tape to the underside, because stamping compresses and stretches the leather. Usually the amount of stretching is negligible, but for this project, you need it to stay precisely the same size after tooling:
Soak it underwater for 10-15 seconds. I didn’t photograph this step, but casing is necessary before you can carve and stamp leather. And you have to duct tape it before you get it wet, or else the tape won’t stick.
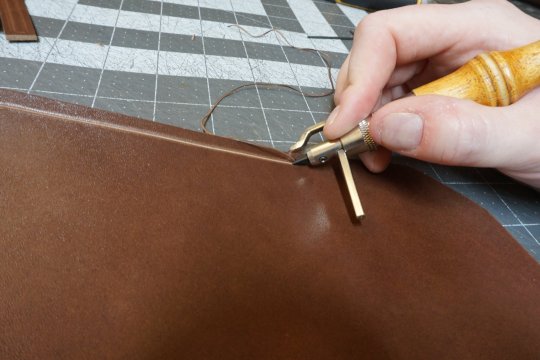
Use a stylus & stitching groover with modeling head to trace your pattern. Be very precise with this and the next step, because with a design this simple, any deviations from symmetry will be verynoticeable and unsightly:
Carve lines with a swivel knife. (Note that I did notcarve the line around the edge, that is just to keep your stamping aligned.)
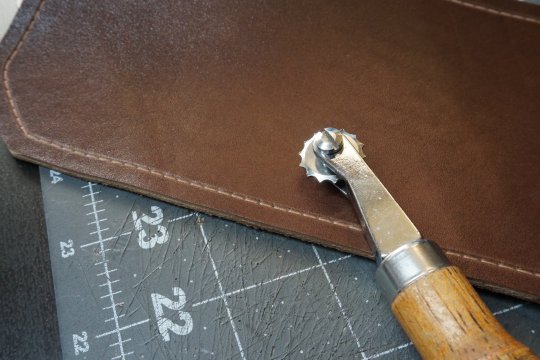
Use an edge beveler to round off the edges of the leather. (Usually this would be done aftertooling, but in this case, the rope border looks better if you bevel the edge first):
Tesselating rope border (Craftool stamp R956):
Beveling around the design (B201, B203):
Textured backgrounding to make the design pop (E294, E294-04):
Pear shading – eh, not my best stamp. I don’t get much practice with this one (P709, P972):
And I debated using a stamp to do this part, but decided I’d have more control and flexibility with the swivel knife again:
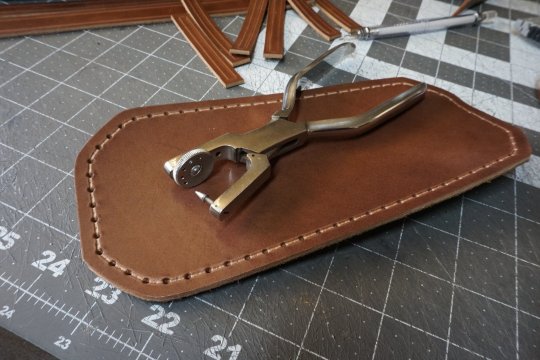
Remove the duct tape. Tooling complete!
Next step will be deciding how I want to paint/dye it.
Tried my hand at leather binding today. Nothing grand.
Literally used leftover scraps of paper from when I cut down my letter size to A5 and relatively cheap leather from Michaels. The snakeskin was under $15–way, waaaay cheaper than the goatskin I bought from Talas. Because there is no way I’m practicing on premium leather.
The process took two days, mainly because 1) I was filming for YouTube, and setting up the camera + making sure I wasn’t accidentally playing music or a video in the background took too many braincells; 2) I actually had to wait for the glue to dry completely before jumping into the next step of the process, and 3) most importantly, I was winging it the whole time. I had no instructions to follow, so I was swapping out needles, reinserting cords into different sides of the boards (outside in, dummy), and wondering if I should case the leather (I did) or pare it (I didn’t).
The video is 1/3 of the way edited, but I’m definitely going to need 2-3 business weeks before I dig into my goatskin.
Good news though–my leatherworking tools came so…maybe I won’t actually wait that long.
And here are the finished tassets attached to the cuirass!
(For those of you who missed the beginning of the story: the thigh guards are not a component of Geralt’s S2 armor in the show, I created them from scratch to help offset how extraordinarily top-heavy that costume is, visually.)
And I think they are actually going to make a strong positive impact on the overall look – Matteo’s wearing the wrong pants so it looks kind of odd right now, but I think once the rest of the costume gets piled on, the tassets are going to give it a much better balance. :)
So I got a commission request for Barriss Offee’s belt, from Star Wars, to which I said, “…who?” and promptly googled it. And then I said yes, because it’s totally in my wheelhouse. But the tooling on it was more interesting than what I usually do, so let’s look at the steps involved.
Starting with a screencap for reference:
Import it into Inkscape, clean up the pattern with vectors:
It is going to be attached to the front of a buckle blank to make it a functional buckle, and the reference pic turned out to be a perfect fit for the larger one. So trace your 4 1/8″ x 2 3/4″ rectangle onto the thickest veg-tan leather you’ve got (I used 10 oz):
Cut it out and clip the corners:
Apply duct tape to the underside, because stamping compresses and stretches the leather. Usually the amount of stretching is negligible, but for this project, you need it to stay precisely the same size after tooling:
Soak it underwater for 10-15 seconds. I didn’t photograph this step, but casing is necessary before you can carve and stamp leather. And you have to duct tape it before you get it wet, or else the tape won’t stick.
Use a stylus & stitching groover with modeling head to trace your pattern. Be very precise with this and the next step, because with a design this simple, any deviations from symmetry will be verynoticeable and unsightly:
Carve lines with a swivel knife. (Note that I did notcarve the line around the edge, that is just to keep your stamping aligned.)
Use an edge beveler to round off the edges of the leather. (Usually this would be done aftertooling, but in this case, the rope border looks better if you bevel the edge first):
Tesselating rope border (Craftool stamp R956):
Beveling around the design (B201, B203):
Textured backgrounding to make the design pop (E294, E294-04):
Pear shading – eh, not my best stamp. I don’t get much practice with this one (P709, P972):
And I debated using a stamp to do this part, but decided I’d have more control and flexibility with the swivel knife again:
Remove the duct tape. Tooling complete!
Next step will be deciding how I want to paint/dye it.
Loki pauldrons from Thor: Ragnarok. 9-oz veg-tan leather, carved and painted by hand.
Started these agesago at the request of an acquaintance, but stalled out after getting the pieces carved & shaped, and they sat in my WIP bin for the better part of three years. Then I got a commission for them and I was like, Glory hallelujah, I can finally get these out of my house.
It came out very tidy, and I’m rather pleased with it, even though the overall effect (green plastic/faux wood paneling/abstract wavy lines) feels kinda like a Holiday Inn built in the mid-2000s.
The painting was a different technique from what I usually do – I did a black basecoat with the Pro Waterstain, as usual, but then used acrylic paint + glazing liquid to put a thin coat of color over it to get the green and brown. The brown bits were then dabbed with rub-n-buff in Spanish copper, and a resolene topcoat put over the whole thing to give it that extra luster.
This, btw, was the reference pic of the actual costume I was working from:
I’m probably not going to bother putting it up as a regular item in my shop, but I could be convinced to make it again.
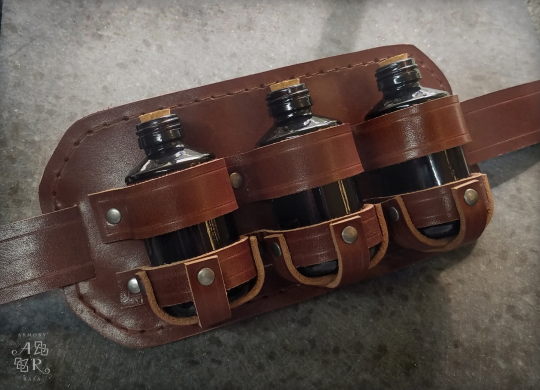
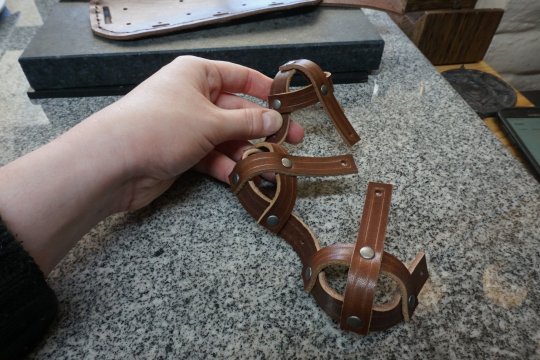
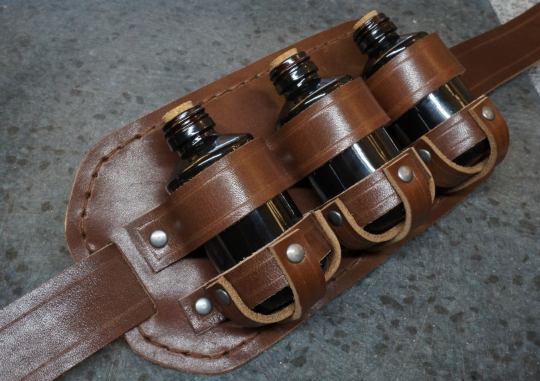
Hey folks, it’s been a while since I put up a freebie tutorial, so here we go, Geralt’s potion pouch from the manticore armor set in The Witcher 3.
It’s a quick and easy little project, good for beginning leatherworkers, and when it’s done you’ll have a versatile little bottle holder that will go with just about any LARP/steampunk/renfaire outfit:
Click down for pattern & step by step instructions!
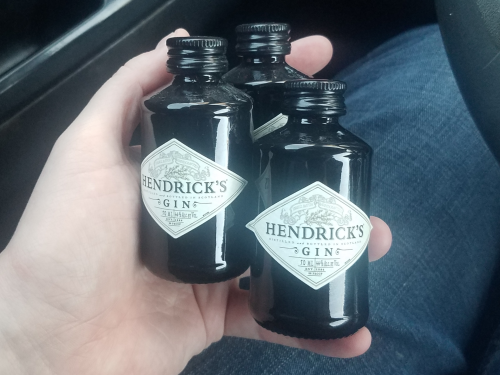
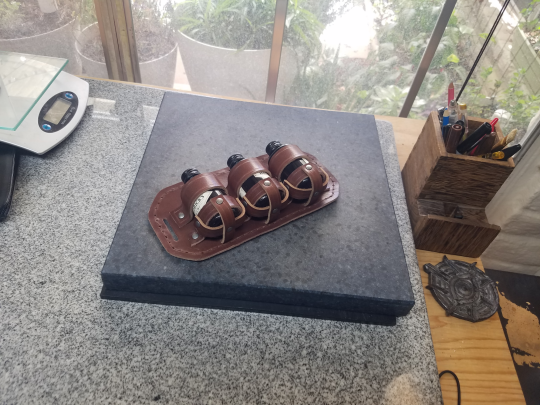
Before you do anything else, you have to know how big your bottles are, because unfortunately this is not a one-size-fits-all pattern. The bottles I found that were the best size/shape were the mini bottles of Hendricks gin:
If you can get your hands on some, perfect – print the following at 100% scale, on cardstock if you’ve got it:
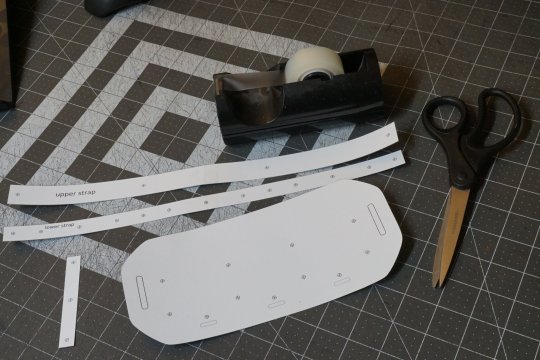
(It is designed for 8.5″x11″ paper – if you’re printing on A4 paper it may come out a hair different.)
If you’re using a different bottle: measure the circumference of the bottle in cm and multiply it by 8, that is the % scale to print at.
Once you’ve figured all that out and gotten it printed, cut everything out and tape the strap pieces together on the dotted lines:
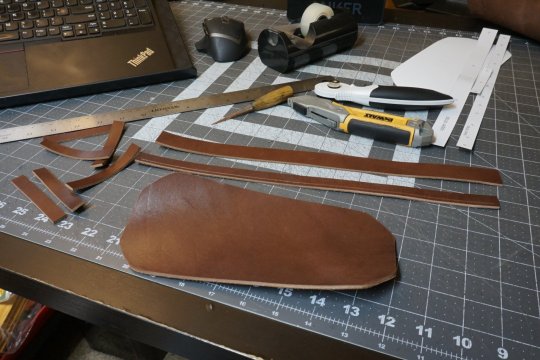
Now cut them out in leather:
I used 6-7 oz latigo for this, but if you don’t have latigo, you can sub in 6-7 oz veg-tan, you’ll just have to dye & topcoat it yourself. (If you are buying leather for this project, a single shoulder is the smallest hide you can purchase, it will run you ~$40 and leave you with plenty leftover for other projects. )
(If your leather is thinner, you will have to adjust the straps slightly, or they will be too loose and your bottles will be prone to falling out.)
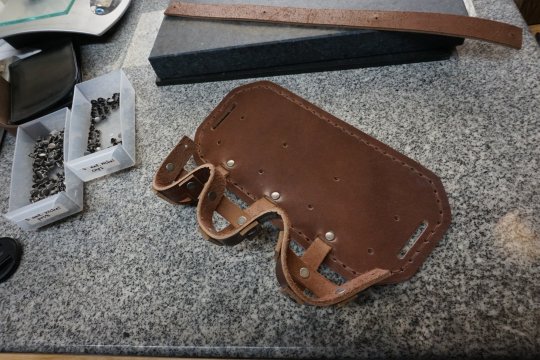
Next step is to run a decorative crease along the edges of all your straps:
The tool for this is the stitching groover; here you are using the modeling head, but in a moment you’ll be using the grooving head too, so if you don’t have one of these, it is worth buying. I put creases around the straps about 1/8″ from the edges.
And now here is the grooving head in action, carving out a channel for your stitching:
This is not, strictly speaking, necessary, but it will make your stitches much tidier and less vulnerable to abrasion. Make a groove around the backing piece, about 1/4″ from the edge.
In the next step I used a spacing tool to mark where to punch the holes for stitching:
But if you don’t have one, no harm done – you can use a ruler and an awl and mark a dot every 1/4″. (When I’m doing very large stitches like this, I use the smallest spacer wheel and just punch every other hole.)
Punching your stitching holes:
If you don’t have a hand sewing punch, you can just use an awl – it’s slower, but will get you the same results.
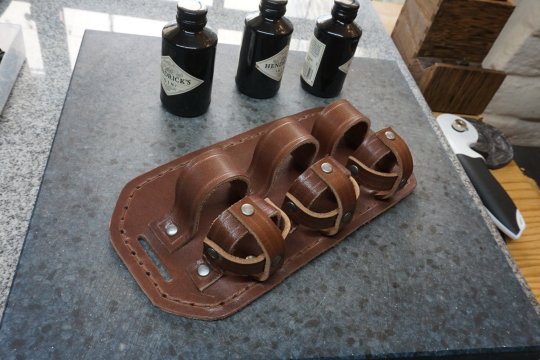
Saddle stitch around the edge of the backing piece:
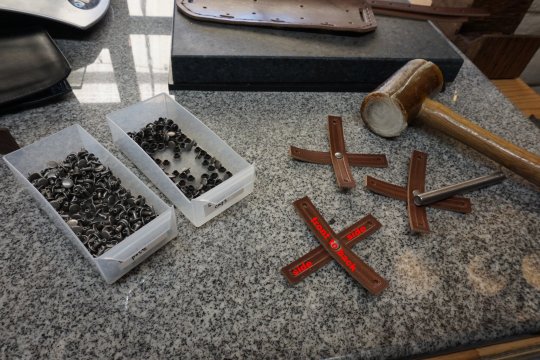
It doesn’t look like much yet (it does look like a cuff) but it’ll look better. My second prototype works how I want it too. They say imitation is the highest form of flattery… #kink #kinklifestyle #kinkcommunity #bdsm #bdsmlifesyle #bdsmdominant #bondage #bondagegear #leather #leatherworking #leathercommunity https://www.instagram.com/p/CXAHfCutnis/?utm_medium=tumblr
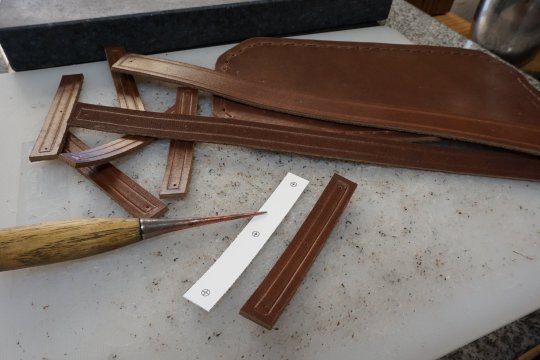
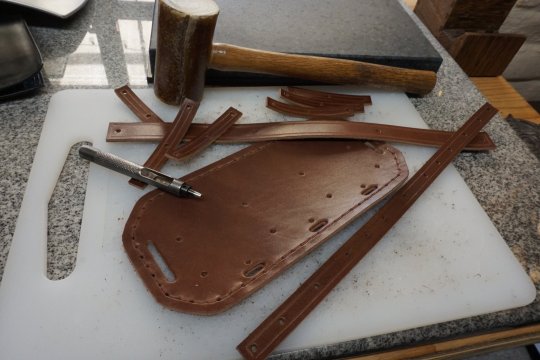
I made a pouch! This has been a part of my “one item a week” endeavour leading up to Swordcraft Quest, Australia’s biggest medieval LARP event. I picked a few items of mine that really weren’t up to scratch and needed an overhaul and have worked towards crafting well made items with quality materials.
This bag is inspired by a 14th century pilgrim’s pouch and apart from the alcohol based dye and kangaroo leather thonging, is largely historical.
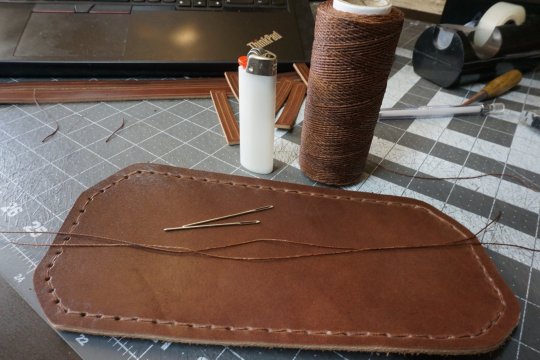
Top - 1.5mm cow leather Bottom - thin sheepskin Lining - 100% wool Thread - 100% linen, waxed with beeswax Fittings - Pewter, mostly from Billy and Charlie. Dyes - Angelus alcohol based dyes.
This bag took about ~40 hours to make and I’m very pleased with it. It is made to fit my iPhone 8, credit cards and ID, so that I don’t have to leave them in my tent at the event.
If you’re interested in my inspiration behind this bag or want a breakdown of how I made it (which is not a step-by-step how-to, mind you, but more of a rambling about the process), you can check out a youtube video I made about it here. Feedback and questions welcome!
First project of the year: lamellar. I have a massive soft spot for eastern armour and Rus style, but never really get a chance to wear it because we’re stuck pretty firmly in the XIVth century. When we had a night off I took the opportunity to throw together a kit and get on the field. The only thing I was really missing was gauntlets. I took most inspiration from the 11th century.
We’ve had this lamellar stuff lying around the craft room for years, and I’m always stubbing my toes on it. They’re 18ga (1mm) mild steel plates, laced together with leather thonging. The straps are made from leather and sewn on/ reinforced with artificial sinew. I made my breastplate in like 8 hours because I’m the size of a child, whereas it took Kieran 3 years to make his because he’s super lazy. I’m going to do another post later with WIP/ up close pictures of how it’s constructed and what it’s looks like on the inside, because it’s pretty interesting.
Belt, greaves, pants under tunic, gambeson: ArmStreet. Helmet: It’s called an Italo-Norman cabaset helm and I have no idea where we got it from, we’ve had it in our personal armoury for years. Axe:Calimacil Dane Axe
Ok today I can share the pretty pictures of my second take of the witcher’s sword scabbard.
Hand tooled, painted and sewn natural leather. Brass fittings. Harness is a part of the set. The scabbard is built on worbla core to fit the blade perfectly and maintain rigidity after being cut open to allow a better drawing angle.
It came out much slimmer than my first attempt at larp scabbard and to be perfectly honest I am very happy with the final outcome. So much in fact that I would keep it for myself if I could ;)
As things stand, I just really hope it will be a good companion on the path.
So I had a fun day yesterday… I ended up finishing 3 different projects I’d started at at 3 completely different times. It was as if the stars were aligned in some fantastic order, and they were ushering in the completion of seemingly unrelated artistic endeavors! Goals were were met and in most instances, surpassed! Huzzah! Today, on the other hand, has been a shit show of constant frustration, with a little bit of shame and circumstantial inconvenience ta boot!? All i gotta say is , “Fuck You and You’re Stupid Retrograded Bullshit, Mercury!?” I’m gonna go hide under some covers for a bit….. #leatherworking #leatherwork #leathercrafting #leathercraft #handmade #madeintheusa #madeinamerica
Here’s another clutch wallet I’m puttin the finishing touches on, at least here’s a pre-assembly pic so you can get a look at the scrollwork (which is done up in copper), and I’ll post the finished product later… #scrollwork #handmade #leathercrafting #leathercraft #leatherworking #leatherwork
Here’s a fun custom wallet I finished about an hour ago… A good ol fashioned Ouroboros with the fitting phrase “So It Goes….” emblazoned on it. Amazingly enough, I actually don’t feel like rambling today, which is always an odd feeling… OooOoo, on a positive note: Im I’m really happy that I’m caught up with my backorders, and it feels great being able to work on new customers stuff, and being ahead for once! (Knock on wood….) Coolbeans then! Back ta werk… #leathercraft #leathercrafting #leather #leatherworking #leathertooling #madeintheusa #handmade #madeinamerica #craftsposure
Good evening everybody! This here’s a brand spankin’ new, all original wallet that I finished in the wee hours of the morning yesterday… Huzzah!!! I can tell that I was out of practice regarding work a bunch the last 3 months!? I feel like I’ve been filled with so much pent up inspiration & new ideas, that (now that i have a bit more freedom to fill all this stuff that won’t stop flowing out of me…… My ETSY shop is finally up and goin again, so I’m just gonna keep adding more and more….. For now tho, its elbow grease time, so back to work with me! Realclassleather.com is now linked to my Etsy Shop, and will redirect you there from my header Link! Till the next time y'all! Cheers! #leathercraft #leathercrafting #leatherwork #leatherworking #artnouveau #handmade #madeinamerica #madeintheusa
Happy Mothers Day! I’ve been feverishly working this whole weekend, making stuff, and spending hours on the interwebz re-setting up my old Etsy account, since I decided to start my business sorta from scratch again, and rebuild it from the ground up! I’d let RCL slip thru the cracks this past 6+ months, while dealing with a love affair that took most of my energy. Now I’m finally ready to prioritize the Real Class portion of my life! Since traffic petered out to my BigCartel sight (my own fault), I wanted to build a better foundation, and after checking out a multitude of web-hosting sites, I realized that good old Etsy made the most sense for now! Eventually i will have another website all my own, for now tho, I’ll enjoy the added traffic thru Etsy! Here’s the finished product of the Ladies Clutch I made, and I plan on making more! You can still type in realclassleather.com and it takes you right to my Etsy shop. Easy Peasy! Okay, gotta run! Cheers everyone! #leather #leathercrafting #leathercraft #leatherwork #leatherworking #handmade #madeintheusa
Woohoo! It was totally one of my new favorite times of year this past week! I got to celebrate a merry, “Time-to-update-and-design-all-new-business-cards-mas”!?! Hours of fun in front of a toasty warm computer, cutting and pasting untill a fancy new card spewed forth into my life! Oh happy day! In all seriousnes tho, I am stoked that Moo finally upgraded their friggin color selection, and tossed in a few new fonts to choose from… So my new cards are actually really kinda classy, fancy even!? Wierd!? Plus I found this fun pattern for card cases, so, now i can be a nerd and make these neat little business card bag/case/holders as presents…Totally bitchin, yo… I suppose, with that, I’ll bid you all a good night! #leathertooling #leatherwork #leatherworking #leathercraft #handmade #madeintheusa
Good evening! So here’s a belt i sent off last week, which was fun to make, since my only guide lines were “Egyptian Goddesses & black panthers”… So since I’d been wanting to do more involving the serpant myths of The Egyptians, I jumped at the chance to make this with the Goddesses Melsokar & Eileithya, the guardians of upper & lower Egypt and who are a part of “The Avenging Cabereii, or "the torturers of the wicked” in purgatory. Apparently they were known for flailing the dead & condemned with whips made of live snakes, and/or, thrusting them into a lake of fire! Yipes! Well there’s a lil bit o trivia for everyone… I’m getting stoked for summer, gardening and making new sh#t finally, since I’m almost caught up with all the work that’s piled up the past few months… Can’t wait! For now tho, realclassleather.com is running on autopilot untill I get done catching up. There’s still some rad stuff for sale up in there, so please have at it! Any questions? Hit me up thru the contacts page on the site. realclassleather.com #leather #leathercraft #leatherwork #leatherworking #madeintheusa #handmade
So I’ve been busy, busy,busy lately, and never really think about interweb life while I’m in the process of living regular-life, so I figured I should throw up (ha! “throw up”) a new picture seeing as tho it’s been a good month and a half since last I graced these humble pages with one of my ramblings & creations!? Here’s one of many new projects I’ve been fooling around with the past couple months, tho I don’t know if I want to sell this or keep it all to myself!? See, I love “remnants”, going to fabric stores and digging thru piles of leftover pieces of stuff that’s destined for a landfill, sometimes jumping in dumpsters, or jumping out of a car, knife in hand, and tearing apart an old couch on the side of the street, just to hack off a chunk of fabric that grabs my attention and inspires me! My favorite part is the challenge of taking that tiny amount of whatever it is, and creating something new, and one of a kind with the little bit “the Fates” have allowed me…. This here “weekend bag” is a perfect example of this, and I have just enough of the main tapestry to make one more, if I’m so inclined….. Anyways, there’s a fun rant till next time (which I’ll try to make happen sooner than later…). I’m also in the process of revamping my website, so for now I’m using the basic BigCartel “no frills” version of realclassleather.com, so please excuse the “un-zazzy-ness” of its current form! realclassleather.com has still got some rad stuff up in it tho, so feel free to browse! Cheers! #leather #leatherworking #leathercraft #luggage #madeintheusa #handmade
While I’m at it on ye ol Instagram, here’s another shot of the bag I finished yesterday, as well! Its for sale up on my website: www.realclassleather.com I’ve been havin fun wondering off my own beaten path, creatively speaking, that is… Certain items that I thought would be harder to make have been either a lot easier than I’d thought, or I’m just starting to get how some of this stuff comes together. Cuz the placement of certain pieces just fit together in such a natural way that tge whole puzzle comes together practically by itself!? (I’m talking about patterns and designs by the way, even tho it does apply to other aspects of my life, too!) Anyways, I hope everyone has a great weekend! Stay warm! #leatherworking #leathercrafting #bucketbag #MadeintheUSA #leathercraft
So after about a week er so, I’m finally getting to the finish line with a few of the many projects ive been focussing on… Lately ive been a little obsessed with all manner of Bucket Bags or Bucket/coach bags… Heres one i just finished and is goin up for sale on the website tonight at: www.realclassleather.com And since this is my first one, Ill keep the price relativley low for now… this is going up for $225 (which includes the shipping), Theres only one for now, so get it while ya can… I don’t feel like ramblin on anymore for now… YOU NEED THIS! HA! #leathercraft #leathercrafting #leatherwork #leatherworking #MadeintheUSA
So I’d been meaning to make another one of these Isis wallets again, since the last/first one was sold about ten minutes after i posted it about a year ago, and I’m doing this for the original price, which was $125 + shipping… It’s kinda like a “Got-Home- Late-Last Night-After-Driving-Straight-From Tucson, And Practically-)Coasted Up On Fumes To My Front Door Since Gas Prices Went Up The Day I Left, So Now I’m Broke” Sale! Only this one wallet tho, so if you want it, come and get it! GO TO www.realclassleather.com to see this and the few other pieces available! Cheers! #leathercraft #leatherwork #leatherworking #MadeintheUSA


 but it’ll look better. My secon")


