#moxiong

Part 1:
https://yi-gege.tumblr.com/post/654717883460517888/mo-xiong%E6%8A%B9%E8%83%B8-source
Part 2:
https://yi-gege.tumblr.com/post/654854947574251520/mo-xiong%E6%8A%B9%E8%83%B8-part-2
完成主要部分 | Finishing the main body
你們知道我花了多少時間傷腦筋因為我不知道這個要放什麼名字嗎?天啊
有顏色的 那 一 條 布翻過來縫到前面
雖然這很像縫裙子的方式, 從外面縫的地方是外面,不是裡面 因為你穿的時候會把 上面那條布翻出來 露出裡面
縫好後熨燙一下。
Flip the colored strip of cloth over and sew it to the front
While this is very similar to sewing the high-waisted skirt, the part that is sewn from the outside is different–it is the outside, not the inside. This is because when you wear this, you will flip the top band down, exposing the seam on the inside.
Iron it after you finish sewing.
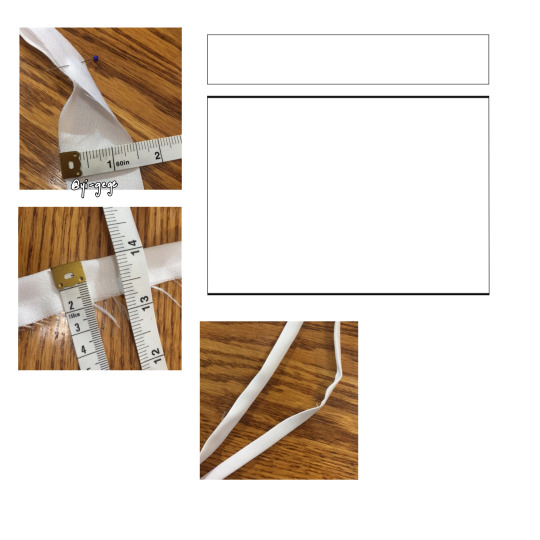
弦 | Ties
因為這是我第一次做這個,我亂猜 繩子應該多寬 後來覺得弦太細了
我建議你們把它弄粗一點 ~1/2in
用普通布做繩子 穿的時間可能會讓你感覺太緊 不舒服 所以你也可以用一根細的鬆緊帶作為繩子
那麼長度呢 我在視頻中看到 那個姐姐 把 繩子 從後面 拉到前面 的時間 繩子還能夠到達她的 膝蓋上
大家都應該知道如何做吧? 縫好後把裡面翻出來
縫好後熨燙一下。
Because this is my first time making this, I guessed the thickness of the ties, but I think I made the too thin.
I think I would recommend a thickness of ½ inch.
Making the ties out of cloth might make it feel too tight when worn for some people, so you can also use a thin elastic as the ties.
For the length, you can see that the sister in the video, when she pulls the ties from the back to the front, the ties still reach the tops of her knees.
Everyone should know how to make this, right? After sewing, flip it inside out.
Iron it after sewing.
繩子縫上!! | Sewing the ties on
縫好後,旁邊應該只凸出一點點
When you are done sewing, sides should only stick out a little bit.

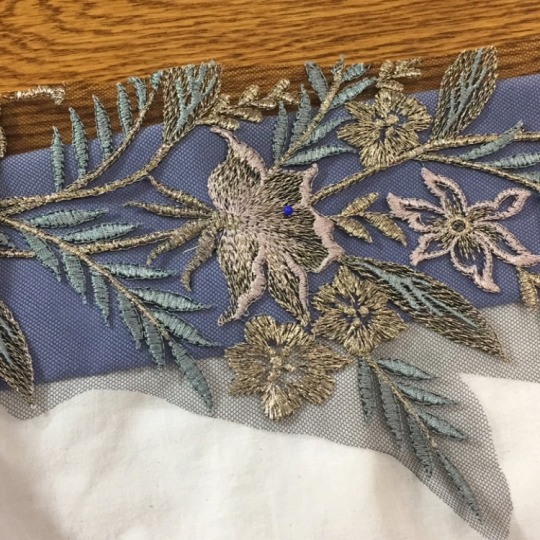
刺繡 | Embroidery
這不是必需的,因為並非所有 的 抹胸 都有刺繡
我買了刺繡,剪下網布,縫在布上
還 有 ,有些 抹胸上面 比較細 一點 所以 看 看 你喜歡什麼
This is not necessary, since not all moxiong have embroidery, but I bought embroidery, cut out the lace, and sewed it on.
Also, not all moxiong top band are as thick as I made it; I’ve seen some with thinner upper bands. It depends on what you like.
完成了!
Finished!
Part 1:
https://yi-gege.tumblr.com/post/654717883460517888/mo-xiong%E6%8A%B9%E8%83%B8-source
Part 3:
https://yi-gege.tumblr.com/post/654910337288650753/mo-xiong%E6%8A%B9%E8%83%B8-part-3
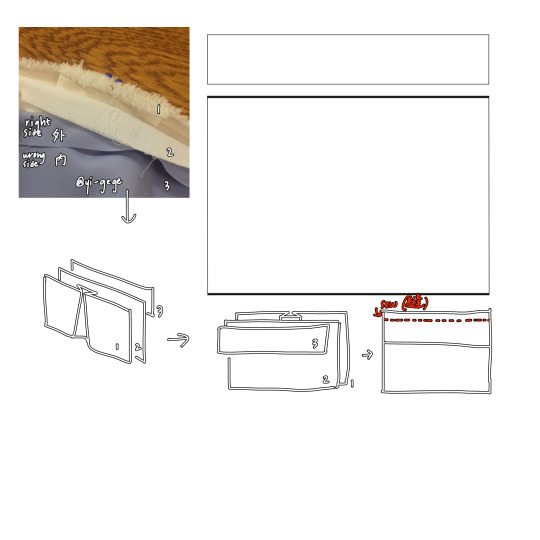
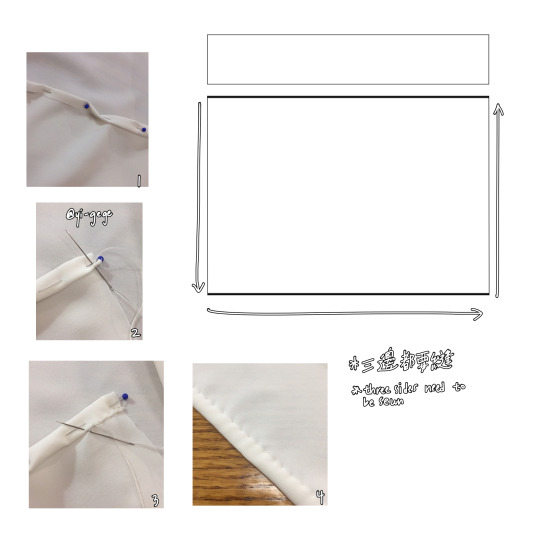
處理毛邊 | Raw Edges
布上的毛邊向內折兩次; 縫上 可以按照我在照片裡面的方式或者可以使用任何其他方式,只要它被縫合
Fold the raw edges over twice and sew, either using the stitch I used in the picture or any other way, as long as it has been sewn down.
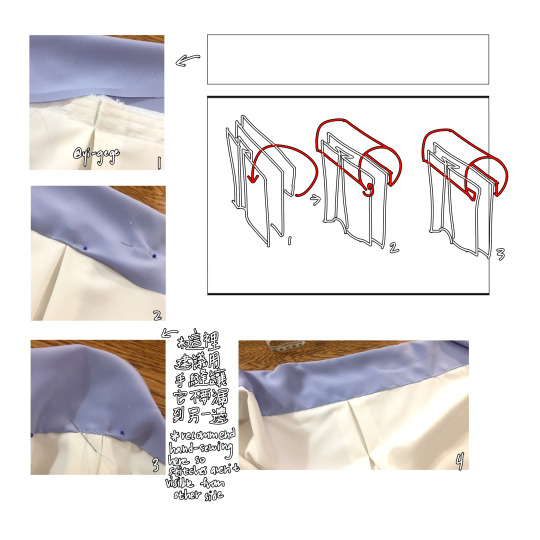
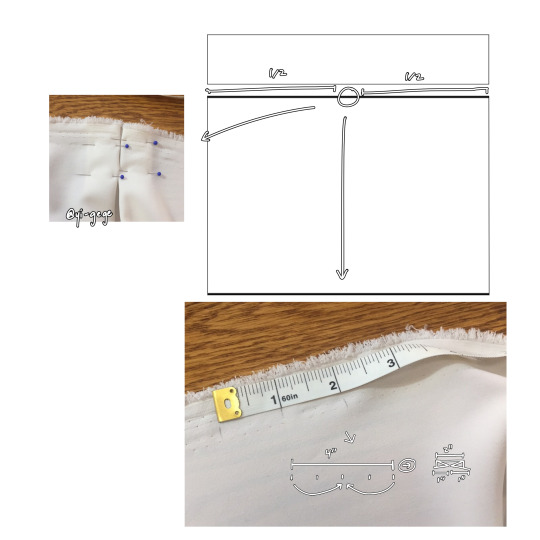
中褶 | Middle Pleat
先找白色布的正中間 畫一條線 再把它左右邊各畫2in的線
畫完的時候把左邊跟右邊最旁邊的線對到中間的線上面
Draw a line to mark the middle of the body and mark two inches on either side. Fold the lines on the left and right to the line in the middle (this is the side that will show on the outside).
把布縫在一起 | Attaching the pieces
因為我的布很薄,所以我又加了一層,但你不必
像照片裡面一樣把布疊起來: 注意布的方向
細 的 那塊布左右應該比大布長一點因為大塊的布已經把毛邊處理好了
Because my cloth was thin, I added another layer, but you don’t need to. Layer the cloth like in the picture and sew along the top. Make sure of the way the cloth is facing.
Your top strip should be a little longer on the sides than the bottom, since the top still has its raw edges.