We’ve got a database for Bodyshop defaults,object defaults,palettes,Maxis match custom content, multple databases for conversions; so if you want to download something, you should have no problem finding it. But what if you want to know something instead? Then you better have that one tutorial you need bookmarked or you’ll have to offer your first child to Google in order to find it on the 8th search page between the clothing stores and videos of people putting glue in their noses. Well, let’s make an end to that kind of nonsense.
This is the TS2 tutorial database, a place to learn about the crazy game called The Sims 2. So take the tour and go learn something you didn’t know yet!
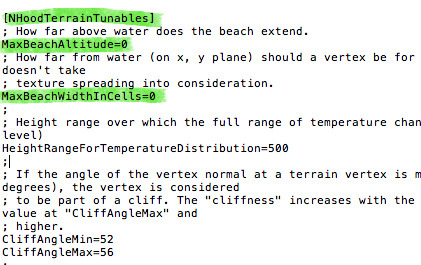
The size of the sand beach in your ‘hood can be adjusted altering NeighborhoodTerrain.ini of your actual EP (I keep forgetting which one, so I replace all .ini files in every EP folder)
This is what I’m experimenting with. Also including this part:
; Upto water depth do terrain paints get applied WaterDepthThresholdForPaint=
Here’s the tutorial on setting up different outfits for different traits – such as different social classes – with my bodyshapes mod. It also explains how to change a shape’s default assigned outfit.
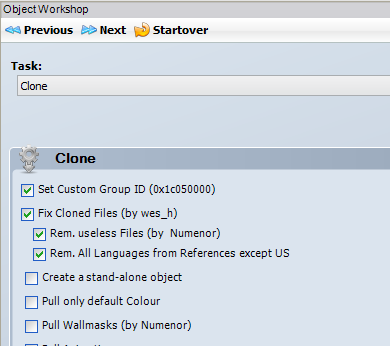
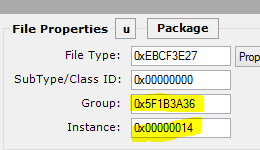
1) Open up the recolor file for the specific garment you want the sim to age up into. Make sure it’s already bodyshape-friendly using this tutorial. (One important caveat – if the outfit will be used as either outerwear or athletic wear, it must not be enabled for maternity or the game will crash when the sim tries to change clothes. I don’t know why.) Write down the group and instance numbers, and then open up the Object Workshop.
2) Clone the uniform template. Make sure to give it a new GUID and write the new GUID down.
3) You’ll see four 3IDRs with different instance numbers:
0x1 is YA 0x2 is elder 0x3 is adult 0x4 is teen
Open up the one you want to change.
4) The second through eighth lines of each 3IDR refer to individual garments.
1: ignore this line 2: everyday 3: sleepwear 4: swimwear 5: athletic 6: formal 7: outerwear 8: underwear
5) Pick the line or lines you want to change, and edit the group and instance numbers to match the ones you wrote down for the item you want sims of that class to be automatically assigned.
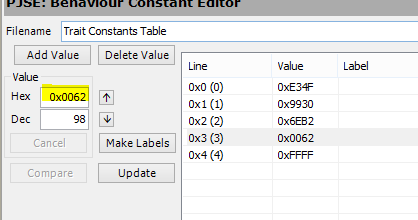
6) Now, open up the LadyApple2 file and look at the BCONs. You’ll want the second one, the one with an instance number of 1001.
7) Put the last four digits of the trait’s GUID into the first line, the first four of the trait’s GUID into the second line, the last four of the uniform’s GUID into the third line, and the first four of the uniform’s GUID into the fourth line. (That is, if the trait is 0x9930E34F, the first two lines need to be E34F and 9930. If the uniform is 0x00626EB2, then the third and fourth lines need to be 6EB2 and 0062.) Leave the last line as 0xFFF.
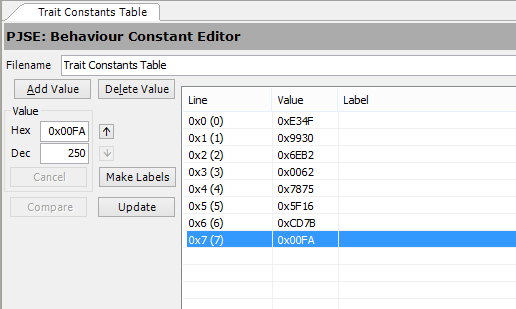
8) If you just wanted one trait to have its own uniform, then you’re done. But if you wanted multiple traits to each have different uniforms, you need to add some lines to the BCON so there’s room.
First, go back and repeat the steps above for each trait you want an age-up outfit for. Then, once you’re back at the trait constants table, delete the last line (the one with 0xFFFF as its value).
9) Add another group of four lines and fill them in for the next trait/uniform using the same pattern (last 4, first 4, last 4, first 4).
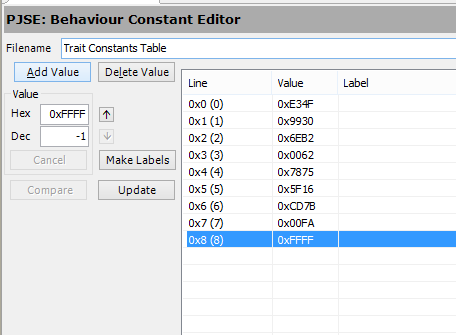
10) Finally, add one last line and make sure its value is 0xFFFF. This is important. The mod will only know to stop looking for more traits when it finds a line that says 0xFFFF; if you leave it out, you’ll get errors.
That’s it!
One thing to note while you’re doing this is that the mod will stop as soon as it finds one trait that the sim has. So let’s say you add first the royal trait with Western-style royal clothes and then a Far East trait with Asian clothes. If you’re giving a token to the emperor of Japan, the mod will see the royal trait at the top of the list, assign the royal clothes to the sim, and never even check for the Far East trait at all. So if you’re doing anything complicated you’ll want to be careful with their order.
Another thing to keep in mind is that if a sim is given a relevant trait after they already have a bodyshape token, it won’t immediately give them a new outfit, but (as long as you allow about six hours for the mod to notice the change, or else leave the lot and come back) they’ll get the right clothes the next time they age up.
Finally, one last thing – if you want to change the default, no-trait-found outfit, you’ll open up the LadyApple1 file, filter it so that only resources with group 0xFFFFFFFF are showing, and then follow steps 3-6 with the 3IDRs you’ll see there.
DO YOU WANT TO MAKE DEFAULTS THAT: - Allow you to have recolours of the original Maxis mesh even though you’ve replaced that outfit in the catalogue? - Are enabled for young adult AND adults if they aren’t already? - Replace an outfit with heels with an outfit with flats and want correct shoe sounds? - Allows you to be able to make recolours of a mesh you’re using for a defaulted outfit that you can upload and anyone can use them without having the same defaults as you? - Replace a single-group outfit with a multi-group outfit? - Only replace the exact outfit you want to replace (e.g. replace ONLY the blazer and pleated skirt outfit for children WITHOUT changing the private school mesh? Or replace the two medieval gowns without replacing the third Vampire one? etc) - Look like outerwear and you want them enabled for outerwear? Or formal? Or athletic? etc? - Has a lot of original colours and you want to use different meshes to give variety (e.g. there are at least ten different colours of ‘dresslongtrumpet’. Instead of using the exact same mesh ten times, you could use the same dress, with a bunch of shoe options?) - Or, you know, you just want to make a plain ol’ default replacement
I’d really appreciate anyone’s feedback on this, whether it makes sense, whether it works… is it easy to follow? Is there anything that needs more explaining or clearer pictures?
This tutorial miniseries will ONLY teach you the GIMP part of recoloring. It assumes you already know how to extract a texture, make your recolor file, and then import a DDS. It will work for clothes, objects, makeup, hair, etc. If you need beginner’s level help, you’ll need to find a tutorial for whatever type of project you’re doing. You’ll also need GIMP installed. Go get it, if you haven’t yet.
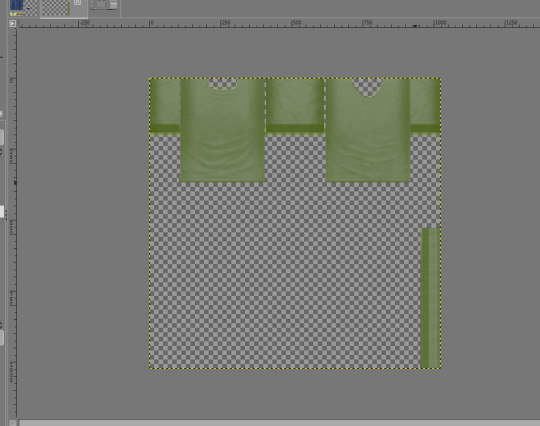
Part 3! If CurvesorHue-Chroma haven’t gotten you the result you wanted, Fill might be right. I only use Fill when there’s a specific color I’m trying to match and I don’t have a Curve for it.
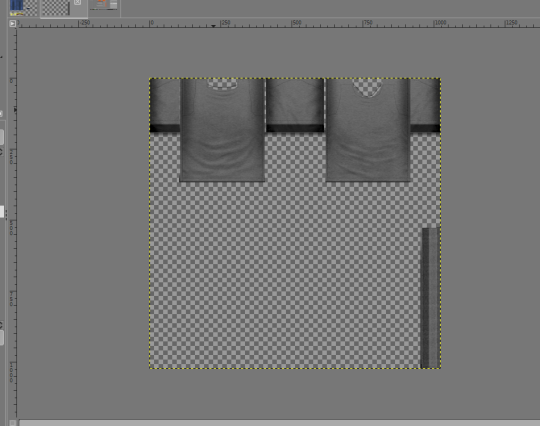
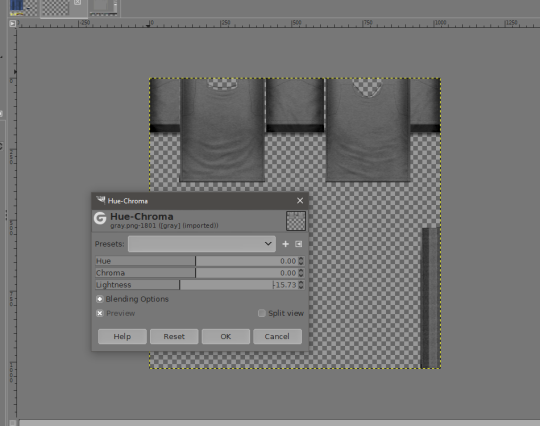
Back to the gray base texture from Part 1, after we darkened it.
If you’re using fill to match a specific color, use the Color Picker tool or hex value to set that color as your foreground color. Click the Bucket Fill tool and set the opacity fairly low. 30% is a good starting level. (Do I need a screenshot of this?? I don’t know!)
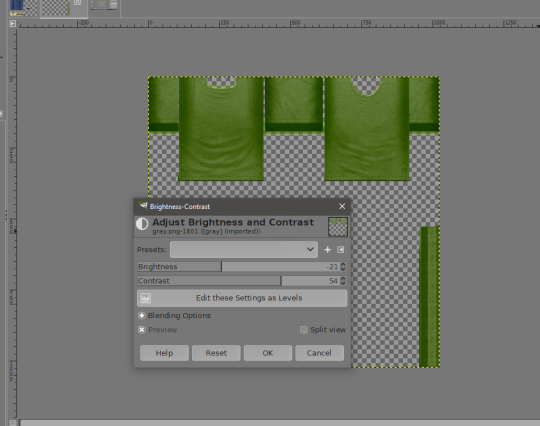
Click all of the parts you want to recolor. You might need to play around with the Bucket Fill opacity until you get a decent balance of color and texture. But now it’s all washed out. We’re gonna fix that by tweaking the brightness and contrast.
Color > Brightness-Contrast will bring this tool up. Slide them around a little until you get what you’re looking for.
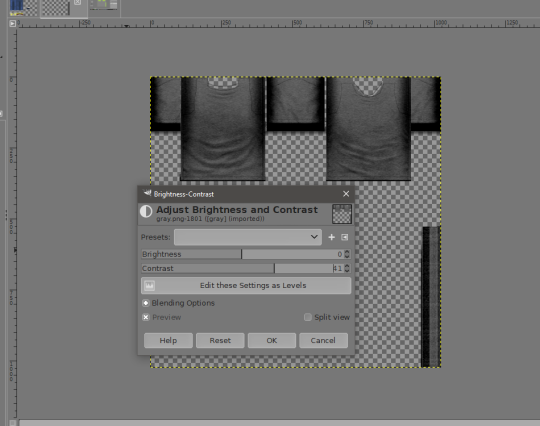
Still not right!? Yeah, that can happen. There’s a second way to use Fill, and sometimes that works better.
Go back to the gray base and click Color > Brightness-Contrast. Turn that contrast up a bit. Make the texture stand out, but keep an eye out for distortion.
Use the Magic Wand (Fuzzy Selection) tool to select all of the parts you’ll be recoloring. (Or select the background and invert, if you’re recoloring the whole thing.) Make a new empty layer. Don’t miss this part.
With your desired color as the foreground color, fill the selected areas with color, at full opacity. Now you have solid colored, completely opaque bits the same shape as your texture.
In the layer menu, slide that layer’s opacity down until the texture shows through, but you still have plenty of color. Merge your layers. Kinda washed out again though, right? Same as before, adjust the brightness and contrast.
From here you can also tweak the Hue-Chroma…and that’s why I don’t love this method. Why not just use Hue-Chroma in the first place? But this can be helpful if you want to try to match something like the EAxis Ikea colors, which don’t have Curve presets. It also works pretty well, with minor adaptation, for adding patterns. Hint hint. (More on that someday, maybe.)
There are probably a bunch of other ways to recolor in GIMP, but these are the three I’ve had the most success with. As before, if anything needs clarification, please let me know. Hope this helps, and happy recoloring!
This tutorial miniseries will ONLY teach you the GIMP part of recoloring. It assumes you already know how to extract a texture, make your recolor file, and then import a DDS. It will work for clothes, objects, makeup, hair, etc. If you need beginner’s level help, you’ll need to find a tutorial for whatever type of project you’re doing. You’ll also need GIMP installed. Go get it, if you haven’t yet.
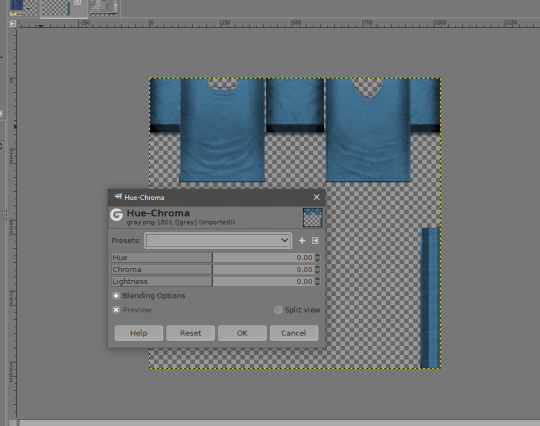
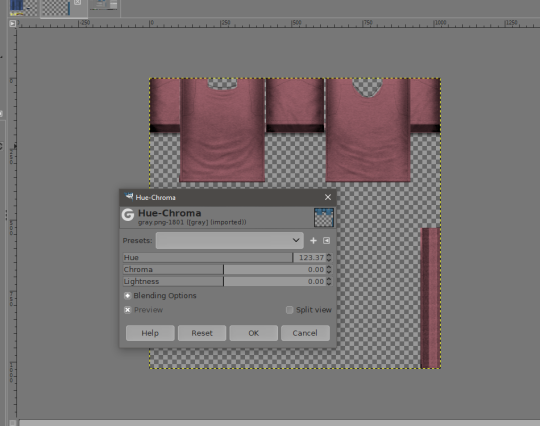
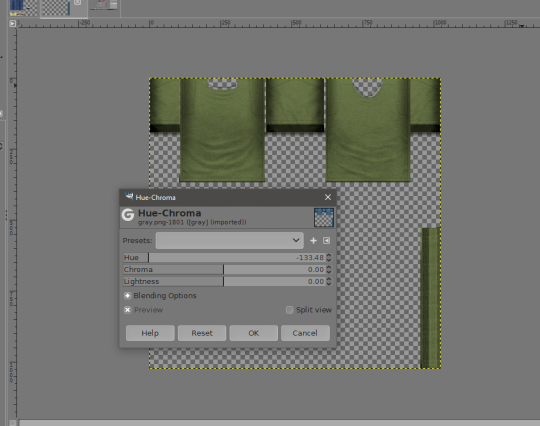
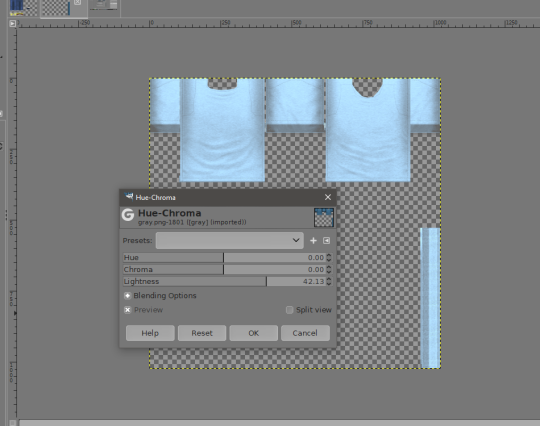
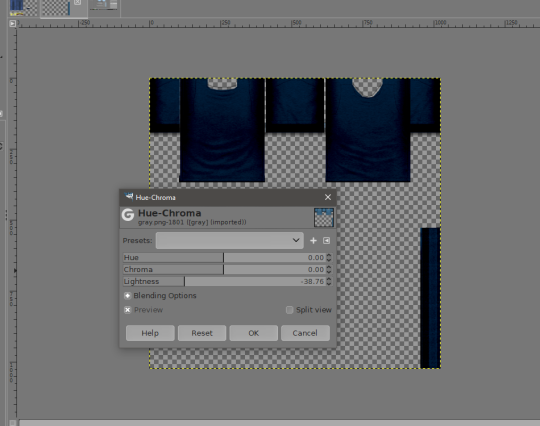
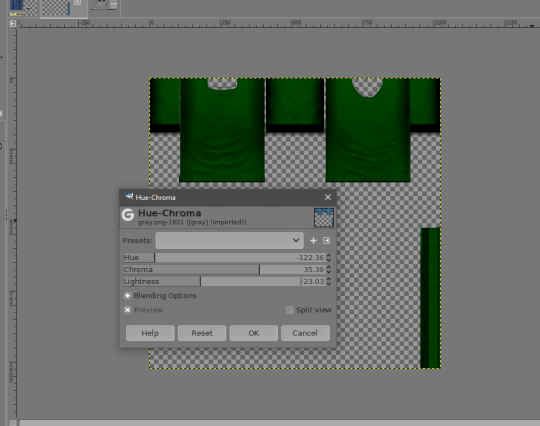
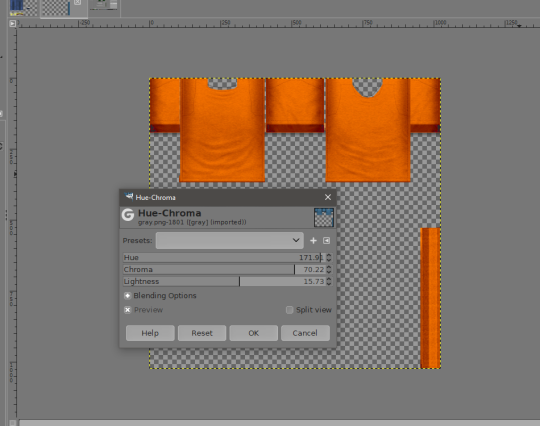
We’re starting Part 2 right where Part 1 left off. We’ve turned our gray texture blue with Curves…but none of the Curves are exactly the color we want. Hue-Chroma lets you get -exactly- what you want. It doesn’t even have to stay blue.
Open the tool by clicking Color > Hue-Chroma. The three sliders this tool has are Hue, Chroma, and Lightness. We already used Lightness in Part 1. It lets you lighten or darken the color. Easy. Hue lets you slide the color through the rainbow. Really technical description, I know. Chroma adjusts the intensity of the color.
Let’s look at Hue first.
Since we started with blue, pulling the slider up will give you pink, red, orange, etc.
Pulling the Hue slider down will give you other blues, greens, yellows, etc. This slider’s effects will vary depending on the color you start out with, but it’s pretty easy to just kinda fool around with it until you get a color you like. Use this slider with total abandon, tweaking until it’s just right.
I seem to have lost the Chroma slider screenshots. Dammit. If they’re not gone for good, I’ll add them in later. Chroma will take your color and wash it out if you slide it down or intensify it if you slide it up. Be careful with this one. It can cause texture distortion if you slide it too far in either direction.
Lightness is pretty straightforward. Pull up for a lighter color.
Pull down for a darker color. Of the three sliders, Lightness is the most likely to distort your texture. It’s also the most straightforward. Just pay attention when you use it.
By moving these three sliders around, we can get all kinds of very specific results.
Green! As dark/light, cool/warm, and soft/bold as you like!
Orange! So bold! So….orange!
I think this method is probably my favorite. I’ve been using it a lot lately. It doesn’t distort the texture as much as other things I played around with, unless you really overdo it. I’ve gotten my best results by using a texture that already has a color, especially one that was applied with Curves, like in Part 1.
InPart 3, we’ll look at a method that can help you match a specific color you already have, but don’t have a Curve for.
When I described a possible “quick tutorial” yesterday, I should have known better. I decided to break it up into three minis, each about a specific method. In this first part, we’ll be looking at Curves.
Curves can be used as GIMP’s equivalent of Photoshop Actions. You’ll want to download some Curves first. There’s a treasure trove of them by @iakoasimshere. Someday, I’ll learn how to make more, to round out the selection of the usual TS2 color palettes, but Iakoa’s selection is substantial. Go get a few.
This tutorial miniseries will ONLY teach you the GIMP part of recoloring. It assumes you already know how to extract a texture, make your recolor file, and then import a DDS. It will work for clothes, objects, makeup, hair, etc. If you need beginner’s level help, you’ll need to find a tutorial for whatever type of project you’re doing. You’ll also need GIMP installed. Go get it, if you haven’t yet.
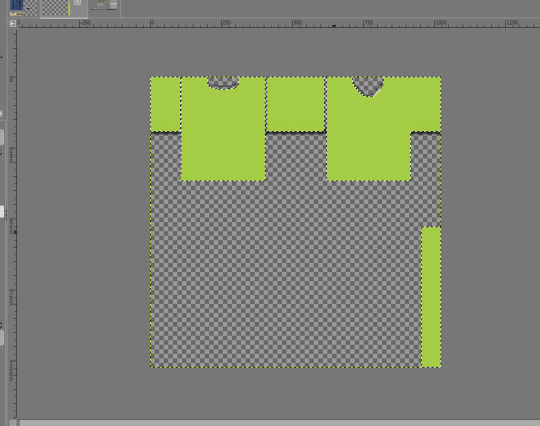
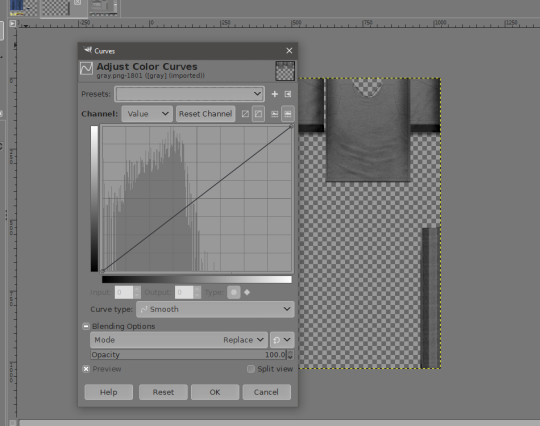
Since this is a basic tutorial, I’m using a simple texture we all know and love. Trapping’s separated Fanseelamb PJ tee. It’s all one color, and it comes in gray.
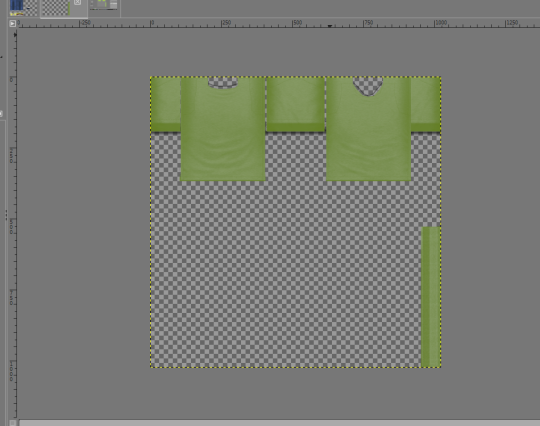
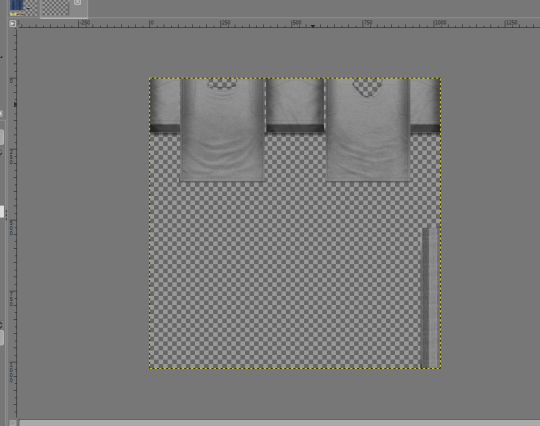
Curves are best used on a gray base. (At least for everything I’ve ever recolored.) If there’s no gray texture already, you can use the Color > Desaturate > Desaturate tool to turn everything gray. You should probably run it on grays too, just to be sure there aren’t any funky pixels that might go weird when you recolor. This texture starts out a little lighter than we want, so let’s darken it. I like the Color > Hue-Chroma tool for darkening. It’s gonna be part 2, but for now we’re just using it to darken the texture to a mid-gray.
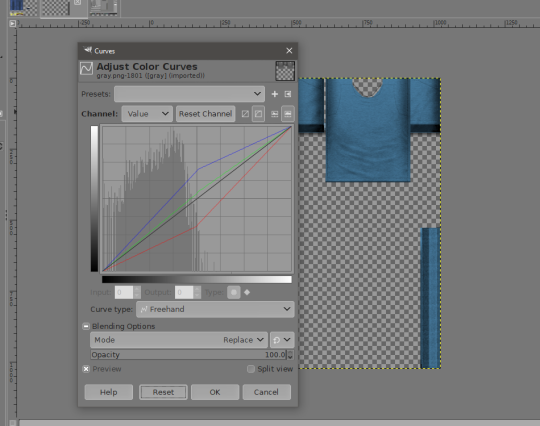
Click “OK”. Now for the Curves! Click Color > Curves to bring up the tool.
To apply a preset curve (the ones you downloaded and unzipped somewhere easy to find), you’ll click the little backwards play button looking thing next to the presets dropdown menu. It will bring up a file opening dialog. Pick a Curve to use, and apply it. (I probably should have gotten a screenshot of that, but you know what picking a file looks like, right? I might come back and circle that button, because tinytiny.)
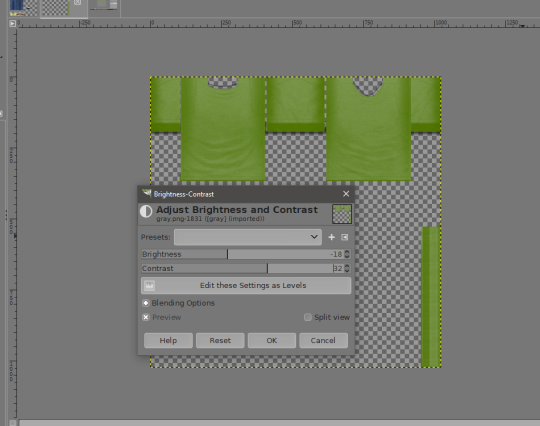
If you like the result, click “OK”. If not, click “Reset” at the bottom. It will revert to dark gray, but the Curves tool will stay open, and you can pick another Curve. Some curves do need a lighter base, mostly pastels. If your results aren’t right, try adjusting the lightness of the texture. If you get bright or dark spots, adjust the contrast with the Color > Brightness/Contrast tool.
That’s it. It’s that simple. Once you like a result, File > Export will let you export it as a DDS file for importing into SimPE. This method is great for making stuff match. It’s what I used to do pretty much all of my recolors that are in a popular Sims 2 (or 4) color palette.
I learned how to use Curves from Iakoa’s tutorials. My tutorial is very condensed, and uses a more recent, English language version of GIMP. Hers are still very much worth a look. This one will teach you the basics, and this one will help you in way more depth if your results aren’t turning out right.
In the next mini-tutorial, I’ll show you what I use when I want -exactly- the color I want.
Just a quick little tutorial for neighborhood creators who would like to fully customize their neighborhoods! ^^
By the end of this tutorial, you should be able to do things like these!
For this tutorial, you’ll need:
*SimPE 0.75_69 *Alt Sim Surgery * Christianlov’s Gussy Up plugin (you can find it in this archive) OR InSimenator (which has the Temporal Adjustor which you can use to fix the sims’ appearances)
Click here to read the tutorial! I hope you found this tutorial helpful and let me know if it worked for you! Good luck!<3
P.S. This is precisely how I customized the NPCs in my neighborhoods projects as well, including Sedona, Quadington University and Aileen Landing. :)