We’ve got a database for Bodyshop defaults,object defaults,palettes,Maxis match custom content, multple databases for conversions; so if you want to download something, you should have no problem finding it. But what if you want to know something instead? Then you better have that one tutorial you need bookmarked or you’ll have to offer your first child to Google in order to find it on the 8th search page between the clothing stores and videos of people putting glue in their noses. Well, let’s make an end to that kind of nonsense.
This is the TS2 tutorial database, a place to learn about the crazy game called The Sims 2. So take the tour and go learn something you didn’t know yet!
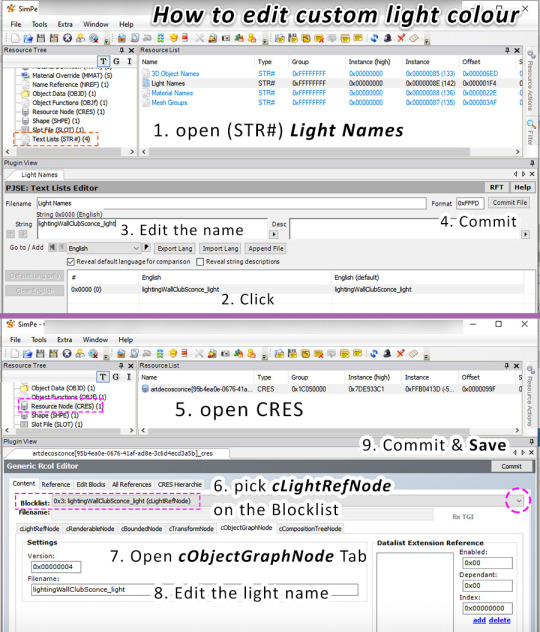
Mini-tutorial: How to change light settings / light colour for custom TS2 lamp using SimPe.
It’s very easy. You replace the name inside Light NamesandcLightRefNodewith another TS2 light name. You’ll find the light names inside custom lamps you have in your game (those that work properly, ofc) OR you can clone a TS2 lamp and inspect the light name. Use the light name found in CRES / cLightRefNode, NOT in STR Light Names.
In most cases replacing the name inside CRES / cLightRefNode is enough to make it work - that’s the most important bit. Buuut.. it’s good practice to fill out the STR# Light Names as well.
More info, Light names and sample pics below the cut!
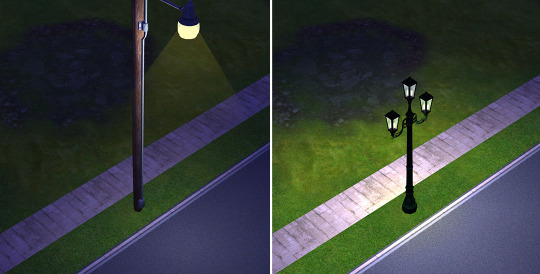
You can change the colour of light but please note that the light point location (height) or direction / angle is not dictated by light name settings and it will stay the same.
What does that mean? Those two street lamps in the pic below use exactly the same light colour and intensity, but the light source for Tri-LuminlightStreetlamp is located much lower. So it makes a huge difference.
If you’d like to create a floor lamp that’s pretty small, like a lantern, and you’d like to have realistic light effects, you clone table lamp, replace or edit BHAV (so it could be placed on the floor without cheats) and recategorize it as floor lamp. OR, If you’re making a floor lamp that’s very tall, you could clone ceiling lamp and move it to floor lamps category.
Most light names - event though there are many of them - refer to identical or very similar light settings. And that’s because there are only a few light colour presets apropriate for indoor lighting in the game. EPs / Stuff packs have a separate file that assigns one of those colour presets - plus intensity - to each lamp that came with that EP / SP.
Most TS2 lamps get either softAmber or softWhite light colour, and intensity levels set between 4 - 6. So, not too many combinations to choose from.
You can use floor lamp light settings for table lamps etc.
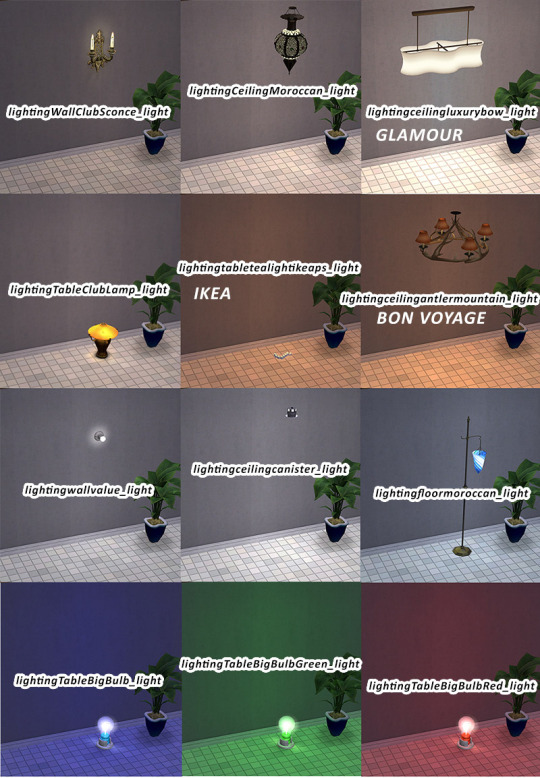
The light names I use most often are:
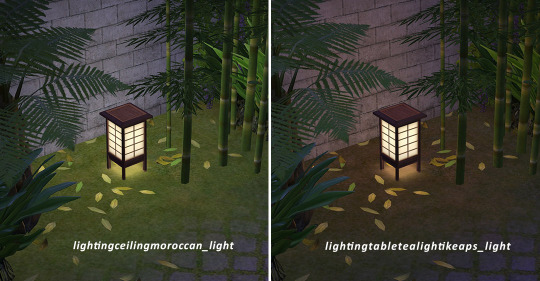
lightingceilingmoroccan_light(Qadim Bauble Ceiling Lamp), soft amber, my favourite light for table / floor lamps and pendant lights. Please note that certain lighting mods turn it into cold white light for some reason.
lightingWallClubSconce_light - amber, warmer than light above but it’s brighter in the center.
lightingtabletealightikeaps_light - fire colour, very warm, used by IKEA candles:requires IKEA EP, or custom lamps that use those settings will not work properly. (Antler ceiling lamp from Bon Voyagelightingceilingantlermountain_lightuses the same fire light colour, but a notch brighter - and requires BV).
Ribbons Aplenty ceiling lamp settings lightingceilingluxurybow_lightfromGlamour SP is probably the brightest warm light you’ll find in the game.
Coloured lights of NightLife neons, and any other that were added as override settings (for TS2 lamps with changeable light colour) don’t seem to work at all for custom lamps.
It’s possible to create custom light colour for the game (there’s a tutorial on MTS) but that’s pretty advanced stuff.
Screenshots taken indoors at night time, with a single lit-up light in the room.
If you use lighting mods, these lights might look very different in your game.
I don’t use any lighting mods made by others, but I did fiddle with game light files to change light intensity and switch white colour to warm for some lamps.
You’ll need SimPe, 3D software like Milkshape or Blender 2.79b and 2D software like Photoshop or Gimp.
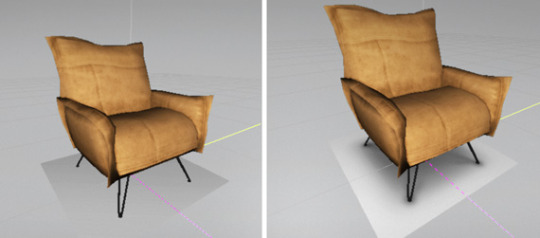
First part is easy. I’ve described my process of creating a texture for TS2 cc object that already has a working shadow subset.
Second / more advanced part is not exactly a step-by step tut, but it contains various tips and explains what resources are required to create a shadow subset.
Full tutorial under the cut:
Note:
if you are reading this on my Tumblr, and you can’t enlarge pictures, try to right-click on a pic and “open in a new tab”. Or you can enlarge the page in your internet browser [Ctrl] + [+]
First part of this tut is for objects that have all the required shadow resources, OR the only thing missing is the shadow model in GMDC.
* If your object already has a shadow and you are sure that UV-mapping is not off, you can import it instead of creating a new one.
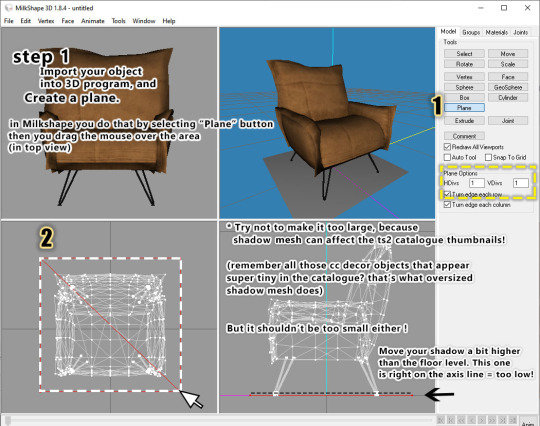
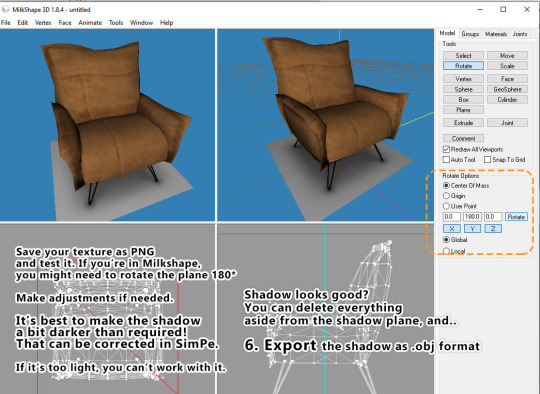
1.
When exporting the models as .obj in SimPe, you need to tick the box next to shadow model, if you’d like to export it as well (SimPe will only export ticked models !) Then click Export…button.
Furniture clones have one groundshadow, and three or four vertical shadows - if that’s the case, I recommend you delete all shadows and create a new groundshadow plane.
Oversized shadow models are the cause of sh*tty thumbnails. If some objects in your Decor catalogue are so tiny you can barely see them, here’s why.
Remember to move the shadow plane up a bit, so it’s very slightly above the ground level.
Make sure you can see your object in wireframe view. Display options for Milkshape can be accessed by right-clicking inside viewport window.
When creating a plane, drag the mouse starting from top left corner, so UV’s are not rotated.
Rename your plane: “shadow“ or “groundshadow” etc, so SimPe auto-adjusts settings for it on import.
Blender 2.79b:UsePlane button, located in “Create”Tab. Remember to tick the “Create UVs” option before you create the shape. Switch to top view by pressing 7 on the num pad, press 5 to enable isometric view.
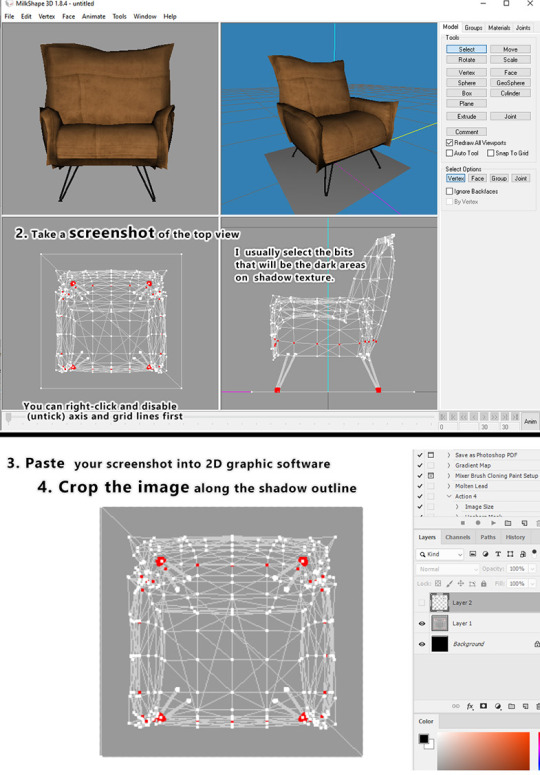
2., 3., 4.,
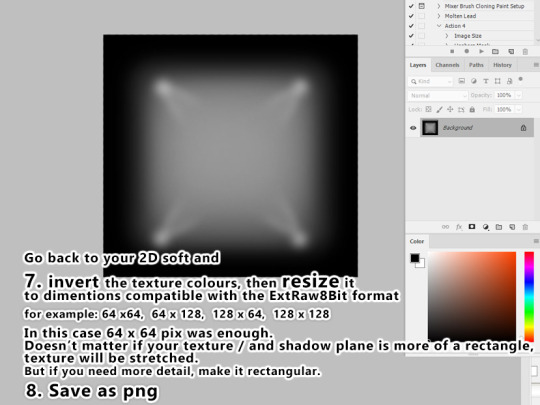
Now you can use this as an imprint for shadow. Remember to leave a tiny margin of 100% white around it!
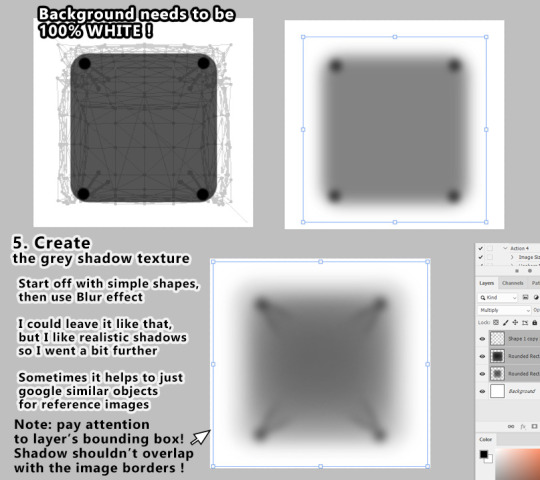
5.
Gaussian Blur comes in handy ;)
You can (and it’s best that you DO) test your texture while you’re working on it.
Texture preview in Milkshape
Double-click the shadow plane in the Modeltab. Go to Materials tab, click Newbutton, then Assign. Click on the elongated button that says <None> (there are two of those, click the upper one) and load your texture. You can reload the texture by going toEdit menu, and Refresh textures.
If shadow looks off, you might need to rotate the plane 180* (or UVs, if you know how).
Note1: you don’t have to save the image as PNG just to preview it, Milkshape (and Blender ofc) can read PSD files.
Note2: obviously, if you didn’t create your own shadow plane, and the one you have inside GMDC works fine, you don’t need to export it.
7., 8.
As I mentioned in the next pic, your .png has to be the same size as the shadow TXTR you’d like to replace. If you wish to change the shadow texture size, that’s described in the second part of this tut. Check out the pic 5 below.
9.Open SimPe and import new texture.
If you don’t “update all sizes” you’ll get funky effects in the game, shadows might change the shape or disappear when you zoom out.
Finished! Or almost finished.
If you’ve created your own shadow model (or edited the old one) there’s one more thing you need to do.
10. Import the shadow model into GMDC. If you don’t know how, look at the pic 1below.
After you test the shadow in the game, and it’s too dark or not dark enough, you might want to edit the shadow intensity in SimPe- that’s super easy. Look at pic 3below, in the second part of this tut.
Not a beginner level stuff, but if you are resourceful, have a go at it.
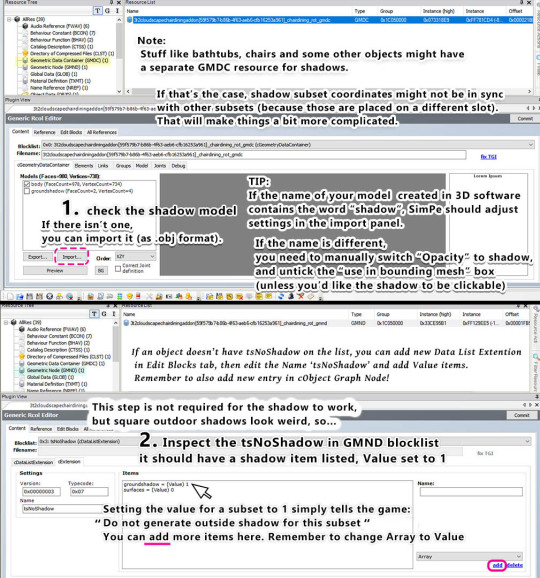
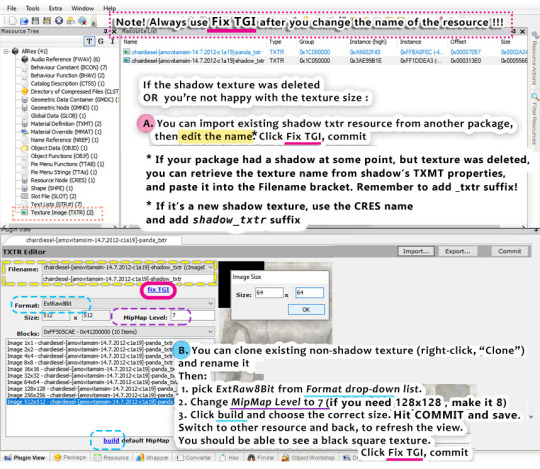
Shadow, as any other subset, requires a few resources to work properly: Model in the GMDC and shadow TXMT settings that point to the right texture. It’s also essential to link shadow subset (model name) to a TXMT through SHPE.
If a TXTR or TXMT resource is missing, you need to add it. You have 3 options:
link your model to TXMT resource from another package through SHPE. Useful if you do repo objects that are all the same shape, only different sizes.
clone existing non-shadow resources and customize them
add shadow resources extracted from another package and edit the CRES name part
And it’s a good practice to add shadow name to tsNoShadow in the GMND, so it doesn’t cast shadows when outdoors. But that’s optional.
1.&2.
GMDC - How to import new .obj model, or replace the existing model.
GMND - How to fix square outdoor shadows.
If you don’t know how to add new item to GMND blocklist - tutorials on repository technique for object add-ons etc always cover that bit.
Mesh Group Importer settings
When you click “Import..”button in GMDC and load .obj file, Mesh Group Importer window pops up. If you’ve never seen it before, take some time to explore the import options - Opacity, and Action both have drop down menus.
ChangingOpacitytoShadow is a purely cosmetic effect. But if you keep it Opaque, shadow in the game will be highlighted when somebody moves design tool over the object !
Actionmenu options are pretty self-explanatory. If you’d like to replace existing model, set it to Replace. Then open drop-down menu in the bracket below and pick the right subset.
To change the name of the modelafter it’s been imported, go to Groupstab in GMDC, click on the shadow and edit the Name: field. Commit the changes and save.
3.&4.
TXMT - How to edit shadow intensity through TXMT settings
SHPE - adding resources
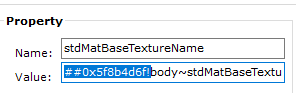
To correct shadow brightness,openCategorized Properties Tab in the shadow TXMT and look for the line “stdMatAlphaMultiplier”. If it’s set to 1.000000, shadow’s usually pretty dark. To make it softer, you need to lower this number. 0.650000 is a good starting point.
If you add the entire TXMT shadow resource extracted from another package (not to be mixed with importing TXMT properties, it’s a different thing) you need to edit the name twice - in Filename field, and cMaterialDefinition tab.
If shadow looks like a solid object in the game that means it is linked to TXMT with wrong properties (shadows require specific TXMT properties) or texture that is not ExtRaw8Bit format.
Instead of trying to edit the TXMT properties, you can import the shadow properties from another package. If you don’t know how to do that,HERE is a little tutorial
TIP: the game only displays groundshadows for certain objects when placed indoors,andsouthwall shadows(wall shadows) only when all walls are up. If you change shadow subset name (in GMDC and SHPE), shadow will always be visible indoors, and outside (custom shadow names).
Remember, it’s essential you always do fix TGIafter editing txmt or txtr name. But in case of adding or editing the SHPE parts (listed subsets) - don’t bother, because fix TGI doesn’t matter here. Stuff should work as long as you get all the names right and committhe changes.
Some old tutorials might tell you to FIX INTEGRITY after editing TXTR, SHPE, GMDC, TXMT. Don’t do it - it’s not required, and it can even break objects.
5.
TXTR - How to change format / size
Note1: For a 64 x 128 pic shadow txtr (vertical), or 128 x 64 (horizontal) use MipMap Level 8.
Note2: obviously you need to select TXTR resource to fix TGI for it.
It’snotrequired for shadow texture to have“shadow_txtr” suffix, it could be “groundshadow_txtr” of anything else.
If you’ve created/added new TXTR, remember to update texture name in TXMT Properties and TXMT File List.
If you think you did everything right, but shadow is blue.. Well, something is NOT right ;) It could be wrong TXMT name or texture name.
Check your object with Scenegrapher. It looks quite complicated but if some resources are “orphaned” = not linked to anything, you’ll see it right away. Make sure you’ve run Fix TGI on edited TXMTs and TXTRs. It’s possible you have a typo somewhere. Start with screening the resource names for missing suffixes, like _txtr or _txmt. Then check the texture names - make sure you haven’t added a suffix somewhere where it’s not required.
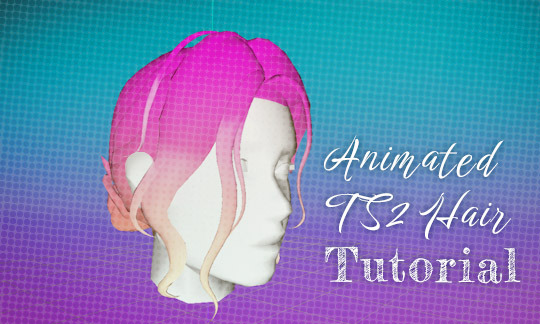
A tutorial on how to add animation effect to custom TS2 hair using Milkshape & SimPe.
It’s not meant for beginners but if you are resourceful it might just be enough.
Note: to make images more readable you can enlarge the page view in your internet browser.
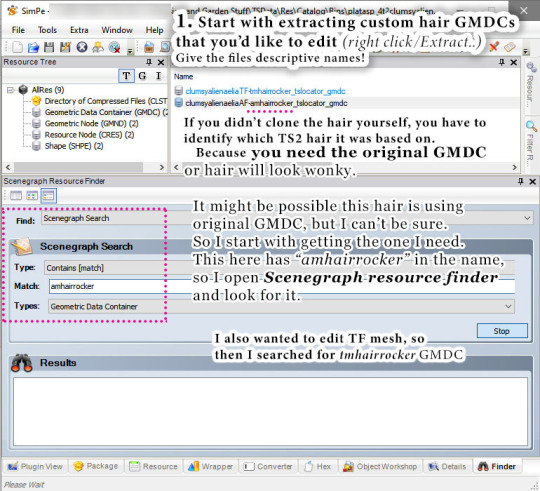
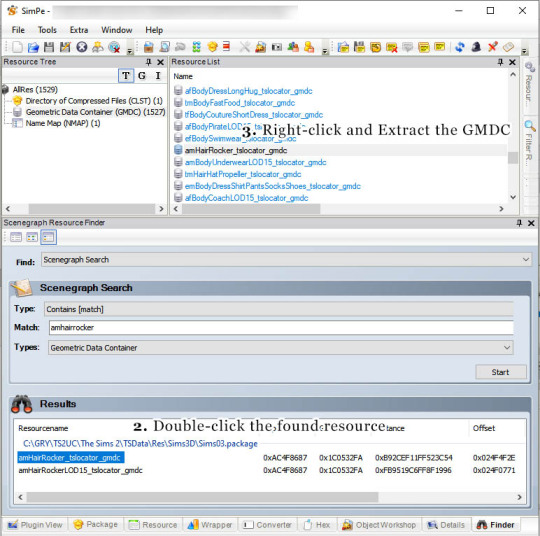
1. Get the right GMDC
And by wonky look I mean: animated parts of hair will sink into sim’s head.
2. Import it to Milkshape
Open Milkshape and import the original GMDC that you’ve found through Scenegraph search. Delete everything from Groups tab and import custom hair GMDC (do NOT include additional bone definitions!).
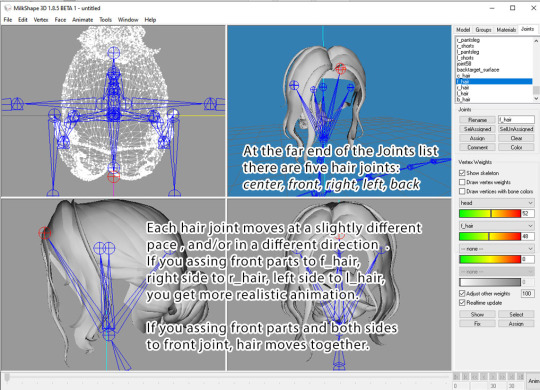
Hide the hair group (scalp) in the Groups tab. You don’t want to mess it up! Then go to Joints tab (Btw, “joints” and “bones” are the same thing).
Save the file as .ms3d (milkshape file). Give it a descriptive name!
3. Add bone assignments
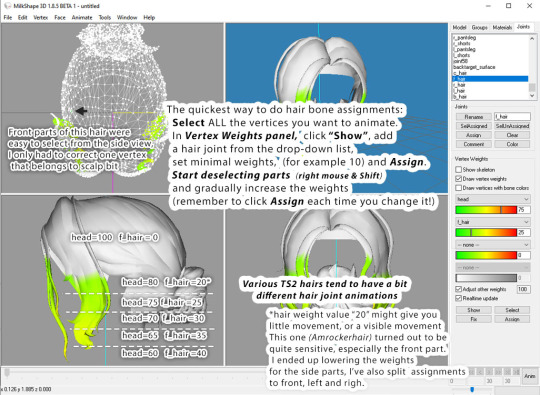
Selecting the right vertices in Milkshape can be tricky. Make sure you are viewing the mesh from different angles, and 3D view (with wireframe overlay enabled).
*I’ve described two ways to do bone assignments. First method (through Joints panel) only applies if you’d like to assign vertices to one joint. In case of hair it would be headbone. Non-animated short hairs are assigned to the headonly.
To check bone weight values, select vertices and click “Show” button (it’s located in Vertex Weights panel).
Have in mind that if you select larger chunk of the mesh the values will be an average and not very precise.
You can inspect the weights easily by ticking the“Draw vertex weights” box:
Double-click the hair joint name on the Joints list. Any assigned parts/vertices should be highlighted in green/yellow (if you see orange, the weights are probably set too high).
Rotate the hair in 3D view to make sure there aren’t any accidental green spots anywhere. If you find any mistakes, click“SelAssigned” button in the Joints panel, then deselect the correct parts and fix the rest: click “Show” then change the second joint back to “none” (and Assign).
Have in mind that adding weights to high-poly hair will make it even more taxing for computers.
The front hair strands aren’t very close to the face here. If hair is close to the skin, setting weights too high might result in hair clipping with the neck / face when sim moves!
Hair on an animated gif below has all the dangly strands assigned to front joint. I wasn’t happy with the result. Minimal weights were set to “20”, and that was a bit too much. Often it looks OK, but sometimes it doesn’t. I’d start with 10 and increase it by 3 - 5.
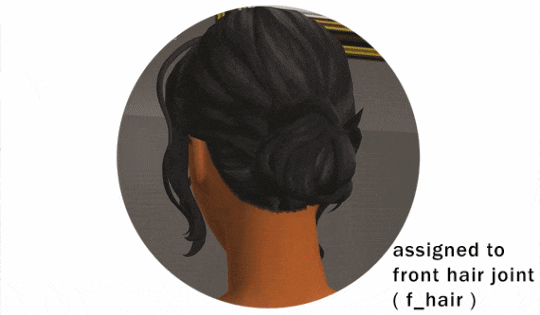
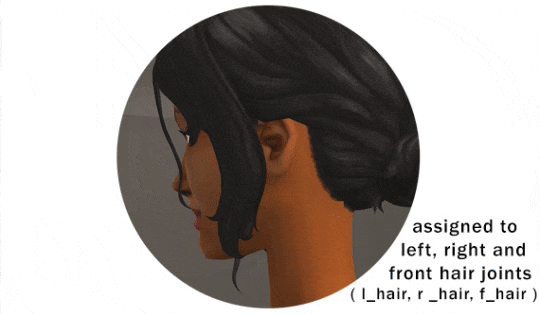
Hair below has thin front strands assigned to f_hair, but side strands were reassigned tor_hair (right) and l_hair (left). You can see the movement is quite different.
After I did that second version I went back and tried to make the thin front strand a bit less stiff. I addedl_hairweights in the upper section, to make it twist a little when it moves. Mixing two hair bone weights is not easy. It looks nice if done right, but I’m not sure if it’s worth a hassle ;)
♢♢♢
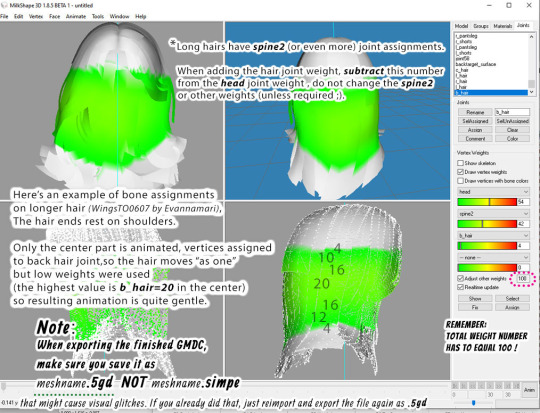
In case of longer hairs, It’s best to set weights to a bare minimum, so it won’t look awkward when you assign it all to one hair joint (back or front joint - I donotrecommendcenterhair joint, unless you’re doing a mohawk or something).
You can assign each vertex to three bones(maximum)
When editing longer hair, start with highlighting the spine2 bone assignments (with “Draw vertex weights”). Shoulder area should have head and spine2 assignments*. If you don’t know how to tackle three bone weights at once, stay clear from those parts.
* In some hair, you might also find neck bone assignments - that’s not correct, you can remove these (or replace).
4. Export the file and update the GMDC
Make sure you export the GMDC edited in Milkshape as name.5gdNOT name.simpe or you might get visual glitches, very similar to alpha blend mode issues.
In SimPe, click on the GMDC resource you’ve edited and copy the filename. Then right-click on it and choose “Replace”. Open your .5gd file, hit “Commit” button and save.
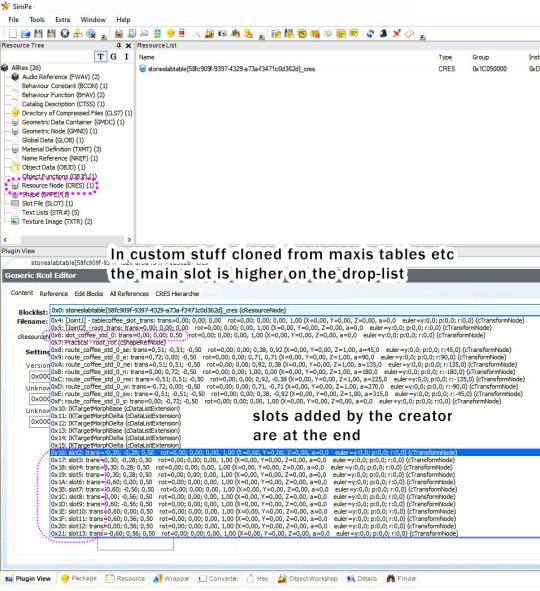
You can clone an object that has sufficient number of slots and edit the coordinates. It’s SOOO much easier than adding slots from scratch! I only did that once and I’ll never do that again.
Open the CRES resource and inspect the drop-down list. Identify the slots and type down the names. Original slots are located higher on the list (you can see this coffee table was cloned from 1-tile table, if it was 2-tile there would be another slot_coffee up there)
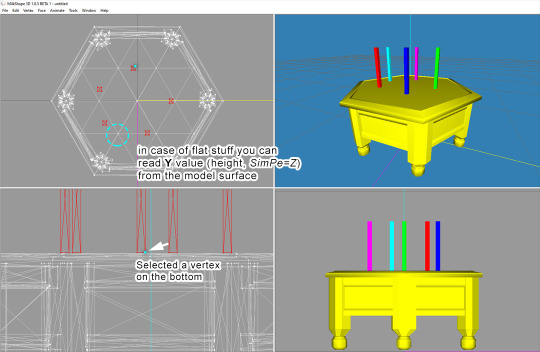
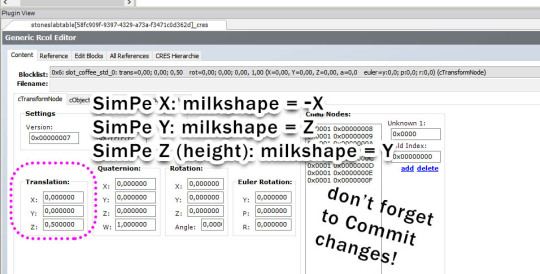
Open your mesh in milkshape, create a thin, elongated cube shape (Modeltab, “Box” button). Duplicate it as much as needed. Now you can move these around and plan where you’d like to add slots. Make sure nothing sinks into your object’s surface. Select one of the vertices on the bottom, go to Vertex menu and use Extended Manual Edit tool to read the position. Type down X, Y, Z values. When you are done with all the cubes, convert the coordinates for SimPe. It’s using a peculiar system for some reason.
X = - X (so -X = X), Y =Z, Z =Y
In case of this hexagonal table I could read the coordinates from vertices on its surface. But IMO perfectly arranged slots on coffee tables look a bit weird ;).
Figuring out the position of each slot can be tricky. But if you were adding your own slots you’d have to go through that process anyway.
Now click on each slot in the drop-down list and edit the Translationvalues.
I’ve attempted to make a new animation for one of Chimerical’s fishes made into animated objects by @deedee-sims - and it worked, BUT the tail now looks like there’s an alpha blend mode issue going on (and trust me, fish txmt doesn’t use blend mode ).
The chunk of vertices assigned to tail joint bleeds through glass. If I assign these to other joints, it doesn’t happen. In my other fish project, where I have more complicated rig, it’s even worse.
Any ideas?
Update:
Not sure if that’s Milkshape or Simpe’s fault - but one of those is clearly f***ing it up. As an experiment, I tried to do the same thing (export and import) on an ancient PC with win XP. Fish looks normal now.
Update2:
This issue was caused by exporting the GMDC file in Milkshape asfilename.simpe. If I use .5gd extension, it’s all good.
I’m baffled Is it common knowledge that you should export jointed GMDC in Milkshape asfilename.5gd, not .simpe ? I’ve just discovered all the issues I had with weird-looking meshes came from this.
My Milkshape will use .simpe file extension by default. But it turns out that can cause visual glitches. It happened to me on a few different systems, different versions of Milkshape and SimPE.
A little tutorial on how to quickly preview your texture for a TS2 object (or any other mesh) using Blender 2.79b - very usefull when you’re working on recolours. Contains a few other tips.
Texture preview in Blender 2.79b is much more convenient than Milkshape, as you can load many textures and quickly switch from one to another. It’s also much easier to figure out a UV layout.
(I assume you already know how to export the .obj from GMDC resource in SimPE, that’s not covered here)
Notes:
This tutorial mightwork for other Blender versions. It will not work for Blender 3. IMO, if all you want to do in Blender is recolour previews, UV-editing and simple meshing, 2.79b is more than enough. There’s even a GMDC plugin for it, that seems to work well for the chosen ones some people Blender can read .psd files and other texture formats. GIMP’s .xcf file format is not supported though, and I don’t think there are any plugins for it (?) so if you’re working on a file with layers, it has to be exported as PSD.
1.
If you’ve just installed Blender, take some time to read the button names and such.
If you create too many new windows and want to merge some, you grab that tiny triangle and drag it back to the right (or up), and drop when an arrow shows up.
2.
Please note that UV islands are not inside the texture area. It can make it harder for you to figure out the UV layout. In the last pic I’ll show you how to move it without messing up the position.
3.
When using hotkeys / shortcuts, remember that mouse arrow has to be inside the viewport that you’re working in.
4.
5.
And here’s how to move UVs to the texture area without shifting it by accident. Of course you don’t have to do it if you’re able to figure out what’s what ! ;)
You can also export the UVmap as texture file. While in Edit mode, click UVsin the UV Editor menu bar, and pick „Export UV layout”.
* I guess I should correct the UV selection part: you press [B] key and thenyouselect UVs with mouse. If you keep pressing [B], then you have to click again to change to normal mouse cursor.
* You need to hover the mouse over the menu bar, to be able to scroll it.
Thought I’d share a quick repo’ing “trick” that maybe everyone already does, but I don’t think I’ve seen in a tutorial.
Instead of copying the entire value, you can double click and copy the first part of the file name of the master:
Then you can double click the first part of the value for the repo’ed file(s) and paste.
It’s ever so slightly faster than selecting the whole value, and much faster if what you’re repo’ing has multiple subsets and you’re doing dozens of files.
And if you’re more of a keyboard person (like me) you can select the whole value at once with Ctrl+A. That’s one mouse-click less
Then you paste the copied name into a repo file: Ctrl+A, Ctrl+V.
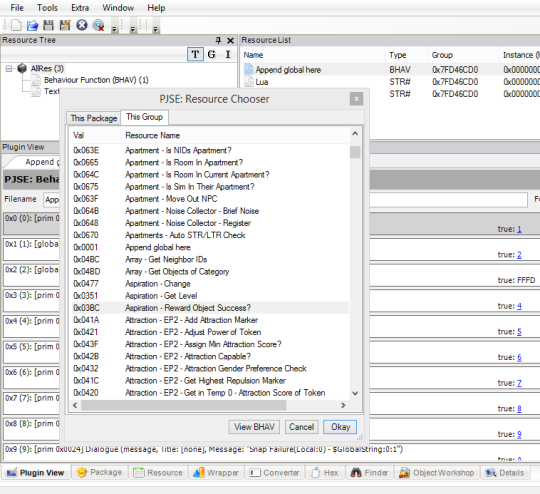
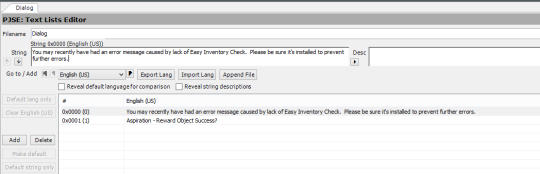
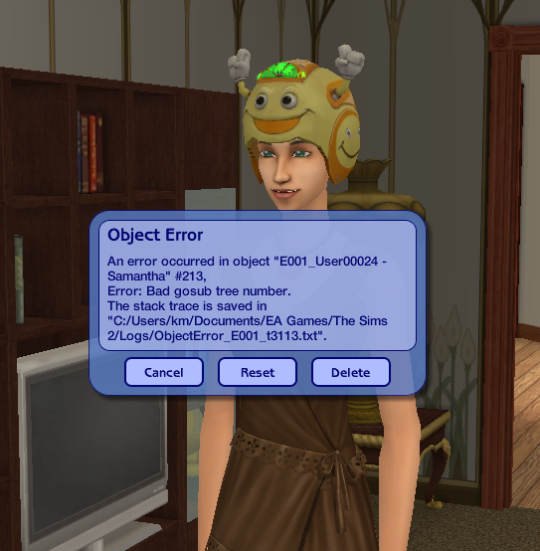
This post is probably only going to be of interest to experienced BHAV modders.
I’ve found a way to make global mods that rely on custom globals give an explanation about what’s wrong if the user doesn’t have the correct custom globals installed (with a major caveat: this only works the second time the user encounters the same error on the same residential lot). I’ll follow up over the next couple of days with a tutorial on how this works for objects (including custom socials) that rely on custom globals and another that explains how to make a repositoried object tell the user which object is missing if it’s going to flash blue.
You’ll need to start your mod off with the GlobalWithWarning file uploaded here at SFS. You can feel free to rename it, add other resources to it, etc. – this is just a template to work from.
So, first thing you’ll do is open up the “Append global here” BHAV, hit the “Append BHAV” special button, and find the global you want to mod.* Make sure to view the BHAV first so you can copy its name and note down its instance number. Then go ahead and append.
Fix the name and instance number of the newly-merged BHAV.
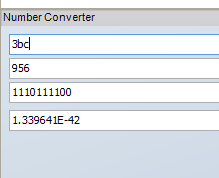
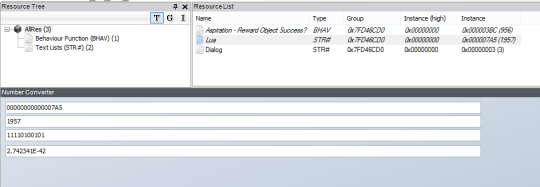
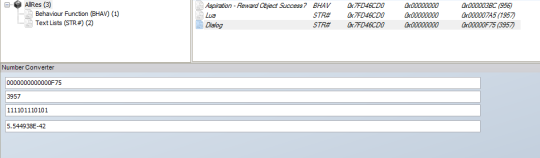
Then swap over to the converter tab and find the decimal version of the instance number.
Add 1001 to the decimal version and make that into the instance number for the Lua text list.
Add another 2000 (so 3001 from the original instance number) and make that the instance number for the Dialog text list.
Go in and edit the Dialog list now – paste the name of the BHAV in on the second line and edit the first line as needed.
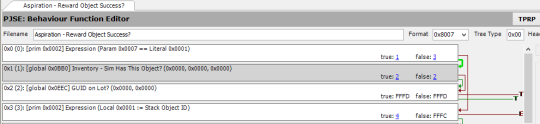
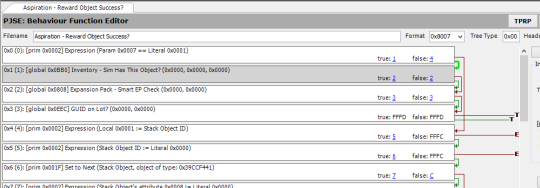
Now it’s time to edit the BHAV. First look for node 0xD and edit the first two operands to match the Lua list’s instance number (here, 0x07A5 turns into A5 07).
Then go up and edit the global checks in nodes 0x1 and 0x2.
In this case, we don’t care whether Easy Lot Check is installed, so we’ll delete that node and set the Param 7 = 1 branch to return true either way after it runs Easy Inventory Check.
If we wanted to add a third global to check for, we’d add in a third node and make sure the preceding node points to it whether the preceding node returns true or false. (We don’t care what Easy Inventory Check returns, since we’re passing it junk data anyway; we just need to know if it’ll run at all. The one thing to keep in mind is that if the BHAV might return an error with the wrong data passed to it, you’ll need to do some more in-depth editing to send it valid data, because this will interpret any error as a missing global.)
Set Local 0 on node 0xB to the instance number of the BHAV.
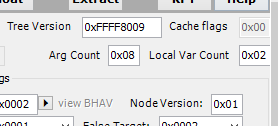
Finally, go double-check that the number of locals is sufficient for the BHAV you’ve appended – it’s really easy to forget.
And that’s it. You can go ahead and edit the rest of the BHAV as desired.
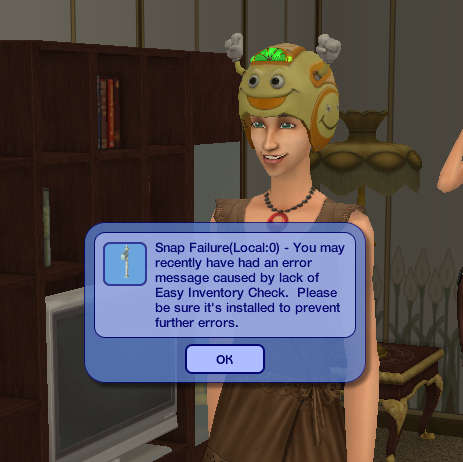
If Easy Inventory Check is installed, then nothing will happen in-game and the mod will silently work as intended.
If it’s not, though, there’ll be one unexplained reset/error message, and then the second time the user encounters the same error on the same residential lot, they’ll get a pop-up explaining the issue (pictured up at the top; the “Snap Failure” dialog string was the best one available for this purpose without requiring each mod to include a conflicting edit of the global dialog strings).
Note that if a user installed a whole slew of things with missing globals that all used this technique, it’s possible that they’d get an warning message about a different missing global than the current interaction needed. The user should end up collecting them all eventually, though, so I don’t think this is a problem.
I hope this technique makes life easier for both downloaders and modders.
*The technique needs to be modified to work for semiglobals. Basically, you need to edit a number in the Lua script (convert the semiglobal group number to decimal and stick it in place of the last number on the fourth line), then add a “$GlobalString:0:1” line to the dialog STR# for the semiglobal group and edit the dialog primitive in the BHAV to reference it. Feel free to ask me if you need further details; I’m happy to help.
There are a few different pieces to the bodyshapes mod I posted. The first and simplest is making new clothing compatible with the hacked bonsai plant, so I’m going to post a quick tutorial on how to do that. Please note that this *won’t* change which outfits are automatically applied when adding the token and when aging up, just which ones the hacked plant can find.
1) Grab the two matching outfits you’re working with. In this case, we’re doing the Logwood and Alum recolor of the Acme Catalog’s Merchant Dress.
2) Open up the Maxis-sized dress and copy the group number.
3) Open up the custom-sized dress and replace the group number for the 3IDR, the GZPS, the STR#, and the BINX with the one you copied. Do *not* touch the TXMT.
4) Replace the instance number on those same resources with the number I’ve assigned to that custom size. For Lady Apple, it’s 0x00000014. I’ll put a list out of the instance numbers and the shapes that match them once I have a few more shapes done, but you can also open up the LadyApple2 file and look for the “Shape Number” line in its only BCON.
5) Open up the 3IDR and change the references to the STR# and the GZPS to match the new group and instance numbers.
6) Open up the GZPS and change the flags from 8 to 9. Don’t forget to save.
And that’s it! It’s a little fiddly, but it’s a reasonably quick process. Brief technical details are behind the cut.
The FT sewing machine’s dialog returns the group, type, and instance of the specific recolor chosen in the temps. All the hacked bonsai plant does is check the sim who’s buying the clothing for a bodyshape token, pulls the shape’s number off of the token, and swaps the recolor’s instance number out for the shape’s assigned instance number before the garment is assigned to the family wardrobe. Even though the unneeded recolor is hidden from the buy catalog, as long as the group number matches the Maxis-sized recolor’s group number and the instance number matches the token, it’s still accessible via this BHAV.
This is the third and final part of my custom 4t2 wall conversion tutorial. For part 1, please click here, and part 2, please click here.
Part 3 begins below the cut!
PART 3: HOMECRAFER
Okay! Now we’re moving onto HomeCrafter. Fire up the program and let it load while you’re getting your files situated – it usually takes a few minutes (at least it does on my computer…this is also a good time to brew a nice cup of tea, since this last part can be kind of tedious, depending on how many recolors you made ☕).
Step 1 First you’ll need to copy all your pretty new textures to the proper folder. Your folder path could be different, but most likely you’ll find it by navigating to Documents > EA Games > The Sims 2 > Projects > HomeCrafter Plus > Walls. If you’re unable to locate your folder, please jump ahead to Step 4 – the Create New Content menu will tell you your working directory – then come back to this step. Paste all your recolors into this folder:
Step 2 (This is just how I set up my workspace; you may find/have a process that works better for you. I’ve downloaded too much CC over the years with frustrating/unclear/random file names, so I’m a little obsessive about making sure my stuff is clearly named.)
Navigate to the Downloads folder – this is where HomeCrafter will export your new walls. I like to sort this by “Date modified”; it just makes it easier to keep track of the files since HomeCrafter will assign them each random names:
Then I open Notepad and put that window next to the file explorer window. At the top I put the description I want for my walls so I can easily copy and paste it while I’m working. Since these are conversions, I always include credit for the original creation in this description:
Step 3 Once HomeCrafter has loaded, hit the giant button to create new Walls. A screen will load with all your currently installed walls. Click the plus sign button on the lower left:
Step 4 Choose your first recolor and click the checkmark:
Step 5 On the next screen, you should see your recolor tiled on the left, and some empty fields on the right. Enter the name of your new wall, the price per panel, and paste in your description. Under subsort, select where in the catalog you’d like your wall to show. When you have all this entered, click the import button.
And as you can see, the wall now appears in the HomeCrafter catalog. Hooray!
Step 6 Minimize HomeCrafter and check your Downloads folder. You should now see a new package file with the prefix wall_, followed by a string of random letters and numbers. Copy this file name and paste it into your notepad file, then add something to identify it – I prefer to use color names since I use those with my swatches and in the catalog, making it easier to identify files in the future. Since the files are being used by HomeCrafter, you won’t be able to simply change their file names now – you’ll need to come back and do this after you close the program, hence the extra steps.
Step 7 Repeat Step 4 - 6 for all your recolors.
Step 8 When you’re finish, close HomeCrafter. Now you can rename your files using your text file to match up the HomeCrafter file names with your desired file names (if you’ve sorted by Date modified, you can just work your way backwards up the list – I always check the last couple of digits of the file names as I go to make sure I haven’t messed anything up). I usually give them a file prefix (in this case, “sils_pm_chevron_walls_”) and then put the color name at the end (so the complete file name for the example wall is “sils_pm_chevron_walls_mmeltdowns”). Since long file names contribute to long load times, try to keep this short while still providing enough information that it’s not confusing to anyone who might download your content (if you intend to share it – if not, just use whatever makes sense to you!).
Step 9 Load up your game and enjoy your freshly converted walls!
Okay! I hope that was clear and useful! If you have any questions, please feel free to hit me up and I’ll do my best to help! This is my first time writing a tutorial, so please also let me know if I messed anything up or if any areas could use improvement. I’ll try to get a PDF version of this put together in the near future as well.
Lots of love, Spacey
PS – I should be finished converting this whole set soon, so I’m hoping to have it up this weekend. <3
This is the second part of my custom 4t2 wall conversion tutorial. For part 1, please click here.
Part 2 begins below the cut!
PART 2: EDITING YOUR TEXTURE You may already have an image editing process, but since this is a start-to-finish tutorial, I’m going to cover my own process here.
Note: As you can see, I’m using an older version of Photoshop (CS3), so depending on your version/program, everything here may or may not be applicable. I apologize in advance if this section is not helpful to everyone – I am not familiar with graphic editing software outside of the Adobe Suite, so you may need to seek more general tutorials for your software to get through this part.
Step 1 Open the texture!
Step 2 Choose your first color, select the Rectangle Tool (U) and, as a shape layer, drag a rectangle that covers the entire canvas. This will create a new layer. You can likewise create a new layer above your texture and fill it with your color, but I prefer the shape layers since their color can be changed very quickly – my smallest palette is 25 colors, so I like to speed up the process where I can. :)
Step 3 Change your new layer’s Blending Mode to Multiply. You should now see your color applied to your texture.
Step 4 This step is more subjective. I like to use the Multiply blending because it gives a nice rich color, but it also tends to “flatten” some of the texture detail. To compensate for that, I usually make two tweaks using adjustment layers. First I create an adjustment for Brightness/Contrast and increase the Brightness. The amount varies depending on the texture, but it’s usually a pretty small increase. In this case, I bumped it up by 15:
That brightens the texture, but I’d still like to bring out the detail a little more, so next I created an adjustment for Levels and moved the center tab slightly to the right. This is a really sensitive setting so you’ll see changes with even tiny adjustments. In this case I went from 1.00 to 0.75:
Note: Depending on your texture, you may not need to do this at all, or you might need to make more drastic changes. I can’t adequately cover all scenarios in a single tutorial, but this is the process I use for most of my conversions and recolors.
Step 5 Okay! Once you’re happy with your texture, it’s time to save it. Make sure you’re saving as a BMP.
Step 6 Change the color of your shape or fill layer (the one set to Multiply) as many times as necessary for your recolors, saving each one as a BMP as you go. This is what I had when I finished recoloring in my Watchmen palette:
(I always save a PSD in case I want to revisit a project later – in this case, I’ll be recoloring these in Fantasy Floss and some neutrals as well.)
Once you’re done creating all your recolor textures, you can close your image editor. It’s time to start importing the walls into your game! Click here for the next part of the tutorial.
It’s finally finished! I got a message last week asking if I knew of any tutorials to convert custom walls from TS4 to TS2, and since I didn’t (and couldn’t find any), I decided to put one together myself.
This tutorial is broken into three parts, one for each program used, and covers the entire process from extraction to import. Since Tumblr won’t let me add more than 10 images per post, it’s also going to be spread across three separate posts. Fabulous.
Step 1 Download the wall(s) you’d like to convert. In this example, I’ll be converting the chevron walls from Peacemaker’s Floor & Wall Tiles - Chevron and Field Designs, since they’ve been on my to-do list for awhile now.
Step 2 Extract the file(s). I usually put them in a project folder at this point, just to make things easier.
Step 3 Open TSR Workshop and select Create New Project.
Step 4 When the Create a new project menu opens, select New import (located under Other) and click next.
Step 5 The Import from .package screen will now open. Next to the “File to import” field, select Browse and navigate to the folder where you extracted the walls. You’ll need to select Package (*.package) from the file type dropdown (located next to the File name field) for the files to show.
TSRW will then ask “Is this a Sims 4 package?”. Click yes and wait until the program fills the “Projectype” field (this usually take a few seconds on my computer). Once the field is filled, click Next.
Step 6 The Project details screen will now open. You’ll need to enter a Project Name, but it doesn’t really matter what you put in since we’re only using TSRW to extract the textures. You don’t need to worry about the Title, Description or Diagonal part. Once you’ve put in your Project Name, click next. The Finished screen will now appear; click OK.
Note: I don’t have TS4, so I always get a pop-up which reads “TSR Workshop could not locate the game folder for Sims 4. Would you like to browse for it manually?” If you also don’t have TS4 and you get this pop-up, just click No.
Step 7 Once your file loads, it should look something like this:
Above the right sidebar, click on the Texture tab, and you should see something similar to this:
Select the DiffuseMap, which is the actual texture for the wall, and then click the small Edit button that appears to the right. A new screen will pop up. From there, you’ll want to click the Export button.
Note: since I don’t have TS4, I’m not really familiar with the mechanics of the game, but from what I’ve read it sounds like recolors occur within the game itself? Someone please correct me if I’m wrong about this, but I’ve never seen anything other than a base texture in TSRW, so we’ll need to recolor the textures ourselves – hence the need for image editing software.
The Export Texture window will now open. I like to give my textures a more easily-identifiable name than what the program provides, so you can change this to whatever you’d like. Change the “Save as” type to PNG and click Save.
You should get an “Export complete” pop-up once it’s finished saving.
Step 8 Once you’ve checked to make sure your texture has exported, you can close down TSRW. If your conversion involves more than one texture, you’ll need to go to the File menu, click New and follow Steps 4 - 7 again (there’s no need to save your project when asked). Otherwise, it’s time to open the texture in your image editor. Click here for the next part of the tutorial.
“Mom, I know the annual gala dinner is very important for you, but I don’t think I want to be a part of it this year…”
“Why?! You’re going to be a part of it, girl! No matter what!”
“Well… may I request to remove my boyfriend Tapaho from the invitation list then? Because I don’t want to see him ever again.”
“If that’s what you want, sure!”
“Don’t worry, everything will be alright! I’ll be here with you!”
“So far, we have… Neptune, Poseidon, Persephone, Selene, Melboula and Matar, who should we also invite?”
“How about Feyrora? I think you missed Feyrora…”
“Ehh, no? Because she will obviously NOT come?!”
*doorbell rings*
“Oh right, that must be the caterers we’ve ordered! Let me greet them real quick! In the meanwhile, don’t do any other invitations!”
“Greetings! Glad you could make it on time. Here’s the lobster you’ll need for the Lobster Thermidor and for dessert, we’d like you to serve Baked Alaska. Any questions? Good? Good!”
“Phew, the door is still open! I’m sorry babe! I.. uhm.. really didn’t want to be late!”
“May I have your name, sir?”
“Taphao Thong Fenhong.”
“Your name is not on the invitation list, I’m afraid. We’re sorry, but we kindly ask you to leave now!”
“What? NOO!! This can’t be true! I’m Cassiopeia’s boyfriend… Cassie, can you ask them to let me in? Cassie? CASSIE?!”
“I’ll be over at my dad’s house tonight, so I can’t join you guys, I’m sorry! But I hope you guys still have fun! See you!”
“Well, I guess it’ll just be the two of us now! May I ask my beautiful sister for a dance?”
“Now you really sound like Mom, stop being so polite, lol!”