#vivarium

")
")


Helens new tank finally arrived and I think she’s really liking it! A lot more space for her for sure!!
Post link

Tiny frog meets tiny frog.
#mevvsan #amigurumi #crochet #crochetpattern #crochetfrog #amigurumifrog #frog #dartfrog #dendrobates #tumucumaque #crochetersofinstagram #crochetaddict #crochetlove #plush #plushie #craft #handmade #handmadewithlove #amphibian #toad #vivarium
https://www.instagram.com/p/CRXIpmIr32c/?utm_medium=tumblr
Post link

The Xenographica in the sand boa vivarium is nice and velvety. This seems to be the plant Ember enjoys to chill out under in the evening.
(I had to Google the name)
Post link

The Kenyan sand boa vivarium is complete! Watch the video here~ https://www.youtube.com/watch?v=zbceTN0EOLM
Post link
tser:
There are some things about bioactive enclosures that just aren’t talked about. Some things are seen as negatives and no one wants to say anything bad about bioactive, and others people just assume everyone knows. I get many of the same questions over and over again, so I’d like to put some less-discussed aspects of bioactive together in one post.
1.) Let your enclosure “cycle” and plants grow in before adding your animal.
When you first set up your enclosure, plant it, and add your clean up crew, you should seal it up (more or less depending on how humid the parameters will be), and let it grow in for at least a month before you add your animal.
For high humidity enclosures, you can cover any mesh or vents loosely with plastic wrap. Low humidity and arid enclosures should be left more open.
There are multiple reasons for this.
First, it allows the plants to establish, recover from any transplant stress, and grow roots. This means they will be far less likely to die from the first time they’re stomped by your pet.
Second, it allows the clean up crew to establish a strong population, to be able to handle the waste output of your pet, and be less likely to be eaten to extinction.
Third, it allows micro CUC, other organisms of the decay cycle – bacteria and fungus – to establish, to break down the waste further, after your macro CUC have dealt with it.
Finally, it allows the environment to balance out, and go through its first mold bloom, so you are less likely to deal with it once your pet is in the enclosure. You’ll likely have some mold again after the pet moves in, but it will be less extreme.
There are times you will not be able to seal up the enclosure and wait for it to establish before your pet moves in. Although not ideal, it’s quite possible. You may lose more plants, and have more cleaning to do for the first few months.
2.) You will probably need to remove most of your pet’s feces for a month or two after they move in.
It may take time for the CUC and the other organisms in the substrate to populate enough to deal with your pet’s waste, depending on how deep your substrate is, substrate surface area, how many CUC bugs you started out with, and the size of your pet (and your pet’s waste).
Keep an eye on poop. If you see it one day and it’s still there twenty four hours later, that means you need to be picking it out, and it’s too much for your CUC to deal with. Just picking it out with a tissue and tossing it is plenty; you don’t need to scoop out any substrate with it. Keep doing this until poo disappears within a day.
3.) You will still have cleaning chores.
Although people often switch to bioactive because it involves fewer substrate changes, there are still clean up chores to do.
CUC will only be effective for waste on the substrate layer.
Most will not climb, and even those that do (my orange Porcellio isopods think they’re semi-arboreal) will not do so in numbers significant enough to deal with poop and food smears on perches, hides, and enclosure walls.
In addition, they will not eat urates. Urates break down quickly, but it is best to lightly mix them into the soil. In some cases, urates from certain species can burn your plants if they’re not broken up.
Cleaning and maintenance chores for bioactive enclosures can include lightly stirring urates into the substrate, washing poop and food off walls, perches, and decor, adding fresh biodegradable material like leaf litter, and watering, trimming, and other plant care. Sometimes CUC will need to be augmented or thinned, and in some cases fed or otherwise cared for.
4.) Bacteria are everywhere.
You will see people adamant about two schools of thought when it comes to bioactive:
People warning you to never, ever sterilize your leaf litter and substrate before using it, because that will defeat the purpose of bioactive.
or
People warning you to sterilize everything before it goes into your enclosure, because of the potential for parasites, disease and pests.
To be honest, neither is more correct than the other! And partly it depends on what species you’re keeping in your enclosure, and where you’re getting your materials.
The reasoning behind the first school of thought is that in order to be a healthy bioactive enclosure, the substrate needs a thriving population of bacteria and fungus. This is true. However, bacteria and fungal spores are everywhere in the environment. Even if you sterilize your substrate and your leaf litter, bacteria and fungus will colonize your substrate as waste is added.
This is the same concept behind fishless cycling. In fishless cycling, a tank is set up, and ammonia is added as a food source for bacteria. Bacteria from the environment will colonize the filter media. Although you can buy bacterial kick-starters to add to your tank, they aren’t necessary. Bacteria that break down animal waste are everywhere, and will “find” the tank.
In your bioactive enclosure, decaying organic material will provide a food source for microorganisms like fungus and bacteria. Even if you start out with soil you’ve baked, bacteria and fungus will colonize the soil. It may take longer to get started, which might mean a few weeks longer of removing feces by hand, but it will reliably happen, no problem.
Sterilizing your soil, leaf litter, and plants may be a good idea if your tank inhabitants are delicate and susceptible to environmental parasites and diseases, such as some amphibians.
Keep in mind that even if you are boiling or baking your substrate, leaves, and other materials, there are some infectious organisms that are not destroyed by the heat, and it will not affect contaminants like pesticides and fungicides.
5.) You will get mold.
One of the things that tends to make keepers panic is when mold shows up in their bioactive enclosure, often in massive quantities. Mold is normal!
Fungus and mold are a natural and important part of the decay cycle, in nature, and in your enclosure. The macro clean up crew (isopods, springtails, insects, annelids) will break down feces, leftover food, and other waste, and bacteria and fungus in the substrate will break it down further.
When the enclosure is first set up, even without your pet, there will be an excess of decaying matter, along with fluctuations in humidity and other parameters, which will cause a mold bloom. Within a month, a properly set up bioactive enclosure will balance out, and there will be less visible mold.
This doesn’t mean there’s no fungus in your enclosure! Healthy bioactive substrate will be full of spores and fungal mycelium, thread-like vegetative structures of the fungus. The mycelium break down waste as part of the decay cycle, and also form a fascinating symbiosis with the plants in your enclosure, helping them to bring up nutrients through their roots.
This is one reason that it is a bad idea to do heavy stirring in your substrate, as you will disturb and break up the mycelium. If you must do excavations, try to do only a small section of the enclosure at a time, then allow the mycelium to re-establish.
White mold will not harm your inhabitants. Other colors of mold happen as well, such as green and yellow. You may also have mushrooms pop up from time to time! While mycelium is the vegetative part of the fungus, mushrooms are the fleeting fruiting bodies. These are also natural and harmless (and beautiful), and may end up as a quick snack for your CUC.
The only time to worry is if you get black mold. Black mold spores can be dangerous for you and your pets to breathe. If you must clean up black mold, be sure to wear a properly rated particulate filter mask.
6.) You will get detritivore gnats and detritivore mites.
When we set up bioactive enclosures, we’re creating the perfect environment for countless animals. When we design the enclosures, we want them to be hospitable to our CUC, which eat decaying organic matter like feces and mold.
Isopods, springtails, and lesser mealworms are not the only detritivores interested in eating poo and fungus, though, and many other detritivores are ubiquitous in the environment and much more mobile than the CUC we choose for our enclosures.
When our enclosure attract these less desirable “volunteer CUC” we call them pests.
I would warn anyone who is thinking about doing bioactive that if you can’t handle fungus gnats in your house, you really shouldn’t do bioactive.
Gnats and mites both tend to freak out new bioactive enclosure keepers. However, they’re just doing the same job as our assigned CUC, and we can’t blame them for finding our perfectly maintained environments ideal for their needs.
The gnats most typically attracted to bioactive enclosures include fungus gnats and phorid flies.
The fungus gnats are attracted to the fungus growing in the enclosure’s soil (a necessary part of the decay cycle, remember), while the phorid flies feed on dead insects and CUC.
Fungus gnats are particularly annoying creatures, as they seem to enjoy flying into people’s noses. They also end up in a lot of mugs of tea.
The methods for eliminating fungus gnats from houseplants are not an option for bioactive enclosures. The things that would poison fungus gnats would also poison the CUC, drying the enclosure out entirely would kill the CUC and make the enclosure uninhabitable for your pet, and top dressings would be dangerous to the CUC and animal inhabitant. Besides that, because bioactive substrates are inherently perfect for them, the fungus gnats would just come back.
To keep fungus flies to a minimum, I suggest yellow sticky traps around the enclosures. Fungus flies are attracted to the color yellow. Make sure no pets – including mammals, birds, or others – have access to the traps! In bioactive enclosures for non-climbing insects, it may be useful to place these traps on the inside of the lid.
Unlike fruit flies, apple cider vinegar traps are not particularly effective for fungus gnats.
Phorid flies are more likely to be cyclical, and more common in bioactive enclosures with larger insects. When a roach or large beetle dies, they will swoop in and start doing their work on the body. Phorid flies can be kept to a minimum by either having a robust clean up crew that takes care of insect bodies quickly (such as lesser mealworms in a bioactive roach colony), removing all dead insects promptly, or by setting a trap to remove the phorid flies when they show up.
Detritivore (or soil) mites can scare a new bioactive keeper because of their resemblance to parasitic mites which can infest our pet reptiles. However, detritivore mites are harmless to our pets, and eat decaying organic matter and fungus in our enclosures. Mites are everywhere, and occupy all sorts of positions in the ecosystem. Detritivore mites are inevitable in bioactive enclosures, but you may never see them! They are extremely small.
As a general rule, don’t worry about soil mites in your bioactive enclosures; you can’t eliminate them anyway.
However, it’s a good idea to try to keep them out of CUC cultures. This is because in the worst case scenario mites can overwhelm springtail and isopod cultures, and may at least slow down their reproductive rate. To prevent mites in CUC cultures, placing the enclosures in trays of diatomaceous earth and keeping cultures separated are good husbandry practices.
I hope this helps anyone thinking of going bioactive, or new bioactive keepers. If anyone has anything to add to this, please do!
I wish something like this was around when I set up my first bios!


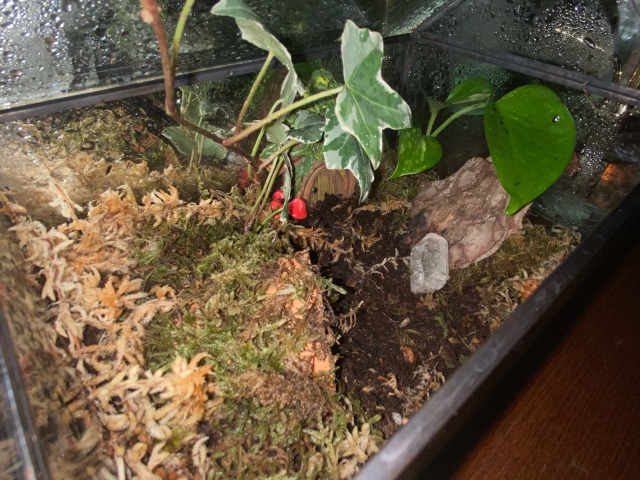

finally finished the terrarium
I have some live pothos and English ivy in there, as well as some various mosses; hoping they hold up well with the humidity. Still need to get a small food dish, but I cannot WAIT for the snails to arrive!!

Oscar my D&D Oc … an affront to nature and God! Smells like compost and occasionally has mushrooms growing over every visible part of his body…
He is a passionate space botanist who became infected with parasitic spores that have taken hold over his body and brain. He lives with them in a sort of symbiotic relationship, bio-hacking himself and using his plant side to his advantage.
He carries a Bio-reactor vivarium tank on his back, attached to a gas mask with ports in the filters, so he can administer body mods as breathable aerosols; slamming them into his mask and inhaling them. The tank also connects to a micro-lab and a syringe-pistol which he uses for long range attacks. However, his bio-hacking experiments don’t always go to plan and occasionally backfire, causing horrifying mutations and the appearance of mushrooms and vines sprouting all over his body.
-
#dnd #botanist #oscaroc #vivarium #terrarium #plantcore #toxic #ocart
https://www.instagram.com/p/CdNkWhUKYKJ/?igshid=NGJjMDIxMWI=
Post link

African fat tail vivarium I just finished setting up…

he’s peeking out veeeery carefully…


Still letting this vivarium grow in before I move Sunny in to it. The baby tears are spreading a lot! Haven’t been able to get springtails to noticeably establish yet, but maybe they’re down in the false bottom? I’ll be trying isopods soonish. I can confirm microfauna survives in here, based on the tiny moths I keep having to shoo out. I guess they’re just hatching in there?
Whenever leaves drop off of my non-vivarium plants or i thin out seedlings, i toss them in there to decompose on the bottom. Gotta get that bioactivity going. Here’s what the tank looked like last time I posted it. Aside from various plant debris, there’s mood moss and baby tears growing along the bottom. This is the first time I’ve had mood moss that didn’t completely die in a month (but it did halfdie, and there’s a weird flaky white fungus that keeps growing on it and necessitating me to throw some of it out). It’s very… moody.
I move the light around every week or so to different spots of the tank so that everything gets a chance to grow. The baby tears just stretch out to reach wherever the light is, and the bromeliads lean one way or another depending on where the light is positioned at the time. The side closest to the door hasn’t had a chance to get the light directly yet, so it looks a little sad comparatively.
Oh, also, I still need way more branches in there, and preferably sturdy ones. Sunny needs space to climb. I’ll probably be adding more after pruning trees this spring.


Leucomelas tank update: moss. So much moss. That branch is just covered in it. The leftmost side of the tank has flame moss growing on the substrate, too- I did not intentionally plant that, so who knows where that came from.
There’s also a fair bit of algae that keeps growing on the glass, rocks, and slower growing plants (like the cryptanthus). Not sure what to do about that- I’m just leaving it on the plants and wiping it off when it grows on the front glass. All of the bromeliads have multiple pups now.
The pilea and begonia are getting increasingly leggy and weird, and aggressively root on to everything (including branches and other plants), so I might be pulling them out soon- not sure.
I didn’t really clean it up before photos this time, so I guess now you see what it looks like when I don’t manicure all the plants, scrub the glass, pick up debris, etc first.
This tank is now 3 years old!
So! It’s worth mentioning that if someone wants to build a vivarium in the winter, the cold temps will cause silicone to cure very. very. very. slowly- hence my delay.
11.)Pots all finished and camouflaged means all that’s left is to solidify the background. I stuck the pots and cork pieces in their final places, then sprayfoamed all around. It’s not essential to fill every gap, technically, but I hate it when crickets get in to gaps or something, so I made very sure that no holes were left in the background- with the exception of behind the plant pots. I wanted to leave as much open space there as possible so the plants don’t get squished. It’s also very important to leave the pots’ drainage holes unobstructed!
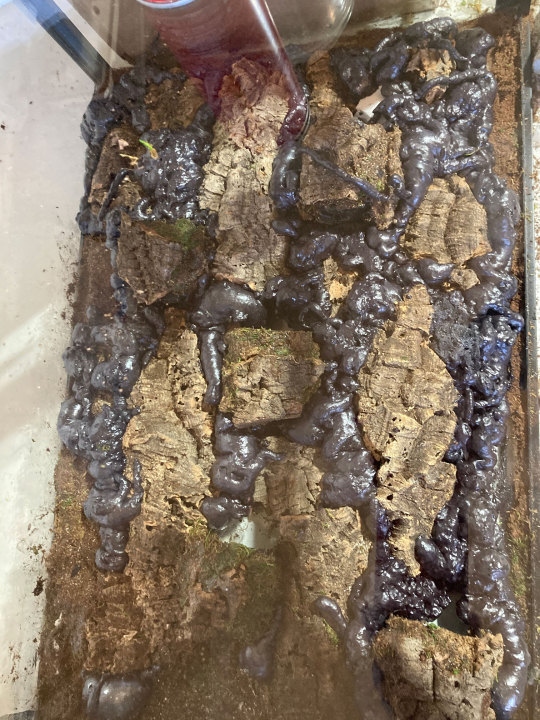
12.) After it dries, now it’s just a matter of ripping off the shiny parts of the foam to expose the roughness underneath so that the silicone and materials will stick. Great fun, broke every nail on both my hands.

13.)I didn’t take many pictures of this part because it was just really messy and in a poorly-lit garage, and because I documented it thoroughly on my previous build post. I did the usual thing where I slather on silicone, stick coco fiber + moss + soil to it, silicone it again, let it dry, do it again, etc. I made this one extra-silicone’d because I don’t want Sunny’s little claws ripping it apart over time (which is happening in her current tank!). I also used a razor blade to scrape excess silicone off the glass of the tank- of which there was plenty, because I’m always a mess when I work on something.
14.)Put on the door (bought from iheartgeckos). So, I did it kind of the opposite way the video told me to because my memory sucks- I taped straight lines 1/4″ out from the edges on the inside of the door, put silicone on the inner tank rim, then put the door down on top of it, and then opened the door to remove the tape from underneath it. Required much more contortionism than it would have if I remembered the directions properly. Anyway, it was a good fit and my silicone line ended up pretty clean. All I had to do after that was wait for it to cure, then bring it inside from the garage.

15.) The fun part! I made the substrate on the bottom a mixture of horticultural charcoal and reptile bark, which doesn’t get nearly as heavy as soil and hydroton/gravel. As for the plants, I already had them waiting for a few weeks under a grow light, so all I had to do was take them out of their pots and plop them in the new pots on the tank wall. There’s three Neoregelias (two mature and one baby), two clumps of Soleirolia soleirolii, and I also moved in a Philodendron scandens from Sunny’s current tank. Here’s where it’s at as of today. I need to let the plants grow in for a while, get some branches for Sunny to climb, then actually move Sunny in, but that’s basically all that’s left.Oh- and I want to put black contact paper over the glass on the bottom of the tank to conceal the false bottom.

Contents
Days ???: Steps 11-15 (here)


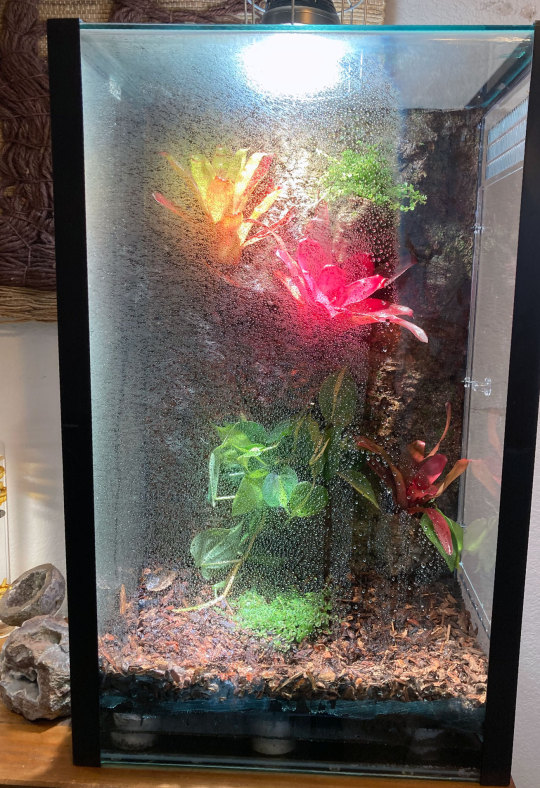
Now that it’s winter here, the dart tanks get really foggy and full of condensation at night, and I just think it looks nice.
Post link
So.
I noticed the right side of this vivarium was looking a little dark. Assuming that some of the diodes on the LED light probably burned out, I turned over the light to get a look at what was going on.

and uhhhhhhh. the light is not the problem. the light is perfectly fine, as you can see. but the creeping fig is creeping, apparently. creeping so much that the light can’t get through on the right side of the vivarium and it’s starting to peek out from under the lid.

My lid is probably a little confusing, so- it’s one of those wire tops you’d use for a rodent or desert herp or something, but since that’s useless for keeping humidity in, I taped plastic wrap over it, and then laid some glass panels on top of that. There’s a reason for this, but to be brief, I don’t want to pay for a fully glass top and the wire one was free.Anyway, the creeping fig is now covering the entire back wall and growing in the area between the wire top and the plastic wrap. You can see its roots dangling down in between the wire top in the image above.
As for why I didn’t notice this until today: it’s winter, so the glass is foggy all the time from condensation. I basically open the lid to drop in fruit flies, get a look at my frogs to make sure all is well, and otherwise don’t really see the inside of the vivarium unless I bother to wipe all the fog off the glass. I usually don’t bother because the fog starts coming back within minutes of being wiped off anyway. I could tell the fig was spreading, but had no idea how much it was spreading because I hadn’t looked directly under the lights in a long time.

For a comparison, here was this tank in December 2021.

…And here it is as of today, February 2022, after I wiped the fog off to see what my plants are actually doing. The cork bark background is now 100% covered in creeping fig.

I like this plant.


this hole was made for me

Vivarium (2019)
Better than I expected.