#bioactive

Sasha’s viv!


Ofeefee being super unimpressed with me once again. Although he’s a fan of where I put a piece of driftwood, apparently.
Post link


I’m trying out this LED UVB bulb from Viv tech for Viper. Since I’ve had it set up, I’ve seen him come out to bask regularly in the morning :)
Post link


Viper’s bioactive! He, too, is still getting adjusted, but he did eat a big 5g fuzzy last night, so he isn’t terribly stressed out.
Post link


More pictures of Mesa, because now I like his enclosure
He has found his own hide - by burrowing under the slate on his hot side. Of course.
Post link


Got Mesa in his new enclosure, finally! It took forever to get his old one broken down, bugs moved and everything set up. But at least it’s over.
Now, on to sanitizing his old tank and getting Viper’s bioactive set up! I’m laughing, but I’m crying
Post link


Finally got pictures of Keeva’s bin, and of her! There is something so unsettling about how she looks when she coils, though.
4 for 4 meals! Ordered some new needles so I can start injecting calcium into her food, now. I’ll also try dusting them with vitamins every few feeds, like I did with Haloke
Post link


Haloke’s tank. Took some things out, added some things in.
If you look really closely on the right hand side you can see Haloke wedged behind her black hide. She was not a fan of all the action.But! The design came out so noisy, and I love it ❤
(Also, Keeva ate again last Monday, right off the tongs. Going 3 for 3 soon!)Post link
 from when I clean")
Isopod upgrade!!
I started two isopod colonies collected about 2 weeks ago (idr?) from when I cleaned out the leaf litter in our dried-out pond. I separated the two groups into “pale with speckles” and “dark with speckles” initially, but the rollie pollie pictured is the only plain one I kept because he’s just SO CUTE AND FRIENDLY!! I love him too much to banish him to the cold, hard outdoors. He’s HUGE, too. Like the size of my pinky nail. So, he’s just grouped in with the dark ones, and I DEFinitely didn’t name him Big Papa, I swear.
I’ve been feeding these guys all sorts of stuff (including homemade eggshell calcium supplement!!) and they’re so adorable how curious they are. So far, their favourite was cauliflower stem slices (it looked like swiss cheese the next day!!)
But enough babying, they needed natural items to keep them busy and entertained (as well as moist and feeling safe.) So today, I cleaned up a bit, gave them each some more dirt (from the compost), sphagnum moss, crushed homemade leaf litter, and decaying wood (and “hides” from that, too.)
Big Papa came out to inspect the renovation right away, but I have yet to see the others be so daring. Hopefully they like it, and start breeding some more speckley babies for my future bioactive tank.
#invertebrate #invertebrates #inverts #isopod #isopods #isopodpets #rolliepollie #rolliepollies #rolypoly #wildisopods #bioactive
https://www.instagram.com/p/CVg61_OJkll/?utm_medium=tumblr
Post link
tser:
There are some things about bioactive enclosures that just aren’t talked about. Some things are seen as negatives and no one wants to say anything bad about bioactive, and others people just assume everyone knows. I get many of the same questions over and over again, so I’d like to put some less-discussed aspects of bioactive together in one post.
1.) Let your enclosure “cycle” and plants grow in before adding your animal.
When you first set up your enclosure, plant it, and add your clean up crew, you should seal it up (more or less depending on how humid the parameters will be), and let it grow in for at least a month before you add your animal.
For high humidity enclosures, you can cover any mesh or vents loosely with plastic wrap. Low humidity and arid enclosures should be left more open.
There are multiple reasons for this.
First, it allows the plants to establish, recover from any transplant stress, and grow roots. This means they will be far less likely to die from the first time they’re stomped by your pet.
Second, it allows the clean up crew to establish a strong population, to be able to handle the waste output of your pet, and be less likely to be eaten to extinction.
Third, it allows micro CUC, other organisms of the decay cycle – bacteria and fungus – to establish, to break down the waste further, after your macro CUC have dealt with it.
Finally, it allows the environment to balance out, and go through its first mold bloom, so you are less likely to deal with it once your pet is in the enclosure. You’ll likely have some mold again after the pet moves in, but it will be less extreme.
There are times you will not be able to seal up the enclosure and wait for it to establish before your pet moves in. Although not ideal, it’s quite possible. You may lose more plants, and have more cleaning to do for the first few months.
2.) You will probably need to remove most of your pet’s feces for a month or two after they move in.
It may take time for the CUC and the other organisms in the substrate to populate enough to deal with your pet’s waste, depending on how deep your substrate is, substrate surface area, how many CUC bugs you started out with, and the size of your pet (and your pet’s waste).
Keep an eye on poop. If you see it one day and it’s still there twenty four hours later, that means you need to be picking it out, and it’s too much for your CUC to deal with. Just picking it out with a tissue and tossing it is plenty; you don’t need to scoop out any substrate with it. Keep doing this until poo disappears within a day.
3.) You will still have cleaning chores.
Although people often switch to bioactive because it involves fewer substrate changes, there are still clean up chores to do.
CUC will only be effective for waste on the substrate layer.
Most will not climb, and even those that do (my orange Porcellio isopods think they’re semi-arboreal) will not do so in numbers significant enough to deal with poop and food smears on perches, hides, and enclosure walls.
In addition, they will not eat urates. Urates break down quickly, but it is best to lightly mix them into the soil. In some cases, urates from certain species can burn your plants if they’re not broken up.
Cleaning and maintenance chores for bioactive enclosures can include lightly stirring urates into the substrate, washing poop and food off walls, perches, and decor, adding fresh biodegradable material like leaf litter, and watering, trimming, and other plant care. Sometimes CUC will need to be augmented or thinned, and in some cases fed or otherwise cared for.
4.) Bacteria are everywhere.
You will see people adamant about two schools of thought when it comes to bioactive:
People warning you to never, ever sterilize your leaf litter and substrate before using it, because that will defeat the purpose of bioactive.
or
People warning you to sterilize everything before it goes into your enclosure, because of the potential for parasites, disease and pests.
To be honest, neither is more correct than the other! And partly it depends on what species you’re keeping in your enclosure, and where you’re getting your materials.
The reasoning behind the first school of thought is that in order to be a healthy bioactive enclosure, the substrate needs a thriving population of bacteria and fungus. This is true. However, bacteria and fungal spores are everywhere in the environment. Even if you sterilize your substrate and your leaf litter, bacteria and fungus will colonize your substrate as waste is added.
This is the same concept behind fishless cycling. In fishless cycling, a tank is set up, and ammonia is added as a food source for bacteria. Bacteria from the environment will colonize the filter media. Although you can buy bacterial kick-starters to add to your tank, they aren’t necessary. Bacteria that break down animal waste are everywhere, and will “find” the tank.
In your bioactive enclosure, decaying organic material will provide a food source for microorganisms like fungus and bacteria. Even if you start out with soil you’ve baked, bacteria and fungus will colonize the soil. It may take longer to get started, which might mean a few weeks longer of removing feces by hand, but it will reliably happen, no problem.
Sterilizing your soil, leaf litter, and plants may be a good idea if your tank inhabitants are delicate and susceptible to environmental parasites and diseases, such as some amphibians.
Keep in mind that even if you are boiling or baking your substrate, leaves, and other materials, there are some infectious organisms that are not destroyed by the heat, and it will not affect contaminants like pesticides and fungicides.
5.) You will get mold.
One of the things that tends to make keepers panic is when mold shows up in their bioactive enclosure, often in massive quantities. Mold is normal!
Fungus and mold are a natural and important part of the decay cycle, in nature, and in your enclosure. The macro clean up crew (isopods, springtails, insects, annelids) will break down feces, leftover food, and other waste, and bacteria and fungus in the substrate will break it down further.
When the enclosure is first set up, even without your pet, there will be an excess of decaying matter, along with fluctuations in humidity and other parameters, which will cause a mold bloom. Within a month, a properly set up bioactive enclosure will balance out, and there will be less visible mold.
This doesn’t mean there’s no fungus in your enclosure! Healthy bioactive substrate will be full of spores and fungal mycelium, thread-like vegetative structures of the fungus. The mycelium break down waste as part of the decay cycle, and also form a fascinating symbiosis with the plants in your enclosure, helping them to bring up nutrients through their roots.
This is one reason that it is a bad idea to do heavy stirring in your substrate, as you will disturb and break up the mycelium. If you must do excavations, try to do only a small section of the enclosure at a time, then allow the mycelium to re-establish.
White mold will not harm your inhabitants. Other colors of mold happen as well, such as green and yellow. You may also have mushrooms pop up from time to time! While mycelium is the vegetative part of the fungus, mushrooms are the fleeting fruiting bodies. These are also natural and harmless (and beautiful), and may end up as a quick snack for your CUC.
The only time to worry is if you get black mold. Black mold spores can be dangerous for you and your pets to breathe. If you must clean up black mold, be sure to wear a properly rated particulate filter mask.
6.) You will get detritivore gnats and detritivore mites.
When we set up bioactive enclosures, we’re creating the perfect environment for countless animals. When we design the enclosures, we want them to be hospitable to our CUC, which eat decaying organic matter like feces and mold.
Isopods, springtails, and lesser mealworms are not the only detritivores interested in eating poo and fungus, though, and many other detritivores are ubiquitous in the environment and much more mobile than the CUC we choose for our enclosures.
When our enclosure attract these less desirable “volunteer CUC” we call them pests.
I would warn anyone who is thinking about doing bioactive that if you can’t handle fungus gnats in your house, you really shouldn’t do bioactive.
Gnats and mites both tend to freak out new bioactive enclosure keepers. However, they’re just doing the same job as our assigned CUC, and we can’t blame them for finding our perfectly maintained environments ideal for their needs.
The gnats most typically attracted to bioactive enclosures include fungus gnats and phorid flies.
The fungus gnats are attracted to the fungus growing in the enclosure’s soil (a necessary part of the decay cycle, remember), while the phorid flies feed on dead insects and CUC.
Fungus gnats are particularly annoying creatures, as they seem to enjoy flying into people’s noses. They also end up in a lot of mugs of tea.
The methods for eliminating fungus gnats from houseplants are not an option for bioactive enclosures. The things that would poison fungus gnats would also poison the CUC, drying the enclosure out entirely would kill the CUC and make the enclosure uninhabitable for your pet, and top dressings would be dangerous to the CUC and animal inhabitant. Besides that, because bioactive substrates are inherently perfect for them, the fungus gnats would just come back.
To keep fungus flies to a minimum, I suggest yellow sticky traps around the enclosures. Fungus flies are attracted to the color yellow. Make sure no pets – including mammals, birds, or others – have access to the traps! In bioactive enclosures for non-climbing insects, it may be useful to place these traps on the inside of the lid.
Unlike fruit flies, apple cider vinegar traps are not particularly effective for fungus gnats.
Phorid flies are more likely to be cyclical, and more common in bioactive enclosures with larger insects. When a roach or large beetle dies, they will swoop in and start doing their work on the body. Phorid flies can be kept to a minimum by either having a robust clean up crew that takes care of insect bodies quickly (such as lesser mealworms in a bioactive roach colony), removing all dead insects promptly, or by setting a trap to remove the phorid flies when they show up.
Detritivore (or soil) mites can scare a new bioactive keeper because of their resemblance to parasitic mites which can infest our pet reptiles. However, detritivore mites are harmless to our pets, and eat decaying organic matter and fungus in our enclosures. Mites are everywhere, and occupy all sorts of positions in the ecosystem. Detritivore mites are inevitable in bioactive enclosures, but you may never see them! They are extremely small.
As a general rule, don’t worry about soil mites in your bioactive enclosures; you can’t eliminate them anyway.
However, it’s a good idea to try to keep them out of CUC cultures. This is because in the worst case scenario mites can overwhelm springtail and isopod cultures, and may at least slow down their reproductive rate. To prevent mites in CUC cultures, placing the enclosures in trays of diatomaceous earth and keeping cultures separated are good husbandry practices.
I hope this helps anyone thinking of going bioactive, or new bioactive keepers. If anyone has anything to add to this, please do!
I wish something like this was around when I set up my first bios!


So along with Crested Geckos I also keep several other species of reptile. This is the bioactive enclosure for my male Leopard Gecko, Aurelio.
The enclosure is a 40 breeder that originally belonged to my female Leopard Gecko, Bonita. But after she passed I revamped it and gave it to Aurelio. The tank took a lot of work to set up and is the result of years of experimenting with bioactive with Leopard Geckos.
The substrate is a mixture of Excavator clay, Quikrete All Purpose Sand, and a generic organic potting mix from my local hardware store. I do 50% soil, 30% sand, and 20% clay. After they were all thoroughly mixed I sieved the substrate to remove large pieces of stone and wood. When setting up the enclosure I took all the sieved wood and stone and used it to line the very bottom of the enclosure. I then added a ton of temperate springtails and some baker’s yeast to encourage mold growth. That mold becomes a good food source for springtails and bacteria that will help to keep the tank clean.
The next few steps are hard to explain in depth without pics, so I’ll keep things short and simple. Basically I added my substrate mix next, I added a black plastic hide on the right, and a half log hide on the left. Both are buried under substrate and stones so they’re basically invisible. I furnished the enclosure with stones taken from a local state park, that were then sanitized, and a couple types of plants. The plants I chose were Euphorbia tirucalli and Sedum reflexum “yellow bouquet”. The plants are doing well and have been growing nicely.
For a cleanup crew I have temperate springtails, tropical springtails, Armadillidium vulgare isopods, dwarf white isopods, terrestrial nematodes, fungus gnats (for some people these are a pest but as maggots they can be a great cleanup crew in the soil), dubia roaches, buffalo worms/beetles, mealworms/beetles, and lots of various bacteria and fungi that are naturally present in the soil. The enclosure is only a month or so old but already my Leopard Gecko’s waste is getting broken down after only a day or so. Which is a GREAT sign!
The tank is lit with 3 grow bulbs, as well as a 24″ T5HO 10.0 UVB bulb. I strongly believe ALL reptiles should have access to UVB so despite some articles out there, I chose to give my Leopard Gecko UVB. For heating I use a 150w CHE on a thermostat. The CHE is in a wide-domed lamp allowing for max heat distribution. This gives my gecko the opportunity to thermo-regulate as he has access to basking areas ranging from 78*F up to 94*F. The ambient temp in the cage is 74*F during the day with a 2*F-4*F drop at night. As said before, Aurelio only has two hides. One cool, and one warm hide. However, due to the fact that the cage is bioactive and is misted weekly the hides are BOTH humid hides with humidity ranging from 60%-90%, something VERY important for a Leopard Gecko’s health as despite common knowledge, Leopard Gecko’s naturally seek out more humid areas and burrows in the wild. Exposing them to consistently dry conditions in captivity can be very detrimental for their health.
I’ve seen Leopard Geckos in some seriously inadequate enclosures so when I redid this tank to give it to Aurelio, I chose to give him the very best life I can. And since upgrading him, I’ve noticed him basking more in the UVB, he eats better, his color is better, and he’s noticeably more active. Keeping your animals in tubs or bare bottoms tanks is NOT natural and here at Manticora Reptiles I chose to give my animals the very best life I can in a bioactive setup.
Post link
MEET MY SNAILS !!!
Sylvia (all white)……


and Sylvester (white with brown stripes)……


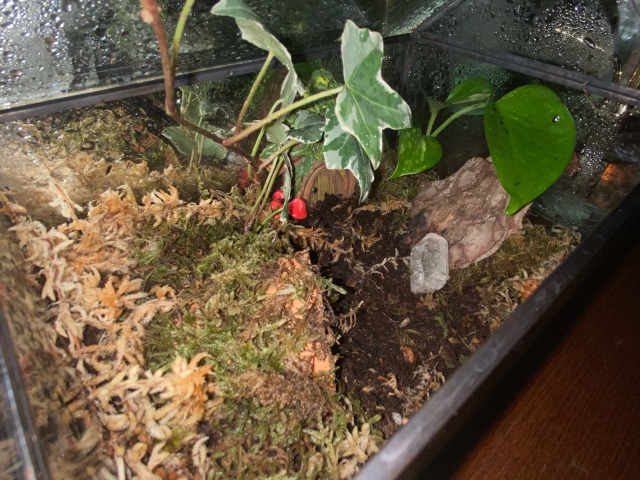

finally finished the terrarium
I have some live pothos and English ivy in there, as well as some various mosses; hoping they hold up well with the humidity. Still need to get a small food dish, but I cannot WAIT for the snails to arrive!!
I JUST ORDERED SNAILS
Two milk snails are on the way, and I could not be more EXCITED! Will post more updates as I put together the terrarium and once they arrive
Names???

African fat tail vivarium I just finished setting up…