By Murali Krishna Bachhu, Anurag Damle, and Utkarsh Shrivastava
As engineers on the Yahoo Mail team at Oath, we pride ourselves on the things that matter most to developers: faster development cycles, more reliability, and better performance. Users don’t necessarily see these elements, but they certainly feel the difference they make when significant improvements are made. Recently, we were able to upgrade all three of these areas at scale by adopting webpack® as Yahoo Mail’s underlying module bundler, and you can do the same for your web application.
What is webpack?
webpack is an open source module bundler for modern JavaScript applications. When webpack processes your application, it recursively builds a dependency graph that includes every module your application needs. Then it packages all of those modules into a small number of bundles, often only one, to be loaded by the browser.
webpack became our choice module bundler not only because it supports on-demand loading, multiple bundle generation, and has a relatively low runtime overhead, but also because it is better suited for web platforms and NodeJS apps and has great community support.
Comparison of webpack to other open source bundlers
How did we integrate webpack?
Like any developer does when integrating a new module bundler, we started integrating webpack into Yahoo Mail by looking at its basic config file. We explored available default webpack plugins as well as third-party webpack plugins and then picked the plugins most suitable for our application. If we didn’t find a plugin that suited a specific need, we wrote the webpack plugin ourselves (e.g., We wrote a plugin to execute Atomic CSS scripts in the latest Yahoo Mail experience in order to decrease our overall CSS payload**).
During the development process for Yahoo Mail, we needed a way to make sure webpack would continuously run in the background. To make this happen, we decided to use the task runner Grunt. Not only does Grunt keep the connection to webpack alive, but it also gives us the ability to pass different parameters to the webpack config file based on the given environment. Some examples of these parameters are source map options,enabling HMR, and uglification.
Before deployment to production, we wanted to optimize the javascript bundles for size to make the Yahoo Mail experience faster. webpack provides good default support for this with the UglifyJS plugin. Although the default options are conservative, they give us the ability to configure the options. Once we modified the options to our specifications, we saved approximately 10KB.
Code snippet showing the configuration options for the UglifyJS plugin
Faster development cycles for developers
While developing a new feature, engineers ideally want to see their code changes reflected on their web app instantaneously. This allows them to maintain their train of thought and eventually results in more productivity. Before we implemented webpack, it took us around 30 seconds to 1 minute for changes to reflect on our Yahoo Mail development environment. webpack helped us reduce the wait time to 5 seconds.
More reliability
Consumers love a reliable product, where all the features work seamlessly every time. Before we began using webpack, we were generating javascript bundles on demand or during run-time, which meant the product was more prone to exceptions or failures while fetching the javascript bundles. With webpack, we now generate all the bundles during build time, which means that all the bundles are available whenever consumers access Yahoo Mail. This results in significantly fewer exceptions and failures and a better experience overall.
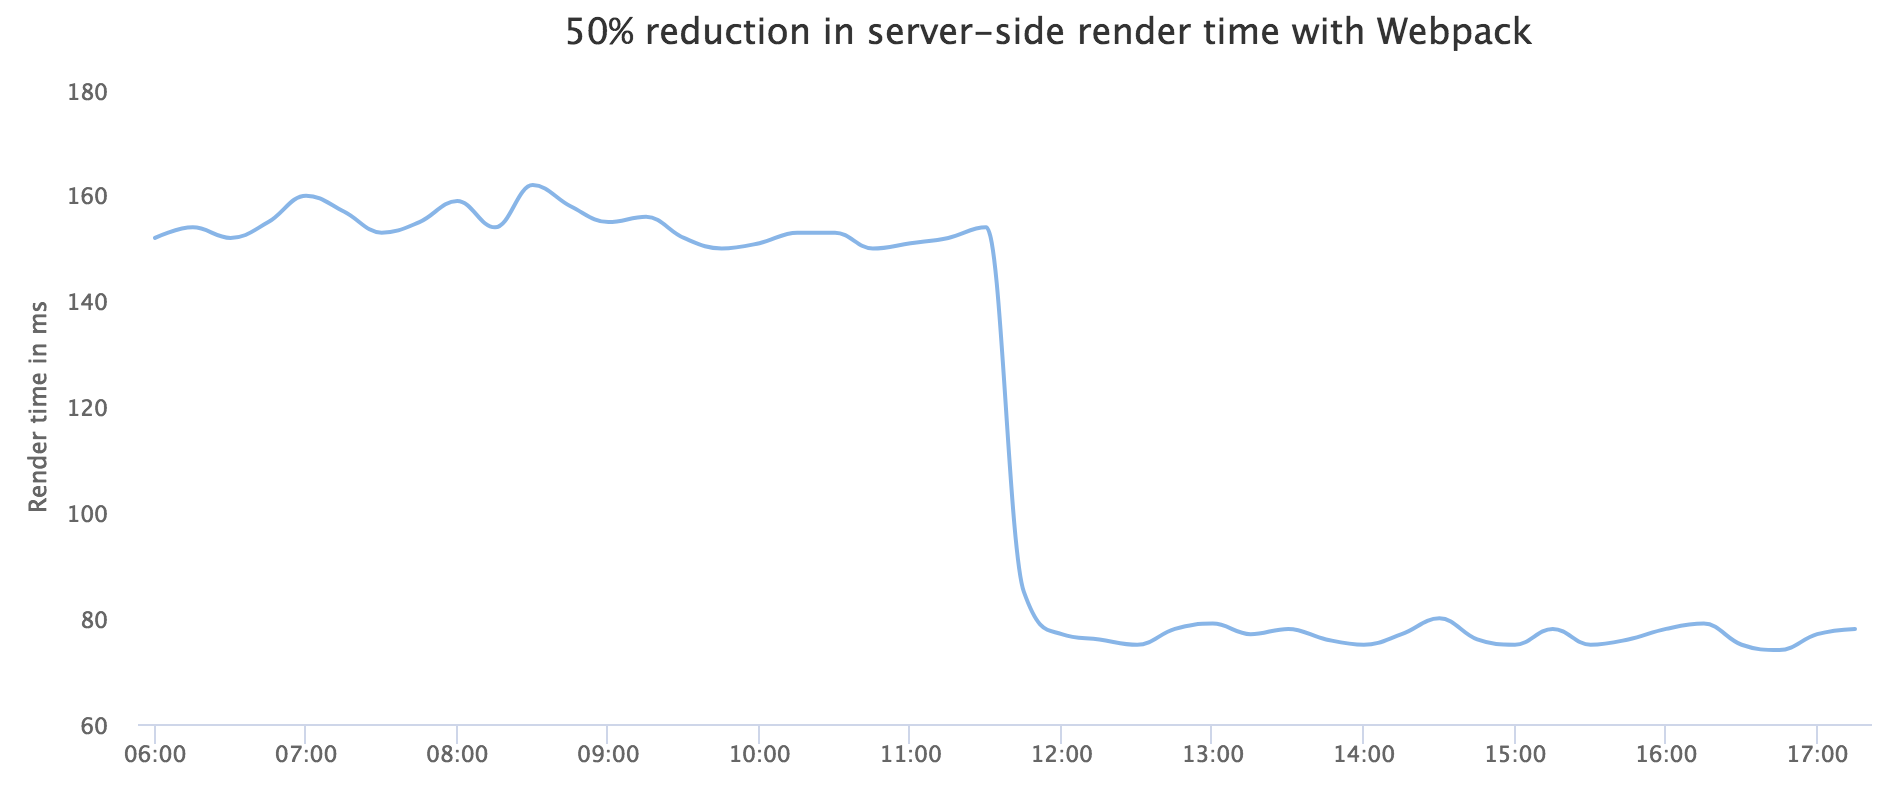
Better Performance
We were able to attain a significant reduction of payload after adopting webpack.
Reduction of about 75 KB gzipped Javascript payload
50% reduction on server-side render time
10% improvement in Yahoo Mail’s launch performance metrics, as measured by render time above the fold (e.g., Time to load contents of an email).
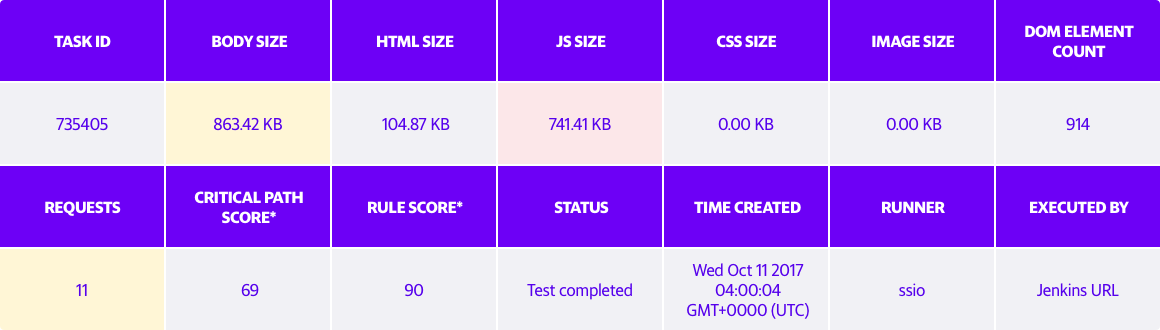
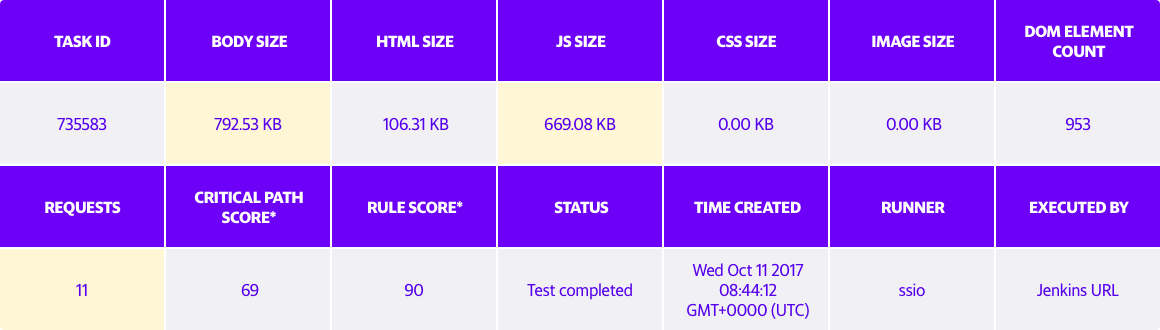
Below are some charts that demonstrate the payload size of Yahoo Mail before and after implementing webpack.
Payload before using webpack (JavaScript Size = 741.41KB)
Payload after switching to webpack (JavaScript size = 669.08KB)
Conclusion
Shifting to webpack has resulted in significant improvements. We saw a common build process go from 30 seconds to 5 seconds, large JavaScript bundle size reductions, and a halving in server-side rendering time. In addition to these benefits, our engineers have found the community support for webpack to have been impressive as well. webpack has made the development of Yahoo Mail more efficient and enhanced the product for users. We believe you can use it to achieve similar results for your web application as well.
**Optimized CSS generation with Atomizer
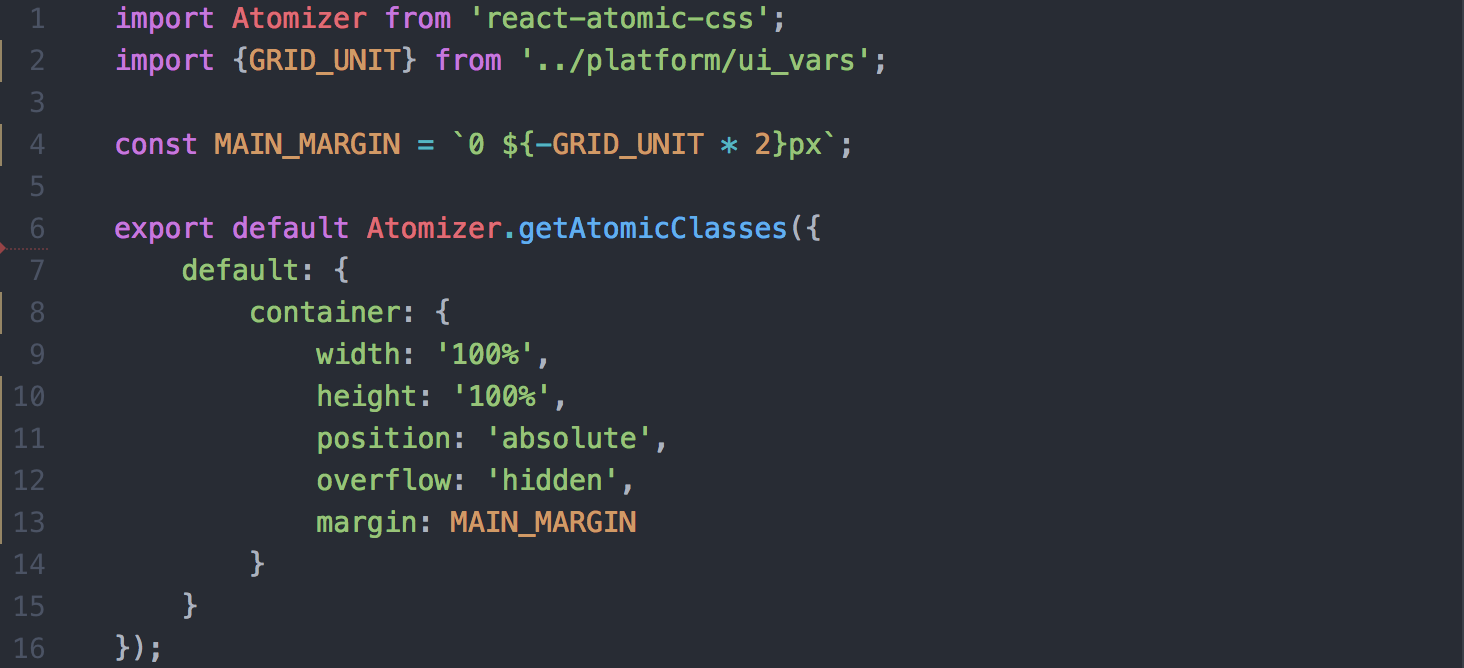
Before we implemented webpack into the development of Yahoo Mail, we looked into how we could decrease our CSS payload. To achieve this, we developed an in-house solution for writing modular and scoped CSS in React. Our solution is similar to the Atomizer library, and our CSS is written in JavaScript like the example below:
Sample snippet of CSS written with Atomizer
Every React component creates its own styles.js file with required style definitions. React-Atomic-CSS converts these files into unique class definitions. Our total CSS payload after implementing our solution equaled all the unique style definitions in our code, or only 83KB (21KB gzipped).
During our migration to webpack, we created a custom plugin and loader to parse these files and extract the unique style definitions from all of our CSS files. Since this process is tied to bundling, only CSS files that are part of the dependency chain are included in the final CSS.
Making a progressive web app with webpack just got a little bit easier
Today we are releasing webpack-web-app-manifest-plugin, which generates an app manifest that shows up in your assets manifest.
I heard you like manifests
Turns out, there are a lot of web things called “manifests”. When talking about web app manifests and assets manifests, sometimes it’s hard to keep track. Buckle up, because we made a webpack plugin that deals with both of these types of manifests.
Web app manifests are JSON files that allow your application to specify the way it should be treated when installed as an application on a mobile device. You may want to specify what the application name and icon should be. Maybe you want to tell the browser to tint some of its UI elements to match the color scheme of your page, or even hide the browser chrome entirely. You can do all of that with a web app manifest.
Assets manifests are JSON files that contain paths to assets that are generated by webpack. They’re generated by plugins such as assets-webpack-plugin. If you add hashes to the end of your filenames to allow cache busting, assets manifests can be very useful. For example, we use our assets manifest to add JavaScript and CSS files to our <script> and <link> tags.
So I put a manifest in your manifest
While we were building our web app manifest, we wanted to be able to add a hash to the file path and <link> to it. So we needed to add it to our assets manifest. Unfortunately, we were unable to find any existing open-source plugins that output the file in the correct way to add it to the app manifest. So, we built webpack-web-app-manifest-plugin.
By default, webpack-web-app-manifest-plugin assumes that you will name your icon files in the format manifest/icon_[square dimension].(png|jpeg|jpg). If you name them using that scheme, you can use this plugin just like this:
// in your webpack config importAppManifestPluginfrom‘webpack-web-app-manifest-plugin’;
// in your page template constmanifest= // however you usually access your asset manifest in code constappManifestPath=manifest['app-manifest’].json;
<linkrel=“manifest”href={appManifestPath} />
If you named your icons with some other naming scheme, you can still add them to the web app manifest, it’s just a little more work. That process is detailed in the README.
Please use it
We’re really proud of the work we’ve done to make web app manifests compatible with asset manifests, which is why we’ve decided to open source it and publish it on npm. Please use it.
If this plugin doesn’t meet your needs, we welcome pull requests. And if you have a passion for progressive web applications, webpack, and open source, join our team!
Here at Tumblr, we use a JS bundler to compile our client-side code. As time went by, we started to feel the very real effects of bit rot in the form increasingly slow build times and the realization that were were 9 major versions behind on Browserify with no straightforward way to upgrade.
We decided to take a fresh look at our process and give Webpack a try. We laughed, we cried, we saved a bunch of time on our builds.
About two years ago, Tumblr embarked on a journey to create and apply cohesive clientside architecture to the website. Our Product Engineers had lived without things like JS bundling, npm libraries, and CSS preprocessors, and a lingua franca for application-level functionalities to share between Product teams was a considerable step forward for our codebase.
One of the things that came out of this initiative was our use of Browserify to create JavaScript bundles that used npm modules as well as our own libraries. Suddenly, we had a straightforward way to share classes and utilities without polluting the global namespace! We decided on Browserify for building and Gulp as our taskrunner.
We decided early on that we wouldn’t just start from scratch and rewrite the entire site, but rather we would pull things over piecemeal from the old way to the new way. We needed a way of splitting code between various pages on the site during this transition. Thus, “contexts” were born.
Acontext bundle is essentially a mini Single Page App. For example, the dashboard is a context. The search page is a different context. The help docs are a different context. Each distinct context meant a different set of JS and CSS build artifacts, which meant a Browserify build for each.
These contexts were still sharing plenty of code between them, particularly vendor libraries, which necessitated another bundle to avoid code duplication (and downloading identical code). We used a vendor bundle to address this. Another Browserify build! We manually maintained a list of modules that would be kept in the vendor bundle so the context bundle builds would know not to include them.
The Browserify build process
Fast forward a year or so and we had added the header bundle, which loaded above the fold, and standalone bundles, which are entirely self-contained and don’t rely on the full vendor bundle. Our builds had turned into something like this (and this isn’t even including CSS):
Each starred thing up there was a separate Browserify build, and it got slower every time there was a new context or standalone bundle. Furthermore, the version of Browserify we were using was falling further out of date, because newer versions were even slower in our case. One engineer created a system to parallelize gulp tasks using the cluster, which sped things up and had the added benefit of turning our boxes into loud, fan-spinning space heaters.
Rethinking the build
Luckily, we did have an idea why things were so slow. Many modules were shared across contexts, but not in the vendor bundle, and our builds parsed them repeatedly. Browserify couldn’t share cached information about these modules across build processes. We could have fixed that by passing multiple entry points into Browserify, but that required rewriting our JS build scripts entirely, which was way too scary.
In the meantime while we were furrowing our brows at the situation we were in, Webpack was emerging as a popular new solution to bundling. It had some neat features that weren’t in Browserify, or not as easy to configure. We were particularly interested in automatic bundle splitting, async loading, and hot reloading. One engineer had looked into it early on, but some of the magic in our Browserify configuration didn’t translate over easily. We shelved it.
From Browserify to Webpack
At this point, our backs were against the wall. Our build process was so fucked up that we really had nothing to lose by trying something completely different except time.
“Okay, fine. Where do I sign up?”
Baby steps
The first step was trying to get something building in Webpack. Since we were still committed to using Gulp, we opted for webpack-stream. I tossed together a basic Webpack configuration and tried it.
We encountered problems immediately. Each of our context bundles used a “bootloader” to kick off the bundled JS with some bootstrapped data generated by the server. Being able to do require('context') and pass in the bootstrap data in an inline <script> tag seemed like a convenient way to share code, but we ended up with a circular require and this little slice of evil in our Browserify configuration:
It seemed like a good idea at first, but it had to go, so it went. We refactored our contexts so that the entry points ran the bootloader immediately rather than exposing it as a static method on the class exported by the context.
Loaders
The next obstacle was that we overloaded require to include non-JS files and had been relying on Browserify transforms for templatesandstyles. We needed to handle these using Loaders, the Webpack equivalent to transforms. Fortunately, the Webpack community had already created loaders to handle these cases.
Whereas our Browserify transforms did several things at once (loading the file, postprocessing, converting to a JS module), Webpack Loaders tend to be chainable single-purpose steps that allow the same end result.
Bundling and splitting
We used bundle splitting in Browserify, but it was a manual process that required separate per-bundle build scripts and a list of modules.
This isn’t the exact code we used, but in was essentially something like this:
Header bundle
var browserifyInstance = browserify(); var requires = ['some-config']; var externals = []; var bundleOptions = {}; requires.forEach(function(requireModule) { browserifyInstance.require(requireModule); }); externals.forEach(function(externalModule) { browserifyInstance.require(externalModule); }); browserifyInstance.require('header/index.js'); browserifyInstance.bundle(bundleOptions);
Vendor bundle
var browserifyInstance = browserify(); var externals = ['lodash', 'backbone', 'jquery', '...']; // list of vendor dependencies var externals = ['some-config']; // Grab this from the header bundle var bundleOptions = {exposeAll: true}; requires.forEach(function(requireModule) { browserifyInstance.require(requireModule); }); externals.forEach(function(externalModule) { browserifyInstance.require(externalModule); }); browserifyInstance.require('vendor/index.js'); browserifyInstance.bundle(bundleOptions);
var browserifyInstance = browserify(); var requires = []; var externals = ['lodash', 'backbone', 'jquery', '...']; // same list of vendor dependencies var bundleOptions = {}; requires.forEach(function(requireModule) { browserifyInstance.require(requireModule); }); externals.forEach(function(externalModule) { browserifyInstance.require(externalModule); }); browserifyInstance.add('contextindex.js')), // ... }
ThatcreateEntryPoints function expanded the glob and created a full mapping of of our context entry points. CommonsChunkPlugin decided if a module was “global enough” and pulled it into the global bundle. In early tests without the global bundle, we found that a lot of those modules were automatically dropped into the vendor bundle.
The other interesting thing we found was that the order of modules in the CommonsChunkPlugin options mattered. The last entry was assumed to be the first script loaded on the page. This is important it defines webpackJsonp, which subsequent bundles rely on to communicate with each other.
Putting it all together
With all of these changes implemented, our builds looked like this:
We were down to two build processes, each using multiple entry points, so each process benefitted from sharing parsed modules between those entry points.
How much faster did it get?
A lot faster. Dev builds took less than a third of the time to run. Production build times were cut in half. Incremental builds using the Webpack watcher were almost instant.
These build times are a bottleneck in the development process, and by saving hundreds (estimated) of developer-hours, we’re freeing up time to work on more features, ship faster, and spend more time with our families.
So did we need to ditch Browserify to speed things up?
Maybe, maybe not. The process of migrating our Browserify configuration to Webpack exposed several foolish things we were doing that we could have fixed without switching bundlers. On the other hand, our build scripts are easier to read now because we’re using core Webpack features that we accomplished with clever (in the bad way) tricks in Browserify.
Either way, you can pry chainable loaders out of my cold, dead hands.
Overall, it’s always a good exercise to make sure you still understand the code you’re responsible for maintaining. Learning a new tool is fun, but when it improves your development flow as much as it did for us, the proof is, as they say, in the pudding.