By Akshay Sarma, Principal Engineer, Verizon Media & Brian Xiao, Software Engineer, Verizon Media
This is the first of an ongoing series of blog posts sharing releases and announcements for Bullet, an open-sourced lightweight, scalable, pluggable, multi-tenant query system.
Bullet allows you to query any data flowing through a streaming system without having to store it first through its UI or API. The queries are injected into the running system and have minimal overhead. Running hundreds of queries generally fit into the overhead of just reading the streaming data. Bullet requires running an instance of its backend on your data. This backend runs on common stream processing frameworks (Storm and Spark Streaming currently supported).
The data on which Bullet sits determines what it is used for. For example, our team runs an instance of Bullet on user engagement data (~1M events/sec) to let developers find their own events to validate their code that produces this data. We also use this instance to interactively explore data, throw up quick dashboards to monitor live releases, count unique users, debug issues, and more.
Sinceopen sourcing Bullet in 2017, we’ve been hard at work adding many new features! We’ll highlight some of these here and continue sharing update posts for future releases.
Windowing
Bullet used to operate in a request-response fashion - you would submit a query and wait for the query to meet its termination conditions (usually duration) before receiving results. For short-lived queries, say, a few seconds, this was fine. But as we started fielding more interactive and iterative queries, waiting even a minute for results became too cumbersome.
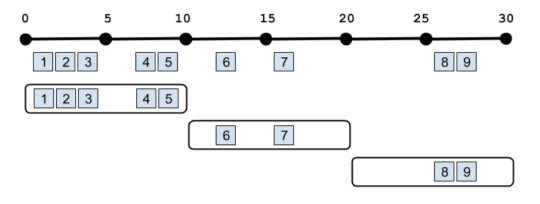
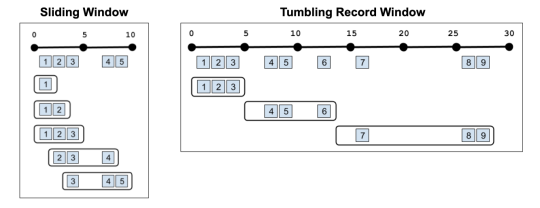
Enter windowing! Bullet now supports time and record-based windowing. With time windowing, you can break up your query into chunks of time over its duration and retrieve results for each chunk. For example, you can calculate the average of a field, and stream back results every second:
In the above example, the aggregation is operating on all the data since the beginning of the query, but you can also do aggregations on just the windows themselves. This is often called a Tumblingwindow:
With record windowing, you can get the intermediate aggregation for each record that matches your query (a Sliding window). Or you can do a Tumblingwindow on records rather than time. For example, you could get results back every three records:
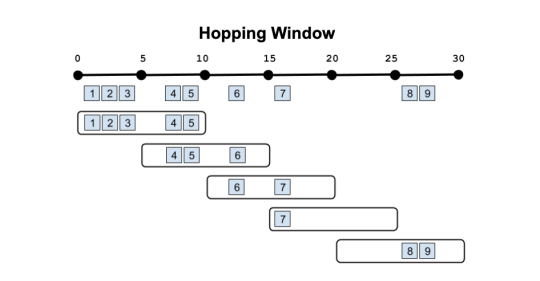
Overlapping windows in other ways (Hopping windows) or windows that reset based on different criteria (Session windows, Cascading windows) are currently being worked on. Stay tuned!
Apache Pulsar support as a native PubSub
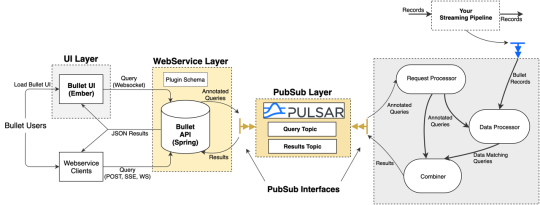
Bullet uses a PubSub (publish-subscribe) message queue to send queries and results between the Web Service and Backend. As with everything else in Bullet, the PubSub is pluggable. You can use your favorite pubsub by implementing a few interfaces if you don’t want to use the ones we provide. Until now, we’ve maintained and supported a REST-based PubSub and an Apache Kafka PubSub. Now we are excited to announce supporting Apache Pulsar as well! Bullet Pulsar will be useful to those users who want to use Pulsar as their underlying messaging service.
If you aren’t familiar with Pulsar, setting up a local standalone is very simple, and by default, any Pulsar topics written to will automatically be created. Setting up an instance of Bullet with Pulsar instead of REST or Kafka is just as easy. You can refer to our documentation for more details.
Plug your data into Bullet without code
While Bullet worked on any data source located in any persistence layer, you still had to implement an interface to connect your data source to the Backend and convert it into a record container format that Bullet understands. For instance, your data might be located in Kafka and be in the Avro format. If you were using Bullet on Storm, you would perhaps write a Storm Spout to read from Kafka, deserialize, and convert the Avro data into the Bullet record format. This was the only interface in Bullet that required our customers to write their own code. Not anymore! Bullet DSL is a text/configuration-based format for users to plug in their data to the Bullet Backend without having to write a single line of code.
Bullet DSL abstracts away the two major components for plugging data into the Bullet Backend. A Connector piece to read from arbitrary data-sources and a Converter piece to convert that read data into the Bullet record container. We currently support and maintain a few of these - Kafka and Pulsar for Connectors and Avro, Maps and arbitrary Java POJOs for Converters. The Converters understand typed data and can even do a bit of minor ETL (Extract, Transform and Load) if you need to change your data around before feeding it into Bullet. As always, the DSL components are pluggable and you can write your own (and contribute it back!) if you need one that we don’t support.
We appreciate your feedback and contributions! Explore Bullet on GitHub, use and help contribute to the project, and chat with us on Google Groups. To get started, try our Quickstarts on SparkorStorm to set up an instance of Bullet on some fake data and play around with it.
ml5js is an online resource to aid learning of implementing Machine Learning methods using javascript for web-based projects - you can discover more here
If you’re an avid user of Tumblr on mobile web, then you might’ve noticed some improvements we made. Bigger font sizes and higher contrast text? Your screen reader actually reads what you hope it would? You’ve guessed it, we’re making Tumblr ✨accessible✨.
Why?
Since we’re rewriting the web, we wanted to make sure we did so with accessibility in mind. I could give you a long description why, but plenty of articles explain better than I can. Put simply: the web should be made useable for everyone.
We began with using the accessibility auditing tool in Google Lighthouse to check the improvements that could be made. Initially, our score wasn’t that great: 62. If you factored in areas that need to be manually checked then our score would have been abysmal. However, we’ve made great strides since then and are on our way to achieving that coveted
We had inaccessible menus and poorly described elements, among other things. Using a tool like VoiceOverorTalkBalk you can see what experiencing Tumblr on mobile web with a screen reader was like. Here’s a gif showing what the mobile web experience on Tumblr was like prior to the changes.
What we did
Some of the more noticeable improvements we made were introducing design changes to increase readability and making improvements following WAI-ARIA guidelines. We’ll walk through a few other changes we made using React.
Visual order on the page follows DOM order
One of the larger changes we made was to revamp modals and popovers (e.g., the post activity screen). Originally we used React Portals but it isn’t always the most friendly for accessibility. Ideally you want to have elements appear in logical DOM order and Portals provides a way to circumvent that. So, no more Portals!
The user’s focus is directed to new content added to the page
Next step was to provide a way to manage focus. We want to a) direct focus to the modal when it’s opened and b) return focus to the element that opened the fullscreen modal. Using React’s lifecycle methods and refs, this is simple enough to implement. In your modal component:
publictargetEl:HTMLElement;// The element used to open the modal publicbuttonEl:HTMLElement;
publiccomponentDidMount() { // We add an event listener to get the element that opened the modal document.addEventListener(‘focus’,this.setOriginalTargetEl,true); // We set focus to some element inside your modal this.buttonEl.focus(); }
publiccomponentWillUnmount() { // Return focus to the element that opened the modal if(this.targetEl) { this.targetEl.focus(); } }
publicsetOriginalTargetEl=event=>{ // Only set it once to get the initial target if(!this.targetEl) { this.targetEl = event.relatedTarget; document.removeEventListener('focus’,this.setOriginalTargetEl,true); } };
Of course, we’re still fine-tuning different elements of the site since accessibility is more than just a number. A lot of these changes will be even more noticeable when the new Tumblr dashboard comes to your desktop. There’s still more to come, so keep your eyes open!
Think there’s a way to make Tumblr more accessible? Hit us up at tumblr.com/jobs and come work with us!
Making a progressive web app with webpack just got a little bit easier
Today we are releasing webpack-web-app-manifest-plugin, which generates an app manifest that shows up in your assets manifest.
I heard you like manifests
Turns out, there are a lot of web things called “manifests”. When talking about web app manifests and assets manifests, sometimes it’s hard to keep track. Buckle up, because we made a webpack plugin that deals with both of these types of manifests.
Web app manifests are JSON files that allow your application to specify the way it should be treated when installed as an application on a mobile device. You may want to specify what the application name and icon should be. Maybe you want to tell the browser to tint some of its UI elements to match the color scheme of your page, or even hide the browser chrome entirely. You can do all of that with a web app manifest.
Assets manifests are JSON files that contain paths to assets that are generated by webpack. They’re generated by plugins such as assets-webpack-plugin. If you add hashes to the end of your filenames to allow cache busting, assets manifests can be very useful. For example, we use our assets manifest to add JavaScript and CSS files to our <script> and <link> tags.
So I put a manifest in your manifest
While we were building our web app manifest, we wanted to be able to add a hash to the file path and <link> to it. So we needed to add it to our assets manifest. Unfortunately, we were unable to find any existing open-source plugins that output the file in the correct way to add it to the app manifest. So, we built webpack-web-app-manifest-plugin.
By default, webpack-web-app-manifest-plugin assumes that you will name your icon files in the format manifest/icon_[square dimension].(png|jpeg|jpg). If you name them using that scheme, you can use this plugin just like this:
// in your webpack config importAppManifestPluginfrom‘webpack-web-app-manifest-plugin’;
// in your page template constmanifest= // however you usually access your asset manifest in code constappManifestPath=manifest['app-manifest’].json;
<linkrel=“manifest”href={appManifestPath} />
If you named your icons with some other naming scheme, you can still add them to the web app manifest, it’s just a little more work. That process is detailed in the README.
Please use it
We’re really proud of the work we’ve done to make web app manifests compatible with asset manifests, which is why we’ve decided to open source it and publish it on npm. Please use it.
If this plugin doesn’t meet your needs, we welcome pull requests. And if you have a passion for progressive web applications, webpack, and open source, join our team!
We decided on building the mobile dashboard next for a few reasons. First, the dashboard is one of the most important parts of Tumblr—for many people it is their primary window into the content here. Because of that, most things that we develop inevitably touch the dashboard. It was time to raise the stakes.
The desktop dashboard and the mobile apps have been moving forward at a blistering pace, but have you seen the mobile web dashboard? It was stuck in 2015. Nobody ever made features for it because it was a completely separate codebase. We avoided that issue with the rewrite. Since the new version we’re building is responsive, our new mobile web dashboard will eventually also power the desktop web dashboard experience. This’ll make it much easier to maintain feature parity between the desktop and mobile web experiences.
Finally, we wanted to make something a little bit more complex than the image page, and the mobile web dashboard seemed like a good next step. It allowed us to start making authenticated API calls and figuring out how to pass cookies through our new server to and from our API; to think about laying the groundwork for a totally responsive dashboard, so we can eventually launch this for the desktop; to make a testing ground for progressive web app features like web app manifests; to start rendering posts that are backed by the new post format; and to figure out how to slowly roll out the new stack to a consistent, small set of users. We also had a pretty bad performance bug and learned a whole lot about profiling Node. (We plan on writing more in-depth posts about some of these topics soon.)
It is good
And the rewrite turned out really well. Even with more features like pull-to-refresh, a new activity popover, and modern audio and video players, we sped up our DOM content loaded time by 35%! The new page has a lot of modern web standards in it too like srcsets, flexbox, asynchronous bundle loading, and a web app manifest. You can install the mobile web dashboard as a standalone app now. It was also way faster and simpler to write using React than it was on our old PHP/Backbone stack.
We’re really proud of the new mobile web dashboard. We look forward to bringing even more new features to it in the near future, and launching even more pages on our new web infrastructure.
If you’ve been following this Tumblr, you’ll likely know that we, the Core Web team, have recently started rewriting and modernizing the Tumblr web platform. This undertaking presents some incredibly exciting opportunities to innovate with lots of fun technologies. We’re working on improving every aspect of the web; the dashboard, the archive, the blog network, you name it.
Are you a senior JavaScript engineer and wanna be a part of this adventure? Come join Core Web!You’ll help create the building blocks with which a brand new modern Tumblr will be built. Your work will directly impact and define the user experience for millions of users and the development tools for a large number of product engineers across several teams at Tumblr!
What you’ll do
We’re looking for an extraordinary senior JavaScript engineer who wants to take on the following challenges:
Keep making our build and deployment more delightful and futuristic
Help establish norms and standards for how this new web client should be architected, including setting JavaScript, CSS, performance and other best-practices, and introducing/creating the tools to achieve them
Internally and externally raising awareness around the work the team is doing by being active in the Open-source and engineering community
Whatever else you think will help us create the highest quality web platform and development experience!
Who we’re looking for
An ideal team member is someone with:
StrongJavaScript and CSSfundamentals
Experience setting up Continuous Integration / Continuous Deploys
Expertise in build tools like Webpack, Parcel (or similar)
Pragmatism and the ability to decide what’s “good enough” (while planning ahead and knowing when to iterate)
An ability to independently drive projects
A desire to innovate and bring new things into the world
An understanding of code quality, unit test coverage, and performance
In the ten years that Tumblr’s been around, a lot has changed in web technology. We’ve kept up, of course, but it’s always been a process of addition, layering one new technology on top of another. And what we were working with—a custom framework built on top of Backbone, messily entangled with a PHP backend and its associated templates—was becoming unmanageable. Our piecemeal conversions to new technologies meant we had thousands of ways posts were rendered (only a moderate exaggeration). And each of those had to be updated individually to support new features or design changes.
It was time to step back, survey the world of web technology, and clean house in a big way. That we could finally test some of the new tech we’ve been itching to use was just a little bonus.
We started by laying out our goals:
A web client codebase fully separated from the PHP codebase that gets its data from the API in the same way our mobile apps do
A development environment that’s as painless as possible
Built on a framework with a healthy and active community, with some critical mass of adoption
With those goals in mind, we spent the beginning of the year on research - figuring out what kinds of things people were building web apps with these days, tooling around with them ourselves, and trying to assess if they would be right for Tumblr. We landed, eventually, on React, with a Node server (running Express) to make isomorphism as easy as possible. On top of that, we’re using Cosmos for developing components, React Router for routing, and TypeScript to make our lives better in general. (My colleague Paul already wrote about what went into our decision to use TypeScript here.)
As if writing an entirely new stack wasn’t enough, we realized along the way that this was our perfect chance to start deploying containerized applications with Kubernetes, a first for Tumblr. We had never previously deployed a node application to production here, and didn’t have the infrastructure for it, so it was a perfect green field on which to build another new and exciting thing. There’ll be more to come later on Kubernetes.
So where are we now? Well, we’ve launched one page powered by this new app - image pages, like this - with more to come very soon.
Though it may seem simple, there’s a whole new technological world between you clicking that link and seeing that page. There’s a ton more exciting stuff happening now and still to happen in the future, and we’re looking forward to sharing it here. Wanna get in on the action yourself? Come work with us: https://www.tumblr.com/jobs.
Flux helped bring the complexity of Data Lasso down, replacing messy event bus structure. React helped make the UI more manageable and reduce code duplication. More below on our experience.
Flux
Data Lasso runs entirely in the browser. It is a somewhat complex app that has a rich UI and is highly interactive.
From the beginning, it used to rely on an event bus that tied different parts of the app together. But with new functionality being added, code complexity was increasing at a very high rate. Some bugs were hard to pinpoint to a source. Fixing others required more workarounds, what in the end led to more bugs.
This surfaced the underlying problem with event bus. While being flexible, it introduced too much complexity by itself, becoming a drag on the code.
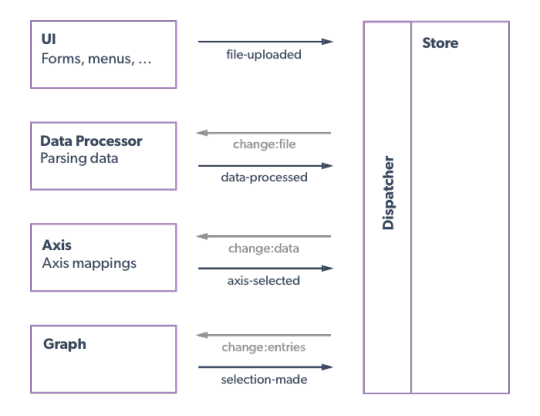
Here is a simplified diagram of uploading a new dataset:
The dependencies that formed were vast - logic from one component was calling into several other (example) components. Something as simple as adding a new upload source was going to double the amount of event listeners and interdependencies.
Flux aims to solve a similar problem, so I decided to give it a try.
First of all, a bit on Flux. It is an application architecture for building interfaces, with it’s core principle being unidirectional data flow. I highly recommend looking through Facebook’s flux overview.
I like to think of Flux more as of a state of mind. You don’t have to use solutions like Redux to get started, it’s up to you on how you want to execute the pattern. That is what I did with Data Lasso - here are some of the key components:
Store + Dispatcher: In Data Lasso, Store is really just a single Backbone Model. Dispatcher, which is typically it’s own thing, is integrated into the Store. Actions are dispatched right on the Store, which is a “single source of truth”.
Actions: As Flux architecture goes, I am a big fan of having strict pre-defined actions, as well as a Reducer. From the standpoint of bringing clarity into the code, those two are great concepts. Data Lasso, however, is not that complex, so I opted for a humble switch statement on the Store that does the trick (here it’s in the code).
With that in mind, the diagram from before changes to this:
From the first glance, it’s not less complex. If anything, there is more entries. That’s not the point, however. The benefit is in having a more predictable logic. It’s more clear what is happening at more or less any point in time.
There are some other benefits:
Anything that can happen, happens in one place. It’s always nice to be able to glance at one file and get a complete picture
Race conditions are less likely, since everything is dispatched through a single point in the app
Overall, Flux pattern was a perfect match for Data Lasso. It really solved some of the pains of a highly dynamic application without adding unnecessary abstract conventions.
React
React was a more straightforward change. Besides the fact that React’s way of doing things matches well to a unidirectional data flow, it was a much nicer view layer to use, compared to Backbone Views.
Some advantages:
Components! Having few reusable components made a ton of difference, improving consistency and reducing code duplication.
Event binding made the UI easier to comprehend and maintain.
While animations took some trial and error to figure out, at the end of the day React was a great improvement, and maybe most of all - felt like a natural next step.
Further reading
Pull Request that implemented Flux in Data Lasso. (Did we mention that Data Lasso is Open Source?)
Flux Overview - video is exceptionally helpful and we would recommend you watch it!
React - while it’s necessary to maintain a healthy level of skepticism towards new technologies that come and go so frequently, React proved a new paradigm of thinking and established a solid solution to a painful problem.
We just published v1.1.0 of the tumblr.js API client. We didn’t make too much of a fuss when we released a bigger update in May, but here’s a quick run-down of the bigger updates you may have missed if you haven’t looked at the JS client in a while:
Method names on the API are named more consistently. For example, blogInfoandblogPostsandblogFollowers rather than blogInfoandpostsandfollowers.
Customizable API baseUrl. We use this internally when we’re testing new API features during development, and it’s super convenient.
data64support, which is handy for those times when you have a base64-encoded image just lying around and you want to post it to Tumblr.
Support for Promiseobjects. It’s way more convenient, if you ask me. Regular callbacks are still supported too.
Linting! We’ve been using eslint internally for a while, so we decided to go for it here too. We’re linting in addition to running mocha tests on pull requests.
Check it out on GitHuband/ornpm and star it, if you feel so inclined.
tumblr.js REPL
When we were updating the API client, we were pleasantly suprised to discover a REPL in the codebase. If you don’t know, that’s basically a command-line console that you can use to make API requests and examine the responses. We dusted it off and decided to give it its own repository. It’s also on npm.
If you’re interested in exploring the Tumblr API, but don’t have a particular project in mind yet, it’s a great way to get your feet wet. Try it out!
Data Lasso, Tumblr’s three-dimensional visualization tool, just got a serious upgrade. Along with a version bump to 2.x, Data Lasso now has some handy new features (as well as completely reworked internals). A GIF is worth a thousand words:
Quick refresher: Data Lasso is a visualization tool that Tumblr built that allows us to look at large multi-dimensional data sets quickly. If you haven’t tried it yet, check out the hosted version here.
New stuff
Data Lasso is built on the premise of being able to quickly visualize data and select a subset of interest, using a lasso-like tool. That tool just became much more flexible. Now, you will be able to make complex selections by adding and subtracting from an existing selection - much like the tools that you are already used to, if you work with image editing programs. Hold your shift key to add, option/alt to subtract.
Now, you can also upload datasets using a URL, without needing to download them. Same rules apply - it can be any .csv,.tsvor.json, as long as it’s properly formatted. That will come in handy if you are using data lasso with public datasets that are available online, or if you are working with systems like Hive that provide a link to your query results.
Reworked Internals
A lot was changed under the 3 dimensional hood of Data Lasso.
Architecture now follows principles of Flux (a fitting approach for a complex front-end application like Data Lasso) and its interface is now powered by React. These two things help to reduce the complexity a lot. More on moving to Flux + React in a blog post to follow.
The build process was moved to Webpack and was simplified a lot. Webpack loaders also allowed us to have .hlsl files in the codebase for the first time - so we no longer had to rely on workarounds to include the vertex and fragment shaders that Data Lasso relies on for utilizing GPU.
It won’t be a major version bump, of course, if it did not contain backwards incompatible changes. With a move to Flux, the event bus was deprecated. So if you are using Data Lasso inside your app and rely on events for interacting with it, you will have to switch to using Store and Dispatcher instead. It is good in the long term - as it provides so much more clarity into what’s going on inside Data Lasso.
That should be it! Overall, 2.0 is a solid release that adds new fundamental functionality, while allowing for future work to go smoother. As usual, if you encounter a problem - open an issue on the repository.
Here at Tumblr, we use a JS bundler to compile our client-side code. As time went by, we started to feel the very real effects of bit rot in the form increasingly slow build times and the realization that were were 9 major versions behind on Browserify with no straightforward way to upgrade.
We decided to take a fresh look at our process and give Webpack a try. We laughed, we cried, we saved a bunch of time on our builds.
About two years ago, Tumblr embarked on a journey to create and apply cohesive clientside architecture to the website. Our Product Engineers had lived without things like JS bundling, npm libraries, and CSS preprocessors, and a lingua franca for application-level functionalities to share between Product teams was a considerable step forward for our codebase.
One of the things that came out of this initiative was our use of Browserify to create JavaScript bundles that used npm modules as well as our own libraries. Suddenly, we had a straightforward way to share classes and utilities without polluting the global namespace! We decided on Browserify for building and Gulp as our taskrunner.
We decided early on that we wouldn’t just start from scratch and rewrite the entire site, but rather we would pull things over piecemeal from the old way to the new way. We needed a way of splitting code between various pages on the site during this transition. Thus, “contexts” were born.
Acontext bundle is essentially a mini Single Page App. For example, the dashboard is a context. The search page is a different context. The help docs are a different context. Each distinct context meant a different set of JS and CSS build artifacts, which meant a Browserify build for each.
These contexts were still sharing plenty of code between them, particularly vendor libraries, which necessitated another bundle to avoid code duplication (and downloading identical code). We used a vendor bundle to address this. Another Browserify build! We manually maintained a list of modules that would be kept in the vendor bundle so the context bundle builds would know not to include them.
The Browserify build process
Fast forward a year or so and we had added the header bundle, which loaded above the fold, and standalone bundles, which are entirely self-contained and don’t rely on the full vendor bundle. Our builds had turned into something like this (and this isn’t even including CSS):
Each starred thing up there was a separate Browserify build, and it got slower every time there was a new context or standalone bundle. Furthermore, the version of Browserify we were using was falling further out of date, because newer versions were even slower in our case. One engineer created a system to parallelize gulp tasks using the cluster, which sped things up and had the added benefit of turning our boxes into loud, fan-spinning space heaters.
Rethinking the build
Luckily, we did have an idea why things were so slow. Many modules were shared across contexts, but not in the vendor bundle, and our builds parsed them repeatedly. Browserify couldn’t share cached information about these modules across build processes. We could have fixed that by passing multiple entry points into Browserify, but that required rewriting our JS build scripts entirely, which was way too scary.
In the meantime while we were furrowing our brows at the situation we were in, Webpack was emerging as a popular new solution to bundling. It had some neat features that weren’t in Browserify, or not as easy to configure. We were particularly interested in automatic bundle splitting, async loading, and hot reloading. One engineer had looked into it early on, but some of the magic in our Browserify configuration didn’t translate over easily. We shelved it.
From Browserify to Webpack
At this point, our backs were against the wall. Our build process was so fucked up that we really had nothing to lose by trying something completely different except time.
“Okay, fine. Where do I sign up?”
Baby steps
The first step was trying to get something building in Webpack. Since we were still committed to using Gulp, we opted for webpack-stream. I tossed together a basic Webpack configuration and tried it.
We encountered problems immediately. Each of our context bundles used a “bootloader” to kick off the bundled JS with some bootstrapped data generated by the server. Being able to do require('context') and pass in the bootstrap data in an inline <script> tag seemed like a convenient way to share code, but we ended up with a circular require and this little slice of evil in our Browserify configuration:
It seemed like a good idea at first, but it had to go, so it went. We refactored our contexts so that the entry points ran the bootloader immediately rather than exposing it as a static method on the class exported by the context.
Loaders
The next obstacle was that we overloaded require to include non-JS files and had been relying on Browserify transforms for templatesandstyles. We needed to handle these using Loaders, the Webpack equivalent to transforms. Fortunately, the Webpack community had already created loaders to handle these cases.
Whereas our Browserify transforms did several things at once (loading the file, postprocessing, converting to a JS module), Webpack Loaders tend to be chainable single-purpose steps that allow the same end result.
Bundling and splitting
We used bundle splitting in Browserify, but it was a manual process that required separate per-bundle build scripts and a list of modules.
This isn’t the exact code we used, but in was essentially something like this:
Header bundle
var browserifyInstance = browserify(); var requires = ['some-config']; var externals = []; var bundleOptions = {}; requires.forEach(function(requireModule) { browserifyInstance.require(requireModule); }); externals.forEach(function(externalModule) { browserifyInstance.require(externalModule); }); browserifyInstance.require('header/index.js'); browserifyInstance.bundle(bundleOptions);
Vendor bundle
var browserifyInstance = browserify(); var externals = ['lodash', 'backbone', 'jquery', '...']; // list of vendor dependencies var externals = ['some-config']; // Grab this from the header bundle var bundleOptions = {exposeAll: true}; requires.forEach(function(requireModule) { browserifyInstance.require(requireModule); }); externals.forEach(function(externalModule) { browserifyInstance.require(externalModule); }); browserifyInstance.require('vendor/index.js'); browserifyInstance.bundle(bundleOptions);
var browserifyInstance = browserify(); var requires = []; var externals = ['lodash', 'backbone', 'jquery', '...']; // same list of vendor dependencies var bundleOptions = {}; requires.forEach(function(requireModule) { browserifyInstance.require(requireModule); }); externals.forEach(function(externalModule) { browserifyInstance.require(externalModule); }); browserifyInstance.add('contextindex.js')), // ... }
ThatcreateEntryPoints function expanded the glob and created a full mapping of of our context entry points. CommonsChunkPlugin decided if a module was “global enough” and pulled it into the global bundle. In early tests without the global bundle, we found that a lot of those modules were automatically dropped into the vendor bundle.
The other interesting thing we found was that the order of modules in the CommonsChunkPlugin options mattered. The last entry was assumed to be the first script loaded on the page. This is important it defines webpackJsonp, which subsequent bundles rely on to communicate with each other.
Putting it all together
With all of these changes implemented, our builds looked like this:
We were down to two build processes, each using multiple entry points, so each process benefitted from sharing parsed modules between those entry points.
How much faster did it get?
A lot faster. Dev builds took less than a third of the time to run. Production build times were cut in half. Incremental builds using the Webpack watcher were almost instant.
These build times are a bottleneck in the development process, and by saving hundreds (estimated) of developer-hours, we’re freeing up time to work on more features, ship faster, and spend more time with our families.
So did we need to ditch Browserify to speed things up?
Maybe, maybe not. The process of migrating our Browserify configuration to Webpack exposed several foolish things we were doing that we could have fixed without switching bundlers. On the other hand, our build scripts are easier to read now because we’re using core Webpack features that we accomplished with clever (in the bad way) tricks in Browserify.
Either way, you can pry chainable loaders out of my cold, dead hands.
Overall, it’s always a good exercise to make sure you still understand the code you’re responsible for maintaining. Learning a new tool is fun, but when it improves your development flow as much as it did for us, the proof is, as they say, in the pudding.
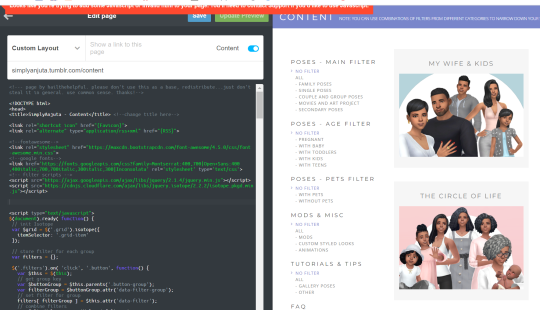
You guys, apparently there were some security changes on Tumblr and JavaScript is no longer allowed for blog pages, which probably affects a lot of blog pages that use a custom theme. You need to contact support & ask to make an exception for you if you want to keep using it - which is what I did now (waiting for a reply).
I noticed today that the theme I have to organise my content still works (https://simplyanjuta.tumblr.com/content), but Tumblr doesn’t allow me to save changes for it anymore (so I can’t add new posts to the page, for example) - It displays the message “Looks like you’re trying to add some JavaScript of invalid form to your page. You’ll need to contact support if you’d like to use JavaScript.” (see the red line below, and yes, it’s cut funny so it’s barely readable).
After some googling I figured I’m not the only one with this issue:
♡Review: Sacred And Sound Breath Meditation By Lisa Powers Has Been A Great Course. I Took The Course From Udemy And Lisa Gives Demonstrations For Each And Every Type Of Meditation Very Nicely. I Had A Wonderful Learning Experience. Her Voice Is Amazing And Very Soothing To Hear While Learning.
♡Rating: ⭐⭐⭐⭐/5.
♡If You Liked My Review Then Please Do Follow @theprairiewitchwriter For More Reviews.


![Join WRLDIE! #Nonprofit #SocialMedia Network. [Link in Bio] Better World & Future Pages, Groups,](https://64.media.tumblr.com/a880193d49be86c457b67c261e65b821/9835b67b3eef54f9-b9/s500x750/ca4b224fa0427526c24a11b069be2f90552a60c6.jpg "Join WRLDIE! #Nonprofit #SocialMedia Network. [Link in Bio] Better World & Future Pages, Groups,")
![Join WRLDIE! #Nonprofit #SocialMedia Network. [Link in Bio] Better World & Future Pages, Groups,](https://64.media.tumblr.com/a880193d49be86c457b67c261e65b821/686e1f76e9cc2292-86/s500x750/bb41f247e68b43932c25cfe0dcb12f739347c013.jpg "Join WRLDIE! #Nonprofit #SocialMedia Network. [Link in Bio] Better World & Future Pages, Groups,")
![Join WRLDIE! #Nonprofit #SocialMedia Network. [Link in Bio] Better World & Future Pages, Groups,](https://64.media.tumblr.com/e0cdce4a97a4caabcbebc4d02be55ddd/bd5e6df6ff675274-5b/s500x750/0ea5275adabf0e6b08984b5183816c9dc8e35640.jpg "Join WRLDIE! #Nonprofit #SocialMedia Network. [Link in Bio] Better World & Future Pages, Groups,")
![Join WRLDIE! #Nonprofit #SocialMedia Network. [Link in Bio] Better World & Future Pages, Groups,](https://64.media.tumblr.com/b8f8fabf5030ac5d85bb15ab9f8b485f/b80498fd46907d98-f3/s500x750/473fb82ec15c9afbdc963fab74c99424f2ba3e01.jpg "Join WRLDIE! #Nonprofit #SocialMedia Network. [Link in Bio] Better World & Future Pages, Groups,")
![Join WRLDIE! #Nonprofit #SocialMedia Network. [Link in Bio] Better World & Future Pages, Groups,](https://64.media.tumblr.com/c63d5b69e26a0652167e247caed598c9/0157afa67d07611d-75/s500x750/e23e1d2763e4d30d9e7db4bcbfdf50e118fb643f.jpg "Join WRLDIE! #Nonprofit #SocialMedia Network. [Link in Bio] Better World & Future Pages, Groups,")
![Join WRLDIE! #Nonprofit #SocialMedia Network. [Link in Bio] Better World & Future Pages, Groups,](https://64.media.tumblr.com/d136092f3b558a03b2afe09b22d15071/763790fdf6df91ba-07/s500x750/bb424576b7f5d2ed26555aeeada073f53b0ea4a6.jpg "Join WRLDIE! #Nonprofit #SocialMedia Network. [Link in Bio] Better World & Future Pages, Groups,")
![Join WRLDIE! #Nonprofit #SocialMedia Network. [Link in Bio] Better World & Future Pages, Groups,](https://64.media.tumblr.com/a8014c93ef4e448e6719b9e06c4073ee/4495dcbed46eac0a-40/s500x750/b127d79ba0ee65ba38f2bb67ea6df50b51c24360.jpg "Join WRLDIE! #Nonprofit #SocialMedia Network. [Link in Bio] Better World & Future Pages, Groups,")