#expanding foam armor

You have a bunch of cans of expanding foam at the ready and you’re wondering what to make with them. The easiest answer to this is pretty much anything, but very large props or weapons with solid bases and clunky armor are your best bets.
That’s because anything made out of expanding foam will naturally be a little thick. Those props will have seven layers once completed: cardboard base, foam, masking tape cover, newspaper paper mache cover, clay paste paper mache cover, primer, and paint. You could make, for example, a great Buster Sword from Final Fantasy VII out of expanding foam, but try to do that with a pair of delicate Steampunk wings and they would just look awkward.
Take a look at some of these amazing props to get an idea of what’s possible.
Weapons

Armor


viaIrarenovo
Large Props

viaTemperance

Basically, the sky’s the limit. Get your base ready and spray away!
This guide was made under the wing of Costume Discounters (www.costumediscounters.com). Please go check out their site!! They sell wigs, shoes, shirts, essentials…all sorts of goodies.
Using expanding foam is a pretty straightforward process–you spray, carve, cover, and paint. You can’t get to that point if you don’t have the right tools, though. This is what you’ll need to make your next prop:

Cardboard
For making the base that the expanding foam will stick to.

Craft Knives
You’ll want a whole bunch of these–they get dull fast.

Masking Tape

Newspaper

Water
To help the foam rise.

Spray Bottle

Wallpaper Paste
You can use regular old Elmer’s Glue if you can’t find any, but this will work a lot better.

Paper Mache Clay
This may not be the paper mache you recognize. When mixed with water and glue it becomes a thick, clay-like material that is very durable once it hardens. It will give your prop its hard coating.

Sandpaper
For smoothing out the paper mache.
Since it isn’t a tool it isn’t listed above, I’ll write it here: remember to get several cans of expanding foam. You’ll carve away a half to two-thirds of the foam on your prop to get the right shape. You can also always add on foam and recarve if you make a mistake, but you’re out of luck if you don’t have any more left to use.
All of these materials are pretty cheap and commonplace–just pick them up from your local craft and hardware store and get working!
This guide was made under the wing of Costume Discounters (www.costumediscounters.com). Please go check out their site!! They sell wigs, shoes, shirts, essentials…all sorts of goodies.
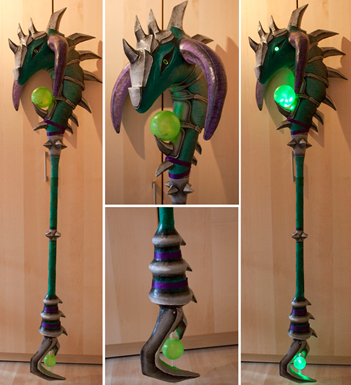
You have this really cool-looking sword in your head, but it’s got so many turns and dips and twists that you don’t think you’ll ever be able to make it. That’s where expanding foam comes in handy.

Usually used in home construction, expanding foam is a liquid insulator that, when it comes in contact with the air, expands to fill the space its given. Once it hardens it feels a lot like floral foam (those green blocks you loved to poke holes in as a kid)–it’s just more sturdy. You can use this to create and carve complex patterns that aren’t possible in any other material, like this fabulous dragon-head staff.

Staff head base via Kamui Cosplay
The only downside of expanding foam is that can’t stand alone. Since it has so many air bubbles, paint won’t cover it very well and some of the pieces of your prop may snap off. As long as you wrap masking tape around the form and put paper mache over it, though, you’ll have a light, durable, easy-to-paint prop that was cheap to make and impressive to see!

(The same staff head from above after it’s been prepared for painting.)
This guide was made under the wing of Costume Discounters (www.costumediscounters.com). Please go check out their site!! They sell wigs, shoes, shirts, essentials…all sorts of goodies.