#cosplay armor guide

Nothing is worse than putting the last details on your prop, messing up, and not having enough time or supplies to fix it. These tips will help save you a lot of grief in the long run.
1. Research the piece you’re making. Whatever you do, research the fudge out of every prop you make. If you’re making armor for a specific character, find several different pictures and videos of that character from all angles. If it’s wings for a steampunk prop, look up a few species of birds and see how their feathers come together. This is intrinsic to getting your pattern right. After all, you don’t want to get to the event only to realize that your prop is totally wrong.
2. Do mock-ups. Whenever I’m getting ready to make a prop, I sketch it out and construct it in paper first. It might seem excessive, but it will make the entire project run more smoothly. Mock-ups help you:
a. See where there will be strain in the prop.
b. Determine the best way to connect each piece.
c. Rework the design if something isn’t meshing.
d. Create a template for your patterns.
3. Make sure your pattern is perfect. Never rush making the pattern that you’ll use to cut out the pieces for your project. If you start with ill-fitting pieces, the best you’ll get out of all your work is a bad-looking prop. At the worst you’ll get to the event and have it fall apart around you.
4. Beware of hot tools. I once burned my heel with a heat gun so bad that I couldn’t walk right for a month, and now I have a permanent scar. If you’re using a heat gun, make sure you have somewhere safe to put it when you’re molding your prop. If you’re working in boiling water, look out for drips of hot water.
5. Beware of hot plastic. The plastic will get deceptively hot as well, and a lot of times you won’t notice it until it burns you. If you don’t want lobster red, hyper-sensitive fingertips for weeks, use thin leather gloves and proxy tools (rollers, spoons, etc.) to work on your prop.
6. Don’t leave your props in the heat. They won’t totally melt, but they will get bent out of shape…and then you will too.
a. When you’re driving to your event, make sure any Wonderflex or Worbla props are packed in a cooled compartment out of the sunlight.
b. When you come home, keep them safely stored in room temperature or below and don’t put them in front of a window. It’s pretty easy to fix the droopy parts if your prop does melt, but you won’t want to do it.
And finally…
1. Save your scraps.
2. Fit together your pattern pieces like a jigsaw on your sheet.
3. Use primer!
4. Glue beforeyou paint.
5. Don’t try to bend or stretch the material too far.
6. Hold the corners of each unrolled sheet down with weights.
7. Prevent bending by using several layers of material.
8. Mix and match Wonderflex and Worbla so you’re always using the best material for the job.
9. Update old patterns for new projects.
Stupid mistakes end up costing you a lot of time and money, not to mention bodily harm. Try to keep these in mind when you’re working on your next prop and you’ll be amazed at how well it turns out.
Whenever you’re just starting out on something, you’re going to need a little help. Here are a few helpful guides for getting the ball rolling on your next Wonderflex or Worbla project.
Introduction to Using Wonderflex:http://www.youtube.com/watch?v=YElXK-_uIAg This five minute video shows the process that you’ll use for your entire project.
Getting custom-fit patterns:http://kamuicosplay.deviantart.com/art/Armor-Pattern-Tutorial-416269738 (Kamui Cosplay is really simple to understand).
Making a Valkyrie Helmet:http://www.projectfancy.net/?post=132
Dressing up heels:http://lumis-mirage.deviantart.com/art/Tutorial-Shoes-with-Worbla-413196274
Making She-Ra’s headpiece:http://www.thestylishgeek.com/2011/08/11/wonderflex-tutorial-she-ra-headpiece/
Remember, you can adapt these tutorials to fit anything. Just use proper planning to make some good templates and you’ll be set!
This guide was made under the wing of Costume Discounters (www.costumediscounters.com). Please go check out their site!! They sell wigs, shoes, shirts, essentials…all sorts of goodies.
You can’t wait to start making your home-brewed suit of armor, but you’re not sure what you’ll need before you sit down. Here are some basic tools that you’ll use whenever you’re working with Wonderflex and Worbla:

Pencil
So you can mark where you will cut.

Paper
If you’re prone to making mistakes, it’s good to make stencils on paper and cut out each piece according to them.

Tape
For keeping stencils down.

Scissors
For long, straight cuts and trimming frayed edges.

Exacto knife
For cutting intricate designs. You’ll want to get a lotof these.

Heat gun
A hairdryer on PCP. A heat gun is, hands-down, the single most useful tool you will have at your disposal. It heats up quickly, will let you target specific areas, and gets the plastic nice and malleable faster than anything else will. You can get one for a little over $20 on Amazon. A microwave or heater will do if you don’t have a heat gun, but trust me, this is so much better.
And that’s it. Six tools and a whole world of prop-making has opened up before you.
This guide was made under the wing of Costume Discounters (www.costumediscounters.com). Please go check out their site!! They sell wigs, shoes, shirts, essentials…all sorts of goodies.
You have a bunch of cans of expanding foam at the ready and you’re wondering what to make with them. The easiest answer to this is pretty much anything, but very large props or weapons with solid bases and clunky armor are your best bets.
That’s because anything made out of expanding foam will naturally be a little thick. Those props will have seven layers once completed: cardboard base, foam, masking tape cover, newspaper paper mache cover, clay paste paper mache cover, primer, and paint. You could make, for example, a great Buster Sword from Final Fantasy VII out of expanding foam, but try to do that with a pair of delicate Steampunk wings and they would just look awkward.
Take a look at some of these amazing props to get an idea of what’s possible.
Weapons

Armor


viaIrarenovo
Large Props

viaTemperance

Basically, the sky’s the limit. Get your base ready and spray away!
This guide was made under the wing of Costume Discounters (www.costumediscounters.com). Please go check out their site!! They sell wigs, shoes, shirts, essentials…all sorts of goodies.
Since expanding foam is so easy to use and plot out, there aren’t many step-by-step tutorials out there (when the process goes so smoothly, there’s isn’t much to explain!). Here are the best available:
Preparing and carving:https://www.youtube.com/watch?v=O23TM-z0OXk Look at how much she uses, and how much she carves away. Don’t go chintzy when you’re spraying on the foam.
Applying paper mache:https://www.youtube.com/watch?v=bn_RosA4uFc&list=UU79qFuymkVas5dCScbLF9fw Remember, you have to cut your newspaper into tiny squares! None of those long strips you used as a kid. They willbuckle, bend, and make unattractive gaps in your prop that you can’t cover up.
Making a sword (this has really well-explained steps at the bottom):http://doxiequeen1.wordpress.com/2010/12/13/how-to-make-a-lightweight-cosplay-sword-tutorial/
Examples of complex shapes: http://www.kamuicosplay.com/2010/10/about-my-love-to-expanding-foam.html
And that’s it!
This guide was made under the wing of Costume Discounters (www.costumediscounters.com). Please go check out their site!! They sell wigs, shoes, shirts, essentials…all sorts of goodies.
Using expanding foam is a pretty straightforward process–you spray, carve, cover, and paint. You can’t get to that point if you don’t have the right tools, though. This is what you’ll need to make your next prop:

Cardboard
For making the base that the expanding foam will stick to.

Craft Knives
You’ll want a whole bunch of these–they get dull fast.

Masking Tape

Newspaper

Water
To help the foam rise.

Spray Bottle

Wallpaper Paste
You can use regular old Elmer’s Glue if you can’t find any, but this will work a lot better.

Paper Mache Clay
This may not be the paper mache you recognize. When mixed with water and glue it becomes a thick, clay-like material that is very durable once it hardens. It will give your prop its hard coating.

Sandpaper
For smoothing out the paper mache.
Since it isn’t a tool it isn’t listed above, I’ll write it here: remember to get several cans of expanding foam. You’ll carve away a half to two-thirds of the foam on your prop to get the right shape. You can also always add on foam and recarve if you make a mistake, but you’re out of luck if you don’t have any more left to use.
All of these materials are pretty cheap and commonplace–just pick them up from your local craft and hardware store and get working!
This guide was made under the wing of Costume Discounters (www.costumediscounters.com). Please go check out their site!! They sell wigs, shoes, shirts, essentials…all sorts of goodies.
You have this really cool-looking sword in your head, but it’s got so many turns and dips and twists that you don’t think you’ll ever be able to make it. That’s where expanding foam comes in handy.

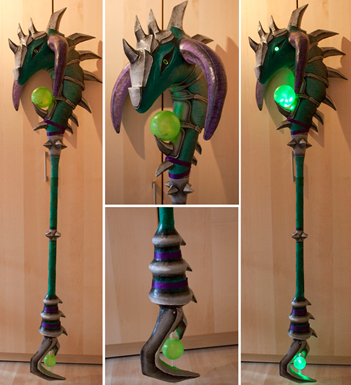
Usually used in home construction, expanding foam is a liquid insulator that, when it comes in contact with the air, expands to fill the space its given. Once it hardens it feels a lot like floral foam (those green blocks you loved to poke holes in as a kid)–it’s just more sturdy. You can use this to create and carve complex patterns that aren’t possible in any other material, like this fabulous dragon-head staff.

Staff head base via Kamui Cosplay
The only downside of expanding foam is that can’t stand alone. Since it has so many air bubbles, paint won’t cover it very well and some of the pieces of your prop may snap off. As long as you wrap masking tape around the form and put paper mache over it, though, you’ll have a light, durable, easy-to-paint prop that was cheap to make and impressive to see!

(The same staff head from above after it’s been prepared for painting.)
This guide was made under the wing of Costume Discounters (www.costumediscounters.com). Please go check out their site!! They sell wigs, shoes, shirts, essentials…all sorts of goodies.
You have to make sure you can use your prop without having it buckle and crack. Reinforcing cardboard is an essential step if you’re planning on using it for your costume! There are a couple different materials that will do the trick; here are some of them, listed from least hard to hardest:
Stiff fabric: Good for tight corners inside of props.
Fiberglass Tape: Not as stiff as craft foam, but easier to manipulate and layer.
Craft Foam: Good for the insides of worn props and those without steep curves.
Paper Mache Clay: Great for carving in intricate details, but not waterproof. It must be covered with a sealant after painting.
Gesso: Once sanded, it will leave your prop with a clean finish for painting. Must be covered with a sealant to make it waterproof.
Resin:The most common choice for cardboard and paper. Will make your prop smooth, strong, and waterproof, but it can be difficult to sand and has toxic fumes.
Bondo:Very, very strong, but isn’t waterproof. It must get a sealant top coat or be mixed with resin.
Just to prove how sturdy you can make these guys:

viaThorssoli
He’s standing on the helmet he just made. No supports, no hidden wires, no tricks–just good crafting. And it’s made out of paper(that link actually shows an excellent way to craft, reinforce, and paint if you want to check it out). Your prop will be able to stand up to most hard use as long as you reinforce it properly.
This guide was made under the wing of Costume Discounters (www.costumediscounters.com). Please go check out their site!! They sell wigs, shoes, shirts, essentials…all sorts of goodies.