As a follow up to our Making Worbla Smooth Experiment, here is the detailed write-up regarding the methods used in that experiment.
Making Worbla Smooth
There are many methods for making Worbla smooth so I decided to do a test run myself based on the primary methods others have used. The three main ways of covering Worbla have been using Gesso, Plasti-Dip, or Wood Glue. This experiment only covers Gesso with Mod Podge acrylic sealerorGesso with Plasti-dip. I didn’t have Wood Glue available during the time of conducting the test so there will be another part to this series that will include a comparison using Wood Glue.
Method
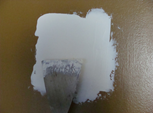
I used 8 layers of Golden Sandable Hard Gesso and 150 Grit Sandpaper. I prefer this Gesso over any clear Gesso as you can actually see the streaks so that when you sand it, you can see the Worbla getting smoother (pictures 3 & 4). In addition, the sandable Gesso has additives that makes it thicker so that you don’t have to do as many layers or as much sanding to make it look good. Yay for that!
You’ll notice I didn’t do a good enough job of sanding so you can still see some streaks in the forth image. If I were to do this again, I would do 6 layers, sand with 150 grit, and then add another 4 layers, then sand again with 150 grit to get a smoother finish (instead of just 8 layers straight). I tried sanding only 4 layers in and unfortunately, I exposed the Worbla, so 6 layers of Gesso is the very minimum in guarding against Worbla exposure. Also, it’s very important that each layer of Gesso dries completely before you put on the next. Otherwise, if you start sanding, the Gesso will chip and take, along with it, all the layers underneath. In picture 4, you will notice this happened on the edges of the Gesso which is why the Worbla is exposed there.
Results
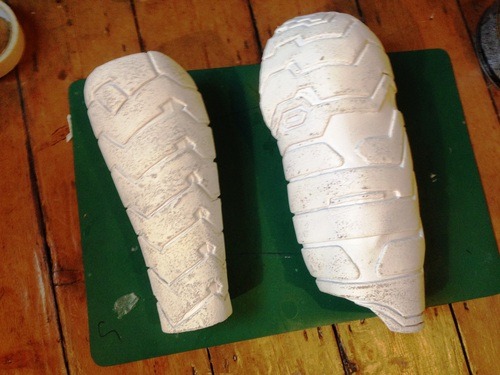
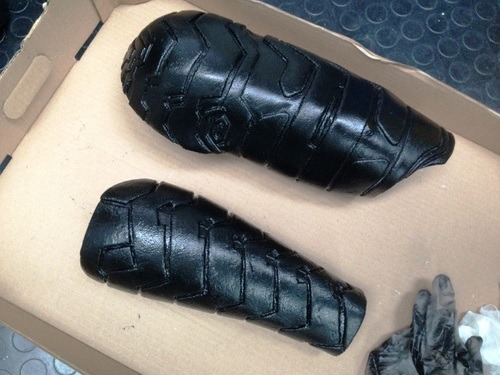
Picture one (left) shows the top piece which is Worbla painted without any additional work. The bottom piece is 8 layers of Gesso, sandpaper, one layer of Mod Podge acrylic sealant, and then one layer of Gold Metallic Paint.
Picture two (right) shows the top piece which is Worbla painted without any additional work. The bottom piece shows Worbla with 8 layers of Gesso, sandpaper, 2 layers of Plasti-Dip, and one layer of Gold Metallic Paint (Rustoleum brand).
Conclusion: I was surprised that the piece with the Mod Podge sealant looks smoother than the one with the Plasti-dip! I think the Plasti-dip made the items look more foam-like than I anticipated. It seems as though the Plasti-dip reacts oddly to Worbla.
Stay tuned when I try this experiment with Wood Glue.
Michele Carragher, the head embroider on Game of Thrones, made this awesome tutorial to show how she created the dragonscale fabric that appears on several of Daenarys’ costumes in S3 and S4.
Ms. Carragher says that the dragonscale fabric was created because “In season 3 the Costume Designer Michele Clapton wanted a Dragonscale like textured embroidery that starts to emerge on three of Daenery’s costumes, which becomes heavier and more pronounced, growing and evolving as the season progresses” (Carragher).
In stages 9-11 of the tutorial we see how the textile evolves from lightly to heavily embellished. This progression is meant to illustrate Daenarys’ personal growth and the growth of her dragons (source).
These high heeled boots are more akin to stretchy boot covers, but for some platform heels. They have an opening for the stem of the heels and the sole. They slip on over the shoe so that the shoe base remains usable (in my case, for other cosplays) and pull up over the leg. Underneath the shoes and shorts I’m wearing some dance tights. To keep the shoes up, I’ve attached a nice sized snap between the shoe and the tights. Facebook.com/decembercosplays
Happy New Year I hope your year is great!! The new pattern for doing the base dress for Elsa queen forest version is ready Leggins and dress!! Elsa pattern: https://etsy.me/2F7AGmP
Wig Hack Wednesday #5 ! Have you ever wanted to use the same wig for that one character who can’t decide if she wants to wear her hair in twin tails or let her hair down? (Aka Nozomi from Love Live) Or, have you found a perfect wig color for your character but the wig just doesn’t come with a back-parting? Well, here is one way you can fufill your cosplay goals on a budget! Also good for when you want to re-purpose a wig for different characters. For this demo, I’m using a Venus in grass green from Arda Wigs. I love this color and the length is perfect for Mallow from Pokemon Sun and Moon. My goal is to add a back-parting to the Venus base wig but make it detachable in case I wanna use the wig for other cosplay. - Part the wig down the middle in the back, and clip the hair away on each side. Cut the hair from the inside layers of the wig to use as wefts for this project. By leaving the outer layers uncut, when you tie the wig into twin tails or let the hair down completely, it will hide the trimmed part - Use Tacky glue (or other glue that dries clear but flexible) on the tip of a small piece of hair. Use your fingers to squeeze the hair flat to make sure the glue covers all of the hair on the tip of that piece. Wait until it almost dries - Put more glue in the back side of the piece of hair by the tip. Press the hair piece down onto a strip of soft felt sheet. I happened to find a nude colored one that matched me, but you can use acrylic paints to get the level of color you want (paint the felt strip prior to the start of the project) Also, I find that holding up the felt strip and pressing the glued hair down allow more control and help create more “curve” shape from the center part - Once you finish gluing hair down on the whole felt strip, turn it over, and hand-sew some wig clips on the back side. 1 inch spacing between each wig clip worked well for me. You’ll need about 4-5 wig clips for the whole felt strip - Now you can clip the felt strip onto the main wig in the back. Make sure you leave two small pieces of hair from the main wig at the top where your felt strip would go - Clip the felt strip in place. Make sure it doesn’t come off when you tuck on it. Take the little piece of hair from the main wig that you left out earlier, and section it in half on each side - Criss-cross the hair pieces to hide the “seam” of the top of the felt strip - Comb and blend the hair from the main wig with the hair from the felt strip, and tie your twin tails - You can unclip the felt strip later and comb down the hair to use the same wig as a normal long wig! Another good thing about this method is that you can use your felt strip for other projects if you buy other wigs from the same company later and in the same color. Or, you can turn an ombre wig into twin tail style for J-fashion shoot and wear the wig as a long wig the next time. This is not the “best” way to do back-parting, but I wanted to focus on being cost-effective and easy enough for beginners to attempt. Have fun wiggin’!
Throwback Thursday styling tips! Since I wasn’t feeling well and missed the chance to upload this week’s Wednesday Wig Hack, a friend of mine suggested that it would be a cool idea to talk about some wigs I have styled in the past. I have gotten questions about how to style “wavy spikes” like I did for my Dio (Jojo’s Bizarre Adventure) wig so here is a little demo. You can also use this technique for characters like Nagito Komaeda (Dangan Ronpa), or Lancer / Diarmuid (Fate/Zero). :)
- First, you want to make your spike. Follow countless of spiking tutorials online for this step. :P Don’t apply too much hair product though because we will use heat on it so it still needs to be sort of soft and flexible - Use a flat iron, with the medium heat setting (I used 380 F for this), grab the spike where you want the wave to start. Bend you wrist so that the spike point downwards. Keep in mind, for this kind of wavy spikes, the pattern of wave will be down>up>down - Let go of the flat iron after a few seconds and immediately use your fingers to catch the spike to hold its shape until it cools down. (Use gloves if you’re sensitive to heat. My hands can’t feel a thing because I’m used to heat tools) - Go at it with the flat iron again! Grab the spike a good distance from the first wave, around 1 inch and a half for me. Then flip your wrist so that the spike points upwards - After a few seconds, let go of the flat iron and catch the spike with your hand again. If you want extreme curve near the tip, you can push the spike in towards the wig. Once it cools down, it should hold the shape - Now you can go in and “puff” up the spike by squeezing the sides. I use Got2B spiking glue on my fingers to lightly coat the spike throughout - Touch up the tip by adding another wave with the same steps as before. Use Got2B spray to seal the style. And you’re done! (Just kidding you have to do like 30 other spikes. Good luck )
Base wig used for tutorial: Malinda in pale blonde from Arda Wigs Base wig used for Dio: Magnum Long in light blonde from Arda Wigs
Wig Hack Wednesday #4 ! Today I wanna introduce a no-sew-no-glue method to add volume to your wig with a jumbo braid (or braiding hair). Using this method will save you time and money because you’ll be getting more bang for your buck! Jumbo braids are pretty cheap and can range from around $2-$8 depend on quality of the hair fiber. Usually, they are used to add thickness to braid hairstyles, but you can use it for any “big-hair” hairstyle, really. Be careful when using hair dryer or heat tools with jumbo braids because they cannot stand as much heat-styling as other wig fibers. For this tutorial, I’m using a jumbo braid in marshmallow from Arda Wigs. - Untie the end of the jumbo braid. Separate and cut a small piece of weft from it. Keep in mind that you’ll need the piece to be double of the length you would want for the final product because you will be folding the piece in half. - Use a latch crochet hook to go under the elastic band of the wig and grab the folded hair - Bring the hook back through the same hole, making sure the latch closes before you pull it through the hole - Grab the hair with your fingers, twist it once and hold - Bring the hair from the hanging side and pull it through the twisted loop without tightening the loop - Bring the loop to the opposite side and twist it again - Pull the hair from the hanging side through the loop again - Pull and tighten the knot so it’s as small as possible - Keep adding more hair to the other elastics and different sections of the wig. You can tease it for more volume!
I used this method to make a Sage Madara (Naruto) wig and it produced great result with high volume but still very light-weight. I hope this helps you create cool wigs with super volume at low cost (looking at Steven Universe people…lol )
Wig Styling: Working with Foam pt 3 - Wrapping Flat Objects and The Wonders of Clear Glue
Wow I sure did forget to post this in a timely manner! This is the third part of our guide to working with wigs and foam, and lately it’s been my favorite! This is a great method to use on wigs like Ivysaur, which require a lot of clean, flat-ish shapes. While I could technically use the hot glue wrapping technique covered in part 2, this is a bad choice for a number of reasons. First, the edges of my object are not hidden, which means I’d have a big, visible hot glue mess at the edge of my weft. Second, it’s difficult to keep hair taut on a flat or gently curved object, so I’d have a hard time keeping the tension up while gluing the hair down. And third, this method is just plain nicer looking.
Instead I used 100% tacky glue on this wig. I recommend this method whenever possible because it is VERY clean, very secure, and mistakes are easily fixed. This is a difficult method to use on a bun or round object because you’re fighting against gravity, but you could always use tacky glue after hot gluing down your edges. Instructions under the cut:
Foam, stiffened felt, posterboard (or understructure material of choice)
Spare wefts
Tacky glue or other PVA-based glue (ie Elmers)
Water
Paintbrush
1) Begin by constructing your base shape from your understructure material. If your shape is curved, remember that any extreme bumps or ridges may be visible after laying your very flat layer of hair. Try to make your shape as smooth as possible.
2) Paint your shape to match your wefts and allow to dry.
3) Add a small amount of water to your glue until it’s around the viscosity of corn syrup or soft body paint - a very small amount should do. You want it to be easier to brush on, but not so runny that the glue flows through your wefts.
4) Spackle some glue onto your base, along where you will lay your first section of hair.
5) Grab your first section of hair. I HIGHLY recommend keeping the hair attached to your weft for now so that you can pull on the fibers without them tangling or pulling away. Comb the hair out so that it’s free of tangles and then paint a generous layer of glue onto either side.
6) Holding firmly onto the weft, run your fingers from the top of the hair to the bottom, smooshing the glue throughout the fiber. Make sure everything is well coated and repeat, squishing out any excess glue if you used too much. If you accidentally tangle your hair, comb it through with a fine-tooth comb.
NOTE: More glue is better than less glue. If you use too little, your glue may begin to dry before you are done coating the fibers, which will cause pilling and may also cause it to not dry clear.
7) Lay your hair onto your base. If the edge of your hair will be visible, take care to form it into a nice point.
8) Repeat the above steps, laying your next section of hair alongside your first. Continue until your entire base shape is completely covered.
9) If your hair is popping up from the base shape or not staying put in the direction you want it to, add a duckbill clip or bobby pin. Allow to completely dry for several hours.
10) Once dry, smooth down or trim away any stray hair you may have missed. Trim up any edges that will eventually be hidden in your finished style.
Ready to get dyeing? Using a polyester dye is a great way to permanently color any synthetic wig. IDye Poly and Rit’s new line of synthetic dye called Dyemore are two great options for wig-coloring - click below the cut for a more in-depth Dyemore review, as well as instructions to jump start your journey into wig dyeing.
For folks who want a physical, true-color version of this chart, you can find it in Cosplay Culture Magazine’s August-September issue!
I’ve used iDye Poly a lot in the past but never RIT’s new polyester-specific line. I was really pleasantly surprised with the results to be honest!!
Rit Dyemore is a liquid form dye available in 12 colors, which is easy to mix and save for later thanks to its resealable bottle. During our tests we found that RIT was far less smelly than iDye Poly. However RIT’s black and darker tones required far more dye in order to achieve a deep color - three times as much dye as iDye.
I’m not joking when I say this stuff is less smelly. I have more or less stopped dyeing wigs partially because it’s so difficult to fully remove all of the iDye from bright colors like true red - it’s tough fully getting the dye out even after running it under water, and after heating or flat ironing you can still get that residual dye smell. I had none of these problems with RIT and still got the same level of brightness - however I’ve not been able to test if this stands up over time and lots of wear.
Also remember that dye can only darken or enhance your wig’s color: it is not possible to create a lighter color from a dark wig. You can however overdye an already-colored wig in order to achieve a new tone – for instance, dunking a pink wig into a blue dye bath will produce a lavender color. The longer you keep the wig submerged, the closer to your dye bath color the wig will become.
For the above chart I dyed white wefts from Arda Wigs, Epic Cosplay, and a budget Asian brand called L'Email in 1 cup of water with 1TSP RIT Dyemore. The dyebath was then heated to just under simmering (about 180 degrees F), with the exception of the bottom row that was under-heated to only 120 degrees. Polyester dye only activates at higher temperatures, so it’s important to keep the water simmering or just below simmering to achieve dark tones. However wig fiber absorbs dye VERY quickly! If you need a pastel or lighter tone and a quick 5-second dunk is too difficult, it may help to add either significantly less dye, or to try turning the heat down to prevent adhesion.
All three brands absorbed the dye in a similar way and at a similar rate. At first glance, all three swatches looked almost identical with only slight variations. However when viewed on a high quality scanner, Arda absorbed the dye most consistently and to a deeper extent cross the fibers , followed by Epic, and then l'Email.
Full Dyeing Instructions
Materials:
Dye of choice
Paper towels
A large cooking pot not used for food
Tongs, a spoon, or a wooden dowel not used for food
A nearby window for ventilation
Dish soap
Gloves and paper towels
Flat iron and combs
1) Prepare your work area and your wig. Your wig should be free of any oils or product that can interfere with the dye process, so if it has been worn before be sure to wash it in soap and water. Remember that dye is not food-safe: anything that touches your dye cannot be used later for cooking or food storage! It’s a great idea to invest in a dye-only cookpot for your projects. Dye can be smelly and irritating, so be sure to open a window for ventilation, especially if you are using iDye Poly. Gloves and paper towels are also a great idea to protect your counter and hands from dye stains.
2) Fill your pot with enough water to completely submerge your wig. You want your wig to be able to float freely in the pot - wig fiber willdiscolor if it touches the bottom of the heated pot for too long!
3) Add your dye to the dyebath and thoroughly mix. Rich, deep colors require more dye, while pastels require much less than you think - as little as 1/10th a packet or bottle. Long wigs will also require slightly more dye than short wigs as there is more fiber to color. A pack of iDye or a bottle of rit can dye up to 2lbs of material, so consider the weight and volume of your wig when measuring out the amount of your dye. One third or half of a pack or bottle should be sufficient for most projects; however if attempting to achieve a very bold or dark color, always err on the side of more.
4) Polyester-formulated dye activates at a higher temperature than natural dye. For best results, heat your dye to simmering or just below boiling - around 160-180F.
Don’t have a dye pot? If your fiber only needs a quick, couple-second dunk, try pouring your simmering water into a different container before adding your dye and fiber. The water will still be hot enough to activate the dye.
4) Perform a test with a sample weft in order to determine how long it will take to dye your wig the desired shade. Remove the weft, wash, and allow to fully dry in order to determine the sample’s color.
5) Dampen your wig with water and then completely submerge in the dye bath. For a lighter color, remove the wig within a few seconds or under a minute. For a deeper color, keep submerged for over five minutes. Gently stir your wig in order to help the dye evenly absorb, but try not to tangle the fibers or else you’ll have difficulty combing them out later.
Having trouble quickly dunking your wig for a light tone? Try adding significantly less dye, or try turning down the heat to a cozy 120 degrees. This will allow you to keep the wig underwater for longer without darkening the color. Refer to our above chart for the approximate color you can achieve with this under-heated dye.
6) Remove your wig and run it under warm water. Add dish soap and massage it through all fibers before running it under the water again. Repeat as many times as necessary until the water runs clear.
7) Your wig fibers will be bent in new and fun directions thanks to the heat, so you’ll need a little restyling. Allow the wig to fully dry first and then comb out any large tangles with a wide toothed comb. Once detangled, straighten the fibers with a flat iron or a hot blow-dryer in a pinch. While heated, run a fine tooth comb through the hair in order to force the hair straight. Repeat several times until your wig is once again straight.
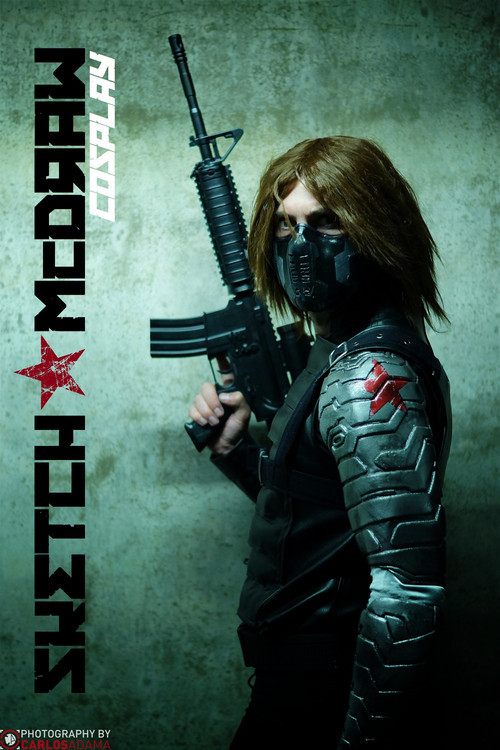
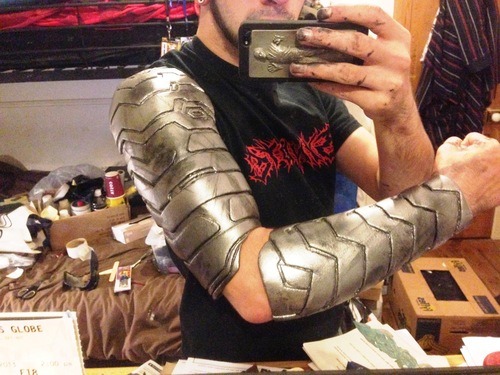
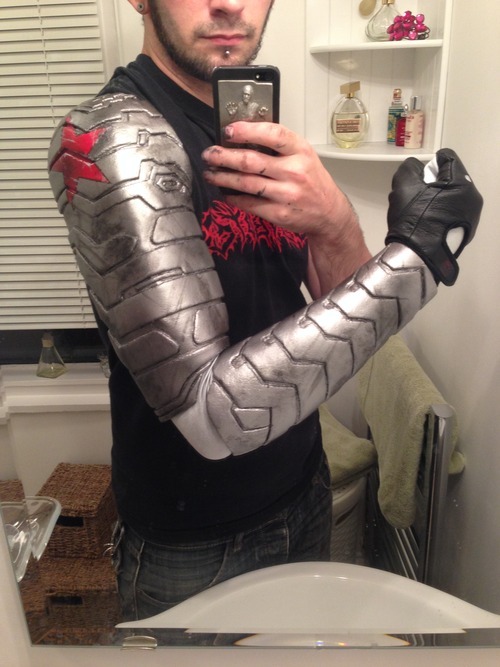
Hello! As I’ve had several people ask about the creation process of the arm I had made for my Bucky costume, I thought I’d make a tutorial and share it with you guys - hope it helps :)
So lets get started!
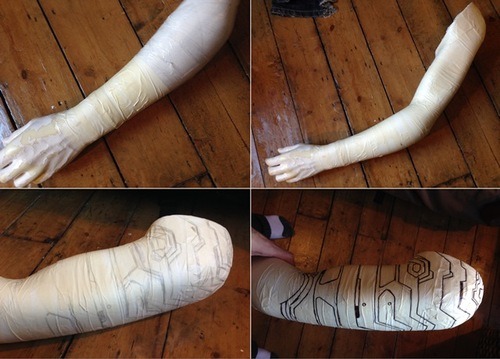
Step 1 - The Template. To create the arm I first needed to make a template, so I used the left arm from a mannequin and wrapped it up in cling film, then cut strips of masking tape to to wrap around and cover the arm (If you don’t have a mannequin arm you can always make your own by wrapping your own arm up and then covering it in tape, then once removed tape it back up and stuff it full of plastic bags/wadding or fill it with expanding foam). Once I had covered the arm from the wrist to the end of the shoulder in masking tape I then began to draw on the detail in pencil, then once I was happy with it all I went over in permanent marker.
After completing the detail of the upper arm I repeated the process with the forearm, and made sure to leave the inner arm/elbow joint blank as this area is not needed as you’ll need space to be able to freely move and bend your arm.
Step 2 - Making the Arm.
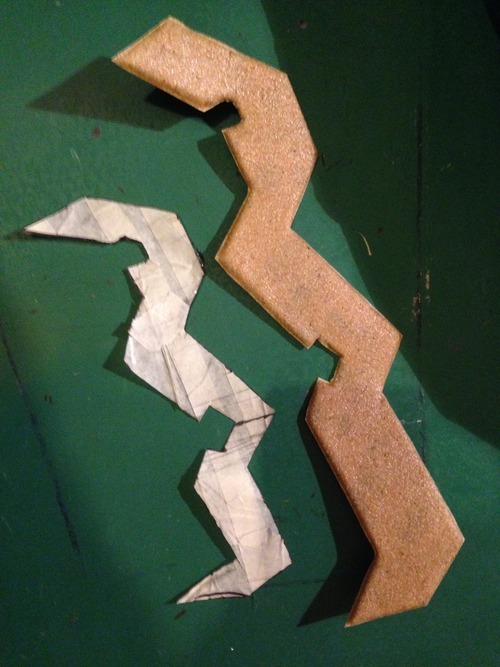
To remove the masking tape template design I used a very sharp scalpel and carefully cut a straight line going from the top of the inside of the arm to the bottom of the arm at the wrist.
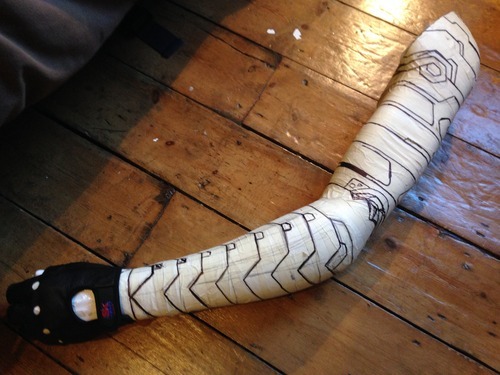
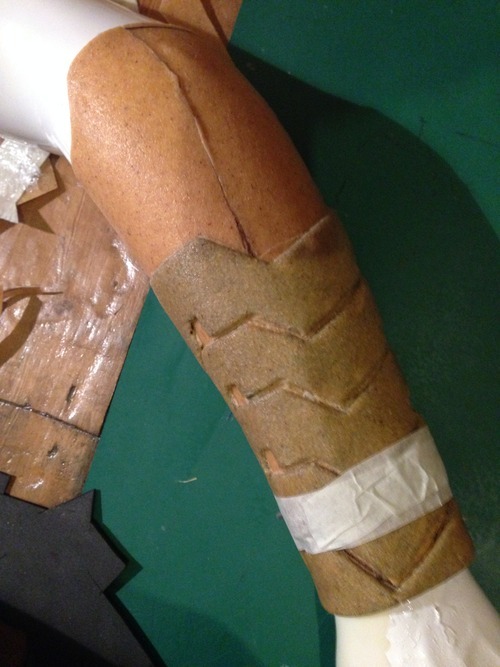
Once I had cut the blank elbow area away from the upper and lower arm pieces I drew around them both onto a sheet or worbla and cut them out, then heated them up and molded them around the mannequin arm making sure not to stick the inside seams together so that I could remove them from the arm afterwards (I forgot to take pictures of this part as I was in a rush unfortunately, but you can see a bit of it in the next picture). The next step was making the detail to cover both the base pieces of the arm, to do this I cut up both the templates to make smaller ones that I could then use to draw around onto the craft foam, cut out and then cover the facing side in worbla, making sure to cover the edges and then used a scalpel to cut away the excess whilst it was still warm and pliable, then reheated the pieces up and stuck them to the arm and used a metal ruler to help straighten the edges of the worbla and to make sure the edges bonded to the main arm.
Once I had done all the detail on both pieces of the arm I removed them from the mannequin arm and on the upper arm I bonded the seam line together on the inside of the arm using a strip of worbla, then made a few strips to cover the seam line on the outside. The strip on the Inner arm of the forearm was made from a seperate piece that I then heated and attached to the main forearm down the one side, while the other side of the strip that is tucked under the main arm is left so that when I put it on/take it off the arm flexes allowing my hand to slide through.
Test Fit!
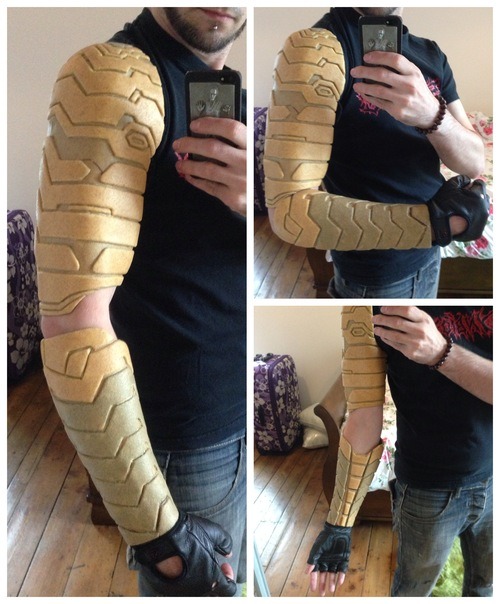
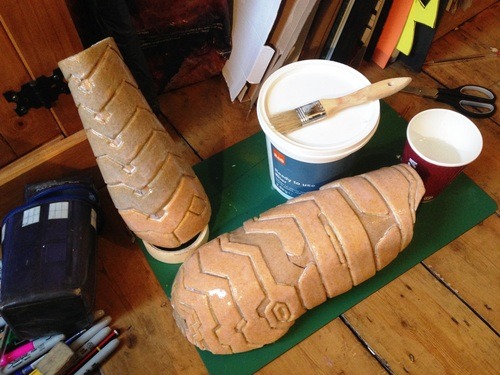
Step 3 - Painting. Before painting the arm I gave the worbla several layers of sightly watered down PVA Glue to help seal the worbla and to help get rid of the the natural texture of the worbla. The next step was to give both pieces 3 coats of white primer spray paint and when fully dry I then used a damp piece of Wet & Dry sandpaper to sand back the paint a little to make it smother.Once that was done I used a damp cloth to clean away any excess dust from sanding and then dried it off before giving both pieces a few light coats of Black Satin spray paint as a base layer before spraying both pieces with a dark silver spray paint.The next step was to lightly spray the arm with a much lighter silver, then once dried I then started weathering the arm by lightly spraying some areas with the darker silver and also the black spray paint, then painted on some scuff marks using watered down black paint and then lightly wiped it off/smudged it to make the arm look tarnished and battle worn.
To create the star I first made a template to work out the size needed, then once I then placed it onto the arm and carefully drew around it with a red permanent marker. The next step was to use some electrical tape to go around the edges of the star making sure then were all straight and went inside of the little trenches between the detail so that when it came to painting it the paint wouldn’t bleed under the tape (again I forgot to take pictures of this process as I was in a rush).
I then used masking tape and newspaper to cover the rest of the arm then sprayed the exposed star shaped area with a a few light coats of white spray paint, then when it was dry I then sprayed it with red spray paint. The next step was to them mask of the inside of the star using electrical tape to and then sprayed the exposed edges of the star to make the black outline of the star. Once fully dried I then carefully removed all of the tape and the newspaper to reveal the red star, then began to weather it by lightly spraying areas of it with a mist like spray of black spray paint and created scratches and chips in the paint by using a thin paint brush with a ‘chrome’ colored enamel based paint, then I sprayed both arms with a few layers of clear lacquer to seal the paint and protect it from chipping easily. For underneath the arm I used a long Silver/Grey ballgown glove.
*I plan to make a piece that covers the elbow joint and fingers at some point, so I will update this tutorial when I do.
I hope this tutorial has been of some help to all you, and if you have any questions please feel to contact me on my page at: Sketch McDraw Cosplay:)
So~ this is my first tutorial so my progress photos are not the best but this is super easy!! Also This scythe is not only sturdy, but it is convention approved!! So enjoy!! :)
Step 39: Turn your blazer “right side” out. Using a flat object that can handle heat (like a metal ruler) sneak it between your satin and liner layer. Push out all the seams and iron them to look sharp and crisp. Pin the layers together as you do, all along the bottom and button seams.
Step 40: Using a needle that does NOT snag your fabric, sew a line along the bottom and button edges about an eighth of an inch away from the edge. Once you’ve done this you can remove the pins. This line will show, so take care to be straight and accurate with your line.
Step 41: Laying your piece out, with the satin facing up, turn over your front half. Your goal is to have the shoulder edge of the back panel and front panel meet. Pin together only the satin fabric this way. The photos should help you visualize how to do this. Sew together the satin shoulder pieces.
Step 42: Grab your collar duct tape pattern. Cut it in half near the “V” cut out. Use it to draft two copies of each piece. It should be a half an inch larger in every direction compared to the pattern piece.
Step 43: Serge or zigzag stitch every edge of these collar pieces. Iron flat.
Step 44: Fold over the long edges of your collar pieces, iron the crease if needed, and sew it down.
Step 45: Pin your liner/interfacing layer to your bottom layer of satin on the collar. Make sure the ball side of your pin is hanging out over the edge of the fabric. You may only need a couple of pins, just enough so the liner won’t move on you.
Step 46: On top of this liner layer, start pinning down your four satin collar pieces you just made. Start with the bottom pieces. You will need to fold the short edge to match the angle of the “V” your bottom layer has. Use LOTS of pins for this, take your time lining everything up. (The balls of your pins can face towards the fabric.)
Step 47: Sew along every edge of the triangle collar pieces. Once every edge is down, you can start removing the pins, including those liner layer pins.
Step 48: Try on the piece and make certain everything is sitting and looking how you expect, especially around the collar. Make your adjustments now.
Notes:You may notice a back collar piece in some of the photos. Don’t worry, that will be covered next part. You didn’t miss anything. I accidentally attached mine too early and it just got in the way.
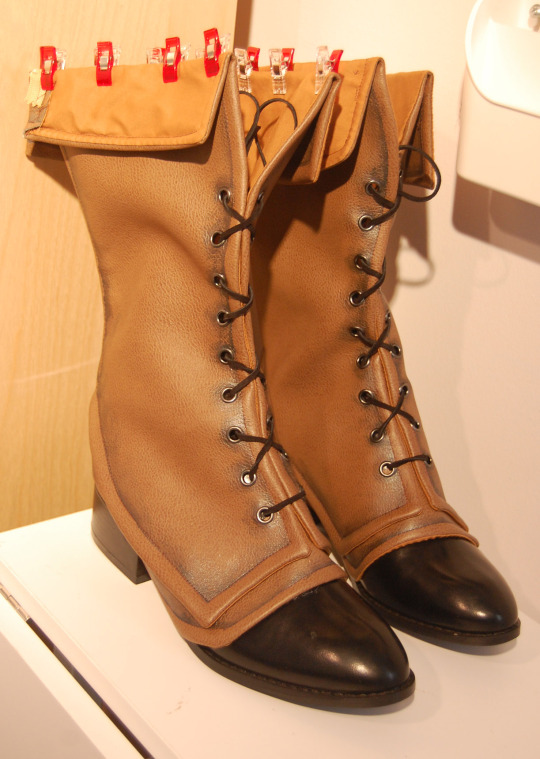
Recently, I wrapped up work on my boots for a cosplay (Lillet from Grim Grimoire) and I got a few questions about how I made them, after posting photos of the first of the pair. So, while making the second, I took pictures and notes along the way.
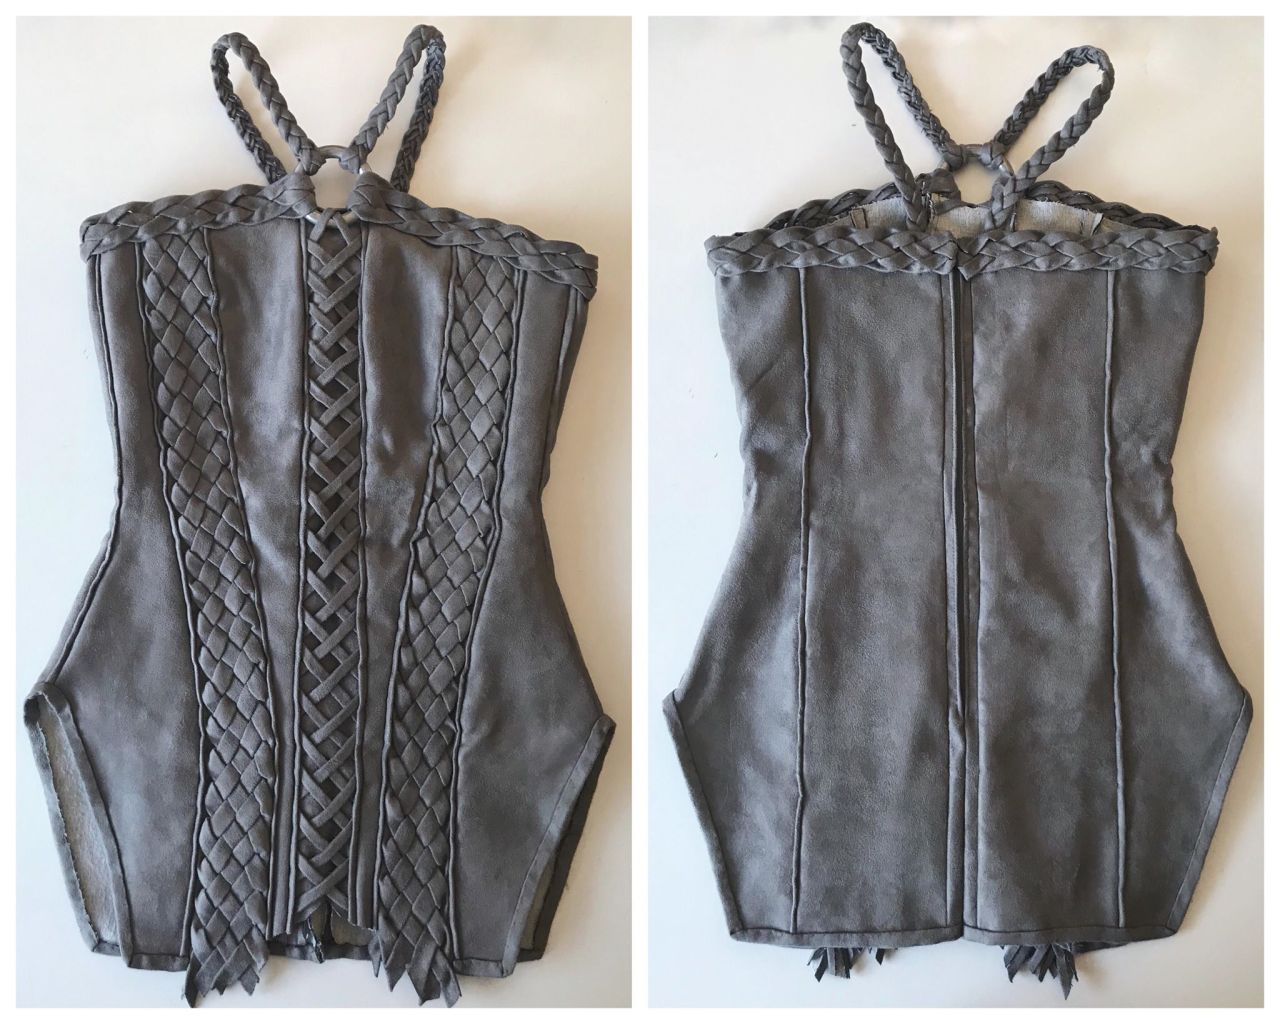
I’ve gotten a lot of questions regarding my Yasha bodice, so I have decided to make this post for you guys and hopefully it’ll answer your questions. My brain is usually a jumble, but I’ll do my best to explain how I made it. It’s not an overly complicated construction, you just need a lot of patience for pressing and handsewing.
The fabric I used for this bodice is a thick faux suede made for furniture. I’ve worked with this same fabric before and I love the texture of it. It is also a real pain to sew in when there’s more than two layers.
If you want to work in stretch, I’m not sure how that’ll work with the method that I used for the braided front panel. Remember that this also isn’t the only way to do it, it’s just how I decided to.
Those buttons were pretty much last minute. I had to improvise with whatever was available in my workshop as my flight was in about 6 hours. I started off with sanding so I can apply the Apoxie Sculpt on a flat surface. I then let it cure for 3 hours (should’ve let it cure overnight till it’s rock solid) then smoothed it out by using 240 grit followed by a 400 grit sandpaper. Lastly, I half-assed a skull shape in attempt to mimic Roen’s iconic skulls. I think it’d be a total pain in the butt to repeat those steps over 20 times (Yes, TWENTY buttons!) Hence, I suggest making a two-part mold and cast it in urethane resin.
So as a way to add detail to your armor without breaking the bank, hot glue is wonderful!!
Check out these faux studs I created with hot glue and a pencil!
What you need: Hot glue gun Hot glue Pencil or circular object of your choice! Patience.
1: Add a circular drop of hot glue to wherever you want to stud! Make it as big or little as you need it and make sure you have it on a level surface or it will slide.
2: Let it cool a little bit. Just a smidge. If it starts to get cloudy, you let it dry too much and it might not come out perfect.
3: Once you gave it a few seconds, take your pencil or object and push it into the center.
4: Push hard! It’ll add that depth you might want. ALSO WHILE PUSHING, TWIST THE OBJECT OR MOVE IT SLIGHTLY TO KEEP IT FROM STICKING TO THE GLUE.
5: Do this for a few more seconds or even a min to be sure! Once you feel it is dry enough, take the object out. You might need to shake it free or twist it free BUT BE CAREFUL.
This is the most basic painting technique. Prep the brush by dipping it in water and gently smoothing it between your fingers to squish out excess moisture (like with your skin, keeping a brush slightly moist will keep the bristles from drying out and breaking). Then you dip the brush in paint and go to town.
Dry-brushing
Painting without dipping the brush in water first. This gives a streaky effect that works really well for weathered props.
Stippling
It’s pretty much poking the surface with the tip of the brush again and again to make dots rather than lines. It might sound silly, but you can create an amazing texture using it.
Aging a prop by painting it with a color and quickly rubbing it off, leaving behind a residue in its cracks and crevasses. This is great for warrior, soldier, sci-fi, and steampunk props.
Sponging
Dabbing the paint on with a sponge. It give the prop a very organic look.
Stenciling
Painting through the gaps in a created form to create clear lines between colors. You can do this with reusable forms or painter’s tape.
Splatter
Sprinkling paint onto a prop to create a splatter shape. Great for war-torn costumes, this is a really fun technique that packs a lot of punch.
Spray
Using a spray can! Because it’s so quick, easy, and even, this is a favorite technique for prop-makers. Base coats are usually spray-painted on.
A more intense version of spray-painting. Using different air pressure and painting from different distances lets you create broad or fine lines, adding depth to the paint job.
Tutorials
Remember–using a combination of these techniques to apply your primer, paint, and sealant will give you the best result! These tutorials will show you what I mean:
Airbrushing and stenciling (it is a painting, but your approach will be the same. Just remember to use paint that’s appropriate for your material!): http://www.youtube.com/watch?v=ymXZLT7PfAk
I’m really sorry! I’ve made a good amount of props, but I haven’t had as much experience with them as I have other aspects of cosplay/costuming. I did as much research as I could to make up for the lack of expertise, but…it wasn’t enough. Thank you OHI Cosplay for the corrections!
****
It can be overwhelming to try and select the right kind of supplies for a project, so it’s best to start small. These are some of the most commonly used primer, paints, and sealants for props:
Kinds of Paint
These are divided into two classes (primers often use the same kinds of bases as well):
Acrylic-based
This is what you should be using. Initially designed as the poor man’s oil paint, acrylic is is easy to use, durable, and has a nice finish when dry. It is, however, more expensive than water-based paint and a little harder to clean (but not by much).
When you buy a can of spray paint, the actual paint you’re spraying is usually acrylic-based.
Water-based
Poster paint is water-based. It dries quickly, is easy to clean, and cheap. It doesn’t have the same smooth finish and lifespan as acrylic paints, though.
Primer
You know that scene in The Adventures of Tom Sawyer where he has to whitewash the fence? That was pretty much priming. You’re completely covering up the materials you used to make your prop, blocking out any of its original color and smoothing out the surface so the paint looks the same way on the prop as it does in the bottle.
Gesso
Very easy to use, provides great coverage, works for several different kinds of projects, and goes a long way. If you apply it in layers you’ll cover up any bumps in the surface of the prop. You need to sand it to make it smooth.
Paper Mache Clay
Requires a little more skill than gesso to use, but allows for molding and sculpting. It totally covers the surface of your prop. You will need to sand this as well.
Paint primer
This doesn’t cover up any bumps; it only blankets the color of the building material. Paints and primers share the same kind of bases (water, acrylic, oil, etc.). You should try to match your primer to your paint, but acrylic primer will work for most projects.
Sealant
This goes on last and is essential to any project. It makes it waterproof, protecting both the paint job and the material used to build the prop. Sealants range from matte (don’t reflect light, like paper) to glossy (reflect lots of light, like glass).
Modge Podge
Also used as a glue, this sturdy and glossy sealant will become your best friend. It really is one of the best products a crafter can have.
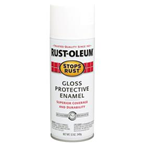
Spray Enamel
Works surprisingly well for how cheap it is. It’s extremely easy to use but will get cloudy if you touch it before it’s dried completely.
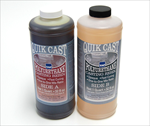
Casting Resin
Also used to make props, resin dries very hard, helping add support to relatively weak crafting materials. It’s a favorite for paper-based projects.
With the selection narrowed down, it’s a little easier to choose what to work with. You can find all of these at any craft store.