#free graphics resource

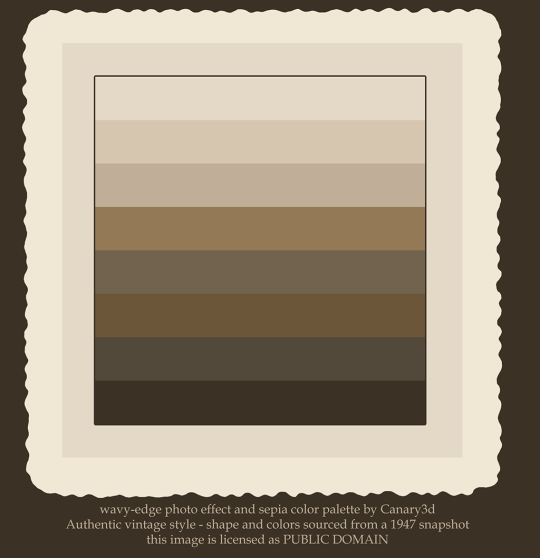
Do you ever want to turn a gif (or any image) into a vintage sepia photo? Here’s one way to do it. First, help yourself to my template png, right here:
Instructions are behind the cut!
This template, incidentally, is based on photos of my dad & his friends from 1947, and all of the colors in the palette are sampled from one photo. These wavy-edged photos were pretty normal around that time–these are a college student’s snapshots, nothing fancy.

Ok, so these instructions are for a gif in Photoshop, but you can adapt them to a still image & any image-editing app. (I’m assuming you already know the basics of gifmaking).
1. Drop the template on top of the top layer of your gif. Resize the whole canvas to make room for the border (I use the crop tool for this–just drag the handles outward and it enlarges the canvas)
2. Use the magic wand to select the light border area. Make a new empty layer and fill it with the lightest color in the palette, or whatever color you want for your border.
3. Create a new empty layer underneath your border layer. Pick one of the darker colors in the palette with the dropper - we’re going to use this to colorize with. (We’re not using the hue/sat adjustment layer for colorizing because it’s imprecise)
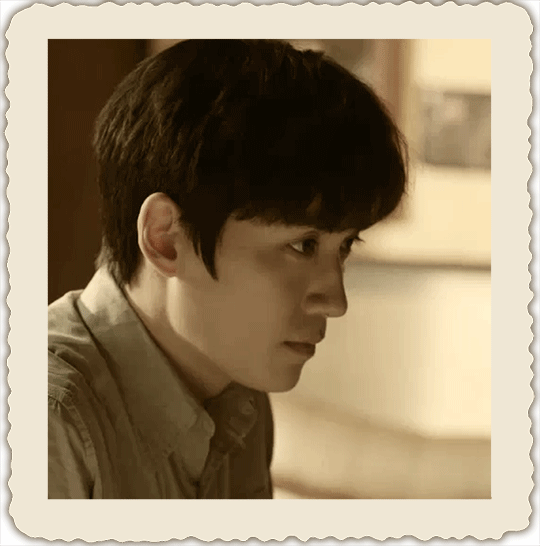
4. Fill the layer with the color, at an opacity of anywhere from 50 to 100 percent, depending on how much of the original color you want to keep. I filled it at 70 percent opacity for this gif of Wu Xie. 100 percent can flatten it out too much, so I like the effect better with some of the original color in it. Use the fill command’s opacity setting for this, not the layer’s opacity, or it won’t apply to all your frames.
5. Select all of the frames of your gif - frames, not layers - and while they’re selected, change the color layer to “color” blend mode. (Otherwise it just changes it for the current frame, which is maddening.)
6. Ok, all that’s left is to add a tacky shadow effect! Use the magic wand to select *outside* your border on your border layer.
7. On the selection menu, invert your selection, so it has the whole photo-print area selected (the wavy edge area and the “photo” area).

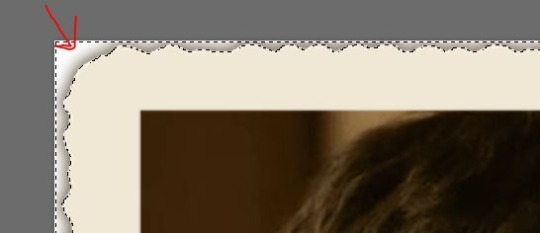
8. Put all of your image layers into a layer group, if you haven’t already. (Select all the image layers and click the button circled in red in the pic) This group needs to stay below your photo effects & border, and below any adjustment layers, as shown in the pic.

9. Click the mask button (circled in blue in this pic) to create a layer group mask – the area outside of your “photo” border should be transparent now.
10. Still on the selection menu, use “modify…border” to change the selection to a border. I’d make it around 10 pixels, but you’ll need to experiment based on the scale of your image.

11. Create a new layer under your border layer, over your color layer. Choose the darkest color from the palette and fill the selected area at 100% opacity.
12. Choose your shadow layer and run a gaussian blur filter. I used a radius of 7 pixels.
13. Put a new layer at the bottom of the stack & fill it with plain white, or with whatever else you want for the background.
14. Delete the template layer, save your PSD file (you DO save PSDs of your gifs until you’re sure you’re done, RIGHT?) and then resize & bake out your gif.