#gifmaking

male gaze this female gaze that what about the gifmaker’s gaze
no mom i can’t im busy making gifs for my lil blog so that my mutuals can validate me in the tags
some people make gifs so fast did u even watch the episode

Just want to put this out there…
To everyone who reblog my gif sets, first of all thank you… but I’m asking to please NOT post negativity in the tags when I obviously care about the drama and the characters enough to make an entire set on them…
Would anyone be able to point me in the direction of a tutorial or app that will enable me to make gifs and screenshots from Netflix and Amazon Prime?
a gifmaker’s guide to captioning their sets
this guide refers to captions as in the accessible kind of captions (plain text), not hardcoded into the gif; if you, like me, have been hoodwinked, bamboozled, and led astray by tumblr’s nifty little so-called “caption” function (the three dots that appear under photos you put into the editor), this guide is for you.
also helpful to all gifmakers interested in accessibility. even if you have no idea what i’m talking about i highly encourage you to give this guide a read to help make your sets more accessible to people in general.
i won’t be going over other media types; this is a guide i developed through my own research for gifmakers like me. it goes without saying i might not have all the info so feel free to reply with any additions you have.
more under the cut. tl;dr at the end.
Tbh I think many people take for granted how much gif makers do, and the fact that this site is unique in their existence of them
Thank you to everybody with the skills to share snippets of media I would not otherwise have seen or had the opportunity of hearing of. Gifs are often the first way I hear of something personally, and frequently the reason I give any new-to-me movie or show a try
“If I had this in real HD I would gif it like crazy. There would be no stopping me!!!” No you wouldn’t. You literally wouldn’t. You would just get so excited about it, make like 3 gifs and then complain about the next low quality video.

I really need to stop lying to myself like this.
I found a good method for batch converting mkv to mp4. VLC wasn’t doing the job for me (it stopped batching entirely, and its encoding was slow, and it was doing something weird to the files so they were coming up garbled when I’d open them in photoshop). And handbrake is hard! I want a one-click solution, so I went with this method that uses ffmpeg.
https://community.adobe.com/t5/premiere-pro/problem-with-mkv-format/td-p/10248788
Here’s a link to the original comment on the adobe forum, but since that’s probably impermanent I also grabbed the text. Credit goes to adobe forumite basil1891, who is obviously a mensch. The link they provided to get ffmpeg has gone away, so I snipped it, but you can get the sources at ffmpeg.org, and I got a good .exe at https://www.gyan.dev/ffmpeg/builds/
[quote]———————————————–

basil1891 Enthusiast , Jun 02, 2019
Maybe converting is the easiest, but hardly the best way, imho. I’d just remux files instead of converting. ffmpeg can do it nicely
How to:
- place the .mkv’s in a separate folder along with ffmpeg.exe
- in notepad create a pair of .bat files there:
StartRemux.bat with a string:
for %%F in (*.mkv) do remux_settings_.bat "%%F"
remux_settings_.bat with a string:
ffmpeg.exe -i %~d1%~p1%~n1.mkv -c:v copy -c:a copy %~d1%~p1%~n1.mp4
Now you can just run the StartRemux.bat, and in a minute you’ll get your videos in .mp4 container, without losing quality and time. If you like, you can change .mp4 to .mov in the settings. Sometimes it’s needed ( as in case when .mp4 does not allow uncompressed audio).
p.s. Important note - those .mkv filenames should not have spaces, or wont work.
————————————————[end quote]
I’ll add that I got an error in my original directory, but when I created a root-level directory with no spaces in the name, it worked fine there. I just converted 30+ mkv’s cleanly with this method and am a happy camper :)
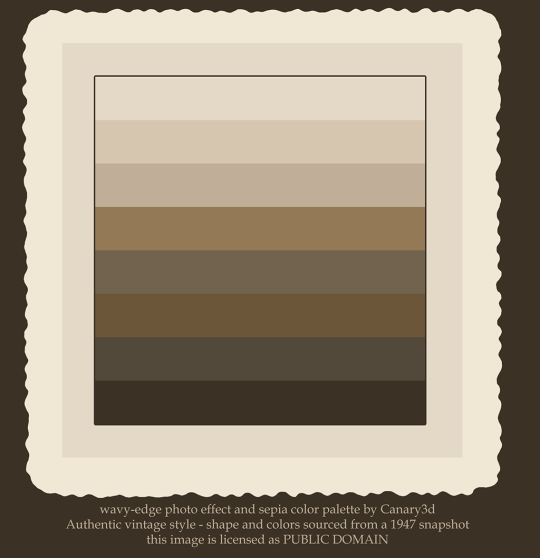
Do you ever want to turn a gif (or any image) into a vintage sepia photo? Here’s one way to do it. First, help yourself to my template png, right here:
Instructions are behind the cut!
This template, incidentally, is based on photos of my dad & his friends from 1947, and all of the colors in the palette are sampled from one photo. These wavy-edged photos were pretty normal around that time–these are a college student’s snapshots, nothing fancy.

Ok, so these instructions are for a gif in Photoshop, but you can adapt them to a still image & any image-editing app. (I’m assuming you already know the basics of gifmaking).
1. Drop the template on top of the top layer of your gif. Resize the whole canvas to make room for the border (I use the crop tool for this–just drag the handles outward and it enlarges the canvas)
2. Use the magic wand to select the light border area. Make a new empty layer and fill it with the lightest color in the palette, or whatever color you want for your border.
3. Create a new empty layer underneath your border layer. Pick one of the darker colors in the palette with the dropper - we’re going to use this to colorize with. (We’re not using the hue/sat adjustment layer for colorizing because it’s imprecise)
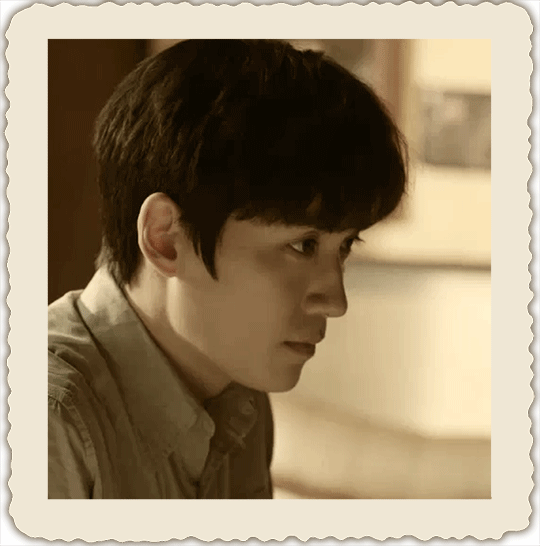
4. Fill the layer with the color, at an opacity of anywhere from 50 to 100 percent, depending on how much of the original color you want to keep. I filled it at 70 percent opacity for this gif of Wu Xie. 100 percent can flatten it out too much, so I like the effect better with some of the original color in it. Use the fill command’s opacity setting for this, not the layer’s opacity, or it won’t apply to all your frames.
5. Select all of the frames of your gif - frames, not layers - and while they’re selected, change the color layer to “color” blend mode. (Otherwise it just changes it for the current frame, which is maddening.)
6. Ok, all that’s left is to add a tacky shadow effect! Use the magic wand to select *outside* your border on your border layer.
7. On the selection menu, invert your selection, so it has the whole photo-print area selected (the wavy edge area and the “photo” area).

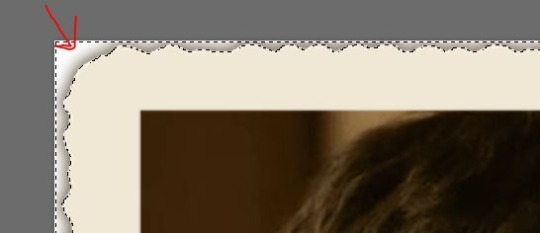
8. Put all of your image layers into a layer group, if you haven’t already. (Select all the image layers and click the button circled in red in the pic) This group needs to stay below your photo effects & border, and below any adjustment layers, as shown in the pic.

9. Click the mask button (circled in blue in this pic) to create a layer group mask – the area outside of your “photo” border should be transparent now.
10. Still on the selection menu, use “modify…border” to change the selection to a border. I’d make it around 10 pixels, but you’ll need to experiment based on the scale of your image.

11. Create a new layer under your border layer, over your color layer. Choose the darkest color from the palette and fill the selected area at 100% opacity.
12. Choose your shadow layer and run a gaussian blur filter. I used a radius of 7 pixels.
13. Put a new layer at the bottom of the stack & fill it with plain white, or with whatever else you want for the background.
14. Delete the template layer, save your PSD file (you DO save PSDs of your gifs until you’re sure you’re done, RIGHT?) and then resize & bake out your gif.