The langblr community is rather dead. What can we do about it? Maybe another langblr challenge would inspire people to keep the community alive? Let’s give it a try.
This challenge is called Langblr Activation Challenge and I really hope as many people as possible will join! The challenge consists of 5 tasks you have to do, one task per week. The tag for the challenge is #langblractivationchallenge, please use it if participating!
The tasks
Week 1: Write an introduction post. Even if you have made one before and everyone knows you already. Tell us who you are, what your native language is, what other languages you speak, what languages you’re studying, what other hobbies/interests you have, etc. Let’s get to know each other a bit!
Week 2: Promote other langblrs. You can promote your favourite langblrs, the langblrs you’re following, the langblrs following you, or just random langblrs you find in the polyglot/languages/langblr/etc. tags. This is a great opportunity to find and help others find new langblrs to follow.
Week 3: Join a langblr group chat/discord server. They are great for getting to know other people in the community and practicing your target languages. If joining a group chat/discord server sounds too overwhelming and/or intimidating, just send a message to some other langblr.
Week 4: Make some original langblr content. It can be anything: a vocabulary list, grammar explanation, resource list, list of songs/movies/books in your native/target language(s), a song with translation/vocabulary list of the lyrics, “questions for langblrs”, langblr challenge, picture of your language books/notes, tips to learn a language/languages in general, etc. Don’t forget to tag it with tags such as #polyglot #languages #langblr to make sure as many people as possible see it!
Week 5: Participate in another langblr challenge! You can find some challenges here. If none of them spark your interest, make your own challenge! Langblr challenges are a great way to improve your language skills and keep the community alive.
I’ve had quitea few people ask me how I made my TV head lately, so I figured I should put together some kind of tutorial! Sadly, since I am Not A Smart Person, I lost most pictures of the crafting process while clearing out my camera roll, which means I’ll have to supplement the few I have with some drawings of my own.
Please keep in mind that I’ve only ever made this one head—my techniques may not be optimal. I had to figure more or less all of it out on my own, since I couldn’t find any decent preexisting tutorials.
Without further ado, let’s get into it!
Materials Used:
Paper
Masking tape
Sharpie
White 6mm-thick EVA foam
Hot glue (lots of it)
Fabric/felt/something to make a simple hinge out of
Acrylic paint
Solar film
Posca pen
LED light, AA battery x2, on/off switch, wires
Tools:
Ruler
Box cutter
Scissors
Glue gun
Hole punch pliers
Step 1: Design/Planning
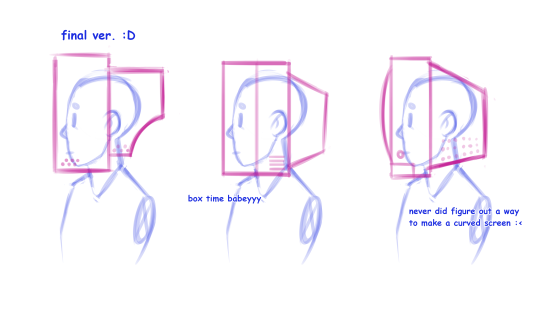
It’s important to have a clear vision of what you want to make before you actually start crafting —it’ll save you a lotof time and materials. I started by sketching out a few potential designs in profile, both to see which one I liked the most and to see how feasible they’d be to actually make as a mask without looking completely oversized.
Once you’ve settled on a design, I recommend drawing it from as many different angles as you think you’ll need for the next step:
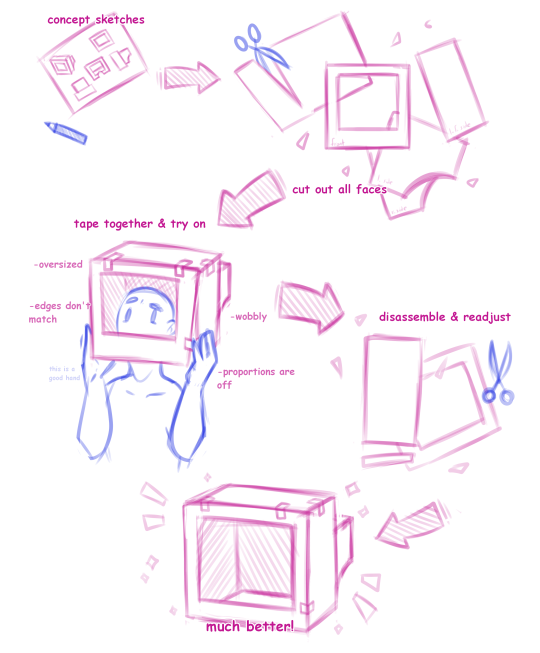
Step 2: Paper Prototype
(I could have swornI kept some pictures of this step? But apparently not so my scribbles will have to do)
Based on my sketches, I then made a prototype of the head out of decently sturdy paper, to serve as a template for the final foam head. I cut out the shape of every face of the head and taped them together to see how it all looked. You’ll most likely not get it right the first time around, so simply disassemble the head again, make any necessary adjustments to the measurements, re-tape and check again. Repeat this process until you are satisfied—it’s much easier to fix issues with the design in this stage rather than when making the actual mask.
There will probably always be a slight wobbliness to the prototype since it’s made of paper, but a good design will feel mostly sturdy. It’s pretty hard to mess up what is essentially a glorified box imo
I recommend labelling the faces and writing down all measurements to more easily keep track of them.
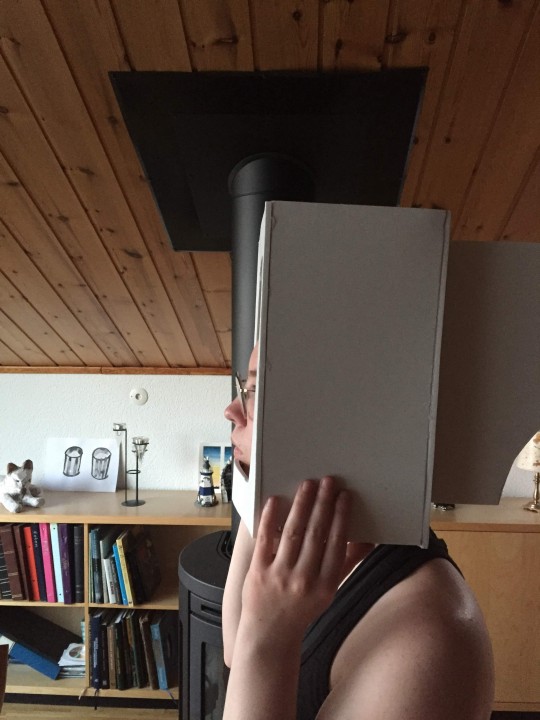
Step 3: Craft Foam Cutting
The head is made out of 6mm EVA foam I bought at my local crafts store. (This specific brand was called dekorgummi “decoration rubber/funky foam”. I’m unsure if it’s available outside of Sweden, but if I’ve understood correctly it’s basically the same thing as EVA foam.)The material came in 30x46 cm sheets and is, quite frankly, amazing— it’s cheap, lightweight and bendable, yet sturdy enough not to be floppy at all, and can be cut, textured, hand-sewn, hot-glued and painted with ease. Seriously I love this stuff So Much I could probably make an entire post just singing its praises aaaaa
I disassembled the paper prototype again. Using the pieces as a template, I then traced the shapes onto the craft foam and cut them out with a box cutter and scissors. You’ll need to adjust the measurements accommodate to for the thickness of the foam—much like the prototype, I taped all the pieces of foam together to check what parts needed adjustments in order to work. Labelling all faces will also come in handy once you start glueing.
Step 4: Ventilation
The air intake holes on the mask aren’t just for decoration; a foam head WILL get very hot unless properly ventilated, especially if the screen is made of a solid material instead of mesh. Using hole punch pliers, I put holes on the sides and all along the top of the head. Don’t hesitate to make lots of holes—you’ll probably need them. My screen still gets uncomfortably hot and foggy if I wear it indoors for extended periods of time without taking it off.
While I haven’t had the chance to try it out myself, it should be possible to make slit-style air intakes using a box cutter, if you’d rather not have small round ones.
Step 5: Gluing
Working my way from the front face of the screen to the back, I then hot-glued all the pieces of foam together. The only part I didn’t glue was the frontal underside part of the screen, to which I’ll soon add the hole for my neck.
Don’t worry if your glueing doesn’t turn out perfect! If any glue wells out at the side when you join two pieces, it can easily be trimmed with a box cutter once it’s cooled. This step is also a good time for trimming any uneven/frayed foam. If you find that the foam frayed a bit when you cut it out, running an iron over it on low heat can help smooth it out.
Part 6: Neck hole
Before this step, I hadn’t made any accommodations for my neck—all I had was a plain piece of foam that wasn’t attached to the rest of the mask, and a big rectangular hole at the underside of the head.
I carefully cut out a hole on the underside of the head, most of which was located on the soon-to-be-hinged part of loose foam. Be careful not to make the hole too big! It’s better to remove too little than too much. Make sure that it fits in such a way that there’s some space between your face and where the screen will go—my first attempts had my nose poking out the front, which looked more than a little bit silly!
Once I was satisfied with the neck hole, I glued two pieces of felt between the inside of the screen and the bottom part so that it hinges forwards. When I put the mask on I simply open the hinged underside, put the whole mask on sideways, turn it around correctly and flip the hinged part back up. The hinged underside fits snugly enough that it doesn’t need anything keeping it in place, and it takes some vigorous headbanging for it to open by mistake (don’t ask me how I know that)
Part 7: Painting
The interior of the head is painted with a coat of black acrylic paint —I’ll get into the reason for this later. Work your way from the back of the head to the front, covering all surfaces of the inside. It doesn’t have to be perfect as long as most of it is black.
The outside of the head is painted with ~5 coats of dark blue acrylic paint. Keep in mind that the foam will absorb some of the paint—you’ll need at least a few coats to get a dark, uniform colour. I had some trouble with the brush strokes being too visible for my taste, but this was fixed by mixing the paint with some water and using a finer brush. This issue could possibly be avoided altogether by spray painting the head instead.
Part 8: Headband/Suspension
You’ll need to make sure that the mask sits properly on your head so that it follows your movements and doesn’t slide around/wobble. The way my screen’s shaped, I could simply attach two strips of leftover foam to the inside in such a way that they form a sort of headband that goes around and over my head, but this is probably not the best or most comfortable solution, and may not work with all screen shapes. Some other ideas I considered were using the inside of an old bicycle helmet or hardhat, or perhaps just glueing a whole-ass snapback cap to the inside lmao
Part 9: Screen
My original plans were to have a screen made out of fine black mesh fabric. The idea is that as long as the inside of the mask is darkened, you can see out of it without being seen yourself. It seems like you could even paint a design onto the mesh as long as you’re careful not to block the holes. Sadly, the seller didn’t ship to Sweden :<
Instead, the screen of my head is made out of black window film (the kind of stuff meant to be put on car windows), which still works in more or less the same way. It does give the screen a shinier look, which could be nice, but unlike mesh, it’s not breathable and fogs up quite easily if not ventilated properly.
I cut out a square a few centimetres wider than the actual screen and drew the eye design onto it with a Posca pen, but you could probably use acrylics as well. I recommend keeping the design simple as to not obstruct your vision too much.
I attached the film to the inside of the front face using hot glue. It took a few tries to get it right, and I’m actually planning on re-doing it as it’s still somewhat floppy.
Part 10: Details
This is where I’d attach any antennas/lights/other decorative stuff, but of course, that might depend on exactly what you’re doing. My head has a LED light that runs on two AA batteries, connected to an on/off button—I had to make the holes for the light and button before painting. The whole thing is simply taped to the inside of the mask to allow for easy repairs/replacing!
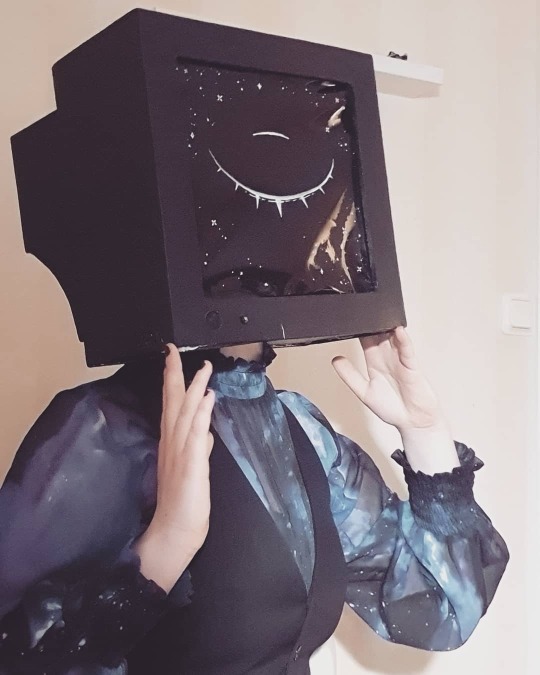
Part 11: Done!
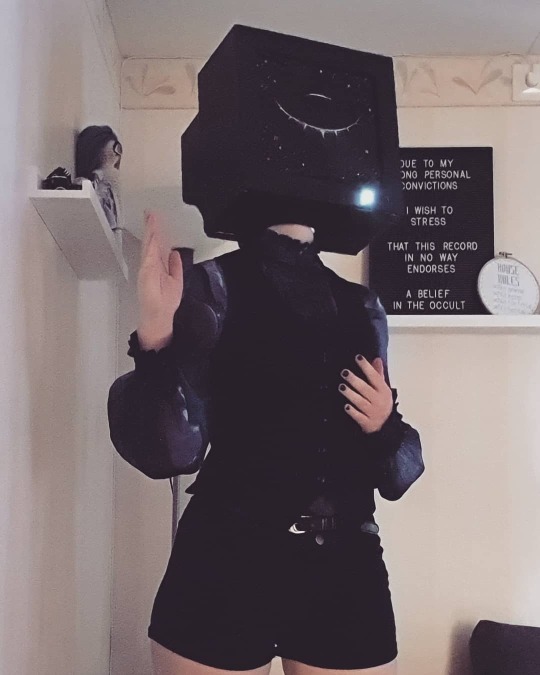
…Aaaand would you look at that, you’ve got yourself a TV head! Assemble yourself a funky outfit out of stuff from your wardrobe and go weird out people at a party! Post pics and get that internet clout! Wear it to IKEA! (Don’t, Actually.) Chill with it at home, secure in the knowledge that you’re 200% cooler than everyone else because your head is now a goddamn TV how sick is that shit
Thank you so much for reading my probably-entirely-too-long-and-wordytutorial! Hopefully I’ve been able to make myself understood despite my less-than-perfect english. If you have any further questions, don’t hesitate to shoot me an ask, and if you do use this to make your own TV head, feel free to show me the result—it’d mean the world to me!
I’m having a barbecue this weekend and because I found CuntMelanie sitting on the furniture again today, she has been “volunteered” to the Urine Pit Cunt. She is buried in a small clearing behind the bushes at the back of the garden. 50 of my friends and family are due to arrive this evening and everyone will make use of her whenever they need a piss. It’s obviously more difficult to piss in her mouth as the evening goes on, especially for the women, who usually piss all over her head, on her hair and in her eyes, now matter how close they are squatting to her mouth. She is going to stink of urine for weeks !
Still room for sign ups, before the event or after it starts! Perhaps something will you see/read/enjoy will spark your muse. All forms of fan-creation welcome: videos, edits, fic, art, text-memes, meta…