BEATING HEART EFFECT TUTORIAL: I was asked by the amazing Samantha@shegos how I made the animated beating heart effect on my Witcher gifset so I thought I would make a tutorial about it! I’ve used this same effect before on this Merlin gifset. This tutorial assumes you have basic giffing skills and work on Photoshop with a timeline.
importing a video and using the timeline/smart object combination
importing your screencaps and using the timeline/smart object combination
I use Photoshop CC 2017.
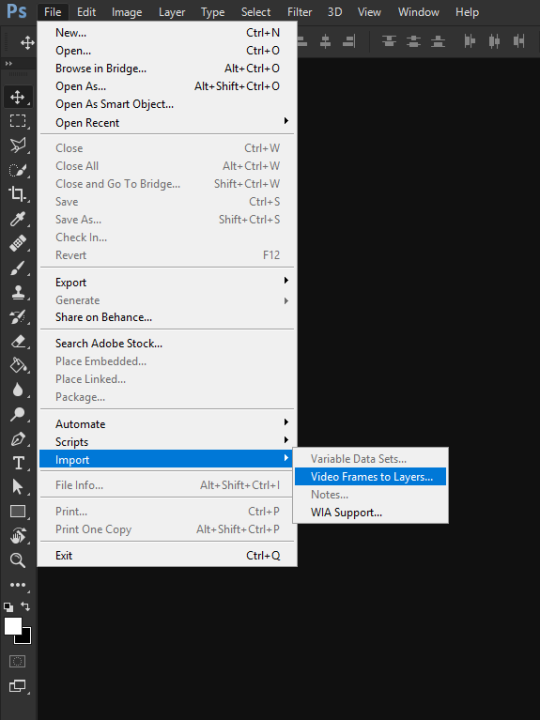
IMPORTING A VIDEO
1. go to file>import>video frames to layers.
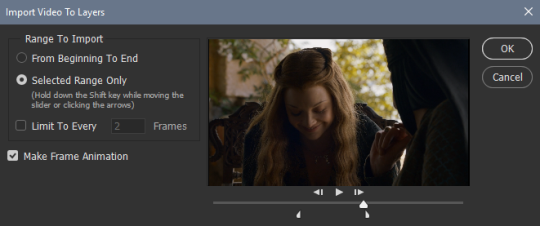
2. once you select your video, this dialogue box will pop up. use the left and right arrows to select the scene you wish to gif.
some people use the “limit to every x frames” but I personally don’t. if you do, I’ve seen people recommend using either 2 or 3.
make sure that “make frame animation” is checked.
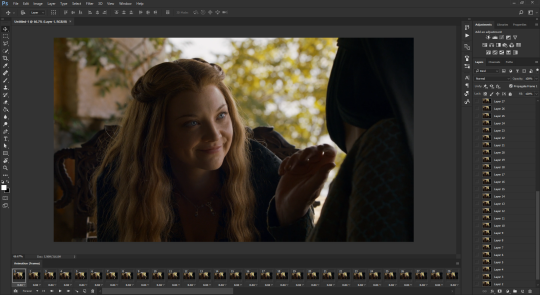
3. this is what your workspace will look like afterwards.
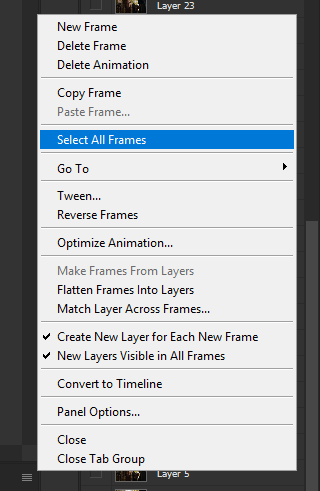
4. down the bottom in the animation window, in the top right corner will be an icon. click it and select “select all frames”.
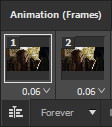
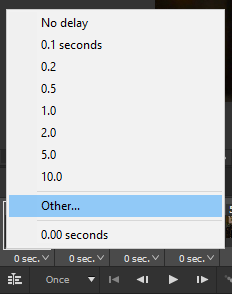
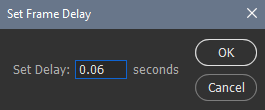
5. now all your frames are selected which means whatever you do to one frame will apply to the others. click on the number below the frame thumbnail. (e.g. 0.04) and select “other”. this is where you will change your frame delay which impacts the overall speed of your gif.
I generally use 0.05-0.07 seconds but it depends on your gif and how many frames it has. just play around with different delays til you find something to your liking.
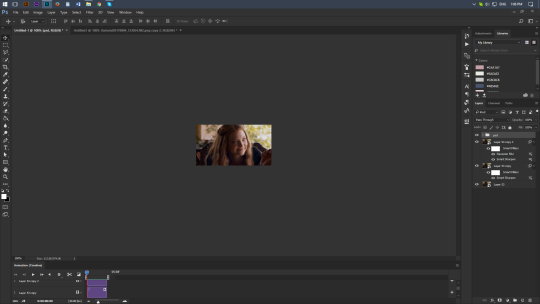
6. there’s a small icon in the bottom left corner of the animation. click it and it will convert your frames to a timeline.
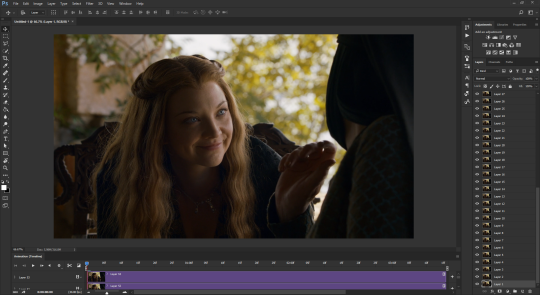
7. this is what your workspace should look like now. select all your layers in your layers panel and right click. select “convert to smart object”.
8. now that it’s a smart object, go ahead and use a sharpen action on it. I’m using my own sharpen action that I’ve uploaded here.
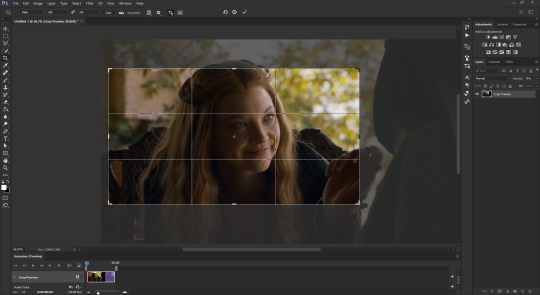
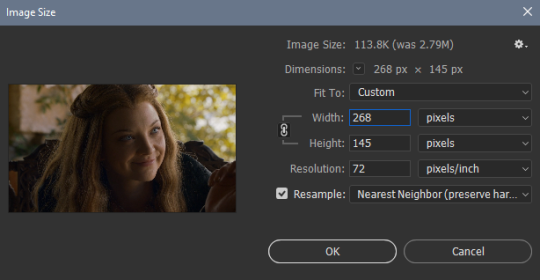
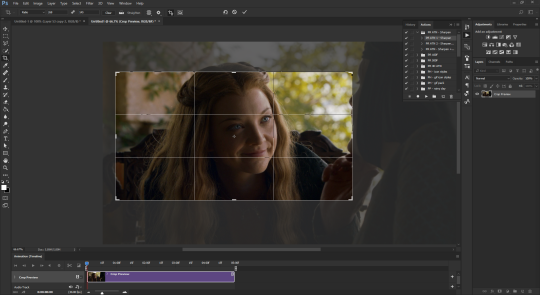
9. crop and resize your image to your desired dimensions. I’m using 268 x 145.
10. add your psd/colouring. I’m just using a very simple psd consisting of curves, brightness and contrast, levels, and a bit of colour balance and selective colouring.
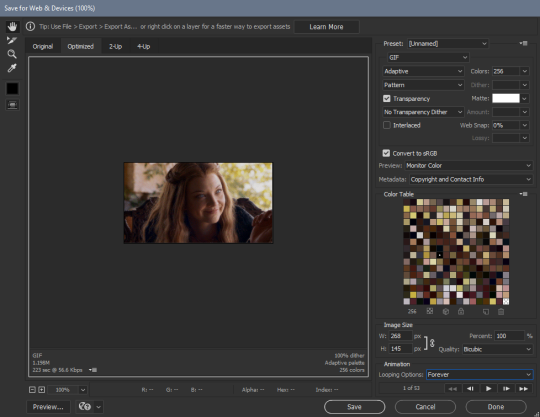
11. go to file>export>save for web (legacy). make sure the looping option is set to forever and just play around with adapative/selective and pattern/diffusion, see what looks best for your gif.
IMPORTING SCREENCAPS
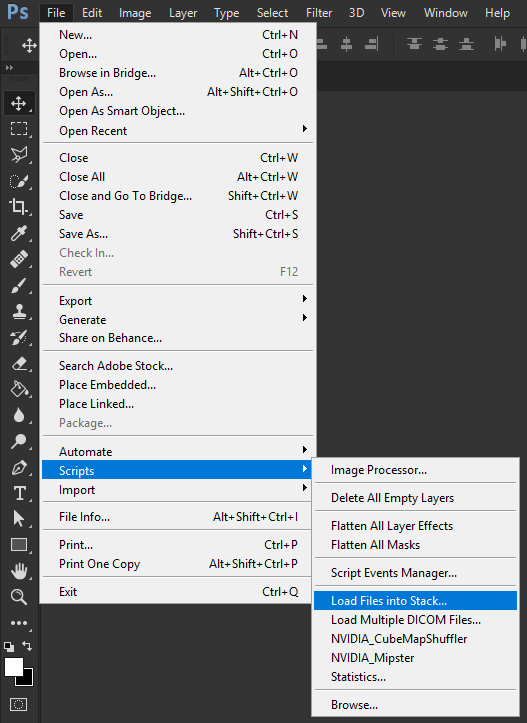
1. go to file>scripts> load files into stack.
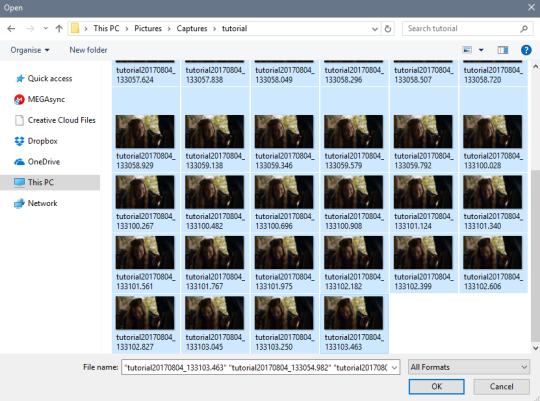
2. Select either file or folder from the drop down menu and click browse. Locate your screencaps and select them all and hit ok.
3. this is what it’ll look like when all your layers are loaded in.
4. in your animation window click “create frame animation”. if you don’t have your animation window open go to window>animation window.
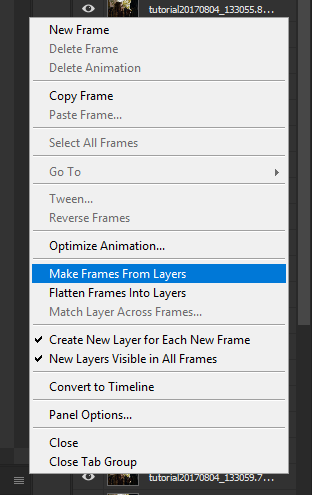
down the bottom in the animation window, in the top right corner will be an icon. click it and select “make frames from layers”.
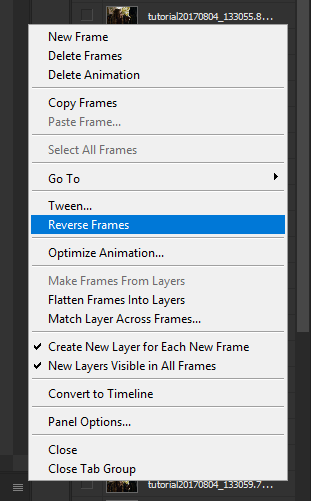
5. click that same icon again and select “reverse frames”.
6. click that icon again and select “select all frames”. now all your frames are selected which means whatever you do to one frame will apply to the others. click on the number below the frame thumbnail. (e.g. 0 sec) and select “other”. this is where you will change your frame delay which impacts the overall speed of your gif. I generally use 0.05-0.07 seconds but it depends on your gif and how many frames it has. just play around with different delays til you find something to your liking.
7. there’s a small icon in the bottom left corner of the animation. click it and it will convert your frames to a timeline. after that select all your layers in your layers panel and right click. select “convert to smart object”.
8. now that it’s a smart object, go ahead and use a sharpen action on it. I’m using my own sharpen action that I’ve uploaded here.
9. crop and resize your image to your desired dimensions. I’m using 268 x 145.
10. add your psd/colouring. I’m just using a very simple psd consisting of curves, brightness and contrast, levels, and a bit of colour balance and selective colouring.
11. go to file>export>save for web (legacy). make sure the looping option is set to forever and just play around with adapative/selective and pattern/diffusion, see what looks best for your gif.
importing a video and using the timeline/smart object combination
importing your screencaps and using the timeline/smart object combination
I use Photoshop CC 2017.
IMPORTING A VIDEO
1. go to file>import>video frames to layers.
2. once you select your video, this dialogue box will pop up. use the left and right arrows to select the scene you wish to gif.
some people use the “limit to every x frames” but I personally don’t. if you do, I’ve seen people recommend using either 2 or 3.
make sure that “make frame animation” is checked.
3. this is what your workspace will look like afterwards.
4. down the bottom in the animation window, in the top right corner will be an icon. click it and select “select all frames”.
5. now all your frames are selected which means whatever you do to one frame will apply to the others. click on the number below the frame thumbnail. (e.g. 0.04) and select “other”. this is where you will change your frame delay which impacts the overall speed of your gif.
I generally use 0.05-0.07 seconds but it depends on your gif and how many frames it has. just play around with different delays til you find something to your liking.
6. there’s a small icon in the bottom left corner of the animation. click it and it will convert your frames to a timeline.
7. this is what your workspace should look like now. select all your layers in your layers panel and right click. select “convert to smart object”.
8. now that it’s a smart object, go ahead and use a sharpen action on it. I’m using my own sharpen action that I’ve uploaded here.
9. crop and resize your image to your desired dimensions. I’m using 268 x 145.
10. add your psd/colouring. I’m just using a very simple psd consisting of curves, brightness and contrast, levels, and a bit of colour balance and selective colouring.
11. go to file>export>save for web (legacy). make sure the looping option is set to forever and just play around with adapative/selective and pattern/diffusion, see what looks best for your gif.
IMPORTING SCREENCAPS
1. go to file>scripts> load files into stack.
2. Select either file or folder from the drop down menu and click browse. Locate your screencaps and select them all and hit ok.
3. this is what it’ll look like when all your layers are loaded in.
4. in your animation window click “create frame animation”. if you don’t have your animation window open go to window>animation window.
down the bottom in the animation window, in the top right corner will be an icon. click it and select “make frames from layers”.
5. click that same icon again and select “reverse frames”.
6. click that icon again and select “select all frames”. now all your frames are selected which means whatever you do to one frame will apply to the others. click on the number below the frame thumbnail. (e.g. 0 sec) and select “other”. this is where you will change your frame delay which impacts the overall speed of your gif. I generally use 0.05-0.07 seconds but it depends on your gif and how many frames it has. just play around with different delays til you find something to your liking.
7. there’s a small icon in the bottom left corner of the animation. click it and it will convert your frames to a timeline. after that select all your layers in your layers panel and right click. select “convert to smart object”.
8. now that it’s a smart object, go ahead and use a sharpen action on it. I’m using my own sharpen action that I’ve uploaded here.
9. crop and resize your image to your desired dimensions. I’m using 268 x 145.
10. add your psd/colouring. I’m just using a very simple psd consisting of curves, brightness and contrast, levels, and a bit of colour balance and selective colouring.
11. go to file>export>save for web (legacy). make sure the looping option is set to forever and just play around with adapative/selective and pattern/diffusion, see what looks best for your gif.
i’m an absolute sucker for watercolor and learning how to do this has been something of a game-changer for me. so now i am doing my best to show you! this tutorial is very image-based and kinda rambly but if you have any questions feel free to ask! if you find this helpful please consider buying me a coffee
disclaimer:this only seems to work well with larger images. the image i use in this example is about 3500x2500 px and downloaded off of unsplash! you could probably fiddle around with the settings to make it work for smaller images, but idk yet. I also don’t know how well this works with faces.
anyway, tutorial time
the very first thing you want to do is turn your picture into a smart object!
this will give you smart filters which are non-destructive and allow you to swap your image out if you want!
the second step is applying a median filter as shown here!
i’ve found that the best number for radius is somewhere between 8-15. lower for more detail and higher for more abstract looking things. play with it and see what works best for your image!
next you’re going to want to add a find edges filter!
once that is applied your image should look something like this!
you’re going to change the blending mode of this filter by clicking here
and then you’re going to set it to linear burn
next, you’re going to go up into the filter gallery and select the stamp filter
these are the settings i have found to be ideal!
once again you’re going to change the blending mode, this time to screen. this will give an illusion of paper poking through the colors and give it some good imperfect spiciness ✨
now you’re going to go back to the filter gallery and this time you’re going to be selecting the watercolor filter!
once again thes4e are the settings for that which i have found work best
add a new effect layer here
and select pallet knife
use these settings
okay! the hardest parts are all over! thank you for sticking with it this long. now you can add a nice paper texture if you’d like! this is a good one
slap that bad boy on the top layer and set it to multiply and you’re good to go!
thank you for reading and good luck with your watercolor editing adventures!