#sally hansen

 bag?Update your make-up kit for Fall with sparkles: we’re especially lovi")
What’s in your (beauty) bag?
Update your make-up kit for Fall with sparkles: we’re especially loving the DIY Ombre nail kit from Sally Hansen.
own it now:
-orla kiley beauty bag
-eyeshadow
-shop ombre nails in store
Post link
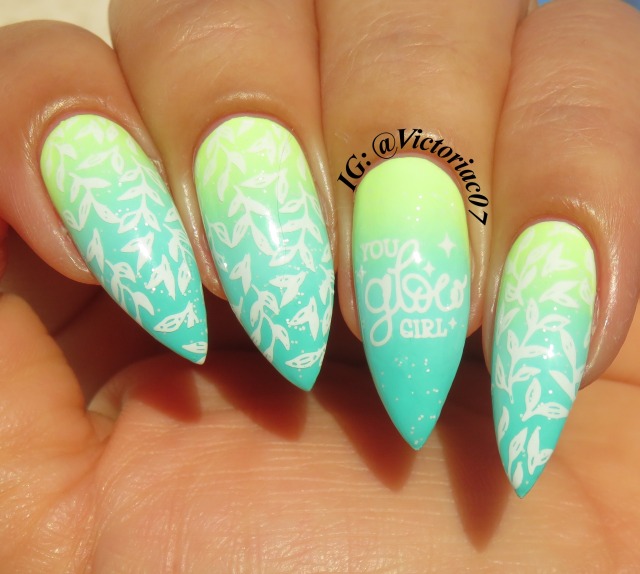
The colors seemed to glow, so I found the phrase fitting
Used in this mani:
Color Club - Age Of Aquarius, I’m Outta Here
Glitter Daze - Sike!
Sally Hansen - First Sour, Then Sweet
What’s Up Nails - Blanc My Mind
Glisten & Glow Topcoat
Stamping Plates: Express Your Nails 02 from @linanailartsupplies, Lovely Leaves 2 from @uberchicbeauty


I love the look of a good crelly with a matte topcoat, and I also loved it glossy so you get both here
Used in this mani:
Painted Polish - Midnight Mauve, Stamped In Mulberry
Sally Hansen - Hurry Plum
Glisten & Glow Glossy/Matte Topcoats
Stamping Plate: B037 from @whatsupnails

Another cute punny mani I originally did for V-Day, but posting late because I’m terrible with getting posts up in time for holidays. But a love themed mani works year round right?
Used in this mani:
Ella + Mila - Pure
What’s Up Nails - Neither Noir
Sally Hansen - Very Cherry
Painted Polish - Stamped In Stone
Glisten & Glow Topcoat
Stamping Plate: Sushi For Me from @uberchicbeauty

Dwight Schrute bringing the romance. This was my actual V-Day mani & I felt pretty pleased with myself! Inspired by a card I came across on Etsy from seller: Thatswhatshesold2u.
Used in this mani:
Pop & Polished - White Out
Ella + Mila - In Line For Wine
Wet N’ Wild - Do Pass Go
Sally Hansen - The Un-red
Glisten & Glow Topcoat
Black acrylic paint

Who doesn’t love a simple floral?
Used in this mani:
Sally Hansen - Cinna-snap
Painted Polish - Holo Harvest
What’s Up Nails - Neither Noir
Stamping Plate: Let’s Doodle! 01 from @linanailartsupplies

I need to do more skittles; they’re so simple and quick. An easy fix when I have a craving to change my nails, but don’t have much time.
Used in this mani:
OPI - Racing For Pinks
Pop & Polished - Winter Rose
Fun Lacquer - Sweet
Sally Hansen - Fast and Fuchsia
Glisten & Glow Topcoat


I decided to enter one of my designs to the Sally Hansen i-heart-nail-art contest!
Please please click here to vote! It would mean so much to me!!! Thanks!
Post link
I have been experimenting combining two or more colours in painting my nails to make it less too common and show a bit of my quirkiness. I gathered all my nail polishes and ended up combining two of them - Sally Hansen’s Berry Important and Mauve Along.
My normal nail paints is either a plain natural colour for everyday wear or something more striking and bright on spring and summer seasons. Good thing I’ve been having spare times lately to explore a bit of my creativity through trying out different things.

(L-R) Sally Hansen Diamond Shine Base and Top Coat, Dashing Diva Cuticle Nectar, Sally Hansen Berry Important 543, Sally Hansen Mauve Along 374 and The Face Shop Nail Dot Pen (white).

I believe a nail art should be suitable to the shape and length of the nail because some arts require a lot of space especially those with intricate details. Also, the capability of the one doing it should be taken in consideration.
In my case, I do it to myself rather than going to a salon and spend over AU$20 just for a manicure + depending on the type of nail polish I have chosen. That’s just too expensive! I’m so glad my mom taught me how to do my own manicure since I was 11 years old. This way, I’m certain that my tools are sanitised and very personal unlike going to a salon and sharing the same tools with other people. It’s one of my pet peeves >.> *health conscious*
I like keeping my nails as short as possible for convenience in cooking/baking, doing house chores, working with my hands and spending hours in front of the computer. So, for my short nails I have chosen the V-style 2-colour combination (I just made up that term by the way *LOL*) to make it appear longer, not too young for my age of 24, and still work appropriate for my day job.

My Manicure Kit: (L-R) 4-Step Buffering Block, Sally Hansen Instant Cuticle Remover, nail brush, emery board, cuticle pusher and a nipper (which is not in the picture *oopsie*) ^^;
My step-by-step process:
Step 1: A manicure. It’s very important to clean your nails first before applying nail polish to ensure that your hands are bacteria-free from all the work you’ve done in a week. This step includes buffering your nails and removing excess cuticles.
Step 2: I applied the base coat to protect and avoid my nails from turning yellow after applying nail polish. I believe this is an important step as well especially if you’re the type of person who does not go out of the house with bare nails. I used Sally Hansen’s Diamond Shine that also provide stronger nails. Win-win isn’t it?
Step 3: I applied my base colours alternately. Sally Hansen Berry Important on my ring and index fingers, then Sally Hansen Mauve Along for the rest of the fingers. I’ve already worn bright red last week so I wanted to tone down on the red this week. ^^
Step 4: Let it dry. If there’s one thing I learned from applying nail polish, it is “patience is key” to a perfect finish. I’m usually the type of person who jumps from one activity to another - I get bored easily. (Must be a gemini’s thing. >.>) Thus, I end up with scratches or fingerprints on my nails most of the time.
Step 5: Applying the second colour in V-shape. Cover the nails using plain sticker strips or masking tape and leave the part of the second colour to be painted on. This way, it’s easy to apply the second colour! I applied Berry on top of Mauve and the other way around. Let it dry again.
Step 6: Cover imperfections between the two colours by applying white dots using The Face Shop’s Nail Dot Pen in white. I got this before I left the Philippines in 2012 for Php 150.00 in their Glorietta branch and still it’s not dried up at all. Talk about getting your money’s worth. :D
Again, let it dry. This time, since the white paint is a bit 3D, it requires more time to dry up.
Step 7: Apply top coat to protect the nail art. I used Sally Hansen’s Diamond Shine again since it serves as both base and top coat! It promises not only to provide high-gloss, but also it’s quick drying, it prevents your nails from chipping and extends the wear of your nail colour up to 10 days! Isn’t it a bargain?
Finally, the last and my most favourite step that most people skip.
Step 7: Apply cuticle nectar. Most people would apply hand lotion, which is totally fine but this formula is especially designed to make your cuticle moisturised and healthy with that salon finish look. *wink wink* I got mine at Dashing Diva in Greenbelt 5 branch before I left the Philippines. *LOL* I hoarded a lot of skin care products before I left.
And that’s it. It only took me 1 ½ hours to do everything, which is already a quick one for me. >.> Last week, I spent 3 hours using one nail polish. Haha! Amateur~
Toodles~


TINY LITTLE BLACK DETAILS ~
I think that it was the first time I used properly a long liner, it’s funny when you think that I’ve been doing my nails for more than 10 years. There is always first times I guess lol. Usually, I use a tiny detail brush but for this one the liner was more appropriate.
Polishes I used :
Essie : Style In Excess
Essie : Now And Zen
Essie : Looks To Thrill
Sally Hansen : Taffeta
Sally Hansen : Sheer Lilac Gloss
Mavala : Platinum Marble
OPI : Positive Vibes Only
L’Oréal : Vert Epoque
Black Polish
Blog|Twitter|Pinterest|Facebook
Post link

BLACK & WHITE PATTERNS WITH COLORFUL DOTS ~
I really like this nail art! Black & white patterns always do the job.
I was inspired by HeyNiceNails on Instagram. She used colorful glitters but I didn’t have any nail polish like hers so I decided to do dots to replace it. It looks cool I think.
Polishes I used :
Sally Hansen : Shell We Dance ?
Essie : Join The Club
Revlon : Peachy
China Glaze : Fairy Dust
Bourjois : Bleu Model
CND : Carou-Celery
D’Jonna : n°10
White & Black Polishes
Blog|Twitter|Pinterest|Facebook
Post link

COLORFUL FLOWERS ~
You can never go wrong with flowers. These are so easy to do, they’re literally 6 dots. I really like the colors I used, they go well together.
I was inspired by Samrosenails on Instagram for this nail art.
Polishes I used :
Revlon : Sunshine Sparkle
Revlon : Sun Shower
Essie : Need A Vacation
Essie : Funny Face
Sally Hansen : Coral Reef
Models Own : Cornflower Gleam
Missha : OR001
Purple Franken Polish
Blog|Twitter|Pinterest|Facebook
Post link
")
