Outside bathroom with the bush toilet - surround with invisible fence, then place a gate. Click on the gate then
Nraas>DebugEnabler>Object>Toggle Visibility.
The gate will now become invis’ and your sims won’t shoo everyone from the lot when using the loo.
Like so.
To get rid of the fence and gate just unplace a new fence over it by holding control as you place it and it will remove the original fence and gate.
Great for using with Rabbithole Rugs too - you can make them visible again by clicking on their tag in map view. Or, if you’ve placed a rug on any lot with a wall, click the wall to access the rug’s options. No need for the rug to be visible and potentially ruin an aesthetic.
So I have been working on making some custom CC for my Cheshire Sims. I have been semi-successful but need some advice from more experienced sim creators.
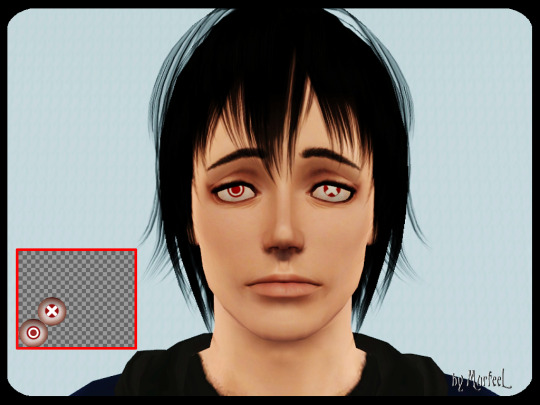
First off I made some accessory tattoos using this tutorial… -I would like to know how to remove the non-edited sock swatches (circled in red) from my CC. -Additionally is there a way to merge these two accessory tattoos into the same group since they are both the same edit of a base game sock?
Second I have made some custom Cheshire eyes but am experiencing issues making them recolorable and there is an issue with the whole sim face being affected by the white intensity of the eyes. I am in need of a good sims3 contact tutorial, any recommendations would be appreciated.
Thirdly I love @murfeeleeAMR Cheshire cat tattoo but I would like to convert it to a blush. That way it doesn’t require CmarNYC’s core mod and can be tweaked aka have more markings added to it. If you have some free time @murfeelee I would love to have your insight on this matter.
And that’s my Current Conundrum. I plan to release three male Cheshire sims as soon as I finish making these mods and the sims. I am excited to share more sims with all of you and I thank those of you who take the time to read my posts and comment on my sim uploads. Thank you all for your support!!
If any of you would like to help me with this CC just leave a message and I can provide you with my CC files/ packages.
One of the most easily overlooked steps in CC creation is remembering to get rid of the extra variations you don’t need. In TSRW, all you have to do is click the dropdown arrow, to see how many of EA’s variations are gonna eff up your CC if they’re not dealt with right here right now!
To the right is another dropdown arrow. Click it!
You’re gosh darn right I’m sure!
And you’ve just gotten rid of one of them! Now do the same thing for the others, till you’re left with just one, and you can’t delete anymore.
Viola!
____________________________________________
#2) Contacts:
To make contacts, you’ll need EA’s default eyes texture as a reference. It’s found in the FullBuild2.package, wherever your copy of TS3 is installed (usually C:\Program Files (x86)\Electronic Arts\The Sims 3\GameData\Shared\Packages).
BTW: I NEVER open the Full/Delta packages directly; I always make a copy on the desktop, and use that instead, so nothing goes horrifically wrong.
Open the (copied!) package file with S3PE, and scroll down to either AfFace_o or AmFace_o. Right click, and export the texture as a .dds file.
There’s also another texture you should grab on that list, amFace_d_0x6f853f0e35157e2d, which is pretty helpful, since it’s got a pre-painted (though lesser quality) diffuse sclera.
Close S3PE, and open the texture in Gimp/Photoshop/etc. I’ll be using GIMP. What you want to do is delete all the teeth, eyelashes, tongue textures, so all that’s left is the eyeball.
Then you’ll edit it to your liking–veiny sclera, bigger/smaller irises, vertical/horizontal pupils, whatever! For example, I was able to give my Renji sim much smaller eyes, by rescaling the iris & pupils on the regular default replacement eyes I use, and making them contacts.
Once you’ve spent 1000 years in photoshop/Gimp creating the eyes you want, then it’s (finally) time for TSRW. Start a New Project and pick a good Costume Makeup:
Then it is a very simple matter of Importing the eyes you made, and swapping out EA’s.
Save & Export the file, and you’ll find your new contact lenses in Costume Makeup!
____________________________________________
#3) FACE TATTOOS TO BLUSH
OK, so when you open the face tatt in S3PE you’re gonna see a blank texture–don’t panic! That’s just the all-black alpha channel doing it’s thing. Export the .dds.
Here’s where I needed to use Photoshop, cuz whenever I try to open dds textures with all-black alpha channels in GIMP, it shows my texture blank, too. Only in Photoshop can I see the actual RGB channels with no alpha channel in the way–IDKY.
Export it right out as a DXT1 dds with no alpha channel.
Then, you’re gonna need a greyscaled/black and white version for the multiplier, so desaturate the color and boost the contrast (or however you want to go about it) until you end up with a nice black and white image:
Then Delete the black background.
And then you can Export this version out as a DXT5 Interpolated Alpha dds.
You’re done with the texturing now, so go to TSRW to make the blush!
Start a New Project and choose the Multi Blush, since it has more recolorable channels.
Import the white DXt5 in the Face Overlay, and Import the RGB texture in the Mask.
As you can see, I suck, so there’s still some black background left in my Face Overlay that’s effing up the texture. U_U You’ll have to make sure you do better, so that crap doesn’t happen to you. XD
Also! Make sure you only have TWO recolorable channels enabled in the Tint Color sections, not 3 or 4–since your mask only uses RG, not RGB or RGBY.
But yeah, once your blush is as good as it can be, feel free to Save and Export.
Hey guys! So ya girl has learned a lot over the past month and I wanted to share some of the Blender plugins and tips that I have used to make object creation a little easier and faster!
Let’s start with Blender versions:
I like to use two different versions of blender when I am creating an object.
I use Blender 2.77 to create the initial object and to utilize the wonderful TS3 tools by Cmomoney.
I use Blender 2.91 for UV mapping since the majority of good plug-ins are too new for version 2.77 and the tools in the newest version of Blender are more user friendly.
Note:I create and export my mesh as a Wavefront object from Blender 2.77 first and then import it into 2.91 to arrange the UV map. Once I finish that, I export that object again and re-import it back into 2.77 with the updated UV map. I do this because sometimes the normals get messed up if the object is created in Blender 2.91 and then imported into 2.77 for baking.
I recommend NOT triangulating the faces yet so that the mesh is easier to manipulate. Triangulating should be done once exporting the final mesh imo.
UV Mapping
UV mapping was easily the hardest thing for me starting out and it can still be kinda tricky.
The point of UV unwrapping and mapping is to ensure that a 2D texture evenly and nicely wraps around a 3D object. (See image below. Source: Google)
A proper UV map is also essential for creating a good multiplier, which consists of outlining the object and “baking” on it’s shadows.
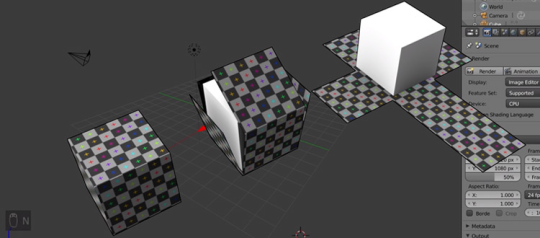
Without a multiplier, the mesh will look invisible in TSRW and in-game. If it is mapped or baked wrong, or the islands are outside of the UV area, the mesh can have empty spots or a bad texture. Here’s an example of a multiplier in Blender:
(Three separate cubes, rendered together, projecting shadows onto each other. There is a different multiplier image for each object.)
Unwrapping:
Most of the time, using “Smart UV Project” works well enough to proportionally unwrap the object but it does not arrange the islands (the 2D faces of the object seen in the UV editor window) in a manner that will render an even texture. You have to arrange them (UV mapping) to get the desired result.
There are multiple ways to unwrap a 3D object in addition to “Smart UV Project” , such as “Cube Projection” and “Lightmap Pack”, which work well too depending on the mesh. Test out which unwrap method works the best for you.
UV Mapping Tools for Blender 2.91:
UV Toolkit: This add-on is useful for aligning, transforming, arranging, and unwrapping UVs. I like to use this add-on to unwrap the islands proportionally. This plugin does cost at the least $19 but it is super worth it.
TexTools: This one is a free alternative to UV Toolkit. It has majority of the same features, minus the unwrap capability. The layout features are more extensive than UV Toolkit. I use this one primarily.
Magic UV: This tool is really useful for copying an islands layout and works best with islands that are similar. For example, if I had a square island that I rotated and scaled larger, I could copy it and paste it onto a similar island for similar if not the exact same results. I use this to ensure that faces are identical in size and orientation. It can be hit or miss, but for a free tool it’s super helpful.
Marking Seams:
You can mark seams on an object to change how it unwraps.
Take a cube for example, marking seams on the edges allows the 3D faces to lay out flat and even on the 2D map.
Marking seams “soft” or “sharp” will also change how the edges look in the game. (In the pic above, the edges in red show where seams have been marked. Source: Google)
Island Placement:
It’s important to keep in mind where the islands are placed and in what direction the texture will be projected onto it.
The x-axis on the UV map primarily affects how big or small the texture appears on the object. Stretching the Island along the x-axis will project more of the texture onto it. Keep in mind, however, that if the island is rotated, this projection changes as the x-axis has changed.
The larger the island, the better the quality. If the island is too small and the texture projects really large, the texture can look super low-quality and pixelated in-game. See the affect of rotation below:
Overlapping Islands:
Complex objects are sometimes too big to fit on the UV map. This is where overlapping similar islands comes in handy.
One major thing to note about overlapping is that when the object is baked, that bake will overlap and whatever comes out on top will be what is projected onto the islands.
Try to overlap islands in areas where you want the shadows and texture to appear the same.
Be sure to NOT overlap islands that will be two different textures/channels. For example, when baking an RGB, make sure that only the islands that you want to be in Green/Channel B are overlapping or the textures will not project correctly. See example below:
(Red/Channel A is the default color that always fills the entire image. The UV for the red cube is not overlapping with the blue or green cubes in the first image though. In the second image, all 3 are overlapping in multiple areas.)
Conclusion:
Learning the best way to UV map an object takes some time and really depends on how complex it is.
I hope this helps! I couldn’t really find anything sims 3 related that was up to date when I was learning and just figured it out on my own lol.
Thanks for the support guys! Maybe I’ll do something more in depth later on but it’s 4 am and a bih is tired so… I hope this is useful!
Helloooo! This is a quick crash course on how to edit/create the script for custom shell buildings. This is not a beginner tutorial! However, I’ve made it super easy for anyone who wants to try!
I decided to start with the script so that experienced cc creators and modders could just take it and go lol. There absolutely will be a more in depth tutorial, that will cover the entire process, as it is a long one!
This part, however, is super important! After looking at the scripts for shells included in the game, I realized that each shell has an individual one.
This is the reason that some prior attempts have resulted in the shell not showing up in-game. The script cannot be copied and applied to a customized clone like other objects.
Now that we’ve solved that mystery, lets get into the tutorial!
Since I’m such a good person lol, I’ve included a prepared template. Everything is basically already coded and ready to go!
It also includes unprotected versions of two core dlls: Sims3GameplaySystems.dll & Sims3GameplayObjects.dll
(I can barely take any credit lol, since the shells in the game have literally the same code with different class names. So, it is a super easy code!)
Creating The Script:
Required programs:
Microsoft Visual Studio - For C# coding, be sure to install the .NET Desktop Development workload. See an installation tutorial for VS 2019 here.
Youdo not need to know how to code C# for this tutorial but it’s great if you already have some prior knowledge and/or experience using VS.
First start by opening the project in Visual Studio:
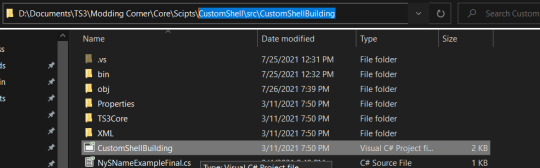
Download & extract thisfolder and navigate to the “src” folder shown below.
Click “CustomShellBuilding” to open the project.
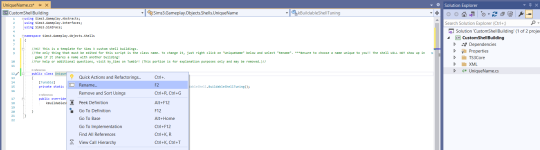
With VS now open, simply follow the directions written in the script (forgive my typos lol, they’ve been corrected):
Rename the script class to something that is unique and probably wont be duplicated.
Once you have renamed the class, it will update both in the coding window and in the Solution Explorer.
The notes in green are 100% optional and do not affect the code at all. Feel free to delete them!
Now that the class name has been updated, the script is ready to build.
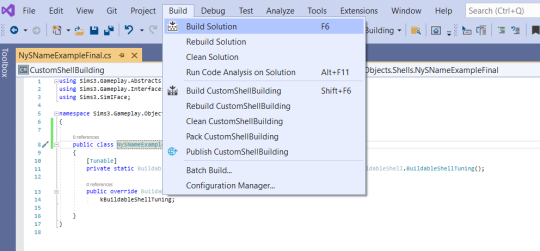
Simply, click “Build” in the upper task bar and select “Build Solution”.
This step will create the .dll file that you will need to add to the .package file.
To find the .dll, navigate to the “net20″ folder. The file path should be similar to what is highlighted below.
& Voila, It’s done! You’ve successfully created the script for your custom shell.
Next Steps:
This script can now be used for onecustom shell.
This process must be repeated for additional shells!
To learn how to add the script to the package file, see “Adding The Script To The Package” in this great tutorial on MTS.
The script name added to the OBJK should be the following format:
Namespace.ClassName
Ex) Sims3.Gameplay.Objects.Shells.UniqueName
Use this to create the FVN Hash for the S3SA resource.
Additionally, the Sims 3 Object Modding tutorial on MTS is helpful for beginners to reference.
Keep in mind that this is one step in this entire process. More tuts coming soon***.
It’s a shame it took me this long to figure this out lol! For anyone who is experiencing this little error, here’s a tut on how to avoid it by importing non BG objects correctly lol. So….
Assuming you already know the basics of TSRW and S3PE, I’m just gonna cover the error and how to fix it.
There is already an explanation on how to import the package contents after getting this error, which you can see here. This method works fine but it causes the resulting package file to be completely jumbled and disorganized.
If you get an error that looks like this:
and this:
It means you did not properly import the package. This happens when importing expansion and stuff pack objects into TSRW.
To avoid this error, simply uncheck “Preserve group ID” when importing from package and replace 0x00000000 with the corresponding group ID for that object.
Base game objects have a group ID of 0x00000000
The example below is for a Late Night object, so the group ID is 0x28000000.
If you’re unsure of the group ID, you can see it by opening the file in S3PE.
I hope this helps anyone experiencing this issue! Lol I googled a fix and found the workaround but since I finally figured it out, I thought I’d share!