#meshing

I think I want to write my sims 3 story.
Hey guys! So ya girl has learned a lot over the past month and I wanted to share some of the Blender plugins and tips that I have used to make object creation a little easier and faster!
Let’s start with Blender versions:
I like to use two different versions of blender when I am creating an object.
- I use Blender 2.77 to create the initial object and to utilize the wonderful TS3 tools by Cmomoney.
- I use Blender 2.91 for UV mapping since the majority of good plug-ins are too new for version 2.77 and the tools in the newest version of Blender are more user friendly.
Note:I create and export my mesh as a Wavefront object from Blender 2.77 first and then import it into 2.91 to arrange the UV map. Once I finish that, I export that object again and re-import it back into 2.77 with the updated UV map. I do this because sometimes the normals get messed up if the object is created in Blender 2.91 and then imported into 2.77 for baking.
I recommend NOT triangulating the faces yet so that the mesh is easier to manipulate. Triangulating should be done once exporting the final mesh imo.
UV Mapping
UV mapping was easily the hardest thing for me starting out and it can still be kinda tricky.
- The point of UV unwrapping and mapping is to ensure that a 2D texture evenly and nicely wraps around a 3D object. (See image below. Source: Google)
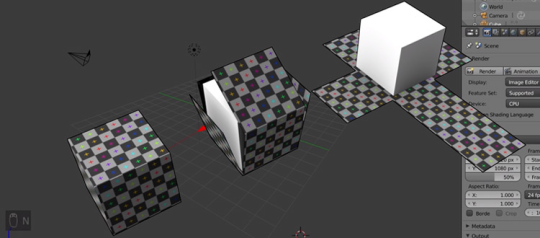
- A proper UV map is also essential for creating a good multiplier, which consists of outlining the object and “baking” on it’s shadows.
- Without a multiplier, the mesh will look invisible in TSRW and in-game. If it is mapped or baked wrong, or the islands are outside of the UV area, the mesh can have empty spots or a bad texture. Here’s an example of a multiplier in Blender:

(Three separate cubes, rendered together, projecting shadows onto each other. There is a different multiplier image for each object.)
Unwrapping:
- Most of the time, using “Smart UV Project” works well enough to proportionally unwrap the object but it does not arrange the islands (the 2D faces of the object seen in the UV editor window) in a manner that will render an even texture. You have to arrange them (UV mapping) to get the desired result.
- There are multiple ways to unwrap a 3D object in addition to “Smart UV Project” , such as “Cube Projection” and “Lightmap Pack”, which work well too depending on the mesh. Test out which unwrap method works the best for you.

UV Mapping Tools for Blender 2.91:
- UV Toolkit: This add-on is useful for aligning, transforming, arranging, and unwrapping UVs. I like to use this add-on to unwrap the islands proportionally. This plugin does cost at the least $19 but it is super worth it.
- TexTools: This one is a free alternative to UV Toolkit. It has majority of the same features, minus the unwrap capability. The layout features are more extensive than UV Toolkit. I use this one primarily.
- Magic UV: This tool is really useful for copying an islands layout and works best with islands that are similar. For example, if I had a square island that I rotated and scaled larger, I could copy it and paste it onto a similar island for similar if not the exact same results. I use this to ensure that faces are identical in size and orientation. It can be hit or miss, but for a free tool it’s super helpful.
Marking Seams:
You can mark seams on an object to change how it unwraps.
- Take a cube for example, marking seams on the edges allows the 3D faces to lay out flat and even on the 2D map.
- Marking seams “soft” or “sharp” will also change how the edges look in the game. (In the pic above, the edges in red show where seams have been marked. Source: Google)
Island Placement:
It’s important to keep in mind where the islands are placed and in what direction the texture will be projected onto it.
- The x-axis on the UV map primarily affects how big or small the texture appears on the object. Stretching the Island along the x-axis will project more of the texture onto it. Keep in mind, however, that if the island is rotated, this projection changes as the x-axis has changed.
- The larger the island, the better the quality. If the island is too small and the texture projects really large, the texture can look super low-quality and pixelated in-game. See the affect of rotation below:


Overlapping Islands:
Complex objects are sometimes too big to fit on the UV map. This is where overlapping similar islands comes in handy.
- One major thing to note about overlapping is that when the object is baked, that bake will overlap and whatever comes out on top will be what is projected onto the islands.
- Try to overlap islands in areas where you want the shadows and texture to appear the same.
- Be sure to NOT overlap islands that will be two different textures/channels. For example, when baking an RGB, make sure that only the islands that you want to be in Green/Channel B are overlapping or the textures will not project correctly. See example below:


(Red/Channel A is the default color that always fills the entire image. The UV for the red cube is not overlapping with the blue or green cubes in the first image though. In the second image, all 3 are overlapping in multiple areas.)
Conclusion:
Learning the best way to UV map an object takes some time and really depends on how complex it is.
I hope this helps! I couldn’t really find anything sims 3 related that was up to date when I was learning and just figured it out on my own lol.
Thanks for the support guys! Maybe I’ll do something more in depth later on but it’s 4 am and a bih is tired so… I hope this is useful!
Hi everyone!
Just popping in to share some of my basic CC making resources with you. By ‘resources’ I mean simple meshes in era-appropriate shapes, but without any specific details. That means you can (relatively) easily remake them into whatever you want. Just a bit of knife here and there, some texturing, maybe some uv map adjustments and you’re done!
Way easier than making a whole dress from scratch or editing any of my published gowns, which are usually already cut in hundreds of weird places…
The coolest thing about those bases: they’re all ready to be used in game. Weight painting? Done! Vertex painting? Done as well! Uv-1? But of course! Unless you make some big changes to the mesh, you won’t have to bother with those annoying things at all.
All are meant to be imported over the base game chemise. That’s important. Don’t try to use anything else as a clone or things may go wrong. Either the mesh won’t import into S4S or it might explode in game. Type 'chemise’ into S4S search bar when you look for your clone and choose this one.
You might need to triangulate some (all?) of those dresses when you’re done! Just press A to select all and then ctrl+T. I usually do it only in the very end (…or not at all if I forget…), because I find squares/quads much easier to work with. They can cause some problems in game though, so don’t be me: don’t forget this step!
And if you find out they come with some problems after all… Well, I can only say I’m sorry, but probably I won’t have time to fix them . They should work fine though - I’ve been using them myself for months and double-checked them right now, so hopefully they’re all good!
Hope you’ll find them useful and make tons of beautiful dresses with them . Good luck!
~Vintage
DOWNLOAD(free on Patreon, no ads)
Creating CC for Sims 4 | Meshing Chesterfield Ottoman in Blender
Little speed meshing video!
(Bag coming soon!)