#stationery


9.8.2019 || Doing a bit of pre reading for the year ahead


01.08.2019 || August bullet journal layout || A little experiment in watercolour

things I wish I had known when starting a studyblr - study-like-you-mean-it
It’s been a looong time since I made this studyblr; I started it in Easter 2016, which means it’s over 3 years old now (which doesn’t seem like a lot but going from GCSEs to having finished the first year of university is a long journey). I thought I’d share a couple of things I’ve learned along the way, through trial and error (mostly error), and hopefully this will help some of you out! :)
- Experiment with your look: It’s great if you settle into an aesthetic straight away and want to stick with it for the whole time you have your blog, and if that works for you, that’s great! If like me you want to keep trying out different styles, go with that (I still haven’t settled on an aesthetic and that’s chill)- most of the time, people will see your posts in isolation anyway so don’t put too much pressure on finding aesthetic cohesiveness
- Don’t think you have to buy all the stationery: You’ll see a bunch of brand names popping up over and over again in people’s posts, and whilst brands like MUJI and mildliners may work for some, you absolutely do not need to buy all of these things in order to keep up a certain ideal aesthetic. I, for one, have strayed from mildliners and use stabilo pastel highlighters now, as they are cheaper and last longer. My go-to writing pen when I work is a BIC biro, which I bought in bulk so it costs 24p per pen. I do have MUJI pens for working on my bullet journal and the B4 notebooks for taking to lectures, but it’s really not necessary to cash out on all the kit in order to be a “legit” studyblr. All you need is a phone camera, a pen, and a piece of paper.
- You don’t need the “studyblr” handwriting: Scrolling through the myriad of studyblr posts, it’s easy to become convinced that you need this stereotypical ultra-neat “studyblr” handwriting, and whilst it does look nice, it’s not the only handwriting that looks nice. I used to take ages to try and write my study notes out so that they conformed to this aesthetic, and it ended up slowing down my studying to the point that I never finished the notes or the material I wanted to cover in a given day. I also ended up making notes for the sake of studyblr posts that ended up not being an effective way for me to study (I learned this the hard way). I’m quite lucky in that my regular handwriting is quite consistent, but to be honest, the overall aesthetic of a post is more important, and sometimes this studyblr handwriting fits into the aesthetic, but I can guarantee it’s not a necessity and you don’t need to spend your time on it if your handwriting doesn’t look like that.
- Composition and lighting are most important: Long story short, you can’t take a good photo of your notes if the composition and lighting aren’t there. Take a look through the most popular photo posts and you’ll see what I mean: it doesn’t matter what the actual content of the photo is, just that it looks nice overall. Again, this is a case of what kind of a look you’re going for: some posts will have this super clean, neat look with no shadows, and other will tactfully play with the shadows for a different kind of image. However, if the shadows in the picture don’t match the aesthetic you’re going for, or you try and edit them out after taking the photos, I can guarantee this is a recipe for disaster.
- Edit, but don’t overedit: Everyone with a studyblr edits their photos. I personally use a combination of VCSO and Snapseed, and have been doing this for a while, but even then I often make errors in judgement about filter strength and editing, and sometimes my photos end up looking overprocessed and frankly unattractive. I have 11.5k followers, and even now I get posts with 0 reblogs because my photo editing has been so bad. It happens (and the posts get deleted once I realise), and that’s just something you just gotta keep trying at.
- Be inspired by others: See something that you like that someone else is doing? There’s no harm in trying to recreate something similar yourself, as long as you’re not plagiarising or downright stealing.
- Regularity is important, but you are more important: Obviously, uploading and/or reblogging content regularly is important to your blog. However, it’s a studyblr, and if you find that it’s getting in the way of doing actual work, there’s no harm in taking a break. I rarely upload during term time, or even in the holidays, because I’m so busy trying to get my actual life sorted and enjoying my university experience. For me, I worked the most on my studyblr last summer after I finished my A-Levels, and that’s when I experienced the most growth through very regular uploads (and since everyone else was also on their summer break, they had more time to spend on tumblr and see my content). From there, it’s just been growing by itself, and it’s almost 10x as big as it was in January of 2018. Don’t feel pressured to dedicate loads of time to producing content if you simply don’t have the time. If you’re a studyblr who reblogs rather than produces content, it’s always possible to just queue up stuff so it’s released regularly whilst you are working.
- Stick at it: It took me over two years to experience any real growth, and by that time I’d poured many hours of work into it. Growth doesn’t come overnight, and no matter how hard you work, you’ve gotta keep working. My first text posts got 10k notes and that did almost nothing to my follower count. Keep going and it will happen, and when this happens, you’ll be able to reach out to more people, directly and indirectly, and it becomes an even more rewarding experience.
I hope this helps some of you, and as always, you can access my Redbubble store here, and if you think what I’m doing is kind of cool (and want to request content that becomes top of my priority list/support what I do), you can find my ko-fi link here (it’s like patreon but they don’t take commission).
Post link

ONE YEAR WITH A MOLESKINE BULLET JOURNAL || MY IMPRESSIONS AND HOW MY NEXT BULLET JOURNAL WILL BE DIFFERENT
Hey guys! It’s been a while- I’ve been swamped in exams and various things after, but I’m back now! Also, a little disclaimer: sorry about the lighting and the background in the pictures here- I’m currently working at my summer job helping to edit the translation of a book, and I don’t have access to my usual lighting and background conditions, but without further ado, let’s get into it!
I’m going to go through a bit of what I thought about the bullet journal I used this year, and then talk a little about what I’m going to change for this coming year based on the experience that I had this year.
Bullet Journal: July 2018 to June 2019
(Side note- I run my bullet journal in these months as it covers a summer and an academic year, which gives me time to set a journal up over summer and record my experiences without having to switch journal right in the middle of an academic year)

So, the notebook that I was using this year in order to make my bullet journal was a blue, lined A5 softcover Moleskine notebook that someone gave to me as a present for the express purpose of making a bullet journal. I wasn’t super hot on the idea of using this notebook for this purpose initially, because I was more keen on the idea of buying a Leuchtturm dotted 1917 for this purpose, but I thought I’d give it a go anyway. Besides, I quite liked the feel of the softcover notebook and this way I didn’t have to buy any more supplies to get myself started.
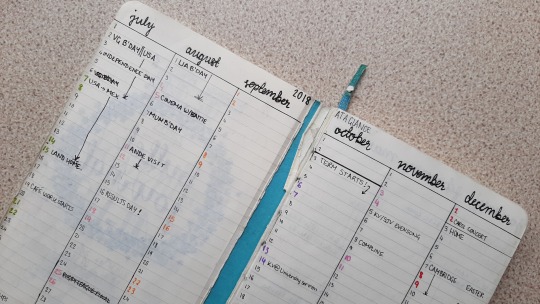
The notebook itself was nice, and the quality of paper was alright: there was a bit of ghosting as you can see in the picture above (the ink from other pages can be seen but it has not bled through). My main issue with this notebook, however, was the fact that over the course of the year, the actual structural integrity was damaged, and the cover came detached from the spine and the bookmark ribbon soon followed, as you can see above. This was mostly due to the fact that the book was softcover and therefore possibly more likely to get damaged, but on the whole the rest of the notebook stayed together quite well.
One thing I did really like about how I did the bullet journal this year, partially prompted by the fact that there were lines rather than dots in the notebook, was the space I left for reflecting and doing actual journally things in the notebook. I experimented a bit with art journal things as well on a couple of pages (but those pages have too many personal details and photos on to be worth sharing), and I really like the way that I could record my experience of my first year at uni in a space that also served a functional purpose for managing my expenses and my daily tasks and events. If you take a look at previous bullet journal posts I’ve made, you can see my weekly spreads, which are a very traditional calendar layout, and that system worked for me as I needed an easy setup that I could lay out quickly.

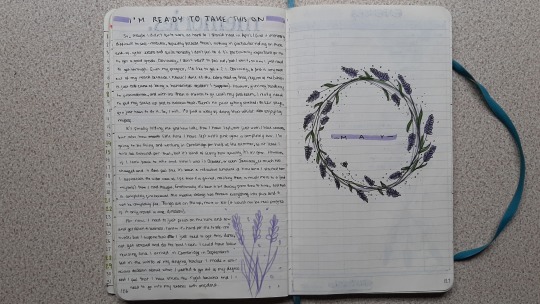
I messed around a lot with the front section of my months: here’s what my spread looked like in July (with my spending more or less blurred out). I like the inspirational quotes, although towards the end of this year I found it hard to keep coming up with new quotes. I quickly lost my “things to be excited about” and “things I am not looking forward to but will conquer nonetheless” boxes because although they were a nice thought, the content was sort of covered in the reflection at the start of each month, and they were taking up room where I needed to record my spending. I also stopped using the habit trackers that I laid out (which took me ages but oh well) because I found that they weren’t particularly useful for me personally. Going forward, I’m keeping the spending section, and I’m replacing the whole right hand page of this spread with a “line-a-day” section, which I introduced in November of 2018 and I found it to be a really good way of keeping track of the important things that I’ve been doing and experiences I’ve been having without taking up masses of my time.
With regards to the notebook, I left a lot of pages blank at the back, which was a shame, especially because I could have spent at least some time writing longer actual journal entries about particularly important events and travels and things, but there realistically weren’t that many pages that were left blank, so it might have been a bit odd. The book was also a bit too narrow for my liking, but that’s sort of by the by. As you can see in the bottom of the pages in the above pictures, I put page numbers in as I thought I should do that when I was first setting this up, but in reality this really did nothing and I’m not going to bother adding page numbers to bullet journals where the notebooks don’t already provide them).
In summary:
- The notebook was ok, but I didn’t like how narrow it was, and the fact that it was softcover meant that it was more susceptible to damage and did get damaged
- Having lines wasn’t hugely problematic, although for the art pages I’d rather have a dot grid. It did let me do some more proper journalling, which I realise I want to do more of in the coming year.
- The habit trackers were really just a waste of time for me in the end
- There are spreads that will stay, like the year at a glance spreads as well as the layout of the weekly spreads as being similar to those of a traditional planner
Bullet Journal- July 2019 to June 2020
I’ve opted this time around for a Leuchtturm 1917 hard cover journal with dotted pages, which is the typical bullet journal notebook, and I can see why. Hopefully the hard cover means it won’t get as beaten up, and the pages are just that bit wider, which allows me to make spreads that look more like planner pages rather than just decorated pages in a notebook. The dot grid has also meant that I’m more comfortable with going a bit further with the art side of things (partly aesthetic, partly stress relief) so get excited for some really funky spreads. I’ve kept the expenses and line-a-day format for the beginning of each month, as well as the full-page monthly reflection that I started in the Moleskine. Because the Leuchtturm has far more pages, I won’t have to compromise on space like I did in the moleskine (outside of term time I had one week to a page instead of across two for space reasons), and there will still be plenty more empty pages left over, which hopefully means I can fit in some proper journal entries. To make a long story short, this upcoming journal is equally as functional for me, but will also be more effective at recording memories as I go into my second year of university.
I’ll have some posts with my latest spreads ready for the start of July, but until I post those on the first, I hope this post was vaguely useful, and as always, you can support what I do below:
http://ko-fi.com/studylikeyoumeanit
https://www.redbubble.com/people/stdylikeumeanit?asc=u
(pls help a poor broke student out)
See you soon for some more content (I promise I’m back now guys)
Post link
I’ve been feeling a little bored with my planner lately, so I thought I’d shake things up a bit with a mid-year planner makeover! join me as I play around with pretty stationery including a stunning Notiq cover and some other fun goodies!

After Hurricane Sandy hit the North East coast, Jackie Mangiolino, the Long Island creative behind Believe Notes, rallied together a group of independent designers to contribute original art work to sell with all proceeds (aside from shipping and transaction fees) benefiting the American Red Cross Disaster Relief. Designers Care is non-profit project reaching out to raise funds to help those in need through inspiration and good design!

Our design for peace after the storm was inspired by the “Unity” and support shown in hopes of uplifting the communities devastated. Please visit Designers Care shop to mix & match a variety of beautifully crafted one of a kind items for a worthy cause. Hand stamped and available on white, black or kraft paper, in black, gold or silver metallic inks. (Click here to view)


It is National Stickers Day so you know what that means? If you buy 4 or more stickers set in my #etsy shop, you’ll receive two mystery sets ✨ As usual, you can also use the code IGFRIENDS to get 10% off ☺️ Enjoy! {snailmailloveshop.etsy.com or direct link in my bio!} via Instagram http://ift.tt/1RDl6kJ
Post link

I finally felt good enough to go at the post office today and I’ve sent all the letters accumulated last month Hope they reach you all soon! ✨ via Instagram http://ift.tt/1UJh9Za
Post link

Little illustrations I’ve made last year all inspired by some of the beautiful pictures I see everyday here in my feed via Instagram http://ift.tt/1PP8nHV
Post link

Spending the first few days of January in bed with a cold isn’t the best way to start the new year but reading and drawing colourful flowers help me keeping my morale high ✨ Have a good week everyone! ☺️ via Instagram http://ift.tt/1R7fSxa
Post link

Happy New Year, you lovely people! Here’s to a year full of creativity and happiness, and of course lots of wonderful letters ❤️ via Instagram http://ift.tt/1SpauEQ
Post link

Does anyone else enjoy drawing on scrap pieces of paper? ✏️ via Instagram http://ift.tt/1QLAkDr
Post link

Today on the blog a super easy tutorial on how to make your own wrapping paper in 3 easy steps ✨ {see more at snailmaillove.com or use the direct link in my bio} via Instagram http://ift.tt/1IUQWGi
Post link