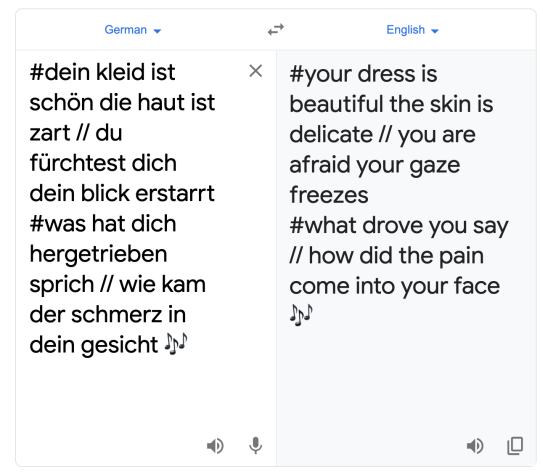
:(((((( tags left by @galsinspace. thank you. i dont speak german but I translated it (?) and i love this so much. it fits so well.. Schrei es in die WindeSong by Faun.
The translation is accurate! @stardatewow connected this song with Wei Wuxian in the Burial Mounds, it tells the story of a girl cast out from society running away into the woods. She got cast out for doing something no one wanted to understand, and she’s scared alone in the woods but swears to come back and take revenge on all those who wronged her. The title means “scream it into the winds” and the whole song sounds like the forest talking to her, soothing her, understanding her, and promising her power.
So stardatewow said it’s the Burial Mounds talking to Wei Wuxian, and I agree! I’m glad you like it, the painting is already so beautiful!! ♡
WOW. Yeah. Okay, thats so accurate. Thank you for sharing this with me!! I think the line that resonates with me the most is the second line, “you are afraid, your gaze freezes”. For Wei Wuxian whose expressions are constantly changing, to play into those around him, flirt, admonish, etc., he is frozen with fear in the burial mounds, completely surrounded in it. It’s so haunting. I cry every time I watch it and having words that go with it so perfectly really makes my heart ache. Heres a link to the song mentioned above.
You’re so right wow, Wei Wuxian is constantly playing around and charming people and it’s such a stark contrast to how alone and stripped of all that he is in the Burial Mounds.
I looked for a translation of the whole song just now but couldn’t find one I really liked. So I whipped one up real quick, under the cut!
Well, this was an easy-to-edit chapter to the point that it only took me as long as a half-chapter to edit. But that means the translation is out that much earlier!
Next chapter is out 7/6/22, and will likely be back to half-chapters again.
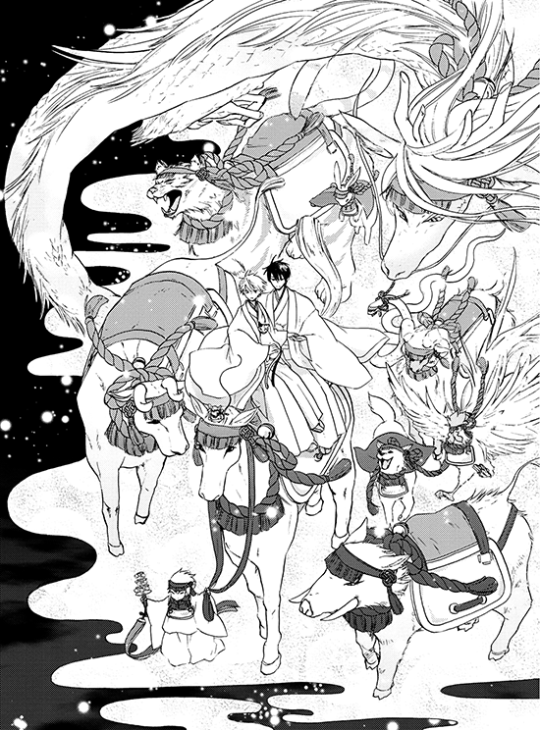
I’ve finally reached the end of Eto Irokoi Zoushi!! It took me over a year so I’m going to celebrate with staring at one of my favorite pages of Chapter 12 XD;
Please do not repost/reuse my links anywhere else!
Thanks to everyone who stuck with me thru these 3 volumes! I seriously adore these characters so I hope you all did too! Their relationship is beautiful XD
As I said before, I will be taking some time to go back and fix older chapters before I go on to start working on the sequel. Honestly, I would like to try to get Afureru Namida finished before that too, but we’ll see since it’s entering busy season for my office.
If you’ve noticed any mistakes/discrepancies/etc throughout the series, please point them out to me so I can fix them! Thank you!
Next up will be Futari no Lion Chapter 3 but I’m only done with 6/32 pages XD; I’m bringing my surface with me to Japan so I might work on it on the flight tomorrow, but catching up on sleep sounds good too…
Admins note: A translation from any followers would be helpful!
This is a rather quick translation, sorry if it sounds a bit off
An advice on complexion*
usually, when we talk about “thick painting”, it is often explained as a technique that allows - as shown here - to add tridimensionality to drawings by using 1) a main skin color and 2) darker colors (shadows). However, this technique, when used by itself, may give a sort of inorganic impression, akin to porcelain (tn: rather than flash).
You can achieve a more lively look (lit: the impression comes alive) just by adding a complexion tone on the bridge of nose, the cheeks and the lips. You can gradually get confident with this method by starting to apply little by little a “blush” color on a new layer with 70% opacity.
Side images:
Don’t overdo it!
You can add the finishing touch with an overlay.
*(the two kanji on the title literally read “blood color”. they refer - most likely - to the reddish tone of the skin in areas with more blood vase like the lips or the cheeks. I dunno if there is an english word for it) The last sentence is kinda wired, so aside from the 70% bit the part about getting used to this technique was a bit freehanded.
A simple coloring tutorial from my privious work.I used paint tool Sai, but you could try same technique while using Photoshop. If you want more detailed description,please check My WMA page!. Hope it would be some help for you!
Admins note: A translation from any followers would be much appreciated!
Translation time!
Image:
I work with separated layers for the hair, the hair shadows, the line, the eyes’ shadows, and the highlight of the lips.
1) undercoat 2) Gradation coat I-(1) (in blue, on the forehead: dropping pipet (probably) (in blue, on the neck: put and mix evenly) coat I-(2) (in purple: dropping pipet) ↓ 3) Coat I coat II-(1) coat II-(2) ↓ 4) Coat II 5) Put the complexion, and you’re done
Description: It’s the simplified making of the image I posted before on work process - painting the skin of a girl (thick paint)(JP). (I completely forgot to post it ; ;) The settings of my brushes on Sai, together with my layers configuration, have been made available on Pixiv! If it could become helpful for anything, I’d be delighted!