#model kit


Yotsuba&! - Koiwai Yotsuba (Kotobukiya)
Yotsuba&! - Koiwai Yotsuba (Kotobukiya)
Just some old photos that I run into while cleaning up some junks in my laptop. (。◝‿◜。)
Yotsuba&! – Koiwai Yotsuba (Kotobukiya) Model Kit
Continue reading


HG Astaroth complete had to do a lot of seamline work and hand painting to get looking good
Post link
")
")
")
")
")


Soooo I forgot to post some pictures of my greatest fabric masterpiece. Was joking with @knighttimeart at TFCon about how Optimus is absolutely the type of guy to be a grill dad with a funny apron, and, well, I just had to make one. Some of my model kit mecha got to dress up all pretty before I sent it to him, and Megatron was even showing off the big pocket. I’m glad it didn’t get lost in the mail, I think I would’ve cried if it had.

I got a new photo set up and took some proper pictures of these two amazing resin kits.

I got this finished right before the new Bulldog model kit was announced, weird coincidence.

I based the appearance off of the one you can see at the start of the first movie.

One detail of the general purpose labors I’ve always loved was the warning stripes and I’m super happy with how they came out.

I love this model kit~

I based the colouring off of the OVA episode that these first appeared in. If I ever see another one available I’ll definitely get it and paint it all gold and give it a flower tattoo on the shoulder…

I wasn’t too happy with how it was coming out at first but it all came together at the end and I love it now.

I love the backwards bent legs, strangely the ones in the OVA don’t have backwards legs…

I very nearly skipped over getting this kit for some reason. Glad I didn’t. :)

I like the Schaft logo so much, it’s so silly.
I’ve run out of kits I’m not saving for customs, and I haven’t bought anyt")
I’ve run out of kits I’m not saving for customs, and I haven’t bought anyt")
I’ve run out of kits I’m not saving for customs, and I haven’t bought anyt")
I’ve run out of kits I’m not saving for customs, and I haven’t bought anyt")
I’ve run out of kits I’m not saving for customs, and I haven’t bought anyt")
I’ve run out of kits I’m not saving for customs, and I haven’t bought anyt")
I’ve run out of kits I’m not saving for customs, and I haven’t bought anyt")
I’ve run out of kits I’m not saving for customs, and I haven’t bought anyt")
I’ve run out of kits I’m not saving for customs, and I haven’t bought anyt")
I’ve run out of kits I’m not saving for customs, and I haven’t bought anyt")
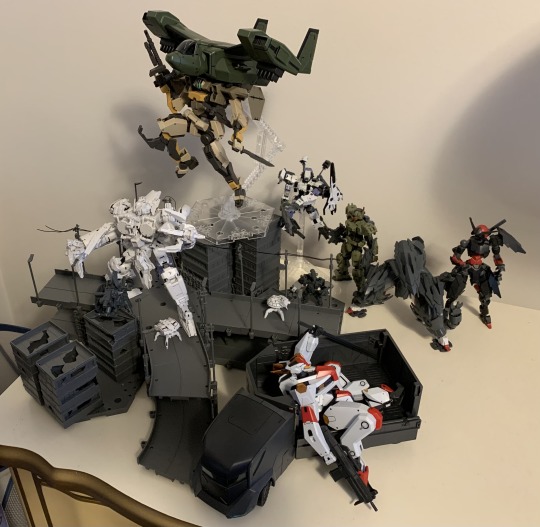
RX-80WR White Rider (ZEUS)
I’ve run out of kits I’m not saving for customs, and I haven’t bought anything P-Bandai in a while, so I tracked down one of the designs I really liked. I know there were other I was into, but this was the only one that immediately came to mind. If you don’t recognize the White Rider, it’s one of the two prototype units for the Pale Rider introduced in the recent game MSG Battle Operation Code Fairy. It certainly does stand out, with the crown, cape, and heavy crossbow. You can easily tell the design came first and they had to create lore to justify it all later.
The Good: Never built the Pale Rider, but this is a pretty good kit. Good range of posability, full accessory storage, some interesting gimmicks, and some cool use of new parts, such as only the right outer arm being new to accommodate the Prototype Shekinah. The cape and Shekinah also balance each other well, so there’s no stability issues.
The Bad: The Shekinah is a completely new piece, and it’s transformation requires quite a bit of prying things apart. It probably wouldn’t be too hard to have designed it to be fully transforming, especially since the barrel does that already.
Last complaint is the stickers, which there are a lot of. This can happen when you’re trying to add new details to an older kit, and granted it comes with doubles of some since you can display it with or without the ZEUS System active.
The Details: And I didn’t use any of them. I did basic panel lining and black fill in recessed areas, and metallic red for optics and the like as I chose to display it with ZEUS active. In addition, I added gold anywhere the stickers said to add it or yellow, and a few more spots on the Shekinah, ankles, and a few miscellaneous other areas. I also added silver to the chest vents, cape, and the top of the Shekinah.
I considered painting the Heat Rapier as if it was active, but as its main weapon is the Shekinah, I wasn’t sure how often I was going to have it out.
Overall, this was a good kit, with a very fun design and main weapon. Don’t know if I’d suggest tracking it down unless you really dig its aesthetics like I do, but if that’s why you want you won’t be disappointed. I did consider, and may still, track down its brother, the Black Rider, but I’m not in the mood to build the same kit twice in a row. Maybe some day.

Post link


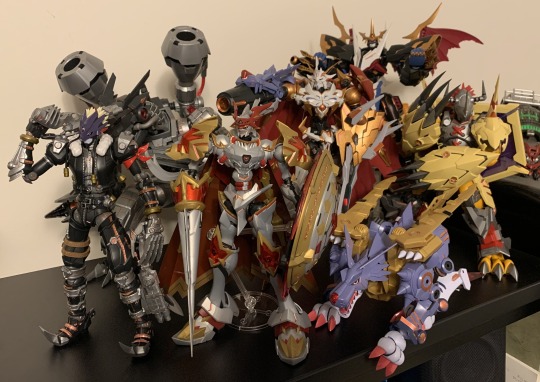
चढ़ा हुआ बंदर Chanda Hua Gundam
I had no idea what I was doing when I started working on this one. I knew I wanted to mix parts from the Kanzenkoou Wukong and Qitian Dasheng Wukong, but that was about it. It ended up being mostly Kanzenkoou parts, with a few extra parts from Qitian and my original Wukong being thrown in, but it still looks good because of how much I painted it.
Honestly, I bought Kanzenkoou, didn’t want to straight build it, and did this instead. *Shrugs*
The Details: As I said before, this build is essentially Kanzenkoou Wukong, with Qitian Dasheng Wukong’s back piece and hip and back skirts to further increase its bulk, and a second tail from the straight Wukong I built before to change up its silhouette.
The backs of the shoulder pads have ports in them so you can store one of the pieces from Sha Wujing Silhouette, and that’s where I chose to store the tails, which I usually display in an arc to give it that nice Stargazer look.
As for colors, it ended up just being black and gold this time. I tried using bronze as well, but it was so similar to the gold I was using that it was nigh indistinguishable unless you really squinted. I also painted the eyes and tongue of the ape face red, and the teeth white to try and visually distinguish that as the face rather than the SD one.
Overall, for not having a clear picture, just the unified, simpler color scheme gives this kit a very different feel, and the tails helped a lot as well. I’ve got a few more planned customs I’m saving kits for, but I’ll have to wait for those backorders to fill before I know what I’m tackling next.
Post link


Figure-rise Standard Magnamon
First time handling one of Digimon’s Figure-rise Standard releases, and they’re pretty interesting. Very different from Amplified.Amplifiedare very complicated, detailed kits that have a heavy focus on articulation and gimmick. FRS on the other hand are much more simple. Still good layering, but more basic posability and focus on screen accuracy over even the original design. I wouldn’t be upset if they did Shoutmon X4 in this style, but if I had to choose, I’d rather they did an Amplifiedrelease as I feel they’d do the gimmick better justice, and there would be a higher chance of integrating future releases for things like X5 or X7. Though, we haven’t seen anything from this line past both this and Beelzebumon, so who knows what the future holds?
The Good: This was a fun one-day build. Good, but simple parts layering. Decent posability. Excellent representation of his/her depiction in the anime (depending on continuity). Had a great time with this one.
The Bad: If you’re used to Amplified, the articulation is definitely not as good. Also, what you see is what you get; no accessories, gimmicks, even extra hands. Not a terrible thing, but good to know.
The Details: I replaced all the stickers on this one: painted the eyes red and black, the belt bolts and ankle pipes silver, and the thumb nails white. I also panel lined all the available areas, as well as filled all the thrusters in with black, and added some shading to the muscles to give them more definition.
Overall, a fun Digimonkit, and a simple one if you find the more complex releases from Amplifiedto be intimidating. If you’re already used to Amplified, it might be a bit of a disappointment in comparison, but I still found it to be a nice way to spend the afternoon.
Post link


NA12 Brady Hound + V-33 Stork Carrier
Last of the Kyoukai Senki kits I had on order. Kinda wanted to get the V2 of the black boss unit, but could never find one on sale. I actually really like the designs from this series; they’re very modern and different from a lot of other Real Mech shows we get, and I enjoy that. I’d be very curious to see the designer(s) for this series do other stuff, like I’d love to see how they’d do a Gundam and how different it would be from, say, G40 which was created to be very realistic, or even Senkiitself since all its units are terrestrial and not space fairing.
The Good: These were very fun builds. The Brady Hound does a few things that surprised me and there was a lot of cool parts usage. It’s also very posable despite how weird its shoulders appear at first. It also comes with a swappable ‘off’ head.
The Stork Carrier was also fun. Definitely more simple than the APC, but has a few neat features to it, and a much more involved gimmick with how it tows the Brady Hound around.
It also comes with a few new accessories; a pair of shoulder mounted shields with small firearms inside, a pair of small automatic weapons, and a storage backpack. I would like to have upgraded my Kenbu with them, but they’re designed to be used with a specific kit, so I ended up not assembling them.
The Bad: The Brady Hound’s shoulders take a lot of force to assemble, and should be flush to the flight units. If you’re not careful, or don’t push them in all the way, you can easily stress the insides. And those shoulders do fall apart more frequently than I’d like, whether it be the winglets falling or armor popping off. The head’s also a little loose, but weirdly hard to swap out.
Similar to the APC, the Stork is just a giant accessory, but while the APC can be used with multiple kits and its additional part can as well, the Stork can only be used with the Brady Hound, and its new shoulder shields are also meant to be used with one specific kit.
The Details: Like the other Senkikits, not a ton of details to be added here. Just panel lining, fill, and optics (metallic green). Same with the Stork, except with a lot more fill and no optics. I did paint the edges of the wings (originally stickers) black, and the tips of its hidden missiles white and red.
Overall, the Brady is a good kit and good design. The Stork is also good, but definitely more passable since it’s just an accessory. If you’re a fan of MS like the Zaku, I think you might dig this one. While I do like the Bunyip more, this is a bit more traditional in design, which more people might appreciate.
Post link


KXK00-M Crossmessiah
I don’t have a ton of history with Medabots/Medarot. I watched a bit of the show as a kid, and I had one of the GBAgames, but little more than that. I will say, though, that Medabotshad a lot of really clever ideas, like Mr. Referee or Space Metafighter X. I also occasionally just like perusing the more recent designs they’ve done, because they’re all really cool. Crossmessiah is one of those more recent designs from the mobile game, and a kit I grabbed because I think it’s neat.
The Good: From the few Kotobukiyakits I’ve handled, this keeps up the trend I’ve come to expect from them: a relatively simple kit with great attention to detail. This kit is designed to look good, and it is spot on to the design it emulates. Every gap has a detailed filler piece, every minor detail well crafted, parts swapping is easy and non-intrusive. It is very well designed.
And can I talk about how crazy this thing’s weapons are? I haven’t kept up with the series too much, but it technically houses 6 very versatile weapons, capable of both basic and heavy beam fire, missiles, blade and piercing attacks, and a crushing claw. A high firepower all-rounder fitting the first mix of the typical Kabuto and Kuwagata themes.

The Bad: Posability is entirely polycap balljoints, and ranges don’t really exceed 90°. You can still get it into plenty of poses, but be aware. And this is probably just Bandaispoiling me, but I do wish the left claw and head fins were jointed instead of being swappable parts. I can understand for the right arm since it has so many opening panels, but I can easily imagine how you could do so for the other pieces without sacrificing much if anything.
The Details: Not a lot to be done here. I did some panel lining where applicable, and added some black to a few interior areas, like the right shoulder, cannon barrels, and along the edges of the extended weapons.
I did want to paint the medal in the back gold, but it’s almost impossible to get out after putting it in >_>
Overall, a decent kit with a great deign. If you like Gunpla it might be a bit simple in comparison, but I don’t think there’s anything wrong with trying a different construction philosophy every now and again.
Post link
I think Beelzebumon was a good choice. Even")
I think Beelzebumon was a good choice. Even")
I think Beelzebumon was a good choice. Even")
I think Beelzebumon was a good choice. Even")
I think Beelzebumon was a good choice. Even")
I think Beelzebumon was a good choice. Even")
I think Beelzebumon was a good choice. Even")
I think Beelzebumon was a good choice. Even")
I think Beelzebumon was a good choice. Even")
I think Beelzebumon was a good choice. Even")
Figure-rise Standard Beelzebumon / Beelzemon (Amplified)
I think Beelzebumon was a good choice. Even if he had a turnaround, he was an antagonist for most of Tamers, and the only other villain we have (not counting repaints) is Mugendramon. He also has a much different silhouette, being a lot sleeker than everyone else in the line, unencumbered by the capes and wings and shoulder pads of its linemates. Also, he’s really popular; popular enough to be brought back in Xros Wars (BTW, Shoutmon X4 please). I’ve also talked to several women over the years who claim Beelzebumon to be their favorite Digimon, and I think that’s important, too. Digimon is a franchise normally targeted to boys, so picking a Digimon that’s known to be popular across the gender spectrum is just a good marketing choice and makes more people happy.
The Good: Fantastic build. Lots of cool parts layering, interesting engineering, and a lot of neat asymmetry. There’s also some wire work going on, which adds a lot of flexibility to posing and helps easily convey motion.
Speaking of posability, it’s good, if a little tough to adjust some of the universal joints. Drop hips, double joints, good wrists. Those wrists in particular are helpful when posing his pistols, as they’re slightly angled.
He also has those custom ports on his legs, and if you remove his… exhaust pipes(?) you can do a few things with his back.
The Bad: While I didn’t have too much trouble balancing him, Beelzebumon has smaller feet and quite a few things jutting off his back, which means you can’t just set him down and expect him to stand, though that’s kind of a through-line for all of Amplified.
Speaking of things on his back, the tail, while an interesting idea, has problems. Even though the instructions claim you don’t have to cut the wire, I had to resize it to remove any gaps between pieces. Also, every time I adjust it I have to push the tip back in since it’s held on by friction while everything else is loose. While it would have been a little more frustrating to build, I kind of wish both ends were clamped in and each tail segment was two pieces clipped around the wire, instead of one.
Also, he is very pointy. It hurts to have hair that nice.
The Details: I continued to use metallic red panel lining throughout this kit, as I have with the rest of the Amplifiedreleases, but I also used a bit of black for his lips and in all the closed zippers and scarf to give them more definition.
As for added color, I painted the eyes and feathers on his head (which were originally stickers), as well as added some black around the eyes to make them look more natural, and around the edges of his mask(?) to give it a sharper appearance. I also filled his exhaust pipes(?), inner belt buckles, and pistol barrels with black. Then, I painted his actual buckles (jacket, waist, and right leg) silver as well as his open jacket zipper (only his jacket buckles had stickers).
Overall, this is a fun kit. A solid, interesting build with decent posability and negligible problems. Also, Beelzebumon is still probably the Digimon with the most complex and interesting character development of any in the canon, and that’s very cool and also sad because it’s been 21 years.
Post link


ASC-716E Armored Special Carrier
I built a model car, dad; are you proud of me yet!?
Jokes and my probably 200+ model robot pedigree aside, I don’t build a lot of vehicles. I remember building a red car someone bought me as a kid, and I built the Ikaruga, even if it isn’t a traditional one, but that’s it. The process of building a robot is more fun for me, as there’s a lot of complex joints, and gimmicks, and more to do with it when you’re finished than set it up for display. That being said, this was an interesting change of pace, and sometimes throwing together a simpler model in a few hours can be more enjoyable than the long, complicated process of some other kits.
The Good: Simplicity in construction says nothing of detail. The ASC has a number of fun details, such as the displayable interior, its side and back doors lining up with both the internal staircase and trailer door, as well as a good deal of surface detail.
It also has a lot of clever engineering, such as a very simple axle that turns the front wheels in tandem, both sides of the trailer are able to naturally drop without deconstructing them, and it has a sliding armored section to cover the cab. If you buy two, you can also attach both trailers together, or endlessly if your wallet is as bottomless.
It also comes with a new arm unit. It’s meant for the Kenbu, but because it comes in white you can technically swap it between several of the AMAIMs. It’s also ambidextrous, if you happen to have two for above mentioned reasons.
The Bad: While it’s neat, it’s a large accessory, and not much else. Without any of the AMAIMS it’s just a car, and even if you like model cars, I don’t know how much you’d enjoy a fictitious one.
The Details: Panel lining and a few metallic red highlights where some of the headlights would be. I did end up using the front headlight stickers because of their complexity in a small space. When applying them, do it from the back as to not fill the hole meant for the translucent plastic.
Overall, despite being surprisingly enjoyable, this is just a large accessory, and not something that should be purchased on its own. Still, it’s neat, and if you like the AMAIMS, this is a fun piece to go along with them.
Post link


JMF-1337B Blazing Gundam
The God Gundam. The name they can’t use in the US, but was the titular Gundam of its own series. It is typically referred to as the Burning Gundam, but the instruction manual for this kit refers to it as the “G Gundam,” which I don’t think is a bad choice, but it is odd, especially considering the name “Blazing Gundam” is definitely in reference to that colloquialized name.
Also, fun fact, the Build Burning and Try Burning Gundam were named without knowing that the God Gundam had its name changed in other territories. Further adding to the strangeness of the God’s legacy.
The Good: This figure looks really good. It reuses a lot of parts from the old God Gundam kit, but changes just enough minor details to look like it’s own unit rather than a repaint of an older one. It also has quite a few melee accessories, and a much more wieldy expanding parts gimmick compared to the Helios and Livelance.

The Bad: What holds this kit back is the very old God Gundam kit it’s based on. Tons of polycaps, not that great articulation, and it’s Beam effects are supposed to be used on both the tonfa and sabers, but get jammed in both very easily (I nearly tore them trying to get them out).
I know it goes against the theme, but this really should have been a completely original kit. Reusing old runners is what hampers it more than anything, as everything new is very cool, but what isnew is just aesthetic and weapons.
The Details: This is a very simple kit, and as such only really required black panel lining and black fill, with metallic green eyes. Most of the important fill details have stickers, as well, so don’t feel like picking up a paintbrush is too essential to get it to look good.
Overall, it’s perfectly fine, and looks good, but suffers heavily from being built upon a very old kit. If you care more about appearances than posability, it’s perfectly fine, and even then you can still get a few good poses out of it, but you’re missing out on the fun of martial arts poses. Definitely the weakest of the three I’ve handled, but still not terrible.
Also it’s call tag is dumb, but I don’t think anyone else cares.
Post link


XXXG-01L2 Gundam Livelance Heaven
This was an oddly hard model to photograph. When taking photos, you don’t want there to be a ton of negative space, and that can be an issue when what you’re photographing is long and slender. Pole arms fall into that category, and the fact that the Livelance comes with a very long beam effect doesn’t help. I only photographed it at full length four times (three of which were in Scythe Mode), and ended up cutting off the end of it in three of those to keep a balanced composition, with the only exception being held incorrectly in order to fit it in frame. I suppose I could have had it lancing another unit to fill that space in, but that might have also taken focus away from the Livelance. Tricky business, it is.
The Good: This is a fairly posable kit, with a lot of extra joints; a sliding shoulder joint, an extra waist joint, and the knees are detachable to increase their range. That extra range is very helpful since it’s using a two-handed weapon, and can achieve a decent number of poses that utilize it effectively. It also has bent-wrist holding-things-hands to help with that as well.
Also, while the Helios had a ton of new parts, the Livelance is a good example of reuse of old parts, with very few extra parts in comparison. It even took me a day or so after its reveal to figure out what it was based on, and the pun in the name, which is a sign of a good revision.
The Bad: One of the advertised gimmicks is swapping parts between kits, but since the Freedom and Deathscythe are from different lines, there’s some looseness that makes it not really work. Also, since it reuses parts, there’s some stickered detail that isn’t sculpted.
Biggest issue is the pearlescent white isn’t great. Especially on the head, I had several issues of marring, staining, and cracks formed just by piecing things together, so be vary careful when assembling specifically the head.
Also, would have liked it if the cape had a lock when not active.
The Details: Apart from the black panel lines and fill, I added a number of metallic blue details (some of which replaced stickers) to the head, shoulders, scythe, and the front of the cape, as well as under the translucent blue on the forearms to embolden the color choice while retaining the details, unlike what I did with the Helios where it was directly under the plastic. I also added some yellow paint to the front and back of the back skirt, and to the inside of the cape (where the aforementioned missing detail was).
Overall, I like this kit, and if the other recent Wing kits are anything like it, I might have to try them out. But it’s also very creative in its own right, and makes me excited for the other Breakers kits I plan on building in the future.
Post link
I feel like a very obvious Digimon t")
I feel like a very obvious Digimon t")
I feel like a very obvious Digimon t")
I feel like a very obvious Digimon t")
I feel like a very obvious Digimon t")
I feel like a very obvious Digimon t")
I feel like a very obvious Digimon t")
I feel like a very obvious Digimon t")
I feel like a very obvious Digimon t")
I feel like a very obvious Digimon t")
Figure-rise Standard Omegamon X-Antibody / Omnimon X (Amplified)
I feel like a very obvious Digimon to do next, that we probably won’t get, is Sakuyamon. We just got Dukemon and Beelzebumon, so we’re currently doing Tamers, we don’t have any female designs in the line yet (which are apparently popular considering how many MS Girls they’ve done recently), and Renamon is one of the most poplar Digimon period. Feels like a no-brainer. The issue with doing Sakuyamon is it’s almost an obligation to do SaintGargomon to complete the set, who is canonically enormous. Also, I’ll say again and again, I want combining Shoutmon X4 or X7. Those designs need some proper toy love.
Most likely we’ll actually get something like Diablmon/Diaboromon or Alphamon.
The Good: Big, very posable, very solid. This was a very fun build from a construction perspective. In particular, I really liked the chest, sword, and cape. They all had interesting elements to them, such as the parts layering or the sticker usage.
It also comes with a ton of adapters so you can attach parts from the previous kits to him: • WarGreymon’s wings in place of the cape using his own adapter. • MetalGarurumon’s wings (in one of two forms) in place of the GreySword using an included adapter and his missiles in one of the knee ports. • Imperialdramon’s cannon in one of the knee ports. • Dukemon’s lance in place of the GaruruCannon using an included adapter and his shield in place of the cape using an included adapter. • Mugendramon’s cannons (entire unit) in place of the cape (no adapter) or (just cannons) to the back of the waist using an included adapter. It’s a lot of customization that I’m not entirely sure what to do with. But it’s cool, though.

The Bad: While it doesn’t impede his posability, he is very pointy and stuff can bump into each other. Also, particularly with his arms, they have a lot of range, but it’s very awkward to adjust the black parts of his arms and sometimes the shoulders, especially with how large his “hands” are and how those particular joints work.
Also, as predicted, while the sculpting is all new it borrows a lot from Dukemon.
The Details: So, as always, I did the bit of panel lining this kit had in metallic red to emulate Children’s War Game. This kit also had a number of metallic green stickers, but since I was doing the red I replaced them with metallic red paint to bring the look together. There were also 3 translucent green parts that I repainted as well.

I spent way too much time detailing the bottom of the feet, which no one will ever see, including myself.
I redid all the gold plastic with paint, and added a few extra details around the chest, waist, and ankles. Apart from that, there were a few small areas where I added black (collar, hands, crotch, knees, feet, cape harness), and I repainted the eyes instead of stickering them.
Overall, I think this is a very interesting kit. The level of proposed customization is a cool touch, though I don’t know if I will take advantage of it myself, but apart from that it’s just a very solid kit.

Post link


XZM-FE05 Hundred Edge
I have been waiting for this kit to come out since it was revealed in February of 2020. The Hundred is very heavily tied into the history of Gundamfan works, and seeing it physically in front of me is this really… intense feeling? I don’t really know how to describe it.
If you don’t know the Hundred’s history, back in 2009 the circle Kuramochi Zukan released the first in a multi-series work chronicling a fictitious Gundam series that took place in 1997 called “Gundam Beast,” and later “GUNM Beast,” possibly to avoid copyright. The Gundam Hundred was their equivalent to the X or Exia. So 10ish years later, now as Kuramochi Kyoryu, and in conjunction with several other groups, they’ve released the first in their Code Beast model kit line. And after handing the Hundred Edge, I’m really excited to see what else they’re going to release down the line.

The Good: This is a very well designed and solid kit. I went pretty light on the detail work on this one (because I plan on getting a second), so it allowed me to just enjoy the build, and it was a lot of fun to put together. It has above average posability, a decent accessory pool, and a transformation that would make every Gundam flight mode cry. The torso in particular does a lot of very interesting and intuitive movements to achieve its elongated lion version for its beast mode.
It’s also enormous. It’s 1/100 scale, yet it towers above Master Grade Gundams (or at least the one I own), and is over twice the height of a standard High Grade.

The Bad: The POM they use on this kit is much harder than with Gunpla, with the ups and downs you might expect from that. The tail is also notmade of POM (one of the few jointed areas to not incorporate it) and falls apart easily when moved, though is easy to put back together.
Last issue I have is extremely minor, but I’m a little disappointed that the transformation for the arms and legs was greatly simplified in comparison to the original design. The current ones are fine, but I would have liked to have built the original jointage.
On a weird note, there were only two pieces left over after finishing, both on the neon sea green runner used for eyes and scopes and such. They also had accompanying stickers, so I was unsure if I had missed something. After a little research, it looks like they’re actually the barrel and scope for the upcoming “Arma Style” upgrade kit, if you were curious.

The Details: I went very light on details this time around. Black panel lining in narrow areas, black Gundam Marker in thicker ones, metallic green over the few neon green pieces. And it looks good, IMO. The only thing I would consider adding would be a bit of black paint to some of the white and orange pieces on the lower legs.
Overall, I’m very happy that this kit just exists, and doubly happy it’s very good. I definitely recommend it, but I feel like part of the reason I am is because I want to support this line and see more from it, and I hope if you’re reading this you will consider supporting them, too.

Post link


MSB-GH03 Gundam Helios
I actually play Gundam Breakers. I run an entirely SD Gundam team, and typically swap between Gold and Silver Rank in 3-VS-3. It’s a…fun game, but I can’t help but feel that the more mechanics they add every update, the less easy it becomes for new players to pick up, even if they make it easier to get upgrade parts. I’ve been playing since Lv5 Parts were the highest you could get, and 800,000 was a high CPWR. Still, I sign in every day, so it must be doing something right.
The Good: This guy has a forearm swivel, and that should say a lot. Most Gundam with large forearm accessories, like the God or 00 Sky, don’t have that. It also has great ranges apart from that, with more modern parts for all its joints, and very few reused parts apart from the back pieces.
Also, with the backpack removed, it’s a very sleek design.

The Bad: That big backpack with its many cannons does have some parts collision issues, but I weirdly haven’t had balance issues with it when the wings aren’t, like, very far back.
Also, it may not have a lot of reused parts, but it does have a lot of reused runners, so there are a lot of extra parts that don’t necessarily connect to each other, but perhaps you can find a use for them?

The Details: While there were a number of stickers for this kit, most of them were for the green stripes on the backpack. I replaced those with paint, as well as used metallic green on the eyes, inside the cannon barrels, and behind the translucent parts (mostly because I did it for the chest and continued to do it throughout).
I did black panel lining and fill throughout the kit. I also added a few drops of yellow in the triangles in the knees and back skirt. The stickers have black in the inner triangles, but some of the official images and paint model don’t have that, while others do. I decided to go without.
Overall, this is a much better kit than I thought it would be. I was expecting it to be more of a cash brag and reuse many more parts, but it ended up being an insanely posable and well designed kit. If you were on the fence about this kit, I would say to give it a chance.
Post link
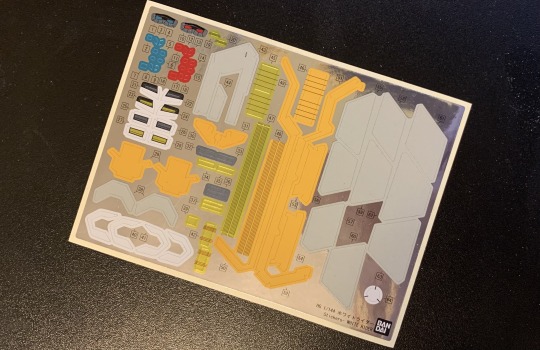
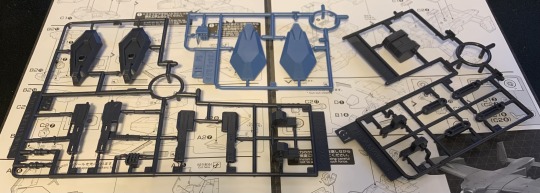
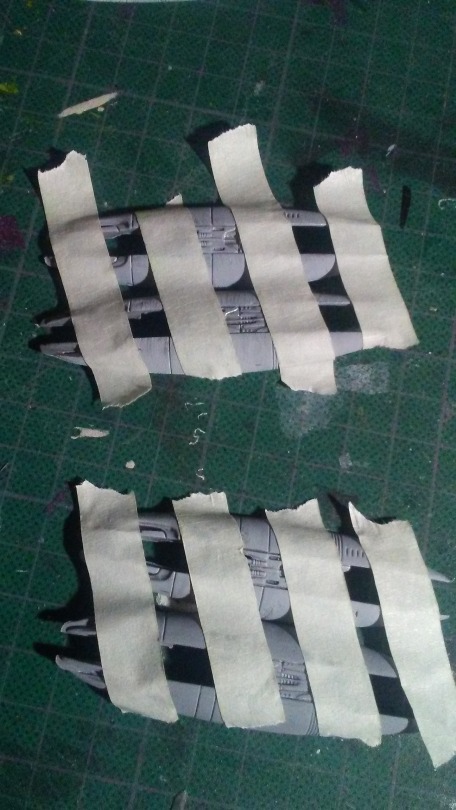
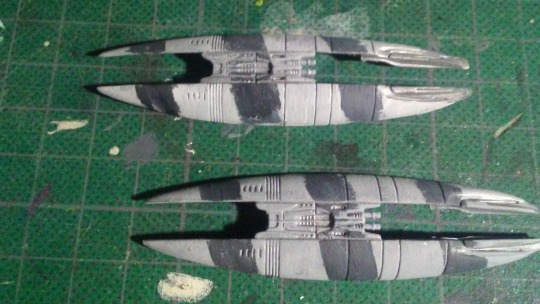
We now paint the main color, and some stripes.
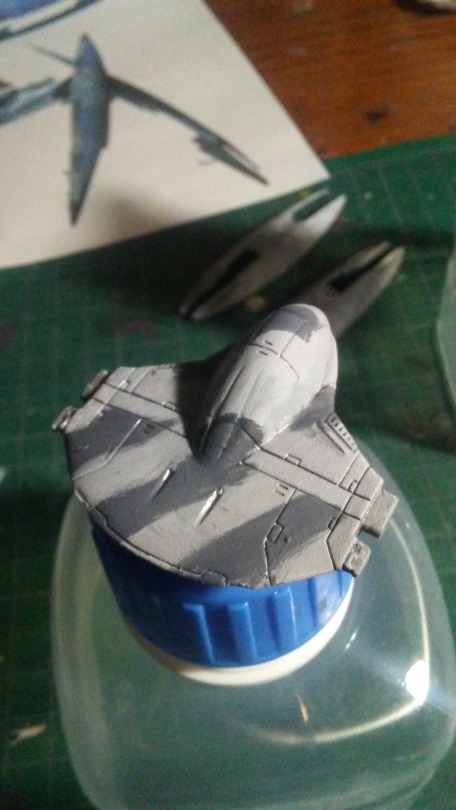
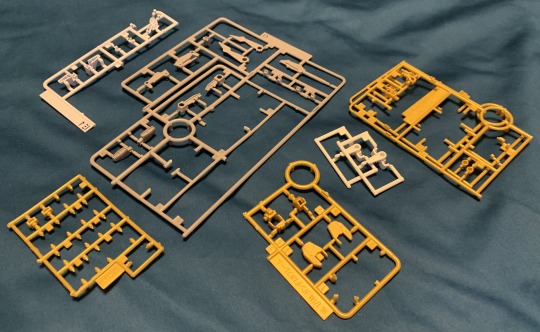
All right guys, lets build and paint this awesome kit together!
Join me on this adventure, I’ll be posting updates everyday, so feel free to follow me to see all the painting process

I found this kit circa 1999 brand new at a comic store for 11.99 US, pretty sweet deal indeed

After applying primer to the parts, I glued some wire to the droid head, so later the whole assembly can be mounted on a magnet painting base

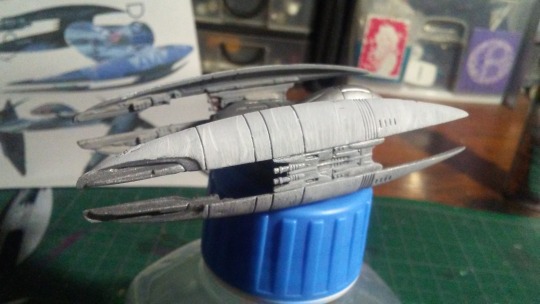
Next, I brushed a layer of silver acrylic paint. We will later scratch some of the final paintjob to expose the silver paint as if it was made of metal all along!
Stay tuned!