#modelmaking


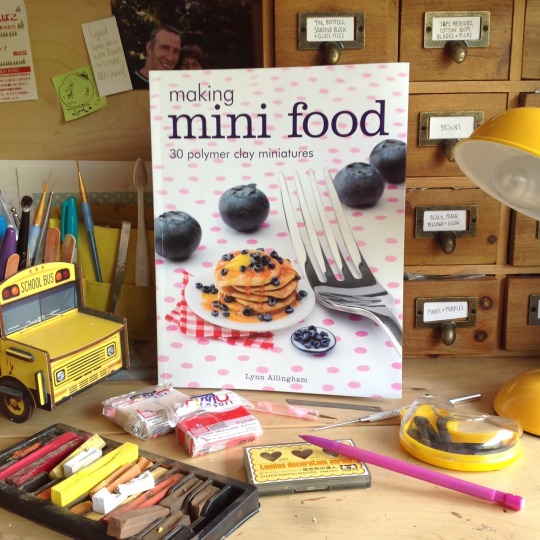


ORIGINALS FOR GRABSI have decided to sell lots of my original pieces from my book ‘Making Mini Food’ALL OF THESE are now in my Etsy shop, please check it out here:Please reblog and share the love❤️


Some more small terrain pieces, I made some lasercut pieces to fit around some drink cans. I shamelessly stole the idea from promethium forge, who sell a kit just like this super cheap online. Go check there stuff out, it’s awesome.
Post link


Finished my Dread Saurian. Very happy with the result, pretty much anything can look decent with a bit of elbow grease!

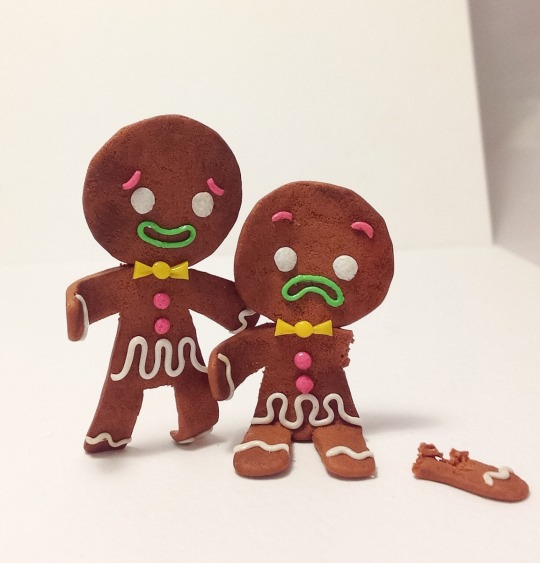
Working on a new batch of fairy trophies. Stay tuned. #fairies #fauxtaxidermy #trophy #resincasting #modelmaking #model #modelkit #garagekit (at Utah)
https://www.instagram.com/p/Bz_eveOBbce/?igshid=1efwepcaz0smk
Post link

I love making DIY model kits - here’s a couple of tiny tables and coffees (the brown table is only a couple of inches long!). I really want to try to make my own miniatures sometime and see how it turns out, but at this point even using pre-made parts from a kit can be difficult work.
#modelkit #modelmaking #miniatures #tinycafe #modelassembly
https://www.instagram.com/p/B_8Tk0ijVzW/?igshid=isoskav1drvd
Post link
Shameless self promotion on tiktok. I’m such a nerdy millennial sell out *sob
.
.
.
.
#gunpla #tiktok #tiktokgundam #modelmaking #gunplacustom #gunplabuilder #nerd #geek (at Bluefield, West Virginia)
https://www.instagram.com/p/CMyiEErDmCg/?igshid=15z1y07gbzoj2
 #modelmaking")


Here’s the amazing fishing boat made by the art department team! It’s mostly blue foam and balsa wood with lots of lovely detailing. In the bottom picture you can also see the beautiful weathered looking sails which will be attached.
Photos by Becky Weston and DeNi Santana who worked on creating this awesome piece.
Post link


Here’s a preview of a prop that is included briefly in the film. Hmm… bears resemblance to a certain merman…
It’s only on screen for a few frames so I was originally going to make it out of card but got carried away and ended up sculpting it out of polymer clay. It took me a whole day to realise that I left out an ulna on one arm. Whoops!
Post link

Lovely bit of ice for you there! Production designer Lizzie Osborne worked with our art department volunteers to make this gorgeous ice effect from fibreglass, resin and a cocktail of fake snow, glue and glitter for the frosted effect. Pretty convincing!
Post link


Some of the lurvely props made by the talented art department team. Here we have two of Tootega’s blankets, some candles and a couple of lichen-covered buckets. The polar bear blanket even has tiny claws!
All photos frombeckyweston.co.uk
Post link
I just poured some new silicone hands for Toots as all of her fingers are currently dislocated at the knuckles *yay*. They’ll have to stay on for the next shot or two until this pair are cured and painted up to match the old ones.
I downloaded a new app for my phone called Lapse-It so I’m going to be timelapsing all the things! Maybe next time I’ll take it off auto-focus and it might stay in focus for the whole thing :P
In other news, I’m going on holiday in a week and I’m so excited I might keel over! Going to have a much needed break for a week.


Some progress images from making the Tootega puppet. She’s much lighter than Derek and frankly, a lot easier to animate as she is all squishy foam and just a bit of balsa wood. Her dress is cobbled together from some H&M bargain rail items with scraps of different fabrics inserted between the layers for extra colour.
Post link

Tootega the Sea-Witch! She’s alive!!!!!
So finally, here is the finished puppet for dearest Toots complete with wild mane, blue fingers and barnacle-encrusted boots. This is just one of her 20 faces that are easily interchangeable for the animation process. I started animating shots with her last week and she’s got bags of character already. Hurray!
Post link


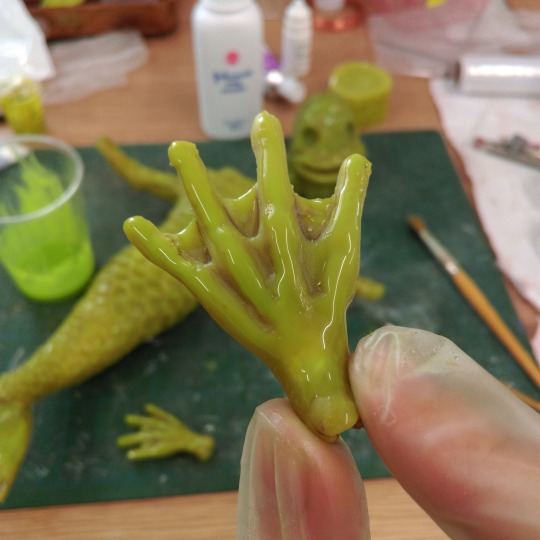
HANDS!! This was the process for making the silicone arms / hands for Tootega. Unfortunately, I did have to do the whole sculpting and moulding bit twicebecause the first mould turned out a right state! For the second attempt, I added some aluminium filler powder which I’d found leftover in a portacabin (thanks Simon!) and that seemed to help strengthen it. I’ve run out of Alchemix at this stage so regular fast-cast resin was all I could get my mitts on. Still, shaking a load of bubbles into it just before pouring probably didn’t help matters the first time round.
Toots has blue fingers now because it was 2am when I was painting the silicone and I just thought it would look cool. She has poor circulation. I quite like it.
I seem to lose a bit of definition when painting the silicone with Psycho Paint. Maybe I should be thinning it down and building up the colour slowly? Seems time consuming (something in short supply at the moment) and in this instance, the thicker mix helped to hide some of the more unsightly seamlines so I don’t mind too much.
As with Derek, the silicone is Smooth-On Dragon Skin 10 Slow. We were able to purchase a spare set of arm-armatures for Tootega, so when I get a chance, I’ll make up a second pair that can be ready when these ones break. Hopefully they’ll last a while though, I got as much twisted wire into the fingers as possible.
*In hindsight, a marble was perhaps not the best idea to use as a key in a hard mould even with a load of vaseline on it (I’ve run out of spray mould release as well). That thing would NOT come out so it’s just going to stay there!
Post link

Here are some tiny props that I’ve been making out of Sculpey for the film (with a £2 coin just for scale). In case you’re wondering what that thing on the top right is, it’s a Jenny Haniver. They’re awesome and gross in equal measures. Some of these play an important role in the story and some are just for decoration.
Post link

A rather squelchy looking silicone heart prop. This one is a large scale for close ups but there’s also a mini one which is about the size of a large raspberry.
Post link

At last, part three! It has taken me a while to get around to writing this up as things have been pretty busy lately between building and casting and SHOOTING! Yes, that’s right, we started shooting last week!! :D *happy dance*
We now have two shots in the bag, starring none other than Derek himself here. So picking up where we left off, here’s how he got camera-ready!
Trimming and seaming was the next stage of the process after demoulding. I used a stone polishing bit (the pink ones) on a Dremel and gradually sanded down the visible seam lines on the puppet after greasing them up first with Vaseline. Some of them I trimmed first with a little nail scissors. There were a couple of air bubbles here and there in the surface so for the bigger ones (there was quite a large one in his lip and one in his elbow), I mixed up a new batch of Dragon Skin and injected it into the hole. I’ve heard that there can be issues getting fresh silicone to adhere to stuff that’s already fully cured but I didn’t find any problems with it.
The smaller tears and bubbles were filled by mixing a bit of pigment into Silpoxy (silicone adhesive, smells just like salt and vinegar crisps!) and patched them up with that. The Silpoxy has a much quicker curing time of about 12 minutes so it’s good for quick patch-ups.
At any point where i’d added new silicone, I covered the area with PTFE tape which is great, it’s really silky and clingy and leaves a smooth matte finish on the silicone underneath once you peel it off. Great stuff altogether!
Next step was to add a bit of a paint job to Derek’s base green shade. I was hoping to do this with an airbrush by thinning down the absurdly named Psycho Paint with toluene. The airbrush wasn’t having any of it though. It would just clog immediately as soon as I’d try spray anything through it. I basically spent the best part of a day taking apart an airbrush, cleaning all the bits, mixing a new batch (”maybe this one will work, it’s really runny”) and clogging it up again. I may or may not have busted the airbrush. (Okay, I did).
In the end I had to just give up and paint him by hand. I found that because of the translucency of the paint however, I had to kind of pile it on in order for it to make much of a difference, which did mean losing some of the scored detail in the fins. I mean, look at the colour of the paint in that cup and you can barely see it going on. There must be a knack to this but i haven’t found it yet. Ah well, maybe next time! For now though, I think he looks okay.
The silicone paint base dries very glossy as you can see so you have to dust some talc onto it when it’s still tacky if you want to get a matte finish. I’ve left him fairly glossy in parts though as I quite like how it makes him look a bit wet and slimy. Oh i also had to cut into his armpits because they were restricting his range of arm movement. I cut them open with a scalpel, took out some foam and silicone and then patched them up so they were a bit more roomy. They’re a little untidy but you can’t really tell.
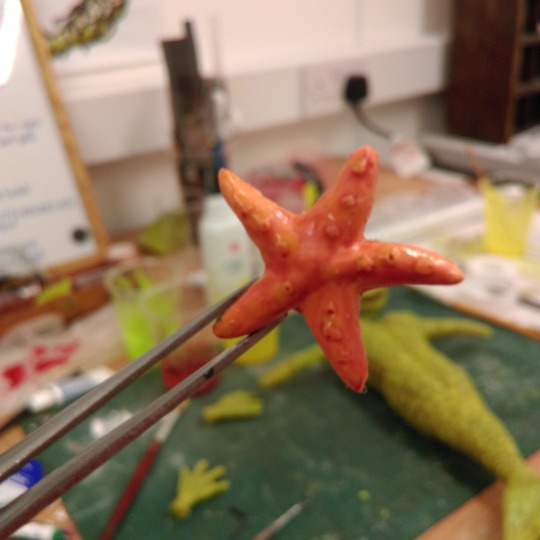
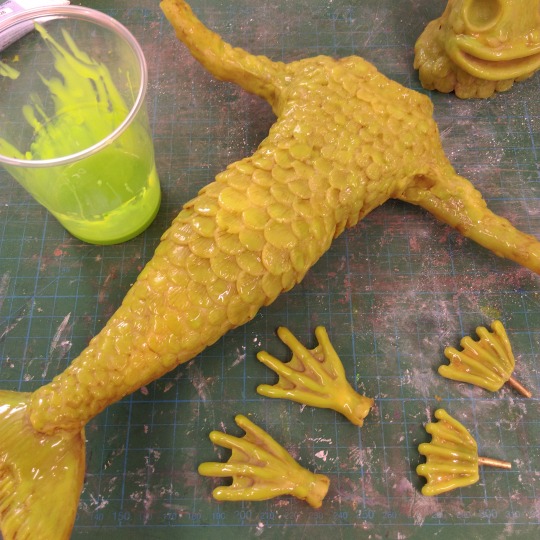
Little starfish for his face was cast separately and painted before being stuck on with more Silpoxy.
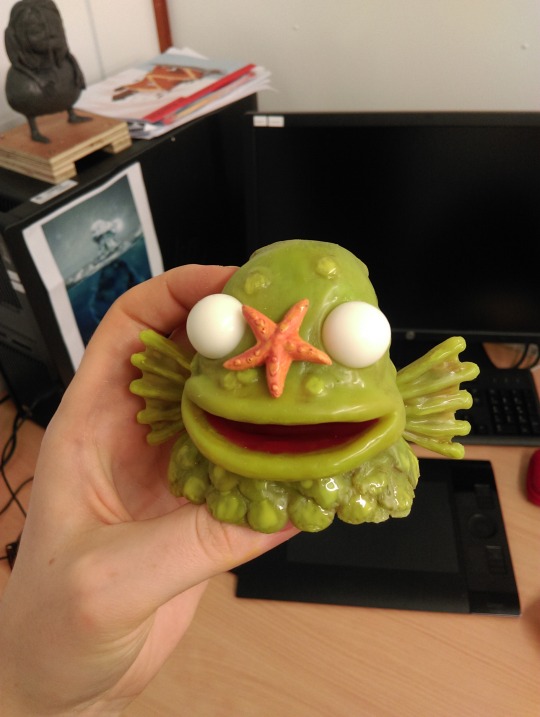
Finally the inside of his mouth and gills (he has gills on his ribs) were painted with red silicone.
For his eyeballs I made a silicone mould of some marbles using Mold Max 20 and cast them out in J-Cast resin. They’re fixed in place in the socket with a bit of wire drilled through the back.
The pupils were actually kind of tricky. I wanted to paint the pupils onto some acetate but because of the curve of the eye, I couldn’t find anything that wouldn’t lift up around the edges (a vac-forming machine would have been ideal but I didn’t have access to one). Then Sam suggested those screwball cups that you get icecream in, the ones with the bubblegum in the bottom? They’re perfect! The bit of plastic where the gumball goes has just the right curvature to sit on a marble. So I trotted off to Sainsbury’s and got a box of those, cut out some circles, bit of acrylic paint, blob of gloss varnish and happy day! They’re just stuck onto the eyeball with a bit of Tacky Wax so they can be moved around whilst animating.

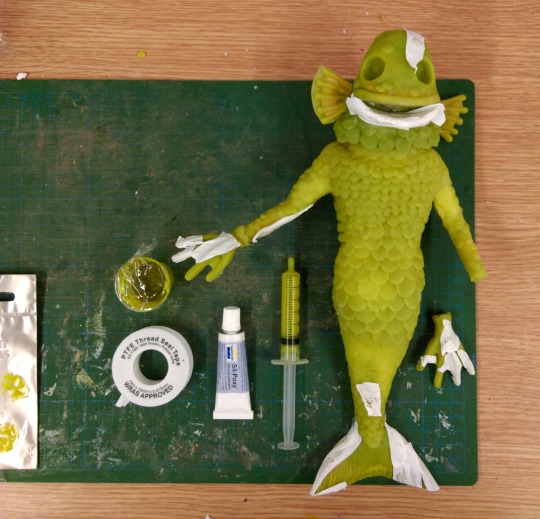
And that’s it really! He’s on set now, doing his thing, being all fishy and stuff. There are definitely areas that could be improved like the silicone is a little thick in his shoulders, his mouth isn’t as flexible as I’d like and I’m definitely not completely happy with the overall paint job. But he’s looking rather lively and charming the pants off everyone who he meets so I think he’ll do just fine :)
For part one, click here!
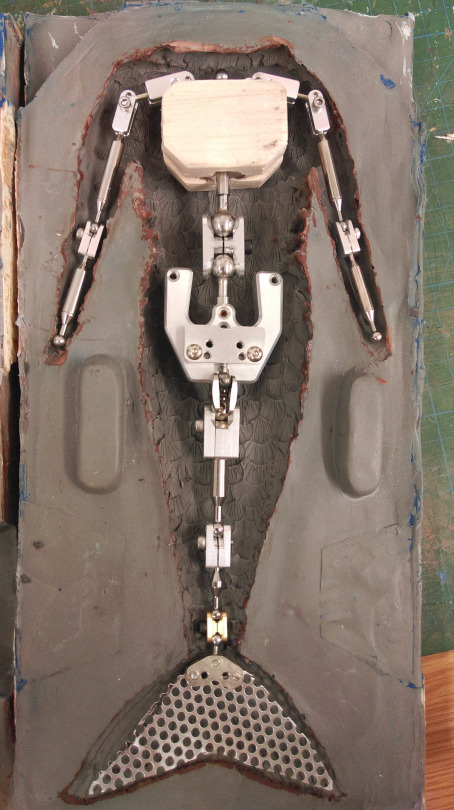
This is continuing on from where I had just cleaned out the moulds and am getting ready to do some silicone casting.
At this point I made a chest block of balsa wood for a less squishy gripping point and then padded out the rest of the armature with upholstery foam. I actually just cut a lump of the stuff from the bottom of my bed (which is less of a “bed” and more of a giant lump of spongy foam on the floor. Ahh student life!) This photo below was before I’d padded the upper arms. I left the lower arms unpadded as they were already quite snug in the mould but I did wrap them in some plaster bandage tape to give the silicone something to stick to and did the same with the tail fin.
Before casting I also filled any exposed joints with plastiline so the silicone didn’t get into them.

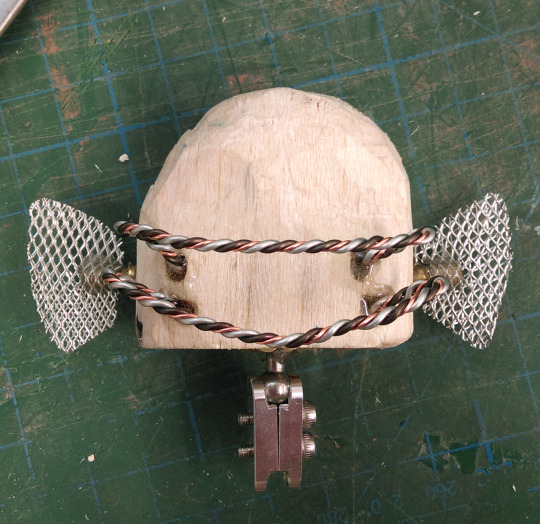
Below is the inside of Derek’s head which is just balsa wood and wire. The side fins are attached to brass K&S tubes so they are removable for casting separately. I’m thinking I maaaybe should have used thicker wire for the mouth… I hope it lasts the shoot!
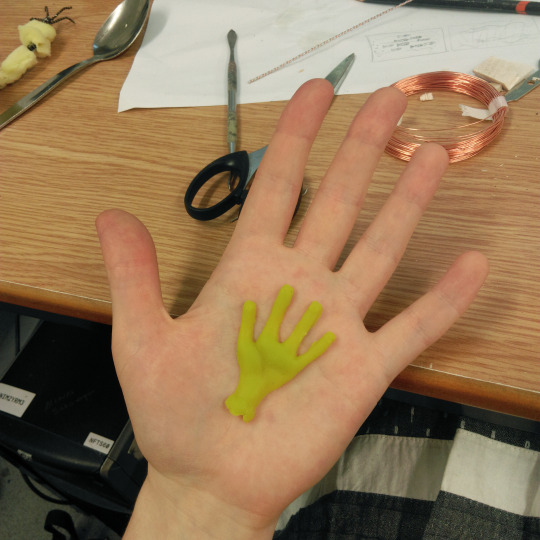
Next I did a base colour test for the silicone which you can see in the hand below. The silicone I’m using is Dragon Skin 10-Slow from Smooth-On which is tinted with a mix of Silc-Pig and Ignite pigments. I got the trial size multi-packs of all of the pigments but I’ve blitzed through the yellows pretty quickly so I need to pick up more yellow Silc-Pig this weekend. The whole puppet will be given an airbrushed paint job afterwards so this is just for the underlying colour.
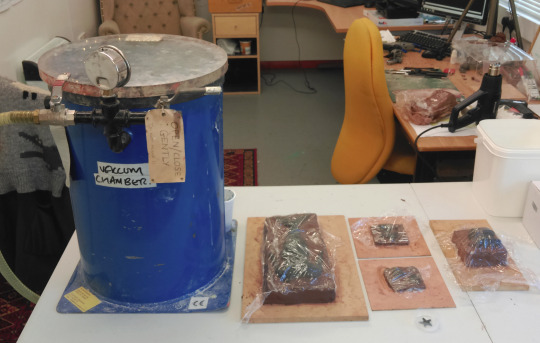
The silicone needs to be degassed in one of these beasts, a degassing chamber with a vacuum pump. I hired this one from Tiranti. It basically sucks all of the air out of whatever you put in it and after mixing the two-part Dragon Skin together, there is a lot of air in there. If you don’t get the air out you will be left with lots of unsightly bubbles in the cast which then need to be filled after. Using one of these gizmos will minimize bubblage and heartache.
In order to make sure there weren’t any “touch downs” in the mould, (ie. areas where the internal armature or foam is in contact with the surface), I painted a layer of the silicone into the mould first. I did this by adding a product called Thi-Vex which is a thixotropic additive, meaning you stir a few drops into the mixed silicone and it quickly aquires a thick consistency that doesn’t run off whatever surface you apply it to.
I also painted a layer of silicone onto the foam-covered armature and hung it up to cure.
When the thixotropic layer was mostly cured but still a bit tacky, I mixed up another batch of silicone, filled both halves of the mould, popped the armature into place and then sandwiched the two halves together with a humongously heavy weight on top (because despite having “BUY CLAMPS” on my to-do list for about 2 weeks, I never did buy any clamps.)
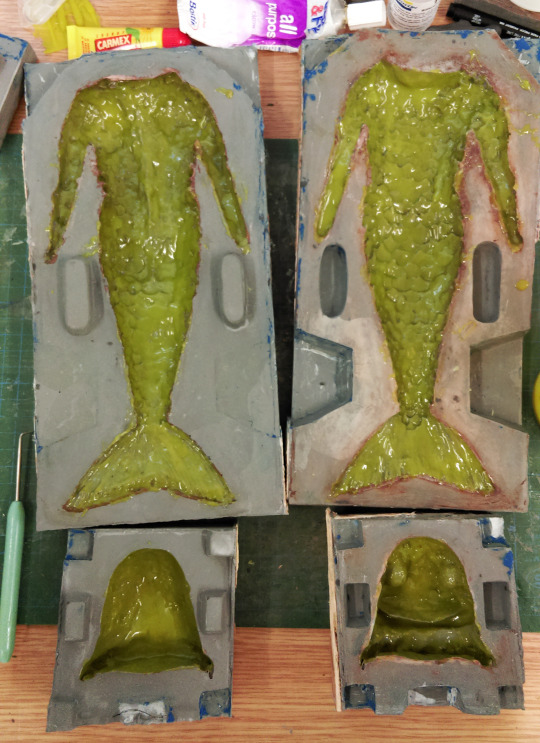
After leaving everything in the moulds overnight, this was the result! The silicone is still quite translucent even with the pigment in (I probably could have added a lot more) but it will all be painted anyway so hopefully the surface paint job with hide the areas where you can see the insides!
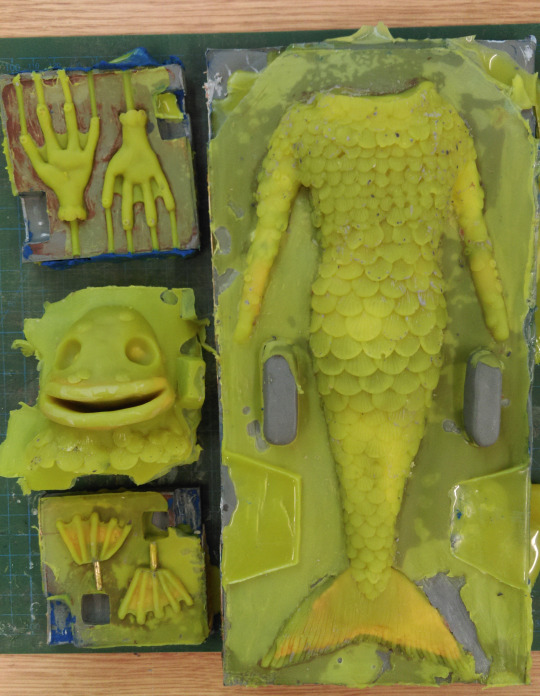
There are a couple of little issues but I’m pretty happy with how most of it turned out. The wires in Derek’s lips didn’t quite line up where they were meant to meaning he was stuck with this permasmile, so I’ve since done a new cast of the head. Also, you can’t see it in this picture but the tail fin didn’t cure well at all! This is because it was in contact with the bad batch of resin that was used to fill that section of the mould. I wasn’t sure if this was the case or not so I cut off the fin and detached it at the joint. I then sectioned off just that small part of the mould and did a new cast. Thankfully this one worked a bit better although when I opened it up, a big slice of the mould came away stuck to the fin! Definitely not good, that stuff should be rock solid. So it’s a good thing that second cast came out alright as I wouldn’t have been able to do a third one!
All that remains to be done next week (once I’ve got more pigment) is some trimming and seaming, filling in a few little areas and an overall paint job. Stay tuned for part 3 :)


I’m going to do a big post about the whole moulding and casting process for Derek the Merman but in the meantime, here’s a peek at the very cool stuff going on over on the Rehearsal Stage where the designers and art department assistants are working on all of the grad animation sets.
This is Lizzie’s section with some really awesome icebergs happening and lots of testing with different materials. It’s exciting to see things coming together! Meanwhile I’m back in my portacabin mucking about with moulds and silicone. Almost done though! I’m doing the final silicone cast of Derek tomorrow and then after trimming and seaming, and some painting, he should be ready by the end of the week *fingers crossed*.
Post link