#retrotech


So sometime last year, I bought this interface because, hey, it’s relatively cheap right? And who cares that it comes without a case?
Well. I kinda did after getting it. Inserting it into a cartridge slot with a lid is incredibly annoying, because it’s difficult to align it to the actual cartridge port.
However, a little while ago, a friend gave me some hardware, and among it was a Philips NMS 1250 modem. Not very useful in these modern times, so it sat on the shelf for a while, and although I did try to convert it to an RS-232 interface at one point, the project wasn’t a very successful (or useful in my case).
I had considered putting the Maxiol into this case before, but never really fully attempted it because of how it would fit; I’d have to dremel out the screwholes and everything… but today, I just thought “screw it”, and went ahead.
Some rough measuring did make me find out I had to cut a slight hole for the PATA connector (which I’m not using, so I didn’t cut it out in full… yet), and a hole for the socketed chips (which are a bit too tall to fit otherwise).
A little while of dremeling later, and this is the result.
It’s not pretty, but it does work, and it’s a bit more protected. I might end up trying to make it look a bit tidier later on as well, but functionality was a bit more important at first ^^
Still to do: drilling 3 small holes to make the LED’s visible. Maybe even putting LEDs in the case itself so they’re properly visible, but I’m not too sure yet if I want to attempt soldering directly on the cart… I’d hate to break my only mass-storage device for MSX ^^
Post link


Went to the Nijmegen MSX Fair today! There was so much cool stuff to see and people to talk to! It was an absolutely amazing day, and definitely worth the super boring trip by train and bus ^^
A Wii drumkit was connected to a MSX Turbo-R (there were a *lot* more of these on show than I expected!) for playing a rhythm game, but I really sucked at it, and someone brought an MSX made out of lego. Not functional, as far as I know ^^
I also managed to buy a Gouda 1MB Memory Mapper for my MSX2, which means I’ll be settled for life, RAM wise… on MSX at least.
Of course there were plenty of games on show and sale, and although those aren’t my primary interest, some of them looked pretty cool. Seems like MSX scene definitely has a knack for publishing their games on shiny looking carts, with boxes, manuals, and all that jazz included. Fancy!
Also had a chat for a while with someone that interfaced a xylophone to his MSX! As far as I understand it works with relays that are triggered by software written in MSX-BASIC. It can go as fast as 64th notes at 255 BPM! (I of course had to ask how fast it could go ^^)
And of course, plenty of setups with port expanders filled to the brim with all the fancy toys an MSX user could wish for.
Post link


")
")
. Enjoy.http://lynndrumm.ban")
just released my album. Gameboy stuff. Pay what you like (or not at all). Enjoy.
http://lynndrumm.bandcamp.com/album/damage<3
Post link


End papers from my newest book The History of the Computer pre-order ink in bio and on sale 4/26
I love making patterns for my books and just had to show you all a sneak peek
What machines can you spot?
.
:
.
.
.
.
#retrogaming #retrocomputer #retrocomputing #retrotech #computerhistory #computerscience #teched #techeducation #scienceteacher #girlswhocode #girlsintech #womenintech #womeninscience #instabooks #bookstagram #rachelignotofsky #patterndesign #spacerace #teachersofinstagram #teacherlife
https://www.instagram.com/p/CY7IMw-PW9p/?utm_medium=tumblr
Post link

End papers from my newest book The History of the Computer pre-order ink in bio and on sale 4/26
I love making patterns for my books What machines can you spot?
.
:
.
.
.
.
#retrogaming #retrocomputer #retrocomputing #retrotech #computerhistory #computerscience #teched #techeducation #scienceteacher #girlswhocode #girlsintech #womenintech #womeninscience #instabooks #bookstagram #rachelignotofsky #patterndesign #spacerace
https://www.instagram.com/p/CY7IMw-PW9p/?utm_medium=tumblr
Post link
![B ui n e[swipe] 10 eighties computer ads scan by @unicity74follow @neontalk and @concepttalk…](https://64.media.tumblr.com/3664c0c7e952b55e28ff3bcc218a3027/79d2822bc5a0d2f5-f2/s1280x1920/b455dda13060d269b3ff6e1f38b80e28d0a74957.jpg "B ui n e[swipe] 10 eighties computer ads scan by @unicity74follow @neontalk and @concepttalk…")
B ui n e
[swipe] 10 eighties computer ads
scan by @unicity74
follow @neontalk and @concepttalk
…
#eighties #80stech #80stechnology #retrotech #retroelectronics #retroelectro #vintagetech #vintagetechnology #vintage #80saesthetic #the80s
https://www.instagram.com/p/CYjaGiKK4NP/?utm_medium=tumblr
Post link
 Portable personal computer by Italian manufacturer Olivetti.Source: w")
Olivetti Portatile M22 (1986)
Portable personal computer by Italian manufacturer Olivetti.
Source:www.storiaolivetti.it
Post link
 The Nokia 9110 Communicator is the updated model of the Nokia 9000")
Nokia 9110i Communicator (1998)
The Nokia 9110 Communicator is the updated model of the Nokia 9000 Communicator in the Communicator series. Main applications where: Fax,short messages,email, Wireless imaging: digital camera connectivity, Smart messaging, TextWeb, Web browser, Serial Terminal, Telnet, Contacts, Notes, Calendar, Calculator, world time clock, Composer.
Source:Wikipedia
Post link


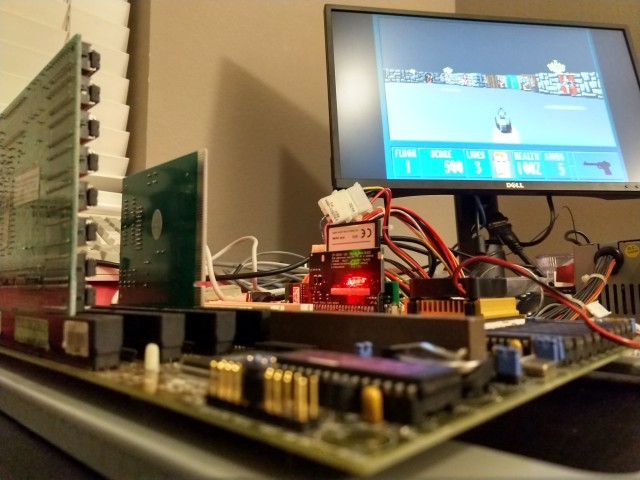
Repairs
I had picked up a VLB Diamond Stealth 64 video card at Computer Reset, so obviously I needed a VLB motherboard to put it to good use.
I picked up 5 bad VLB motherboards.
The first three I knew were not likely to work. They were rare early Pentium boards with both PCI and VLB, but all had the same Varta battery destruction. The other two were generic 486 boards that looked to be in great shape. Unfortunately, both had some unseen damage such that they would only run if flexed in just the right manner.
So I made the trek out to Computer Reset again.
I found one good-looking VLB board, an Asus this time. Unfortunately, no POST. It wouldn’t even get far enough to output a failure code on my POST card. I spent far too much time trying to get any sign of life out of it …
… before finally turning it over and realizing it had some pretty significant scrapes on the underside.
See, I had pulled it out of a large box of other boards. Who knows how long they had been there and where they had been before or who had dug through them already. At some point, something scraped across the back of this board and hurt it pretty badly.
I’ve never done any significant rework on a board like this, but it’s never too late to learn. I started by marking the scratches with a marker, then out came the scalpel and the continuity probes.
The first few wires were easy — short traces between the DIP sockets for cache RAM. Their endpoints were easy to see, and the pins were easy to solder to.
The others were a bit harder. First thing I had to do was scratch off some of the solder mask on either side of the scrape to confirm if continuity had indeed been broken. The traces were too close together for me to solder short bridge wires right across the gap, so I had to follow them back to vias or pins on either end.
When there that many traces that close together, they can be hard to follow. I like to take a fine-tip marker and draw a line following the trace all the way to the end. After I’ve soldered a wire in place, a little rubbing alcohol cleans up the marker, and I can move on to the next.
In this case, I was lucky that only a handful of traces were significantly broken. A few small scratches I was able to bridge with just solder, patching several nearby with a drag solder technique similar to that used for surface mount ICs.
Once I was done patching, I covered any areas with remove solder mask with clear nail polish. I tried dabbing a bit of hot glue on the ends of the wires to help them stay in place, but it didn’t really work well. Next time I’ll try something different (more nail polish has been recommended to me by some far more experienced techs).
In the end, the repair was successful. I was able to get it to boot right up after patching those few traces, and didn’t even have to break out the soldering iron a second time. I am quite pleased with how this turned out.
I’ve got some other odds and ends picked up from Computer Reset that should turn this into a nice machine. I’ve got it running currently with a 66MHz Intel 486DX2, 96MB RAM, the Diamond Stealth 64 VLB video card, and an EtherLink III. Somewhere I know I’ve got a SoundBlaster to round it out.
I’ve also got both an Intel and an AMD 100MHz DX4 that I would love to put in this machine. I’m interested to see if my patchwork will hold up to running the board at full speed.
For now though, Wolfenstein.

Doing part test fits getting ready to start wiring a new homebrew project.