#diy mask


Hey I haven’t been around on Tumblr for a while. Life is crazy and shit.
Anyway, here’s what I’ve been working on all weekend. I wanted to make pocket masks for everyone along the lines of this tutorial, but my sewing skills are only intermediate. So I altered it and wrote it up. This is a pocket mask instruction sheet for basic sewers. It doesn’t matter what color thread you use or if you can’t sew super straight, because this is a turn-it-inside-out design where you won’t see any of the seams anyway! Here you go. Hope you find this useful. While this will be faster if you use a sewing machine (I’m trying to turn 10-20 of these out per day) you can also quite easily substitute hand sewing.
What you will need:
- Breathable 100% cotton fabric. Examples: Muslin, cotton jersey, lightweight linen. An old bedsheet, pillowcase or T-shirt will work fine as long as the fabric is loosely woven, breathable, and smooth enough to hold against your face for extended periods of time. It should be 100% cotton so that it can be washed at high temperatures after every use and still hold up. See this link for more info: https://smartairfilters.com/en/blog/best-materials-make-diy-face-mask-virus/
- Elastic: ½ inch elastic, Dritz brand. Can be substituted with flat ribbon ties if necessary.
- Filter fabric. This can range from very good filtration (surgical melt-blown non-woven fabric) to good (vacuum cleaner bag filter) to mediocre (craft felt) to desperate but probably better than nothing (paper towels, toilet paper).
- Nose wire (optional). Garden wire or aluminum craft wire suggested, must be bendable and non-tarnish/waterproof.
- Sewing materials: ruler, scissor, needle, thread (any color), pins.
- Suggested: a piece of cardboard, an ironing board and iron to flatten pleats and folds as you work.
Exact dimensions of all necessary material:
- 9”x17” breathable cotton fabric
- 11” of ½ inch width elastic band (substitute: two 16” flat ties)
- 8” of ½ inch width elastic band (substitute: two 12” flat ties)
- 4” nose wire (optional).
- 8”x5” filter material (thick nonwoven fabric as described above)
Instructions. See images for illustrations.
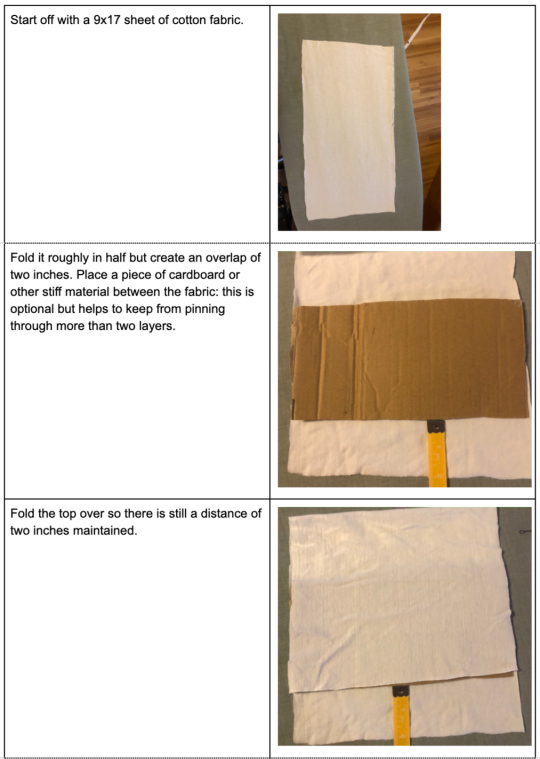
- Start off with a 9x17 sheet of cotton fabric.
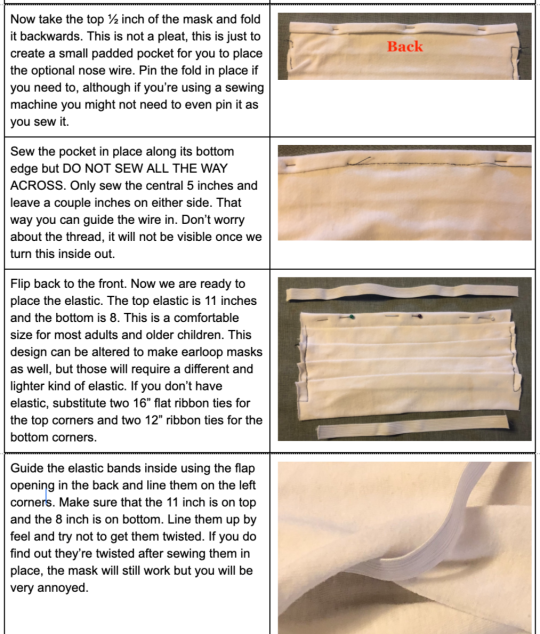
- Fold it roughly in half but create an overlap of two inches.
- Fold the top over so there is still a distance of two inches maintained.
- Fold the bottom two inches up on top and pin it in place. This will create a kind of flap pocket which we will use to a) turn it inside out when we’re done b) place and hold in the filter material.
- You can get rid of the piece of cardboard now. Move the upper fabric edge until it is one-third of the way to the top edge, while the fabric edge underneath is about half the way down.
- Flip the fabric over, making sure to keep the top folded edge on top. This will become the front of the mask once you are done sewing and turn it inside out. Now you need to create the pleats. It might be helpful to mark off every .75 inches to get started on the pleats, but this is optional. You can probably just do the four front pleats by feel.
- Reach your fingers inside the fabric tube and pleat the front of the fabric tube. Create about four pleat folds. The pleats should point upwards, because when you turn this inside out again at the final step, they need to face downwards. As you create the pleats, work the bottom of the fabric upwards while keeping the top the same.
- There should be at least 1.5 inches of unpleated fabric at the top. Once it looks right, pin the pleats in place. If you’re having trouble creating the pleats without wrinkling the fabric in the back of the fabric tube, try putting a piece of cardboard back between the two layers while you create the pleats.
- You can now take out the horizontal pins that are holding the overlapping flap in place, because the vertical pins are holding the folds steady now.
- Then sew the sides closed. Sew it close to the edge and make sure to leave at least 1.5 inches on the top and bottom, because that is where you will put the elastic. This seam doesn’t have to be perfect because it’s not the main seam anyway, it’s just to keep the pleats in place while we work on the rest of the mask. Take out the vertical pins after you’re done sewing.
- Now take the top ½ inch of the mask and fold it backwards. This is not a pleat, this is just to create a small padded pocket for you to place the optional nose wire. Pin the fold in place if you need to, although if you’re using a sewing machine you might not need to even pin it as you sew it.
- Sew the pocket in place along its bottom edge but DO NOT SEW ALL THE WAY ACROSS. Only sew the central 5 inches and leave a couple inches on either side. That way you can guide the wire in. Don’t worry about the thread, it will not be visible once we turn this inside out.
- Flip back to the front. Now we are ready to place the elastic. The top elastic is 11 inches and the bottom is 8. This is a comfortable size for most adults and older children. This design can be altered to make earloop masks as well, but those will require a different and lighter kind of elastic. If you don’t have elastic, substitute two 16” flat ribbon ties for the top corners and two 12” ribbon ties for the bottom corners.
- Guide the elastic bands inside using the flap opening in the back and line them on the left corners. Make sure that the 11 inch is on top and the 8 inch is on bottom. Line them up by feel and try not to get them twisted. If you do find out they’re twisted after sewing them in place, the mask will still work but you will be very annoyed.
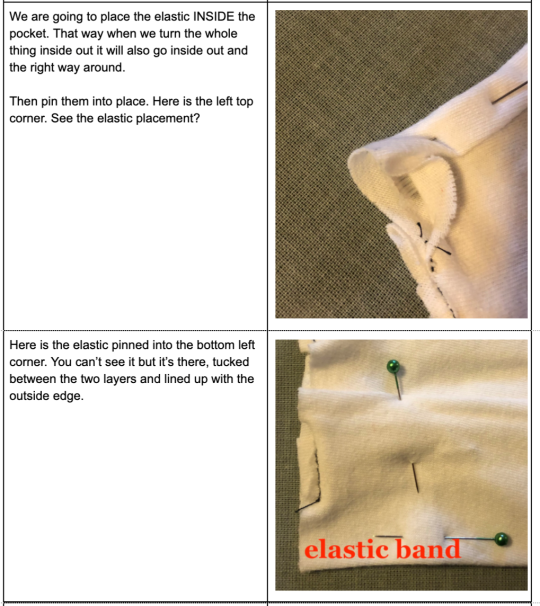
- We are going to place the elastic INSIDE the pocket. That way when we turn the whole thing inside out it will also go inside out and the right way around.
- When the elastic is lined up, pin the elastic into place on the top left and bottom left corner.
- You can’t see the elastic but it’s there, tucked between the two layers and lined up with the outside edge.
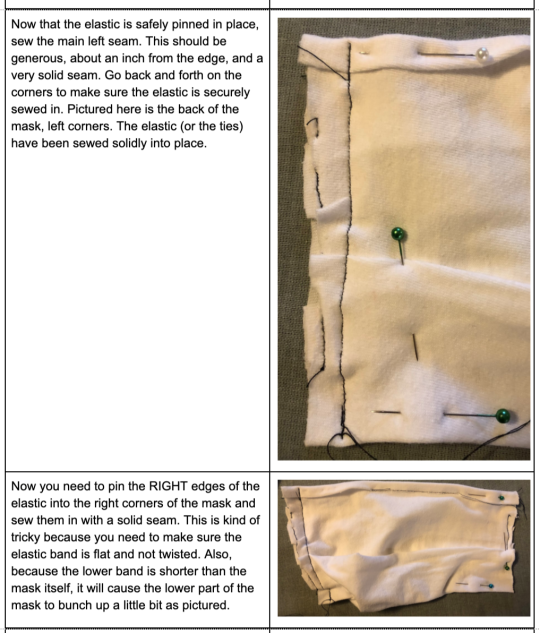
- Now that the elastic is safely pinned in place, sew the main left seam. This should be generous, about an inch from the edge, and a very solid seam. Go back and forth on the corners to make sure the elastic is securely sewed in.
- Now you need to pin the RIGHT edges of the elastic into the right corners of the mask and sew them in with a solid seam. This is kind of tricky because you need to make sure the elastic band is flat and not twisted. Also, because the lower band is shorter than the mask itself, it will cause the lower part of the mask to bunch up a little bit.
- Now sew the right seam.
- You’re basically done! All you need to do now is remove the pins, reach inside the back opening and turn the mask completely inside out. No visible seams!
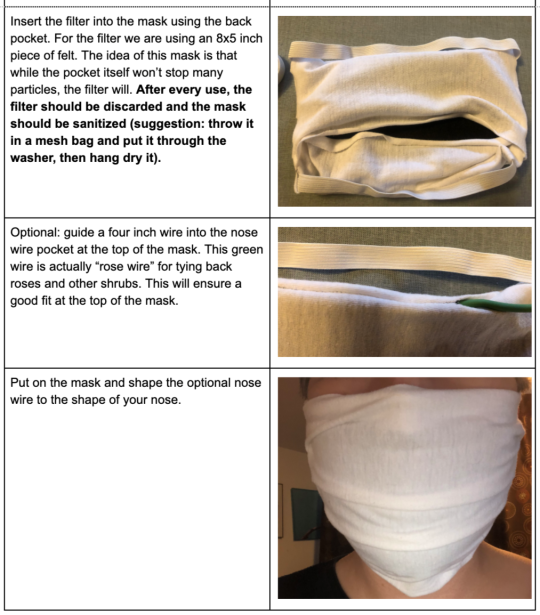
- Insert the filter into the mask using the back pocket. For the filter we are using an 8x5 inch piece of felt. The idea of this mask is that while the pocket itself won’t stop many particles, the filter will. After every use, the filter should be discarded and the mask should be sanitized (suggestion: throw it in a mesh bag and put it through the washer, then hang dry it).
- Optional: guide a four inch wire into the nose wire pocket at the top of the mask. This green wire is actually “rose wire” for tying back roses and other shrubs. This will ensure a good fit at the top of the mask.
- Put on the mask and shape the optional nose wire to the shape of your nose.


INDIE BEAUTY EXPO HAUL
Last week I attended the Indie Beauty Expo in New York and I must say, it was a breathtaking experience! From the outstanding speech Kimberly Elise gave us about her journey as a natural haired woman in hollywood to the wide selection of Indie brands, I was truly impressed.
As you may know, I am passionate about DIY’s and green beauty. I try to avoid commercial beauty products that are swamped with ingredients I cant pronounce. That’s simply why I attended this event. For once, I was surrounded by brands that wanted to protect my skin and the environment with clean & green ingredients.
The expo had never ending tables of brands with wonderful ingredients and outstanding entrepreneurs. I will be doing a haul and review on some of the products I collected from the expo. So stay tuned :)
Post link
DIY:
1. To Tighten Pores:
-1 egg white
-½ teaspoon of honey
-¼ teaspoon of lemon juice (for oily skin)
Dip facial tissues/toilet paper into the mixture and place onto your face for 10-15 as a sheet mask.
2. For Blackheads:
-1 tablespoon of honey
-1 teaspoon of milk
Dip cotton ball in mixture and apply to affected area. Rinse thoroughly after 15-20 minutes.
3. For Acne:
-2 tablespoons of mashed banana
-1 tablespoon of baking soda
-½ tablespoon of fresh lemon juice
Mix and apply to face for 10 minutes. Rinse thoroughly.
4. For Dark Spots and Acne Scars:
-1 tablespoon of ground cinnamon
-3 tablespoons of aloe vera gel
-½ tablespoon of pure almond oil
Mix and apply to face. Rinse thoroughly after 10-15 minutes.
5. For Wrinkles:
-1 tablespoon of ground cinnamon
-3 tablespoons of tomato puree
-1 tablespoon of turmeric powder
Mix and apply to face. Rinse thoroughly after 15-20 minutes.
STORE BOUGHT:
1. Tree Hut Hydrating Overnight Masks ($14.99, available at Ulta)
2. Black Sugar Strawberry Mask Wash Off ($11.50, available at Ulta)
3. I Dew Care Pure to the Pore Mask ($19.00, available at Ulta)
4. Freeman Feeling Beautiful Mask *comes in charcoal or peel-off cucumber* ($3.99, available at Rite Aid)
5. Biore Deep Charcoal Cleanser ($5.99, available at Target)
6. Biore Pore Strips ($6.49, available at Walgreens)
As some of my followers have helpfully pointed out, lemon juice and baking soda CAN be harmful to your skin if used excessively or on the wrong skin type. Please be cautious using these ingredients. I personally have TRIED all of these masks myself, I’m never gonna post stuff like this without guaranteeing it works. I had no problems with either ingredient, my skin looked and felt fine, but that is not a guarantee that the same will pertain to you. Please be careful, test any dicey products or ingredients on your hand or arm and make sure that they are not abrasive before applying to your skin, and perhaps lessen the concentration of these ingredients when making these masks if you still choose to make them. Thank you to everyone for reblogging with the reminder that some ingredients can be harmful, I completely forgot to add that disclaimer. Stay safe hoes