#diy projects


The board of my shelf is done. Yay! I love how the green Celtic knot turned out. It also has a thick clear finish so that any spills can be wiped clean easily, which is great for an art studio shelf.
Post link

Totally in love


DIY Makeup Setting Spray!

What You Will Need:
- An empty, clean spray bottle like pictured above. (mini spray bottles work)
- Water
- Glycerin (can be found in first aid section of a drug store, it is a relatively cheap product)
- Measuring cups or spoons (depending on amount you are making)
Instructions:
- Use a 1 to 3 ratio of water and glycerin (if one cup of water is used, mix with 1/3 cup of glycerine
- Pour all products into the spray bottle
- Shake well
Tips:
- Do not mix large amounts at a time, this product will only stay fresh for 2-3 weeks in the fridge. (product does not contain preservatives)
- Shake before each use
Enjoy!!
DIY Makeup Brush Cleaner

- From simple household items you can now clean your makeup brushes!
Things You Will Need:
- Dirty Makeup Brushes
- Small Bowl
- 1 Cup Of Clean Fresh Water
Recipe:
- 1 TBS Olive Oil
- 1 TBS Shampoo ( baby shampoo works best because it is very gentle but you can use anything)
( If you need more just make sure to use 1 to 1 ratios of each ingredient.)
Directions:
- Mix the olive oil and the shampoo together in a small bowl
- Dip makeup brushes into the solution and massage the liquid through the brush to break up all compound makeup. Spend sometime on this step to make sure all of the makeup is out.
- When done with this step dip the sudsy brush into the cup of clean water (make sure to not fully submerge because the bristles are glued to the handle and you may loosen the glue)
- After water, blot the brush onto a clean and dry dish cloth or paper towel until dry, if you notice their is a lot of makeup coming off and you think their is still more go for a repeat clean.
- Leave your brushes out to dry
- I would advise you not to save this recipe longer than your complete cleaning off all your brushes. Since used makeup can harbor bacteria, re-cleaning your brushes with the same solution would not actually be cleaning them. Mix up a new batch when your brushes need to be cleaned again.
Why The Olive Oil?
- Olive oil plays a role in the cleaning process and also leaves the bristles in better condition than they were before.
I hope this helps you clean those brushes in a cheap and affective way!
DIY All Natural Lip Exfoliator

Here is a recipe for an easy, natural lip exfoliant!
Things You Need
- A small container to store your exfoliant in. You can use a cleaned out lip balm container if you’d like, or a new small container with a screw on top to keep product fresh.
- A bowl
- Teaspoon measures
- Spoon or popsicle stick to stir
Recipe
- 1 TBS Brown Sugar
- 1 TBS Olive Oil
- 1 TBS Honey
* Mix small parts at a time together *
* Spoon into container and close *
ENJOY!


How to make mosaic heart from broken tiles found at the pebble beach
How to sew burlap pillow cover with cross stitch embroidery


I have been painting my cabinets. It’s really awesome watching it come together. I can’t wait to have them finished. Then I will be painting the walls. It’s hard getting it all done by myself. Especially because the kids are usually up my butt. I just need to stay mommy strong. I can do this I think.
Post link


I wanted a box to store things but I did not want to go out and buy an expensive organizer. I searched my house and found a nice box and extra fabric. This box is simple to make and cute. The most important benefit is that it was cheap and fun to make.
Supplies:
· Fabric of your choice *make sure it’s big enough to cover your box*
· Any box
· Hot glue gun and glue sticks
Instructions
1. Place your box on top of your fabric
2. Follow your hot glue gun instructions
3. Glue your fabric to the box
Be safe and smart. I burned myself quite a bit.
Post link
DIY: How to make your own edible cryptobiotes!


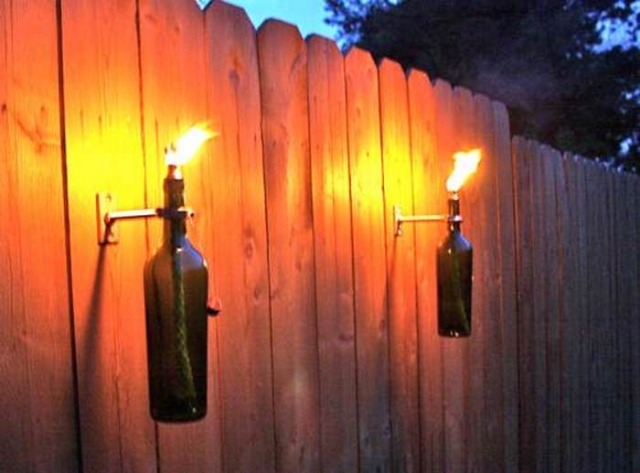


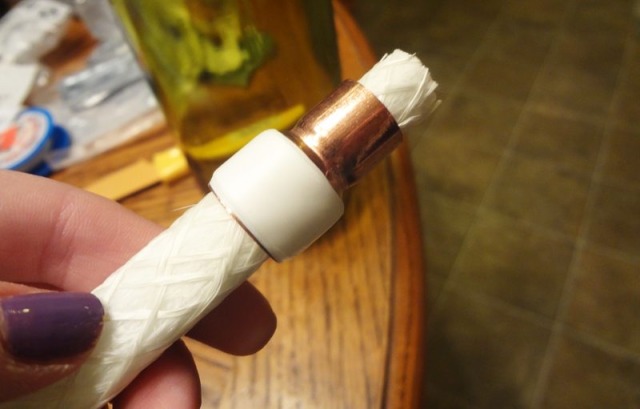

Glass Bottle Torch:
•Empty Wine Bottle (or any beautiful glass bottles which have necks 1 inch in diameter)
•Teflon Tape ½ inch
•Copper Top Plate Connector (threaded for 3/8”-16 thread rod)
•1” Split Ring Hanger (threaded for 3/8”-16 thread rod)
•1/2” x 3/8” Copper Coupling
•1/2” Copper Cap
•Two Hex Nuts (threaded for 3/8”-16 thread rod)
•Two #10 x 1” Zinc Plated Wood Screws (if you’re mounting it to wood)
•3/8”-16 Zinc Plated Threaded Rod
•Tiki Replacement Wick
•Torch Fuel (use ONLY fuel made specifically for outdoor torches to be safe. i.e. Tiki brand)
•Scissors
•Drill/Screwdriver
Rotating Corner Cabinet by Zentrumland
Portable Folding Picnic Table & Chairs designed by FXJ Design.
Coca-Cola Evolution Bar by Backyard Resin
This beautiful bar is made of beautiful dark walnut and clear resin. It measures 120" × 20" and was made custom for a Coca-Cola fanatic.
Japanese Dovetail by Tom Kato Inman
Garden transformation by GreenGenieLandscapes
The “Cabrio Balcony” designed by Velux.
DIY Floating Shelf
1 × 8 top and bottom - 2 @ 24 inches
1 × 2 front - 1 @ 24 inches
1 × 2 sides - 2 @6.5 inches
2 × 2 cleat - 1 @ 22.5 inches
2 × 2 cleat legs - 3 @ 5 inches
Notes: The actual thickness of a 1 x board is .75
inches, and the actual width of a 1x 8 board is 7.25 inches
Architect: Gabriela Raymundo Arquitetura
Metal Structure: La Tène
Rectractable Deck: Backes Madeiras Especiais