#instructable


Had to regenerate a new batch of my self-care pocket checklists for an upcoming trip (we may have different definitions of necessity) and figured I might as well document why the details which may seem so natural in the end result are wildly unnatural to execute.
Lamination film doesn’t just magically hold like magnets, of course – it’s gotta have a margin around the object it contains, so it can adhere to itself. But since you have to arrange objects in your lamination pouch by hand and then delicately lift the pouch into the machine, there will inevitably be some misalignment. So one pain about laminating many small objects is that you have to spend extra time cutting all their edges individually, and you can’t scale by cutting in a grid.
This little Kadomaru corner cutter is my raddest (only?) papercutting investment other than the straight cutter. It cuts three incremental sizes of corners, which is perfect for cutting internal corners with one corner size and external laminate corners with the next size up. I do the same for my tiny A8 notebooks, cutting the cover corners to the next size larger than the page corners.
(As usual, I attained this process by making everything up as I went along – there may well be a more efficient way that my future self will be kicking me for not realizing earlier. If so, please drop me a message.)
Post link

no one should be surprised at this point. I’m going to be in Japan during persimmon season and I won’t shut up about it! can’t wait to start seeing persimmons in stores here, any day now
previous persimmony adventures
Post link


So long as I am wearing pants, I am nearly never without a Field Notes notebook, and have boosted my personal productivity through the roof by always having on hand measurements for projects, new friends’ contact info, and random ideas for projects like this. Can’t do without a paper exobrain.
When I was at Oregon Country Fair a couple months ago, my friend wanted to take notes too, but he didn’t have a pen or paper, so I ended up keeping post-its in the back of my Field Notes for him, and I realized how critical analog note-taking has become to my daily life (be it a stack of post-its in my back pocket or a proper notebook). So I decided to make tiny notebooks to give out as gifts at off-grid events.
You could theoretically buy mini notebooks at the Japanese dollar store, but when something is overtly productized, I find I am more averse to start using it for the first time. Thick notebooks with super fancy printed covers and archival paper are super appealing, but have never started writing in one because they are too nice. The non-committal smallness (48 pages) and kraft paper roughness of Field Notes makes it easy to just start writing, so I heavily emulated them.
I bought some 100lb kraft cardstock, took out my paper cutter and some plain printer paper, and started chopping to see what worked. Field Notes are 3.5″ x 5.5″. I tried scaling down about 60% to 2-1/8″ x 3″, meaning the unfolded cover was 4-1/4″ x 3. I could cut 6 of these from a single sheet. Folded in half, this yields 12 sheets or 24 pages, which sounded like a perfect little pocket-sized amount of writing surface for a 3-day event.
I made one sacrificial notebook with the cardstock and inner paper cut to the same dimensions to see how much the pages would stick out when thickly folded in half (answer: about 1/16″), and then compensated all future inner pages by cutting them (unfolded) at 4-1/8″ x 2-15/16″. Field Notes probably has some kind of fancy machine that cuts everything flush once it’s bound, but I was just using a plastic cutter and wanted to keep it simple.
I stapled & folded them in the center and used my Kadomaru corner cutter to round off all the corners, doing the cover separately and about 3 inner sheets at a time. Then a quick “property of” inscription and done – it was a super gratifying 2 hour hackathon. I really love turning simple, featureless materials into utilitarian nuggets.
Gonna go find some mini pens before leaving to give out with these :)
### EDIT ###
After excessively extensive research, the writing utensils I ended up getting to give out with these: Paper Mate InkJoy mini retractable ballpoints (4.5″L), and this ultracheap pack of mini mechanical pencils (3.75″L).
Now that the assembly line process is down, each batch of 6 (discretized to a single sheet of cover stock) takes half an hour.
Post link

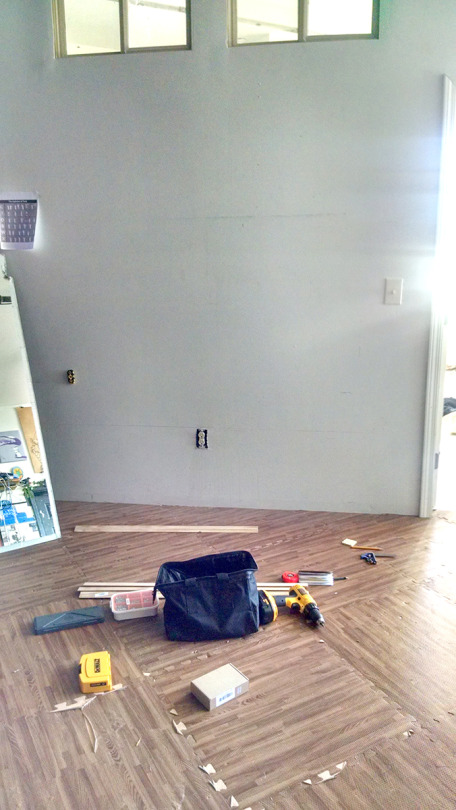
For the past couple of years, my indoor practice space has been a weirdly-shaped trapezoid of living room with foam puzzle mats and a slightly cracked mirror we picked up for free that leans haphazardly against the wall. It’s the space I spend the most time in aside from my room, so I decided to make it suit its function a little better.
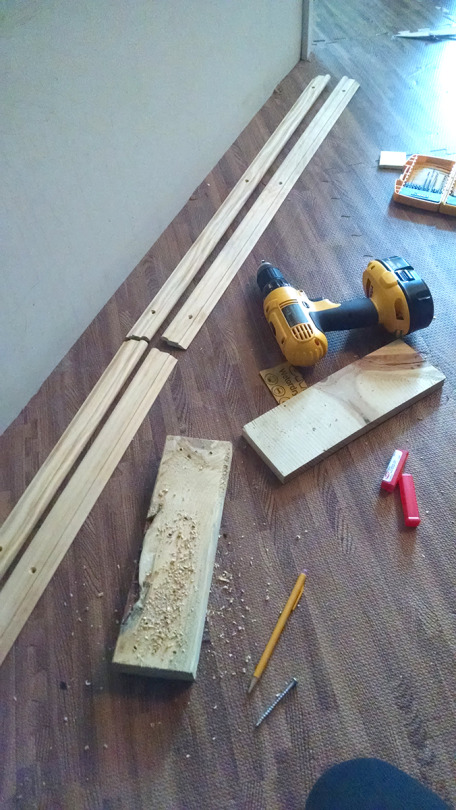
This mirror is heckin’ heavy, not to mention sharp-edged, and obviously couldn’t be trusted to plastic mirror mounts. I had just finished making a router table, so I decided to make a mount sort of like a photo frame: by routing a channel the depth of the mirror out of the back of some solid wood trim, and then screwing the trim into studs. This would give the mirror a very sturdy base to rest on top of, and it would be snugly held against the wall along its entire length.
Since I wasn’t planning to frame the sides, I made the trim a little longer than the mirror for aesthetic reasons.

yay routing! checking the depth fit

before, ew. there was a surprise outlet behind the perma-leaning mirror!
predrilling the trim to line up with the studs (the only reason I cut them in half was to fit them in my backpack on the way home)
I highly recommend recruiting a helping hand to hold things level, but if you are #foreveralone like me, you can pull fun stunts with your feet

janky mirror up! I also mounted a pegboard on the left to hold my spinny props.

As the largest open space in my house, this area does double duty with my housemates’ VR setup (note the sensor mounted at the top right), so we need to be able to quickly cover all the mirrors to minimize sensor confusion. I picked up 5 yards of cream lining from the fabric store and sewed a tunnel top to make some sweet floor length curtains. Bonus: they make the space look bigger and conceal the cracked mirror edges :)

Post link


It’s settled: I’m in love with my wood router. Here are the chronicles of the simple/fancy router table I designed for it.
At heart, a router table is just a thing you use to mount your router upside down, so let’s be real: the only component that actually matters here is a copy of your baseplate pattern on a piece of plywood, which you can just trace if you want something quick. Unfortunately, I am a fancy lady and wanted a couple of extra bells and whistles for convenience.
(You could do everything here using only a router if you wanted, but I used a lasercutter for most of it since I happen to have cheap access to one.)
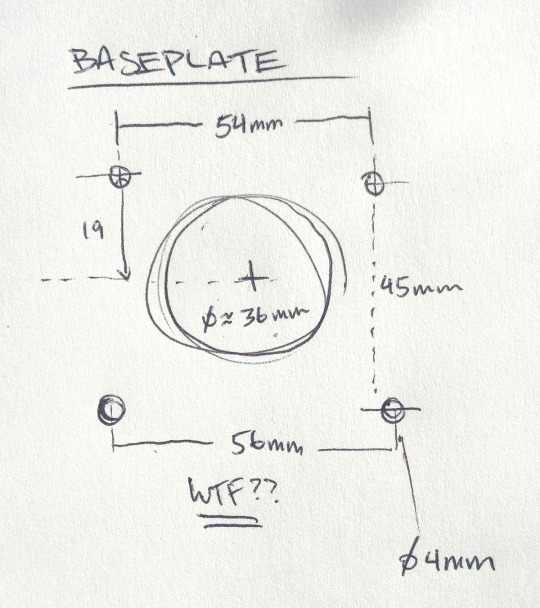
I started by measuring my horrifically proprietary baseplate, which had some truly annoying offsets (this is a problem common to all router baseplates). Like, why differ the spacing of the top and bottom pairs of screws by only 2mm? clearly so that people will throw up their hands and buy your mounting hardware out of sheer frustration
I didn’t want to buy an entire box of metric screws just to get the four measly M4 screws I needed for mounting. Fortunately, a friend saved me by “finding” some at work.
I futzed around on a 12x24 area in Illustrator to make the template. I only wanted the table to be about 16″ long for portability, so I used the remaining area for a fence and an ergonomic push stick (AHEM NOT A SEX TOY).

Afence is a straight guide for feeding material into the router at a particular offset. Again, you could just get away with clamping on any old straightedge, but I don’t like carrying around extra clamps for contingencies; those things are heckin’ heavy. So I picked up two ¼-20 hex bolts and wingnuts, ran slots down the length of the table to make it super easy to adjust, and decided to etch ruler marks into the sides of the table to make it easier to eyeball whether the alignment was roughly even. The center slot doesn’t actually have a purpose right now; I just figured it would come in handy at some point in the future, maybe for circle cutting.
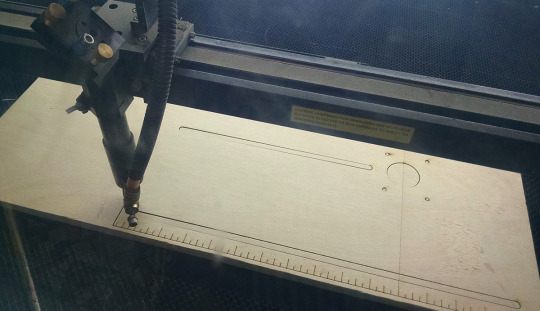
I then lasercut the DXF from a 1/2″ thick piece of nice birch craft plywood (again, I’m a fancy lady; you could just use whatever sturdy plywood you have lying around). Note that in the final design I decided to make the board a little narrower and cut it entirely self-contained within the plywood, as opposed to just making one straight cut across. This is to ensure that the edges are squared, which is rather useful.
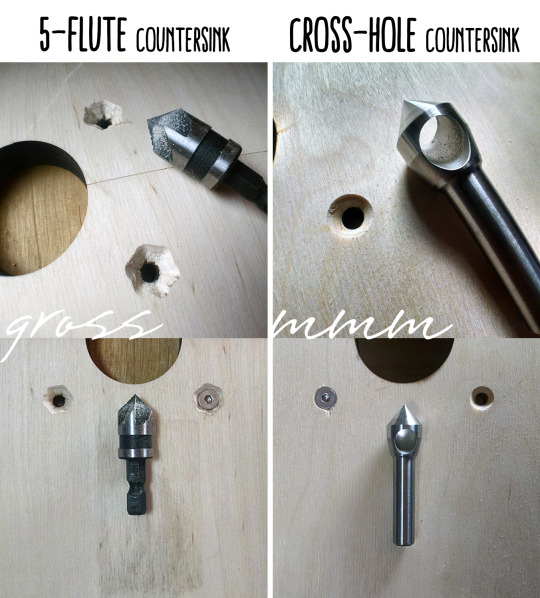
The screws need to sit flush with the top of the table, so I countersunk the mounting holes. It was fortunate that I did this on a test piece, because the 5-flute countersink bit I had on hand was terrible and made a countersink like a toddler had tried to chisel it with a screwdriver.
I highly recommend everyone just throw out their shitty many-fluted countersink bits right now and replace them with a cross-hole (or “zero flute”) countersink, because damn do those things cut flawlessly.
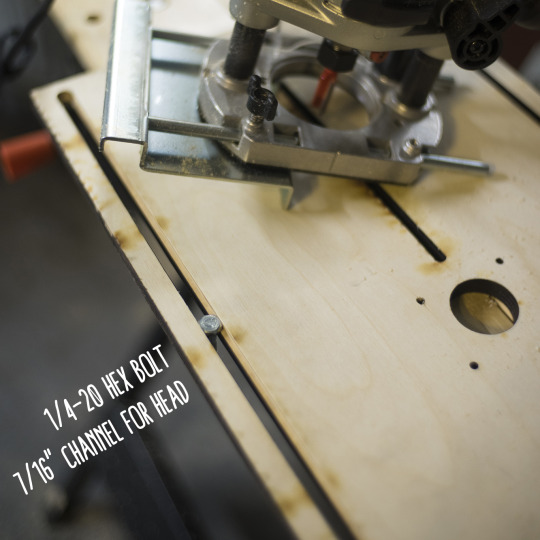
After using the adjustable fence for a bit, I decided to plunge route 7/16″ recesses into the backs of the 1/4″ slots. This has the dual benefit of (a) holding the hex heads so that you don’t need to have a wrench on hand, and (b) letting the heads sit flush with the underside of the table, so the fence can sit anywhere over the surface you’re clamped to.
All done! The final touch is a dust port on top of the fence that a shopvac can plug into, to keep your lungs clear :)
Materials ($10-20)
- 1/2″ thick plywood, 12″x24″
- (2x) ¼-20 hex bolts 1-1/4″L + wingnuts
- (4x) 20mm M4 countersunk screws (router dependent)
- dust port (~$10)
Tools used
- router (obviously) with plunge base and fence
- digital calipers
- lasercutter (optional; can do everything with router)
- bar clamps
- 7/16″ router straight bit
- countersink bit
- any workbench
Post link

my book of weird email invitations is finally in print! so you don’t get your expectations up it’s basically just a collection of email invitations I have sent to my social mailing list, but lovingly typeset in LaTeX with bizarre annotations and occasional cartoons and a slightly apothecarial 1920s-inspired hand-drawn cover.
sorry the shipping costs more than the book
(conversely, I priced the book below the shipping!)
publishing infodump
“Publishing” my first “book” was a truly non-herculean effort that ran an inimitable week in the creating and three months in the waiting!
The inside is mostly text, plus a few simple line drawings that did not require high-quality printing. I was looking for an economical softcover B&W book between 4"x6" and 5"x7", with a page minimum less than 50, and no order minimum. I did the cover design and interior layout myself (LaTeX never ceases to be useful!), so I didn’t need any additional design or advertisement services. I didn’t immediately want an ISBN (because let’s be real, only my friends are going to buy this), but also didn’t want to rule out that option in the future. I would have loved a matte cover, but couldn’t find a suitable PoD printing service that offered matte softcovers.
This Medium post comparing several small-batch PoD printers was extremely informative. I researched just about every custom print service there is out there, and ended up going with Lulu primarily because they were the only PoD service offering a low-cost B&W option smaller than 5"x7". My main issue was spine misalignment, as my 48-page book had a spine 0.09" wide, which was (understandably) too close to the margin of alignment error to be usable. I ended up scrapping the spine design entirely in the third and final proof run. I thought Lulu’s turnaround time was a little slow, as it took close to 3 weeks to receive each run, but their customer service is fantastic and they replaced my first two botched runs at no cost.
If I publish any visually oriented content in the future (a photo book or glamour magazine of my cat is definitely on the table), I will likely go with Blurb. Their sample print pack has great photo quality and they seem to offer a good range of formats and quality for presenting different types of visual content.
Post link


