#router


Build you own rocking chair course - Day 5
Cutting headrests, mounting rockers and fitting back supports
#woodworking
#chair
#rockingchair
#woodshop
#bandsaw
#festool
#saw
#chairmaker
#router
#shoplife
#woodwork
#woodworks
#wood
#woodschool
#handmade (at Canadian Woodworks Furniture)
https://www.instagram.com/p/B3w93QyHQxS/?igshid=145390k0s2u55
How to Hardwire Your Home, Tech Without EMF!
Mar. 10, 2022 - The Human Frequency
A simple guide on how we hardwired our home for internet and phone, and how we live without cell phones and wifi and still have the same access as everyone else. Following our instructions, you too can stay connected and live a healthy and safe life, hardwired.
A companion video to my article from March 7: https://www.thechembow.com/hardwire-your-home


It’s settled: I’m in love with my wood router. Here are the chronicles of the simple/fancy router table I designed for it.
At heart, a router table is just a thing you use to mount your router upside down, so let’s be real: the only component that actually matters here is a copy of your baseplate pattern on a piece of plywood, which you can just trace if you want something quick. Unfortunately, I am a fancy lady and wanted a couple of extra bells and whistles for convenience.
(You could do everything here using only a router if you wanted, but I used a lasercutter for most of it since I happen to have cheap access to one.)
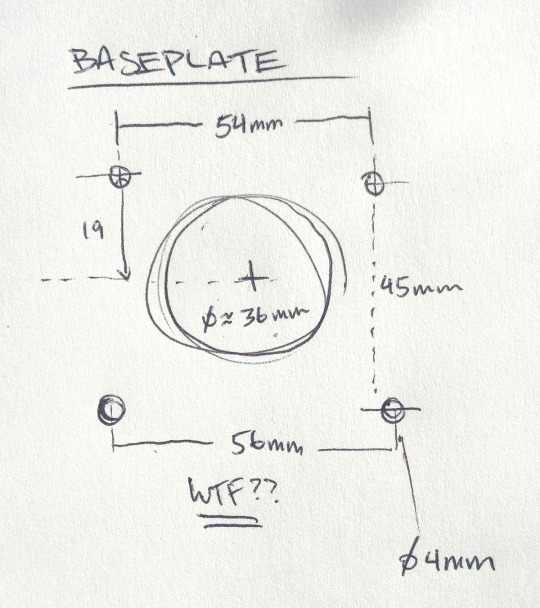
I started by measuring my horrifically proprietary baseplate, which had some truly annoying offsets (this is a problem common to all router baseplates). Like, why differ the spacing of the top and bottom pairs of screws by only 2mm? clearly so that people will throw up their hands and buy your mounting hardware out of sheer frustration
I didn’t want to buy an entire box of metric screws just to get the four measly M4 screws I needed for mounting. Fortunately, a friend saved me by “finding” some at work.
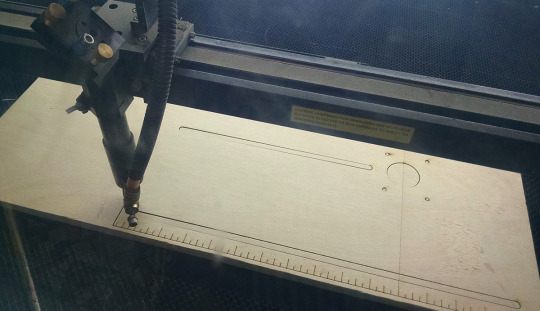
I futzed around on a 12x24 area in Illustrator to make the template. I only wanted the table to be about 16″ long for portability, so I used the remaining area for a fence and an ergonomic push stick (AHEM NOT A SEX TOY).

Afence is a straight guide for feeding material into the router at a particular offset. Again, you could just get away with clamping on any old straightedge, but I don’t like carrying around extra clamps for contingencies; those things are heckin’ heavy. So I picked up two ¼-20 hex bolts and wingnuts, ran slots down the length of the table to make it super easy to adjust, and decided to etch ruler marks into the sides of the table to make it easier to eyeball whether the alignment was roughly even. The center slot doesn’t actually have a purpose right now; I just figured it would come in handy at some point in the future, maybe for circle cutting.
I then lasercut the DXF from a 1/2″ thick piece of nice birch craft plywood (again, I’m a fancy lady; you could just use whatever sturdy plywood you have lying around). Note that in the final design I decided to make the board a little narrower and cut it entirely self-contained within the plywood, as opposed to just making one straight cut across. This is to ensure that the edges are squared, which is rather useful.
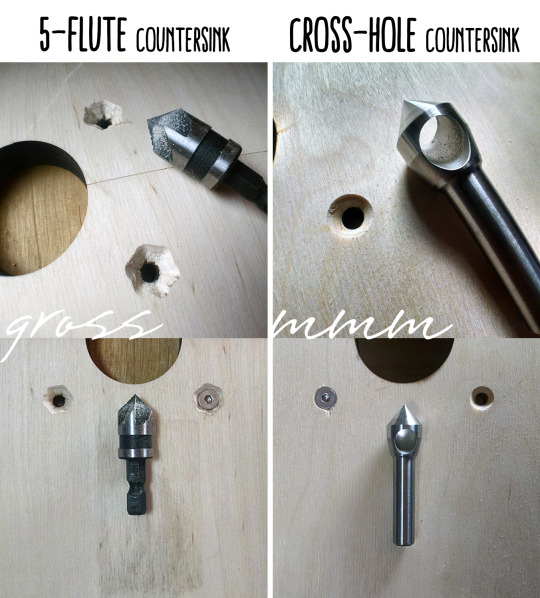
The screws need to sit flush with the top of the table, so I countersunk the mounting holes. It was fortunate that I did this on a test piece, because the 5-flute countersink bit I had on hand was terrible and made a countersink like a toddler had tried to chisel it with a screwdriver.
I highly recommend everyone just throw out their shitty many-fluted countersink bits right now and replace them with a cross-hole (or “zero flute”) countersink, because damn do those things cut flawlessly.
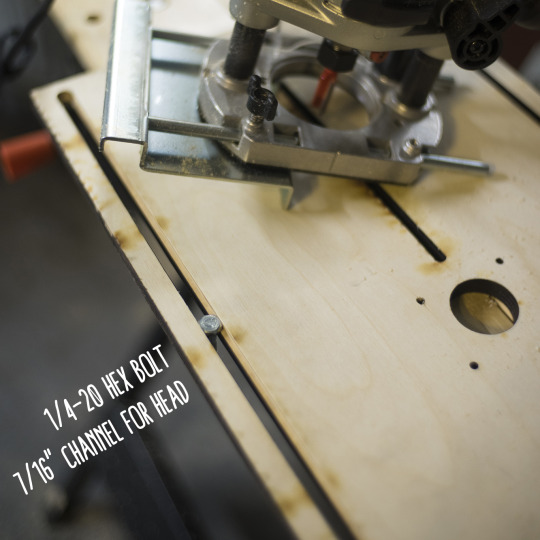
After using the adjustable fence for a bit, I decided to plunge route 7/16″ recesses into the backs of the 1/4″ slots. This has the dual benefit of (a) holding the hex heads so that you don’t need to have a wrench on hand, and (b) letting the heads sit flush with the underside of the table, so the fence can sit anywhere over the surface you’re clamped to.
All done! The final touch is a dust port on top of the fence that a shopvac can plug into, to keep your lungs clear :)
Materials ($10-20)
- 1/2″ thick plywood, 12″x24″
- (2x) ¼-20 hex bolts 1-1/4″L + wingnuts
- (4x) 20mm M4 countersunk screws (router dependent)
- dust port (~$10)
Tools used
- router (obviously) with plunge base and fence
- digital calipers
- lasercutter (optional; can do everything with router)
- bar clamps
- 7/16″ router straight bit
- countersink bit
- any workbench
Post link
