#lasercut


 / lasercut")
 / lasercut")
 / lasercut")

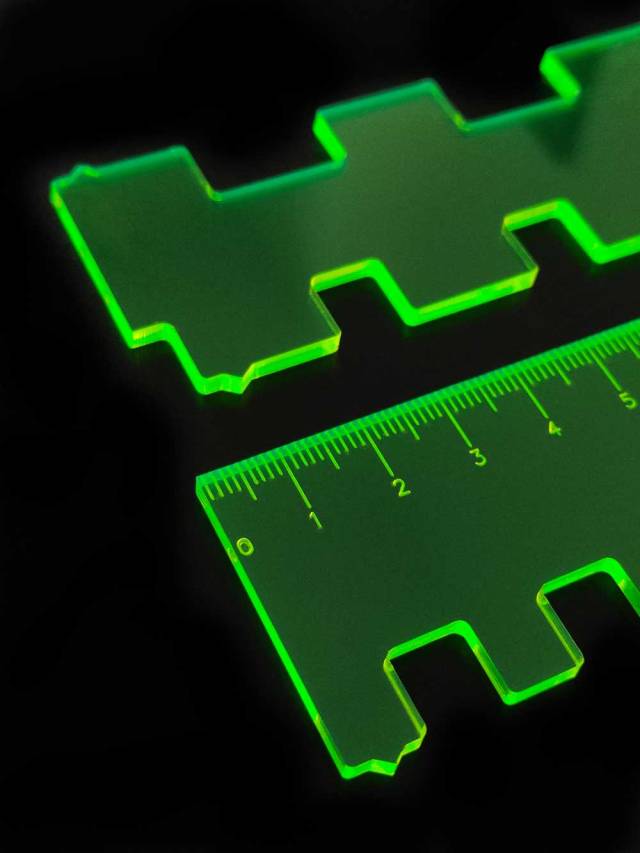
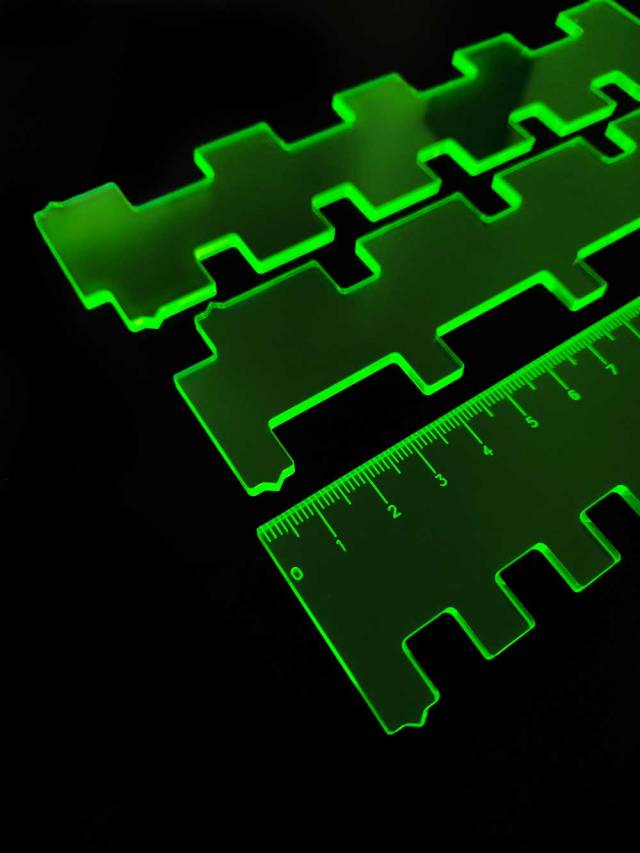
transparent fluo acrilic needle pushers for bulky gauge knitting machines · contact me for custom orders: I can make for different gauges with different pitches: 1/1 · ½ · 2/2 · 1/5 · 2/3 · 1/3 · 3/1
• fine (3,5 e 3,6 mm)
• standard (4,5 mm)
• bulky (9 mm)
• mid (6,5 mm)
• europee finezza 5 (5 mm)


The observatory necklace and brooch pin is back in stock with a bit of a new look! www.prettylittleearth.etsy.com
Post link

I just finished this fun fresh lemonade set for a client. It would look great on a tiered tray as well. #freshlemonade #woodkit #diyhomedecor #diyprojects #diy #paintedtieredtrayset#lasercut #tieredtray #homedecor #lemons #lemondecor #crafts #create #farmhouse #summer #decor #createeveryday (at Layton, Utah)
https://www.instagram.com/p/CcNvy1BLIUo/?igshid=NGJjMDIxMWI=
Post link


Flock Ceramics
***Half price sale on handmade Crimbo presents and stocking fillers ***
Last christmas post date is the 21st december
Post link


Work on the Busou Shinki battle arena is now complete! I’m really happy with how it turned out and glad to finish this project after having it on my mind for so long.
I need to get round to setting up some proper action scenes, but for the moment Strarf is on hand to give you a sense of scale whilst Arnval and Mizuki take a break under a Re-Ment kotatsu.
Post link


In my quest to build a model battle arena for my Busou Shinkis, I’ve now finished getting the parts cut at a nearby company with laser cutting machine for hire (thanks Bristol Design Forge!).
I’ve used a combination of 3mm laser-grade plywood and 5mm white acrylic for the parts. If you’re lasercutting plywood, I’d definitely recommend checking the material for any warping and using fixings to keep it as flat as possible on the bed of the machine. I’d also recommend setting up the cutting order so that any engraving is done first, then internal cuts (i.e. holes in parts) and then finally external cuts. This is so that if the material is slightly warped, it’s less likely to interfere with the position of later cuts as parts are cut out and drop onto the bed.
As you can see from the photos, there are loads of parts but luckily they all fit snuggly together. The next step is to get the plywood painted up, so I’d better get to it!
Post link
Material for the Busou Shinki battle arena getting cut in the laser cutting machine!


Rogan Brown paper microbes. The collection of both hand and laser-cut specimens are inspired by tree moss, cell structures, bacteria, coral, diatoms, and radiolaria.
Post link
Fricking laser beams. #calligraphy #lasercut #industrialdesign (at Katherine Harper Hall)


OTD four years ago, in 2016, NASA’s Juno Mission arrived at Jupiter and began doing ALL THE SCIENCE. Pop on over to our online shop to pick up some goodies to celebrate the gorgeousness of this gas giant!
Featured above:
Mismatched laser cut Jupiter and Juno spacecraft wooden earrings
3D printed gold steel Juno Mission logo necklace
Juno Mission spacecraft print socks
Swirls on Jupiter steampunk choker (as imaged by NASA’s Junocam)
Click for quick links to browse all of our Jupiter productsand Juno products.
-Summer & Emily
Post link
⚡️⚡️
#cliteracy
#clitthunder
#stencil
#lasercut
#sophiawallace
#streetart (at New York, New York)


At @artbreakers_vancouver in two weeks I will have some of these limited edition laser cut acrylic pins! Come and get yourself one of these spooky pals at ArtBreakers on Oct 26 and 27 at the Heritage Hall on Main St in Vancouver!
.
.
.
.
#artbreakers #illustration #lasercut #Halloween #spooky #creepy #pingamestrong #spookypins #womeninanimation #acrylicpins #acrylic #madeinvancouver
https://www.instagram.com/p/B3h07U2j2BB/?igshid=1n1lk0ubdggbl
Post link

When I was doing some power setting tests on the laser cutter last week, I made the image backwards so I could try block printing with the acrylic plate. Today I gave it and shot and it worked out great!
.
.
.
#lasercut #lasercutting #blockprinting #handblockprinting #neonpink #speedball #magenta #yvrartist #maker #acrylic #womeninanimation #illustration #mixedmedia #geekcrafts #diylife #diy #makersgonnamake #processshot #printing #ink #madeinvancouver #goodluck #dice #dnd #dungeonmaster #swordandsworcery
https://www.instagram.com/p/B14edasjyhR/?igshid=1hdwrabczohzl
Post link

I made these one eyed goat pins on the laser cutter at @makerlabs yesterday! I’m trying hard to repurpose acrylic scraps since I’m still learning and trying to reuse as much as possible. The eye pupils I filled in with red paint
.
.
.
#lasercut #lasercutting #makerlabs #goat #blackgoat #pingamestrong #pin #yvrartist #illustration #indieartist #acrylic #diy #lapelpin #womeninanimation #toolsforwomen
https://www.instagram.com/p/B11ylLUjkmc/?igshid=11wp0jqtnfwuq
Post link

Just packed up this #customlasercut order- a set of 4 stat trackers for D20 dice. (I just *happened* to have one in my studio for this photo.)
#todaysworktable #dice #D20 #dungeonsanddragons #lasercut
Post link

My regular cat studs will soon come in green eyes, gold eyes, or SKULL options.
#laseretched #handpainted #lasercutjewelry #lasercut #catskull #skull #vultureculture
Post link

I try to have a fun project on hand constantly, something I can do to warm up my creative brain before a studio workday. Recently I’ve been painting patterns on this #lasercut wooden snake, kind of like a #tinydoodles project changed shape. I want to do more projects like this, and I think animal silhouettes really lend themselves well to this process. Maybe a bird next?
#handpainted #snakemedicine #patterns #creativewarmup #makersgonnamake #freelanceartist
Post link

I picked up more #radiantacrylic so I’ll be restocking #monstera leaves earrings and necklaces soon. Here’s one on an actual monstera leaf at @tillerystplantco!
#lasercutjewelry #plantsmakepeoplehappy #tropicalleaves #lasercut
Post link


It’s settled: I’m in love with my wood router. Here are the chronicles of the simple/fancy router table I designed for it.
At heart, a router table is just a thing you use to mount your router upside down, so let’s be real: the only component that actually matters here is a copy of your baseplate pattern on a piece of plywood, which you can just trace if you want something quick. Unfortunately, I am a fancy lady and wanted a couple of extra bells and whistles for convenience.
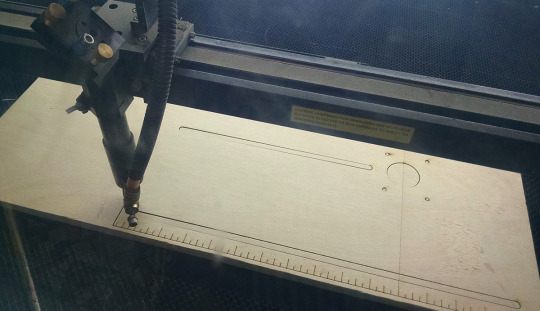
(You could do everything here using only a router if you wanted, but I used a lasercutter for most of it since I happen to have cheap access to one.)
I started by measuring my horrifically proprietary baseplate, which had some truly annoying offsets (this is a problem common to all router baseplates). Like, why differ the spacing of the top and bottom pairs of screws by only 2mm? clearly so that people will throw up their hands and buy your mounting hardware out of sheer frustration
I didn’t want to buy an entire box of metric screws just to get the four measly M4 screws I needed for mounting. Fortunately, a friend saved me by “finding” some at work.
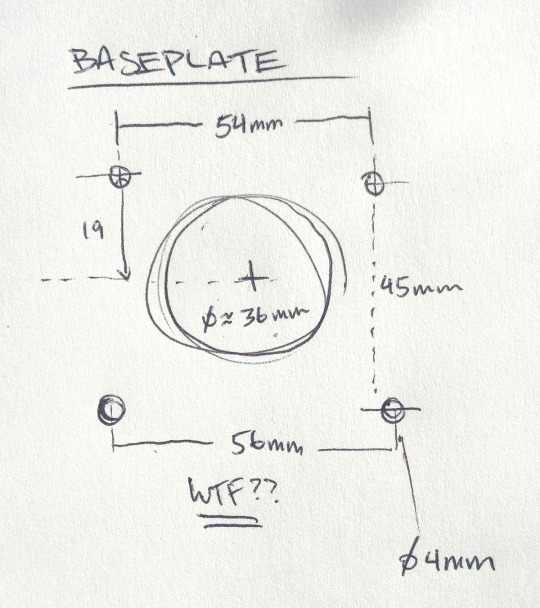
I futzed around on a 12x24 area in Illustrator to make the template. I only wanted the table to be about 16″ long for portability, so I used the remaining area for a fence and an ergonomic push stick (AHEM NOT A SEX TOY).

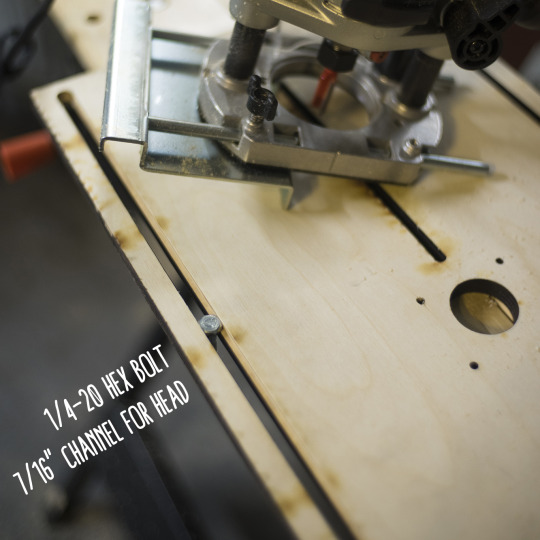
Afence is a straight guide for feeding material into the router at a particular offset. Again, you could just get away with clamping on any old straightedge, but I don’t like carrying around extra clamps for contingencies; those things are heckin’ heavy. So I picked up two ¼-20 hex bolts and wingnuts, ran slots down the length of the table to make it super easy to adjust, and decided to etch ruler marks into the sides of the table to make it easier to eyeball whether the alignment was roughly even. The center slot doesn’t actually have a purpose right now; I just figured it would come in handy at some point in the future, maybe for circle cutting.
I then lasercut the DXF from a 1/2″ thick piece of nice birch craft plywood (again, I’m a fancy lady; you could just use whatever sturdy plywood you have lying around). Note that in the final design I decided to make the board a little narrower and cut it entirely self-contained within the plywood, as opposed to just making one straight cut across. This is to ensure that the edges are squared, which is rather useful.
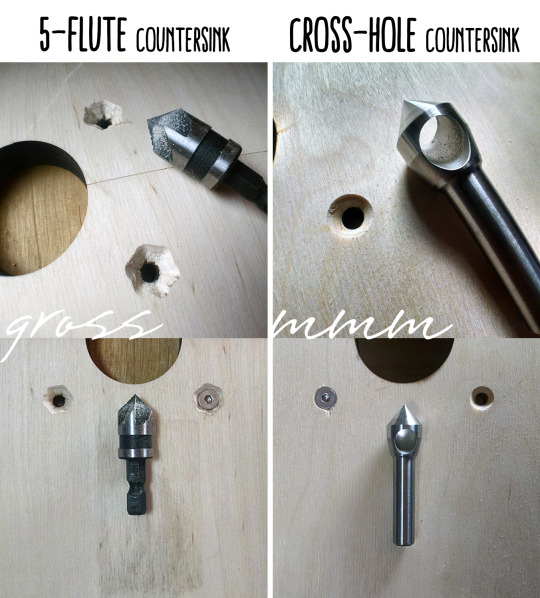
The screws need to sit flush with the top of the table, so I countersunk the mounting holes. It was fortunate that I did this on a test piece, because the 5-flute countersink bit I had on hand was terrible and made a countersink like a toddler had tried to chisel it with a screwdriver.
I highly recommend everyone just throw out their shitty many-fluted countersink bits right now and replace them with a cross-hole (or “zero flute”) countersink, because damn do those things cut flawlessly.
After using the adjustable fence for a bit, I decided to plunge route 7/16″ recesses into the backs of the 1/4″ slots. This has the dual benefit of (a) holding the hex heads so that you don’t need to have a wrench on hand, and (b) letting the heads sit flush with the underside of the table, so the fence can sit anywhere over the surface you’re clamped to.
All done! The final touch is a dust port on top of the fence that a shopvac can plug into, to keep your lungs clear :)
Materials ($10-20)
- 1/2″ thick plywood, 12″x24″
- (2x) ¼-20 hex bolts 1-1/4″L + wingnuts
- (4x) 20mm M4 countersunk screws (router dependent)
- dust port (~$10)
Tools used
- router (obviously) with plunge base and fence
- digital calipers
- lasercutter (optional; can do everything with router)
- bar clamps
- 7/16″ router straight bit
- countersink bit
- any workbench
Post link

@sarlise #suiix band wear @therushinghour sample #lasercut jacket tonight rocking @tropfest tonight! If you haven’t heard SUIIX music, check them out on @spotify !! #fashion #music #beauty #tropfest #shirtfilm #picnic #livemusic #valentine #smartwoman #beauty #blue #blackandwhite #live #music #gig #concert #outdoor #confident #sunday
Post link

Jac our CD wearing @therushinghour - New site is almost ready! pants by @gormanclothing thank you @foraggiophotographic @sayo_prada for the photos #terrarium #fashion #instagood #interiorstyle #interior #instadaily #minigarden #totoro #handmade #design #bespoke #makegoodart #thankful #stylist #ootd #minigarden #blogger #fashionista #lasercut #whywhiteworks #life
Post link


Baker Bunneh DIY house kits are back! Is his house blue, pink, polka dot, on fire? It’s all up to you!
Each kit is laser cut and engraved on birch plywood. I’ve included one I painted last year!
Post link


Hi Bunnehs! Special Holiday Shop Update! So happy I was able to do some more special ornaments/holiday items this year, they are up in my shop at heathersketcheroos/shop.com ! I will be closing/sending out last orders on the 20th!
Post link