#nails inc


I almost forgot to post these! I did my friend’s nails on our Disneyland trip ages ago. She’s going through a blue phase so luckily I had a great blue polish with me!
Post link


Coming out of the wood work with the tutorial you never asked for. That I did so long ago I might not remember it anymore but a picture is worth a thousand words, right?
Let’s get down to business!
SUPPLIES (I think):
-Lou it Yourself nail vinyls, small, medium, and large
-Rock Hard base coat
- @opi-products “Never Have Too Mani Friends!”
-OPI “Take a Right in Bourbon”
- Nails Inc. “45 Second Top Coat with Kensington Caviar”
LET’S PAINT SOME NAILS
1. Base coat. Easy. Done. Yes, you need a base coat. Fight me.
2. Take the large width nail vinyl and place it horizontally on your nail. As far down as you want. Whatever floats your boat. You gon’ paint everything above that line. I wanted about ¾ to be painted so BAM.
3. Look at that beautiful opaque black with a nice crispy line. And that hot mess around the nails. That’s a problem for future me. I think I did two coats??? QUCK DRY TOP COAT THAT FOR THE NEXT STEP.
4. Now you’ve got to place the nail vinyls to make the silver stripes. I’m not going to lie I spend a ridiculous amount of time on this and all of the sizes because I could. The thinnest one being between the lines. You do you here. Make those lines your own! Paint carefully between the lines. I went horizontally on the nail again here to fill it in. Two coats??? Probably.
5. Peel that tape off and hope your lines turned out properly. WOOH. Success. Remember that problem for future me? The future is now and it’s time to clean that up. A Q-Tip with some nail polish remover should do the trick.
FINISHED. You know I quick dry top coated that because I have no patience or coordination.
Post link

These were technically my “Fourth of July” nails, but since they weren’t quite appropriately themed I waited a bit to post them. (And maybe I’m a bit lazy…) I was really happy with how these turned out. They got a bit mattefied as a wore them for a few days, but I feel like it helped me photograph them while I was out in the intense Vegas sun.
I was pretty entertained by the fact that each color was a different nail polish brand. Not sure how I managed that!
Post link

 by beebeely-look featuring a nail polish ❤ liked on PolyvoreCroppe")
Post link

Post link


FLOWERS & STARS ~
This nail art has everything that I like aka flowers, stars and the color pink but idk I’m not a fan of it lol. It’s ok I would say.
Polishes I used :
Nails Inc. : Chiltern Street
Bourjois : Orange Création
Sinful Colors : Yolo Yellow
Essie : Beauty Marked
White Polish
Blog|Twitter|Pinterest|Facebook
Post link


ARTSY & EARLY SUMMER ~
Maybe if I do a summer nail art, sunny days will come faster. How the hell can it snow in April ? When I saw this nail art by Nails.by.Nikk, I really liked how original it was.
Polishes I used :
Essie : Crop Top & Roll
Essie : Turquoise & Caicos
Maybelline : Fire Island
Maybelline : Go Bare
Maybelline : Sea Sky
Sinful Colors : Beaches And Cream
Kiko : n°054
Nails Inc. : Chiltern Street
White & Black Polishes
Blog|Twitter|Pinterest|Facebook
Post link
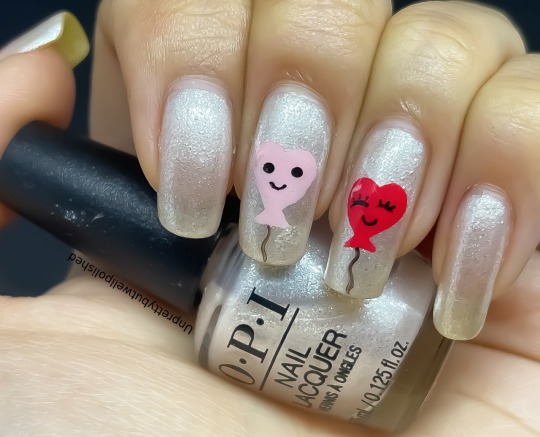
STILL DOING VALENTINE’S DAY NAIL ART EXCEPT ON VALENTINE’S DAY ~
Because I like being original and not doing like everyone else… I post a valentine’s day themed nail art on March lol. I wanted a quick and easy mani so when I saw this design by Hannah_Nails_It I decided to give it a shot. The final result is kinda cute I think. I especially like the red balloon. She has eyelash extension on lol.
Polishes I used :
OPI : Naughty And Ice
Nails Inc. : Chiltern Street
Barry M : Passion Fruit
Maybelline : Winter Baby
Black Polish