#paint splatter


So I made some fun brush stroke/paint splatter textures and I thought I would share (right click and open in new tab for full resolution images).
Once I make few more I’ll put them up for grabs on Cubebrush in one pack, so this is just a free sample.
Let me know what you guys think and feel free to show me if you use them in your artworks :) I’m really interested what other people can do with them.
Post link


Here are some free abstract glowcore backgrounds anyone can use for anything at all! No credit needed, but it is appreciated! <3
Post link
If you missed part one (armour) you can find it HERE.
If you missed part two (trousers) you can find it HERE.
If you missed part three (cloak) you can find it HERE.
If you missed part four (wood/leather) you can find it HERE.
If you missed part five (bronze/gold) you can find it HERE.
In this last tutorial I will run over how I paint some of the details and show the finished result!
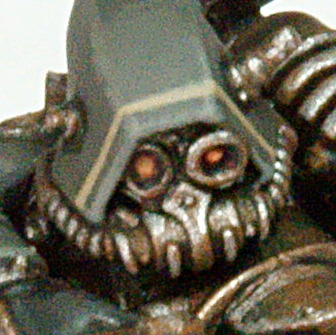
Stage 20 - Eyes

To paint the eyes and other ‘glowy’ bits I start with a basecoat of two parts Jokaero Orange and one part Mephiston Red. I then build up layers, leaving a little of the previous coat showing each time to get a light effect. For the second layer I use Jokaero Orange. The layer after that is one part Jokaero Orange and one part Averland Sunset and for the final coat (pretty much just a dot) I mix a little white in to the previous mix.
Stage 21 - Cables
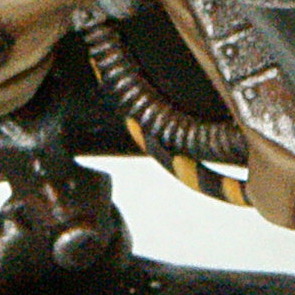
I like to do most of the cables with yellow and black striping because I think it looks very effective. To do this I paint Averland Sunset in stripes over a black basecoat. I then mix a little white with the Averland Sunset and paint along one edge of each stripe. I finish with a mix of one part Stormvermin Fur and one part Abaddon Black to paint a grey edge to each black stripe in a similar style.
Stage 22 - Rosarius

The parchment is basecoated with Steel Legion Drab and then highlights are achieved by gradually mixing in Karak Stone. A mix of Kharak Stone and white is used for the final highlight and then the whole parchment is shaded using a wash of two parts Aggrax Earthshade, one part Seraphim Sepia and two parts Lahmian Medium.
The wax seal is basecoated with a 50:50 mix of Mephiston Red and Rhinox Hide. A small amount of Karak Stone is mixed in for some highlights and it is shaded with a wash of Aggrax Earthshade mixed with a little Lahmian Medium.
Stage 23 - Cloak Trim
To paint the trim I first use Zandri Dust and carefully paint a line around the hood and outside of the cloak. I then do the same, covering this line with Karak Stone to make it a bit lighter.
The End Result

After doing the base, this is a finished Skitarii Ranger!
I hope that this multi-part tutorial has been interesting. If you try out this colour scheme, please send me some pictures!
If you missed part one (armour) you can find it HERE.
If you missed part two (trousers) you can find it HERE.
If you missed part three (cloak) you can find it HERE.
If you missed part four (wood/leather) you can find it HERE.
I use this same set of colours and technique to paint the trim on the gun, belt buckle and censors.
Stage 17

Apply a basecoat of Runelord Brass to the areas that you want to be bronze/gold.
Stage 18

Apply a careful wash of Reikland Fleshshade (Gloss) to the areas you just basecoated. Guide the wash to carefully enter the recesses and shade.
Stage 19

Make a mix of two parts Runelord Brass to one part Runefang Steel. Apply this as an edge highlight to the bronze/gold parts of the mini.
Next time I will cover the various details on the model in the final post for these minis.
If you missed part one (armour) you can find it HERE.
If you missed part two (trousers) you can find it HERE.
If you missed part three (cloak) you can find it HERE.
I use this same set of colours and technique to paint the gun casing, pouches and backpack/straps. This saves the mini from having too much going on with lots of different shades and textures.
Stage 14

Apply a basecoat of Rhinox Hide to the gun casing, pouches and backpack.
Stage 15

Do a mix of three parts Steel Legion Drab and one part Rhinox Hide and apply an edge highlight to the parts you previously base coated.
Stage 16

Mix a small amount of Lahmian Medium with Agrax Earthshade and apply a wash to the brown parts to blend the highlights in and apply a bit of shading.
Next time I will show how paint the bronze/gold details.
If you missed part one (armour) you can find it HERE.
If you missed part two (trousers) you can find it HERE.
Stage 9

Make a mix of approximately three parts Stormvermin Fur to one part Abaddon Black. Apply this as a basecoat to the cloak. You may need two thin layers to get an even covering.
Stage 10

Mix a wash of four parts Nuln Oil, one part Lahmian Medium and one part Athonian Camoshade. Apply this to the whole of the cloak, using your brush to ensure it doesn’t pool to much (especially on flat surfaces).
Stage 11

Make a mix similar to stage 9 in which you basecoated the cloak. I like to make this layer a little bit lighter than the original basecoat by including a little more Stormvermin Fur. Apply this mix to the majority of the cloak as a highlight, being careful to leave your shaded areas in the creases of the cloak.
Stage 12

Using Stormvermin Fur, apply a further highlight to the edges of the cloak and the most raised parts.
Stage 13

Mix a small amount of Administratum Grey with Stormvermin Fur and apply a final highlight to the edges and highest points of creases.
Next time I will do the wood/leather.
If you missed part one (armour) you can find it HERE.
Stage 5

Apply a base coat of Steel Legion Drab to the trousers. To ensure that you get an even finish you will want to apply two thin coats.
Stage 6

Make a 50:50 mix of Steel Legion Drab and Zandri Dust and carefully paint the raised sections and creases for a first highlight.
Stage 7

Apply a wash over the trousers. I use a mix of two parts Reikland Fleshshade, one part Agrax Earthshade and one part Lahmian Medium.
Stage 8

To finish off the trousers, mix two parts Zandri Dust with one part Kharak Stone and apply this final highlight the most raised areas and creases of the trousers.
Next time I will cover how to paint the robes.
Hi everyone. I’ve had a few requests from people wanting to know how I painted my Skitarii. Here is the first of a short series showing you exactly how it is done;
Stage 1

For stage 1 I airbrush Iron Hands Steel over a basecoat of Chaos Black. Iron Hands Steel is an airbrush paint from the Forgeworld Range which is now sadly discontinued. It is slightly darker than Leadbelcher,so you could get exactly the same effect by mixing in a tiny bit of Abaddon Black, but I don’t think it would significantly alter the final effect by using Leadbelcher.
Stage 2

I now use an old brush to stipple Scrag Brown over the metallic parts of the miniature. This helps give it a rusty effect. The aim is to get into a few of the crevasses and lightly stipple the flat surfaces, but leave a fair amount of the metal showing.
Stage 3

Apply a wash over all of the metallic areas to provide shading. I tend to use a mix of around 4 parts Nuln Oil, 2 parts Agrax Earthshade, 1 part Lahmian Medium.
Stage 4

To finish the armour apply an edge highlight of Runefang Steel to all of the armour. It is also good to do a few scratches to make it look worn and enhance that rusty look.
Next time I will cover to how paint the inner robes.