#citadel miniatures


New warbuggy all done, ork buddies are now ready to die historic in the grim dark future of the 41st millennium.
Post link


Hello Everyone!
Here are the final photos of Bjorn the Fell-Handed, and the whole “At Night They Howl” diorama.
If you like miniature painting at all, follow this man. He’s at another level.
Post link

Evil Sunz Shokkjump Dragsta
Today I finally finished off my Shokkjump Dragsta! I started this model as soon as I received the Speed Freekz boxed game and got really close to finishing it but then got distracted with other projects. This was the most enjoyable model I have ever painted! I really can’t wait to paint all the other new vehicles for my Evil Sunz army. I’ll be entering this in my FLGS’ painting competition next month. Wish me luck!
Miniatures completed in 2019: 12 (10 infantry and 2 vehicles)
P.S. You can now follow me on Twitter at @InaHidingPlace
Post link


Forgeworld Kataigida Secutarii Axiarch
As part of my doubles tournament army I wanted to use some Secutarii. I got a unit of Hoplites done (they are very nearly finished and will be shared soon) and to give them a boost I wanted them to be led by an Axiarch. As there isn’t currently a miniature available for this character I converted one from Inquisitor Greyfax which provided the perfect base due to her long coat. I used a Secutarii head and backpack and now she fits in perfectly.
Miniatures completed in 2019: 11 (10 infantry and 1 vehicle)
Post link


The Farstriders
I’ve finished by third Warhammer Underworld’s warband ahead of a tournament this weekend. I wanted to give this group of Stormcast a go because I like their use of ranged weapons which has a different set of tactics to other warbands at the moment. I’ve played a couple of games with them so far and I’m really enjoying them and have seen some success. A deck built around layering loads of single points of damage and scoring objectives for doing so works very well against some warbands, but I’ve yet to play other Stormcast, Orruks or Mollog.
I’m really pleased with the finished result of these minis. The Forgeworld heads really give them much more character and I look forward to using more of these (especially the female ones) in the future.
Miniatures completed in 2019: 8
Post link
 I dec")
 I dec")
 I dec")
After failing fairly spectacularly at Warhammer World’s Grand Clash (137th out of 164 players) I decided to rest Spiteclaw’s Swarm for a little while and try something different. I’ve liked the idea of The Farstriders since they were released as they all have ranged weapons which brings something different to the way they play.
I’m not a big fan of the Stormcast Eternal deathmasks. I like faces on my characters so that you can see their expressions which often tell a story. I was therefore thrilled when Forgeworld released the two packs of Stormcast Eternal heads (one pack of male and one female). In my experience, Forgeworld sculptors haven’t always been the best when it comes to faces, but this time they have really knocked it out of the park. I just bought the male heads to begin with, but I will definitely pick up the female heads too for when I convert the other Warhammer Underworlds Stormcast warbands.
These are just some work in progress shots. I’m working on these models in-between other projects, but I hope to have them finished in time for a tournament on 17th March.
Post link

Next step: Highlighting
Now this is the step i’m worst at. I have yet to make an edge highlight i’m satisfied with. Never the less, i’m determined to get better.
I might change the highlight above his mouthpiece, and paint that part bronze instead.
Great progress with the Forgeworld Kataigida Skitarii (see my examples and links for the tutorial HERE).
You’ve done a great job with the edge highlights @gallopsalot. The nice thing about doing edge highlights on this is that you don’t want them to be too tidy. They are to represent chips and scraping on the rusty metal, so would generally be along edges, but you want them to be a little uneven and sometimes could scrape deep along the surface.
Post link

Really cool to see @gallopsalot trying out my Adeptus Mechanicus paint scheme! The legions of Forgeworld Kataigida are marching to war!


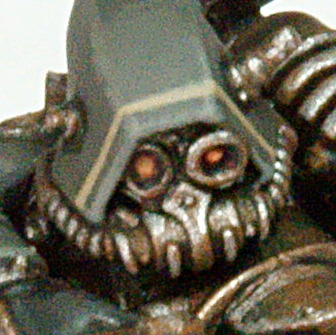
Skitarii Ranger Squad from Forgeworld Kataigida
Here is the first finished Skitarii Ranger squad from my home-brew Forgeworld, Kataigida (I use the Graia doctrine when I play games).
If you want to see how I painted them, I have done a tutorial in six parts (Part 1/Part 2/Part 3/Part 4 /Part 5/Part 6)
Post link
If you missed part one (armour) you can find it HERE.
If you missed part two (trousers) you can find it HERE.
If you missed part three (cloak) you can find it HERE.
If you missed part four (wood/leather) you can find it HERE.
If you missed part five (bronze/gold) you can find it HERE.
In this last tutorial I will run over how I paint some of the details and show the finished result!
Stage 20 - Eyes

To paint the eyes and other ‘glowy’ bits I start with a basecoat of two parts Jokaero Orange and one part Mephiston Red. I then build up layers, leaving a little of the previous coat showing each time to get a light effect. For the second layer I use Jokaero Orange. The layer after that is one part Jokaero Orange and one part Averland Sunset and for the final coat (pretty much just a dot) I mix a little white in to the previous mix.
Stage 21 - Cables
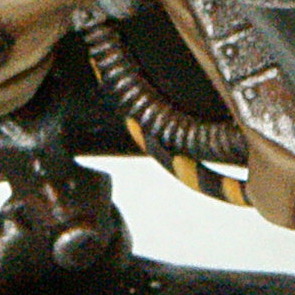
I like to do most of the cables with yellow and black striping because I think it looks very effective. To do this I paint Averland Sunset in stripes over a black basecoat. I then mix a little white with the Averland Sunset and paint along one edge of each stripe. I finish with a mix of one part Stormvermin Fur and one part Abaddon Black to paint a grey edge to each black stripe in a similar style.
Stage 22 - Rosarius

The parchment is basecoated with Steel Legion Drab and then highlights are achieved by gradually mixing in Karak Stone. A mix of Kharak Stone and white is used for the final highlight and then the whole parchment is shaded using a wash of two parts Aggrax Earthshade, one part Seraphim Sepia and two parts Lahmian Medium.
The wax seal is basecoated with a 50:50 mix of Mephiston Red and Rhinox Hide. A small amount of Karak Stone is mixed in for some highlights and it is shaded with a wash of Aggrax Earthshade mixed with a little Lahmian Medium.
Stage 23 - Cloak Trim
To paint the trim I first use Zandri Dust and carefully paint a line around the hood and outside of the cloak. I then do the same, covering this line with Karak Stone to make it a bit lighter.
The End Result

After doing the base, this is a finished Skitarii Ranger!
I hope that this multi-part tutorial has been interesting. If you try out this colour scheme, please send me some pictures!
If you missed part one (armour) you can find it HERE.
If you missed part two (trousers) you can find it HERE.
If you missed part three (cloak) you can find it HERE.
If you missed part four (wood/leather) you can find it HERE.
I use this same set of colours and technique to paint the trim on the gun, belt buckle and censors.
Stage 17

Apply a basecoat of Runelord Brass to the areas that you want to be bronze/gold.
Stage 18

Apply a careful wash of Reikland Fleshshade (Gloss) to the areas you just basecoated. Guide the wash to carefully enter the recesses and shade.
Stage 19

Make a mix of two parts Runelord Brass to one part Runefang Steel. Apply this as an edge highlight to the bronze/gold parts of the mini.
Next time I will cover the various details on the model in the final post for these minis.
If you missed part one (armour) you can find it HERE.
If you missed part two (trousers) you can find it HERE.
If you missed part three (cloak) you can find it HERE.
I use this same set of colours and technique to paint the gun casing, pouches and backpack/straps. This saves the mini from having too much going on with lots of different shades and textures.
Stage 14

Apply a basecoat of Rhinox Hide to the gun casing, pouches and backpack.
Stage 15

Do a mix of three parts Steel Legion Drab and one part Rhinox Hide and apply an edge highlight to the parts you previously base coated.
Stage 16

Mix a small amount of Lahmian Medium with Agrax Earthshade and apply a wash to the brown parts to blend the highlights in and apply a bit of shading.
Next time I will show how paint the bronze/gold details.
If you missed part one (armour) you can find it HERE.
If you missed part two (trousers) you can find it HERE.
Stage 9

Make a mix of approximately three parts Stormvermin Fur to one part Abaddon Black. Apply this as a basecoat to the cloak. You may need two thin layers to get an even covering.
Stage 10

Mix a wash of four parts Nuln Oil, one part Lahmian Medium and one part Athonian Camoshade. Apply this to the whole of the cloak, using your brush to ensure it doesn’t pool to much (especially on flat surfaces).
Stage 11

Make a mix similar to stage 9 in which you basecoated the cloak. I like to make this layer a little bit lighter than the original basecoat by including a little more Stormvermin Fur. Apply this mix to the majority of the cloak as a highlight, being careful to leave your shaded areas in the creases of the cloak.
Stage 12

Using Stormvermin Fur, apply a further highlight to the edges of the cloak and the most raised parts.
Stage 13

Mix a small amount of Administratum Grey with Stormvermin Fur and apply a final highlight to the edges and highest points of creases.
Next time I will do the wood/leather.
If you missed part one (armour) you can find it HERE.
Stage 5

Apply a base coat of Steel Legion Drab to the trousers. To ensure that you get an even finish you will want to apply two thin coats.
Stage 6

Make a 50:50 mix of Steel Legion Drab and Zandri Dust and carefully paint the raised sections and creases for a first highlight.
Stage 7

Apply a wash over the trousers. I use a mix of two parts Reikland Fleshshade, one part Agrax Earthshade and one part Lahmian Medium.
Stage 8

To finish off the trousers, mix two parts Zandri Dust with one part Kharak Stone and apply this final highlight the most raised areas and creases of the trousers.
Next time I will cover how to paint the robes.