#victoriaandalbertmuseum


“Peace cannot be kept by force; it can only be achieved by understanding.” - Albert Einstein
Peace, Bronze, in the style of Tiziano Aspetti (born 1554 - died 1606), Italian (Venice), possibly 18th century, Height: 19.5 cm, Victoria and Albert Museum, Bequeathed by Dr W. L. Hildburgh, FSA, A.67-1956
Post link
, War Is Not Healthy for Children and Other Living Things, 1968,")
Schneider, Lorraine (United States), War Is Not Healthy for Children and Other Living Things, 1968, Offset lithograph poster, printed and published by Another Mother for Peace, Inc., Gift of the American Friends of the V&A; Gift to the American Friends by Leslie, Judith and Gabri Schreyer and Alice Schreyer Batko, Victoria and Albert Museum, E.321-2004
Post link
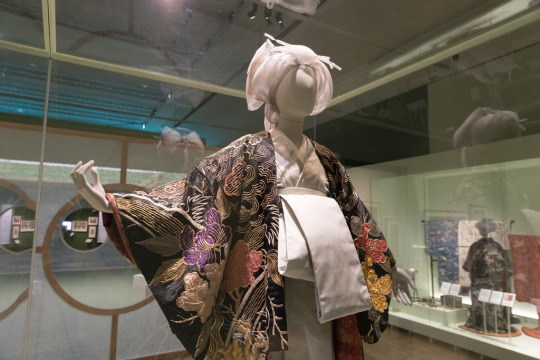
Today (Thursday 27th August 2020) the current exhibition, “Kimono: Kyoto to Catwalk”, reopens at the Victoria and Albert Museum after a period of closure due to the Coronavirus pandemic.
“This exhibition will present the kimono as a dynamic and constantly evolving icon of fashion, revealing the sartorial, aesthetic and social significance of the garment from the 1660s to the present day, both in Japan and the rest of the world.”
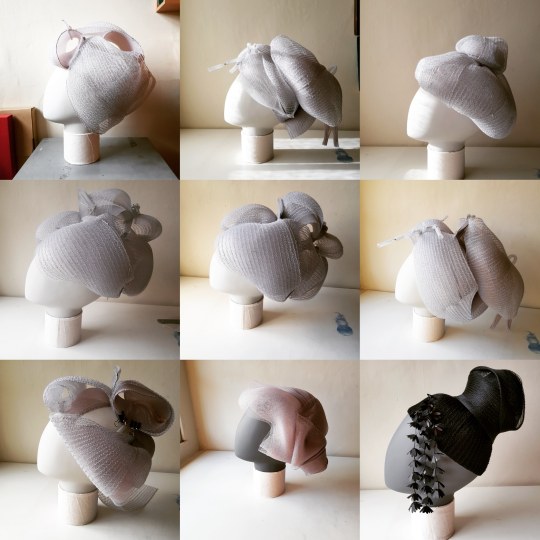
Earlier this year I completed a project for this exhibition, making eleven “wigs” for the fibreglass mannequin heads in hairstyles to represent different periods in Japanese history.
(Image credit: Rachael Lee, Textile Conservation Display Specialist in the Textile Conservation Department at the V&A)
The wigs for this exhibition were intended to be abstract and an impression of the silhouette, rather than incredibly detailed, so as not to distract too much from the costume displayed on the mannequins. When wigs are requested for mannequins, they are often made in house at the museum by the Textiles Conservation and Mounting Department, but due to restrictions on time they were outsourced on this occasion. I was involved in a similar project for another V&A exhibition back in 2018, “Frida Kahlo: Making Her Self Up”, which involved making three headdresses constructed from paper flowers. One of my previous blog posts details the making of these.
The wigs for the Kimonos exhibition were to be made from milliners crinoline, or “crin” for short, which in its nature is really springy and easy to make into voluminous shapes. Crin is an extremely versatile fabric that can be used for millinery, craft and haberdashery as well as fashion and dressmaking. The intention was to form shapes by manipulating it and stitching it together, then attaching these pieces to a Rigiline frame which would sit on the head of the mannequins. Rigilene is a type of boning made of woven nylon rods and can be stitched directly to fabric, without a casing.
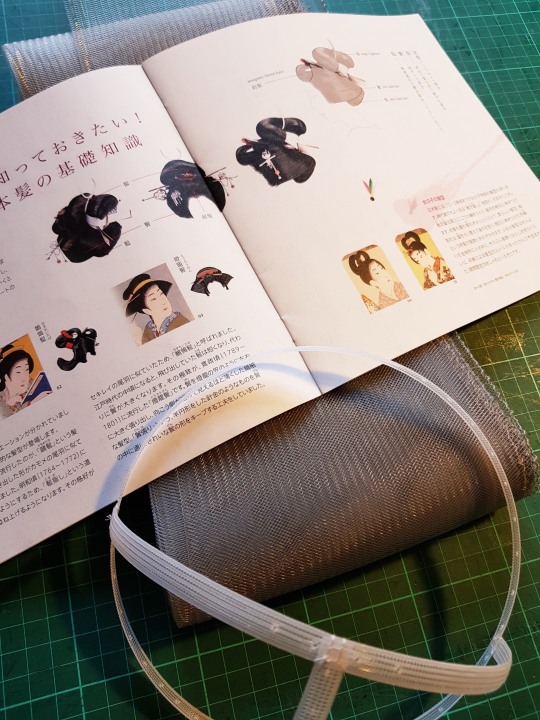
The concept of these crin and rigilene wigs was not new, in 2011 an article was published in the V&A’s Conservation journal entitled, “Keep Your Hair On - The development of conservation friendly wigs”:
“One of the challenges we regularly encounter when displaying head wear is how to achieve a good fit with proper support when headdresses are designed to be worn upon elaborate hair styles. The solution to this quandary would appear easy enough; give heads hair. This seemingly straight forward answer was not as easy to apply as one might think largely due to exhibition designers and curators desire to display objects on non-realistic, abstract mannequin forms. This current trend is considered least distracting to the audience’s appreciation of the costume itself.”
My contact at the museum was Rachael Lee, a Textile Conservation Display Specialist in the Textile Conservation Department, who had been working for many months displaying numerous kimonos for the exhibition. She and some of her colleagues had already worked on a couple of protoypes of the wigs that were sent to me to get an idea of the forms they wanted. I was however told that I was to have creative control over the wigs and to have fun with them!
For the eleven wigs that they wanted I was supplied with reference images to work from.

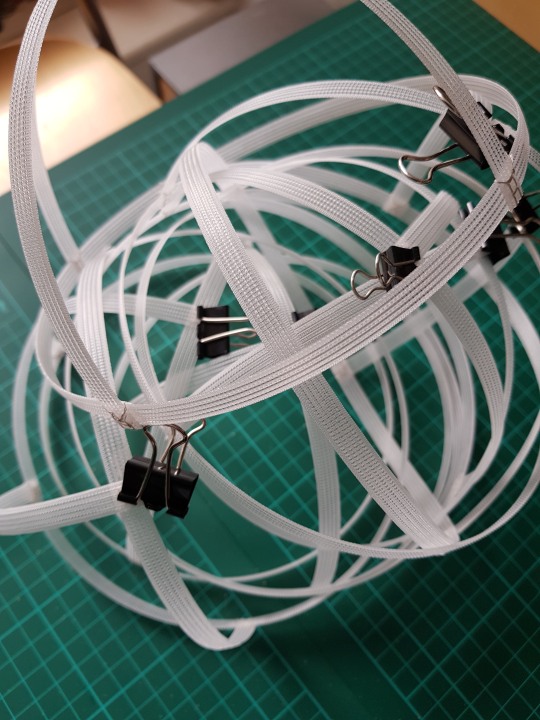
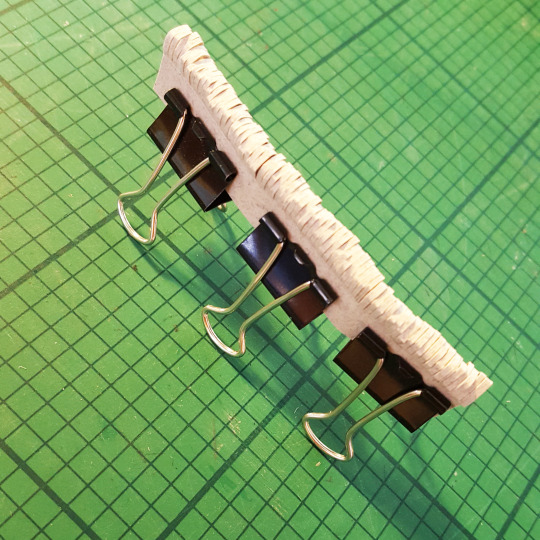
The wigs were to be built on to Rigilene frames. I first measured the circumference of the fibreglass head at approximately the point where I wanted the hairline of the wigs to sit. I left a bit of slack knowing that the frame would get packed out a bit when the crinoline layers were attached. I cut a strip of Rigilene that was overlong so that it could be overlapped and joined together to form a circle, I drilled a series of small holes through the overlapped pieces and then stitched through them to hold the loop together. A second piece of Rigilene was then cut to span the top of the head, and it was joined to the first ring, slightly off centre, in same way using thread. Finally, a shorter piece was cut to tether the outer ring and the central bar together at the back.
As the Rigilene was quite springy, initially I temporarily joined the overlapped pieces using a dab of superglue and held them in place with a bulldog clip whilst it set. This then helped as the two pieces of Rigilene were set in place and held together for me to drill the holes using my Dremel. This process was reproduced a number of times to give me enough frames to experiment with and work from.
As I was working remotely from home, I sent many images of the wigs at various points in their construction to Rachael Lee, who in turn showed them to the curators who gave me feedback during the making process. I had never worked with either Rigilene or crin before so it was a learning curve, manipulating the crin into different shapes and forms to make the 2D images I had into three dimensional forms was a fun challenge!
Further blog posts are to follow in the coming days about the steps I took to create these flamboyant wigs, from the subdued “Gibson Girl” through to the elaborate “Courtesan” with some more modern “Memoirs of a Geisha” characters thrown in I feel I have learnt a lot about Japanese hairstyles along the way!
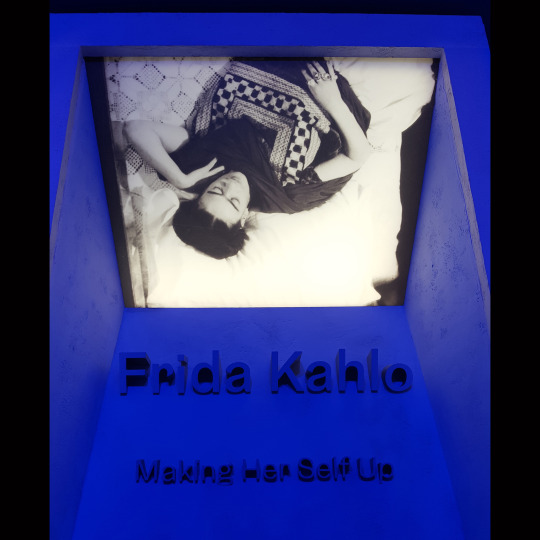
Being a bookbinder requires a vast array of different skills, some of which can be utilised in ways other than making books! I worked at the Victoria and Albert Museum for seven and a half years as a mount-maker before leaving to become a full time bookbinder but still keep in touch with my colleagues from the museum. An ex-colleague and friend of mine, Rachael Lee, who still works at the museum as a Textile Conservation Display Specialist in the Textile Conservation Department has spent the last year and a half, alongside many other people from the museum and abroad, working towards the opening of the current Frida Kahlo exhibition entitled, Frida Kahlo: Making Her Self Up.
The exhibition presents an extraordinary collection of personal artifacts and outfits belonging to the iconic Mexican artist Frida Kahlo. It explores how Kahlo used make-up, jewellery and in particular indigenous Mexican clothing to create her identity. The majority of objects, including medical corsets and Kahlo’s prosthetic leg, are loans from the Museo Frida Kahlo in Mexico City. The colourful collection of clothing and objects were hidden away for 50 years in the museum, Frida’s former home, and found in 2004. The home was converted into a museum after her husband, Diego Rivera’s death. The objects have never left Mexico before so it’s very exciting that the V&A is exhibiting them.
Rachael worked closely on the mannequin development with two different manufactures to create a new figure that evoked the feeling of Frida Kahlo. A 3D printed render of Kahlo’s head was created and turned into fibreglass, it was then seamlessly merged with the rest of the body to create a complete figure. The mannequins weren’t designed to be too realistic or an exact copy of Frida, but a likeness of her with recognisable features, such as her braided crown of plaits. This unique style of display figure couldn’t of been achieved using commercially available mannequins. A paper finish was chosen to cover the surface of the mannequins in order to slightly abstract the figures and give a neutral effect.

My brief was to make individual head treatments, or headdresses, for three of the Frida mannequins going into the exhibition and was initially sent images of these to give me an idea of what the Senior Co-Curator, Claire Wilcox, wanted to recreate. I was asked to make three dimensional paper flowers to attach to the mannequin heads to resemble iconic images of Frida, however I was told that the headdresses didn’t need to be exact copies of these reference images. Frida had many different flower adornments and often wore fresh flowers in her hair so my initial brief was to “create something beautiful but at the same time subtle. There are so many interpretations of Frida, we want ours to be respectful and not pastiche”.
1.“The Resplandor” (Self-portrait as Tehuana)
The exact costume pictured below, still exists as part of Kahlo’s wardrobe and was to be mounted onto a mannequin as portrayed in this self-portrait. As only the face of the mannequin and the flowers on the head were going to be seen, I needed to make the same flowers and arrange them as seen in the portrait.

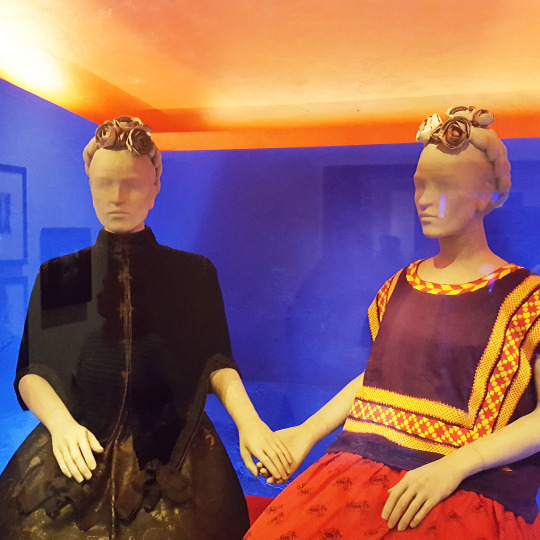
2 and 3. “The Seated Fridas”
The flowers for these two mannequins were to sit across the front of Frida’s head, with some also fitting neatly behind her big plait. The mannequins were to be displayed seated next to each other holding hands in the exhibition, so they were going to have the flowers in their hair displayed as mirror images of one another.

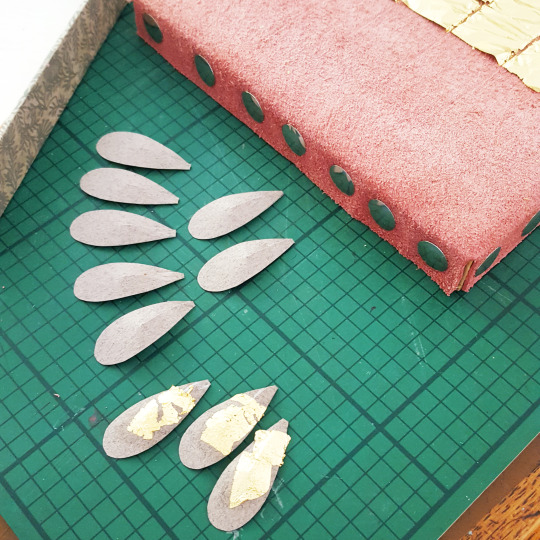
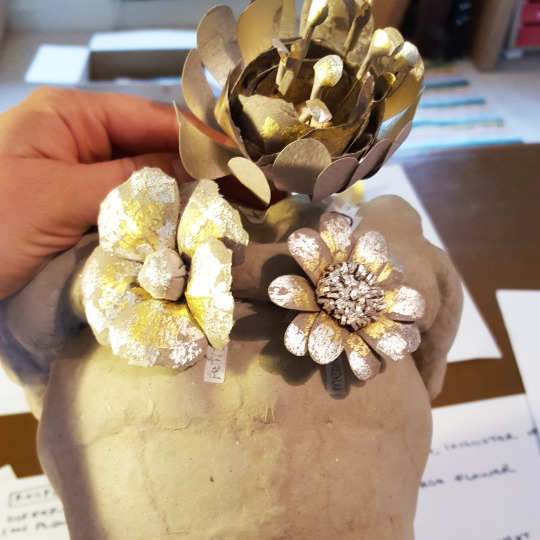
My first task was to make some sample flowers to send over to the V&A for the team to look at against the mannequin heads, at this point I had only seen photos of the heads so it was important to do some trials. All of the flowers were to be made from the same colour paper as the mannequins to tie it all together visually and so not to distract from the clothing.
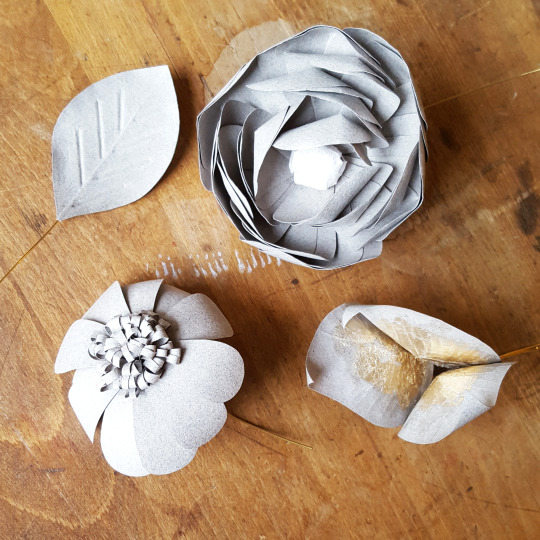
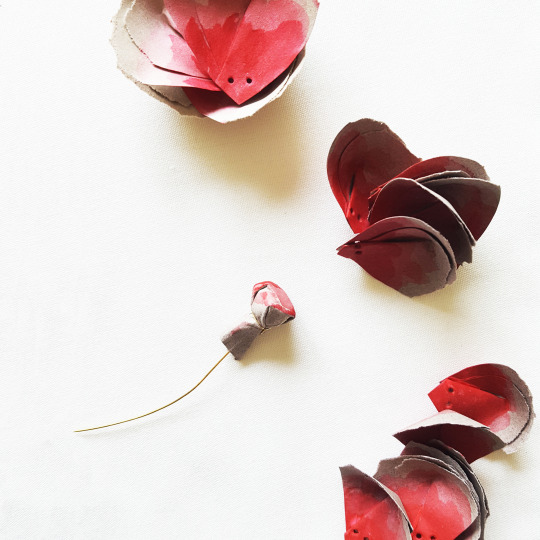
I started by making four trials pieces: one rose, one abstract leaf, one daisy and one leaf.
FRONTS OF TRIALS:
BACKS OF TRIALS:

Due to the fact that the finish of the heads was to be a distressed paper finish with an uneven texture, it was decided that the trial flowers therefore looked a little too pristine next to the head. When sending the trials off to the V&A I explained that the edges could be made to look ‘more frilly’, by altering the templates and tearing the paper petal edges and it was decided that this would be a good alteration to make. The samples were also too large against the head so they were all to be scaled down when making the actual headdresses.
Below shows the trial flower on the left, and the modified flower on the right with the torn petal edges and it is smaller in scale.
Following this initial feedback I then received a parcel back from Rachael with one of the Frida mannequins heads in it, a pack of papers, a pot of paint-wash and some sample card that had been used on the mannequin heads, plus extra images and instructions to work from.
Other similar papers were also supplied for me to use to help create subtle variations in the tone of the flowers. Below shows two roses, the left one has the outer petals made from paler paper that was subtly coloured in the same paint-wash as the mannequin heads.

It was also decided that for The Resplandor the curator wanted to trial a bit of gold leaf inside some of the flowers, so they would shimmer under the museum lighting. I stuck a small amount of gold and silver leaf on one of the paper leaves to give an indication of how this might look.

Once the trial pieces were analysed and the alternations noted it was time to commence with the making of the headdress components, described in stages as follows:
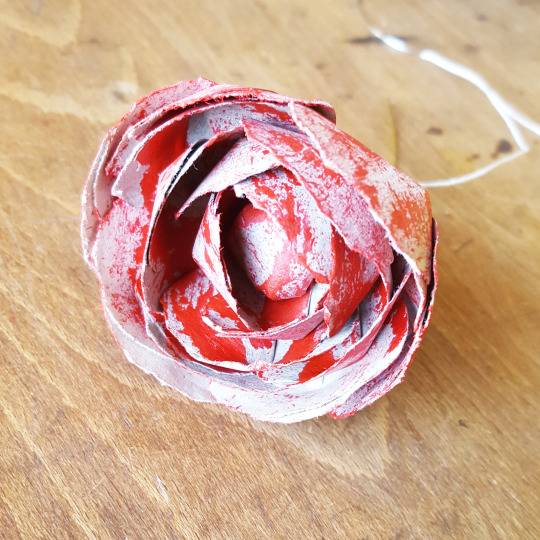
MAKING UP THE ROSES FOR THE TWO SEATED FRIDAS
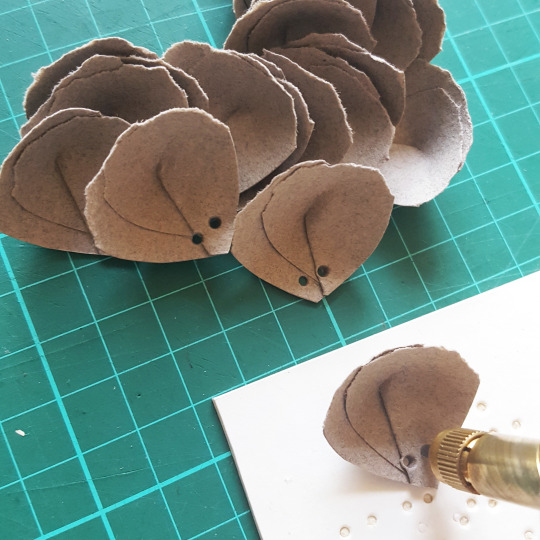
I cut out the petals using a template. These were in four different sizes so I could make up different sizes of rose. The side edges were cut with scissors and the top edges torn into a curve.

The petals were kept in pairs and glued together slightly off-set with some PVA, as seen in the top-most group of petals in the below picture. Once dry they were then folded into a pleat at the base of the petals and glued again to create a more three-dimensional shape - see the bottom group of three petals.

Once formed they were then punched twice with a Japanese hole punch at the base of each of the petals.
For the two Seated Fridas, the mannequins were going to re-enact the scene from one of Frida’s most notable paintings, The Two Fridas; herself and her double, holding hands, with exposed hearts connected by a shared artery. Claire Wilcox wanted one mannequin to look very Victorian and the other very Mexican to enhance the outfits they were due to be dressed in.
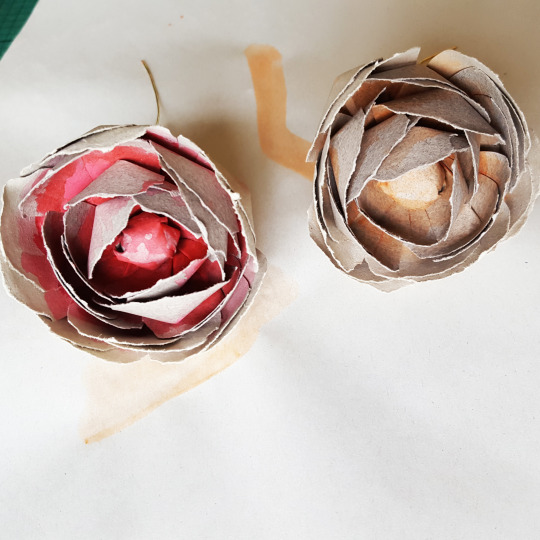
I was therefore asked to try painting inside the paper roses, the Victorian flowers were to have a sepia tint inside and the Mexican flowers to have a red/pink tint. The didn’t want a solid colour, just to have some colour inside the petals/leaves so that the flowers still looked like paper and match the mannequins. The first trial was discarded as the colour was too bold.
So a more subtle colour wash was chosen, using watered down acrylic paints building the colour up from the bottom of each petal in stages.
RED/PINK FOR THE VICTORIAN-LOOKING FRIDA:
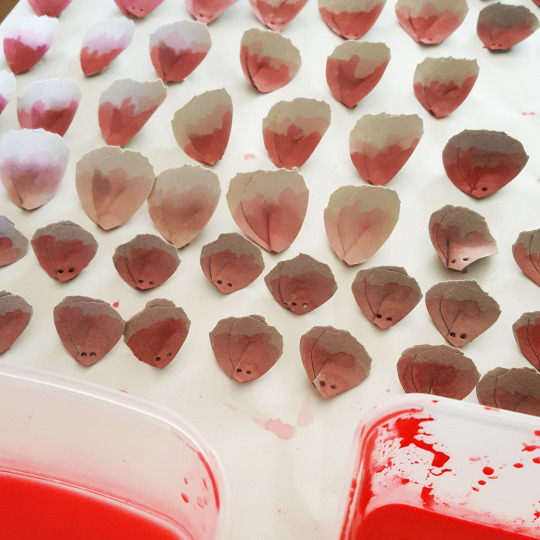
SEPIA FOR THE MEXICAN-LOOKING FRIDA:

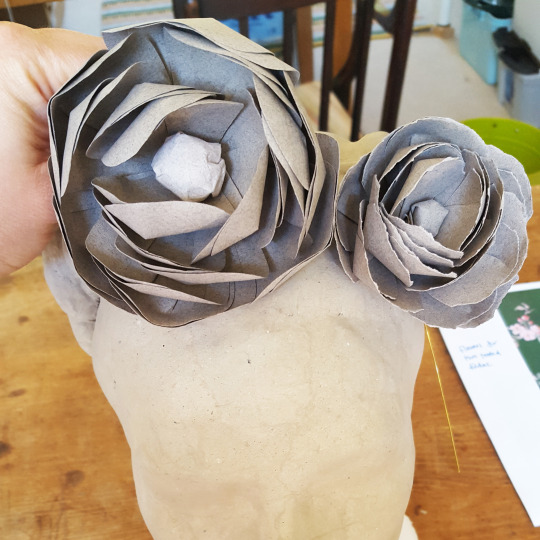
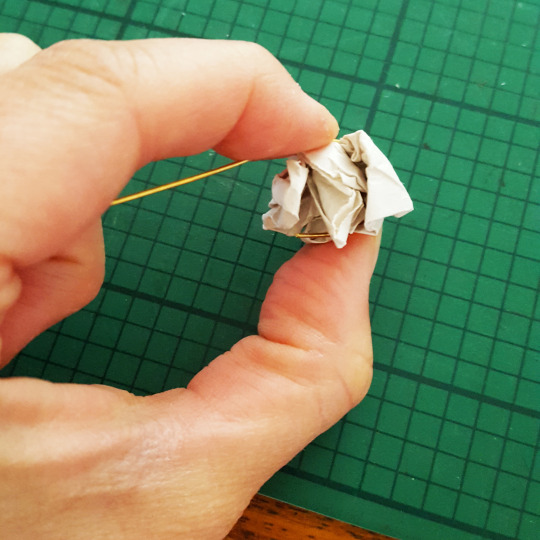
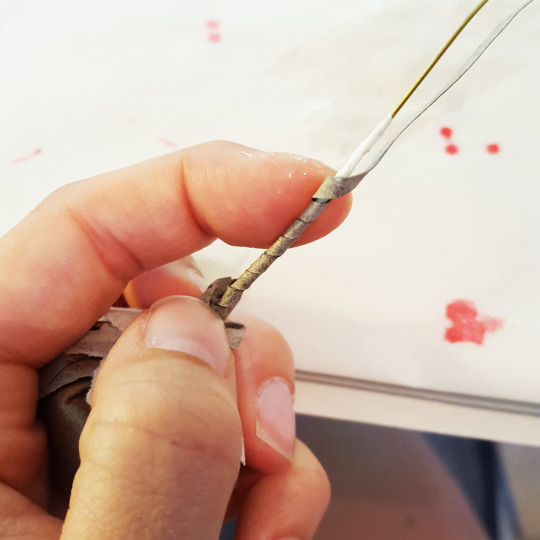
Once the petals were coloured and dry it was time to make up the roses. The centre of each rose was made by winding some wire around a small ball of newsprint. This was then wrapped in a square of the grey paper and wire was wound around it at the base to hold it together.
The petals were laid out in size order. For the largest of the flowers there were six small, five medium and six large petals making up each flower.
I tied some linen thread to the wire.

I then worked around the flower centre attaching each of the petals in place by threading a curved needle through the punched holes.

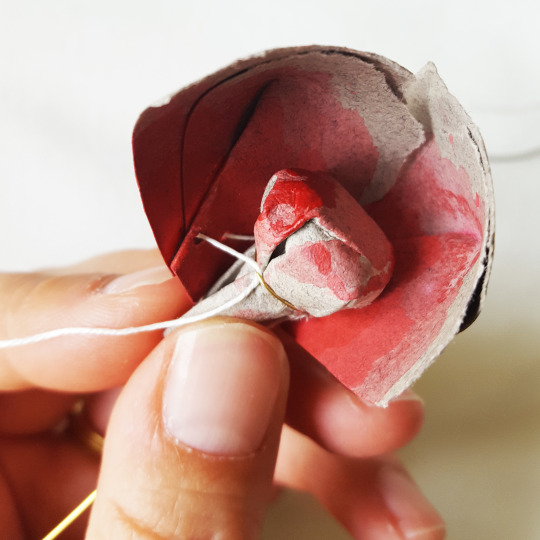


Each Seated Frida headdress had one large, three medium, two small and one petite rose, so the same process was repeated to make up each of these and again for the sepia flowers.

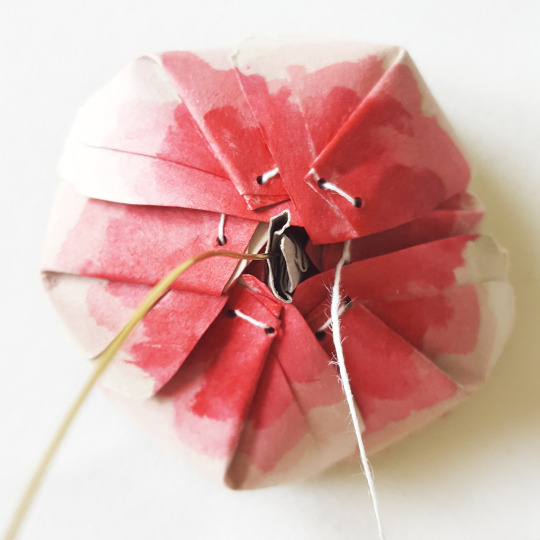
The exposed wire stem of the flowers was wound with masking tape in order to allow for it to then be covered in paper to match the flowers.

Paper leaves were also cut out and stuck to the back of each flower. Once glued they were curled using the edge of a pair of scissors to give them more shape.

The stems were all then wrapped in a coiled thin strip of paper and fixed with PVA glue.
PLACEMENT OF ROSES ON MANNEQUIN HEAD
Once all of the roses were made it was time to concentrate on their placement on the mannequin head.

Starting with the petite rose in the front centre, holes were drilled right through into the mannequin head for the flower stems to push in to.


Given I only had one head to work on I had to mark the positions of each flower so Rachael and her colleagues could repeat the placement (in reverse) on the other head. I also left it up to them to glue the flowers in position once the parcel got back to the V&A as it was safer to send the flowers and head back separately.


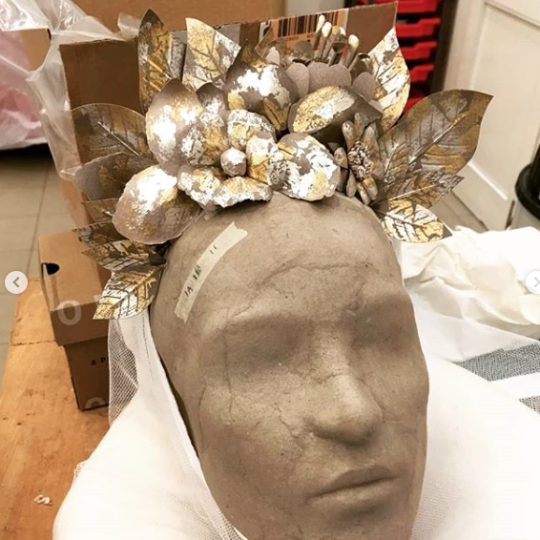
MAKING UP THE ELEMENTS FOR THE RESPLANDOR
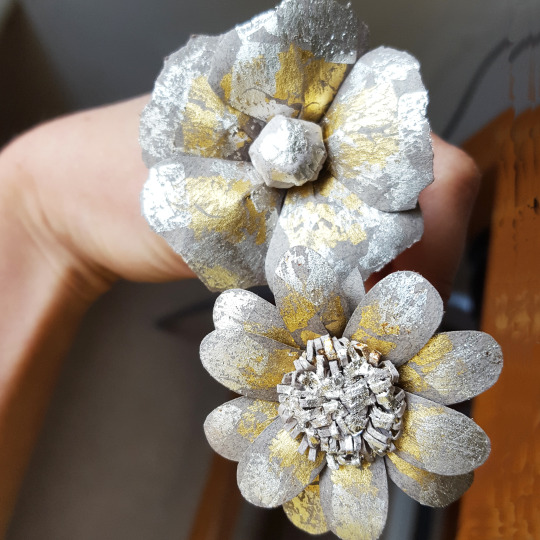
Following the completion of the Seated Frida headdresses it was time to work on the more complex Resplandor head. The iconic image showed Frida with the following on her head: 1 x rose, 1 x daisy, 1 x large flower, 7 x bougainvillaea, 7 x large leaves and 9 x small leaves.
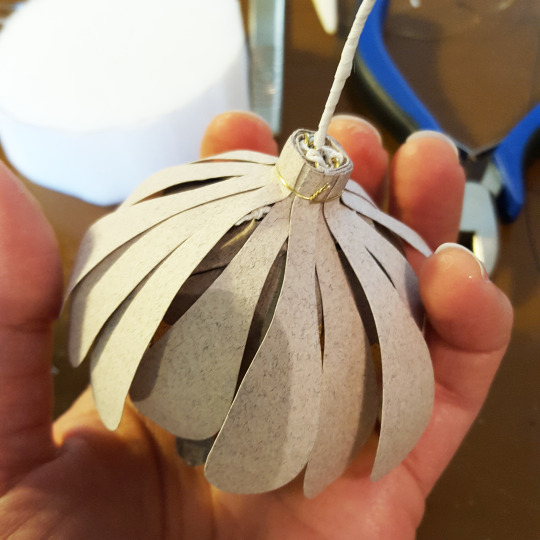
I started by working on the daisy, creating the centre first. I cut a series of thin lines using a scalpel across the centre of a strip of paper.

The two outer, uncut edges were then glued together and held with bulldog clips allowing the cut strips to curve in the centre. This strip was then coiled around a piece of wire to create the textured centre of the daisy.
A series of petals were cut from a template, these were then made more three dimensional by cutting and gluing the tips of the petals together.

Following the trial leaf I did at the start of the process with gold and silver leaf added on, the curator decided she wanted this on all of the Resplandor petals and leaves. I had to make sure that the gold and silver leaf was only going to be on the front face of each of the elements as it was important that no metal was going to be in contact with the object.
The costume was going to be seen through the reflection of a mirror in the exhibition so the gold and silver leaf needed to be quite bright and bold to stand out.

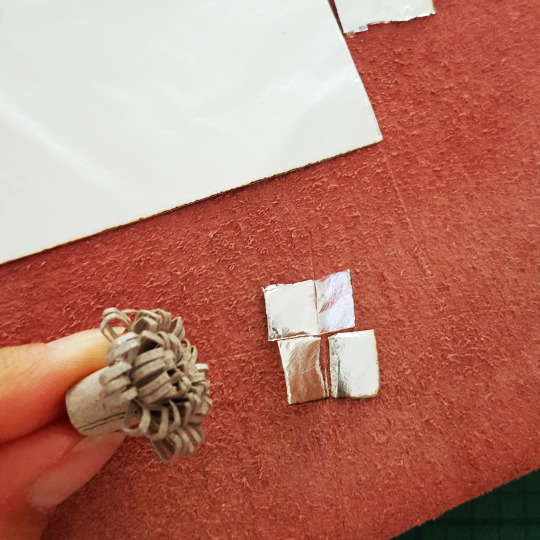
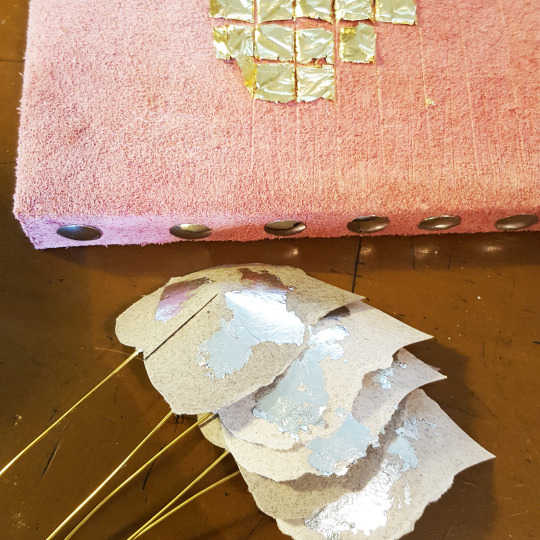
I cut gold leaf into squares on my gold cushion and lifted it up using a piece of cotton wool that had some grease on it to attract the leaf. I applied a wash of PVA glue to each of the petals and then placed the gold leaf onto these in turn and waited for them to dry. Once dry I rubbed off the excess to give a more distressed look.
The same applied for the daisy flower centre, dabbing glue onto the paper and then pressing silver leaf squares down into the detail of the paper swirl.
I then attached the petals to the outside of the flower centre. It was decided that more gold and silver leaf was needed on the flower so I added more to the flower all over.

Next I made petals for the rose, a different style rose to that of the Seated Fridas. These had gold and silver leaf added and were then attached around a flower centre ball of paper.

The completed rose and daisy with their distressed mix of metal leaf on the front face:
Next I made up a series of leaves in two different sizes. These were constructed of two layers of paper stuck together with a piece if wire sandwiched in the middle to use as the stem of the leaves.

Again, squares of gold and silver leaf were stuck to one side and then rubbed down to give a more distressed look.

As well as the flat leaves, I also made up a number of bougainvillea-style elements, combining two or three curved leaves into bunches to build up the look.
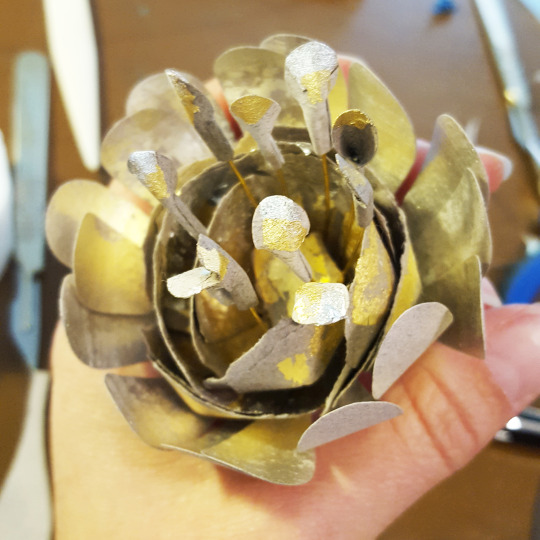
Finally, there was one large flower to make. I used the same base centre and petals as the Seated Frida roses but added in extra long wires to the centre so they stuck out past the petals. The ends of these wires had small curved paper elements stuck to them.
For the outermost petals of this flower I first covered a piece of paper with a block of silver leaf. From this I then cut out individual long petals.

These were stuck to the outside of the centre flower and secured with a small piece of twisted wire. This wire was then concealed with some outer paper leaves.
The completed flower definitely shimmered with all of the detail and leaf on it!
Again, I had to work on the placement of the elements once the pieces were all made. Rachael and her team needed an accurate plan of where everything needed to be placed so I broke the elements down into four rows, marked each piece up and wrapped everything separately to try and make it as clear as possible.


Thanks to Rachael for the following photo showing the Resplandor head with all of the elements attached before it was then dressed with the object.
I am hoping to get access to some of the professional photos taken of the exhibition to better illustrate the final results of the headdresses but in the meantime all I have is the ones I took myself (you might spot me in the second of these two pictures!)

***************************************
Seated Frida ‘European’ (LEFT)
Outfit worn to a New York gallery opening
Kahlo wore this dramatic outfit to an opening in New York in 1933. The velvet evening cape has embroidered ribbon appliqué and two silk bows attached to its long, pointed tails and is professionally made. She paired it with a silk devoré skirt with ruffled hem made from imported silk, which may have been sewn by a local dressmaker. The origin of many of Kahlo’s European-style clothes is uncertain.
Early 1900s, possibly made in France (cape); fabric from France (skirt)
Silk velvet, satin, lace trimming, synthetic lining (cape); Jacquard silk (skirt)
Banco de México Diego Rivera & Frida Kahlo Museums Trust
***************************************
Seated Frida ‘Mexican’ (RIGHT)
Blouse and skirt Before 1954, Tehuantepec, Oaxaca, Mexico
This huipil (blouse) and rabona (gathered skirt) are from the town of Juchitán de Zaragoza on the Isthmus of Tehuantepec, Oaxaca, in Southern Mexico. Tehuana dress was regarded as one of the most beautiful forms of regional dress, and was particularly admired by Rivera. Although not a Tehuana by birth, Kahlo adopted the style of this region after her marriage and wore variations upon it for most of her life.
Cotton
Banco de México Diego Rivera & Frida Kahlo Museums Trust
***************************************

***************************************
Radiance
Lace headdress and skirt Before 1954, Juchitan, Oaxaca, Mexico
The hulpll grande or resplandor as it has come to be known in recent years, after the radiating headpieces of statues of the Virgin Mary, is a ceremonial headdress worn by the women of Tehuantepecfor church, weddings and processions. Its origins are unknown, as are the function of the two vestigial ‘sleeves’ that are glued fast by starch and never used. The garment is worn in two ways by Tehuananas. During Mass, the headdress resembles a cape, with one sleeve to the front and the second hanging behind. On other ceremonial occasions, the wide frill fames the face.
Machine-made lace, cotton and ribbon
Banco de México Diego Rivera & Frida Kahlo Museums Trust
***************************************
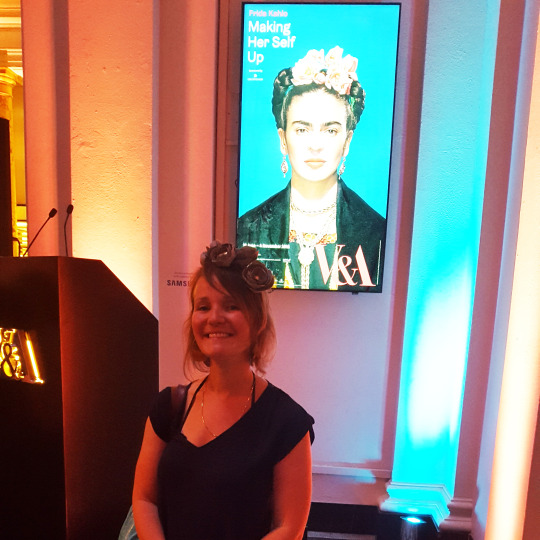
I was invited to the private view of the exhibition on Wednesday 13th of June, the dress code being “inspired by Frida”. So, naturally I made some extra flowers to wear in my hair on such an occasion!
***************************************
Frida Kahlo: Making Her Self Up
On now until Sunday, 4 November 2018

This #corneliaparker conceptual art piece at the #victoriaandalbertmuseum is heart reading and thought provoking and a reminder that some conceptual art has real substance. She got the brass instruments from a northern England mining down where the mines have been closed and many of the brass bands and souls have gone quiet and at the Tower of London - symbolic in its own right - she had these vacuum compressed into lifeless flat objects which hang horizontally between two floors for the viewer to look down upon and through to the floor below.
#exploringtheglobe #worldbestshot_ig #placestovisit #travelbrilliantly #discerningfoodandtravel #thebestdestinations #placestovisit #wonderful_location #fodorsonthego #wanderlusting #worldwonder #ig_greatpics #getaway #letsgosomewhere #travel_captures #travelmore #viewfromhere #womentrip #worldshotz #ig_greatshots #getlostclub #thebestdestinations #travelinspiration #passionpassport #livetravelchannel #placestovisit
#londonbylondoners #londonart #londonartists #conceptualart (at Victoria and Albert Museum)
Post link


Beautiful celebrations at The V &A
Thank you @goodearthindia @vogueindia #sairahunjan #thegirlwiththegoldenneedle #gypsydevi #india #victoriaandalbertmuseum #fabricofindiaexhibition
Post link