#goldleaf


https://www.facebook.com/156250471132606/photos/a.166399253451061.39046.156250471132606/708623079228673/?type=1&theater
[ENG] I am pleased to finally unveil my latest oil painting, “The Flowers of Evil”, my tribute to Baudelaire. :“The Flowers of Evil” - 72/53cm - oil and gold leaf on paper - (Sold)
The prints are available here : https://www.etsy.com/fr/shop/yoannlossel
[FR] Je suis heureux de dévoiler enfin ma dernière peinture à l’huile, Les Fleurs du Mal, mon hommage à Baudelaire :
“Les Fleurs du Mal” - 72/53 cm - huile et feuille d’or sur papier - (Vendu)
Les tirages sont disponibles ici : https://www.etsy.com/fr/shop/yoannlossel
Post link

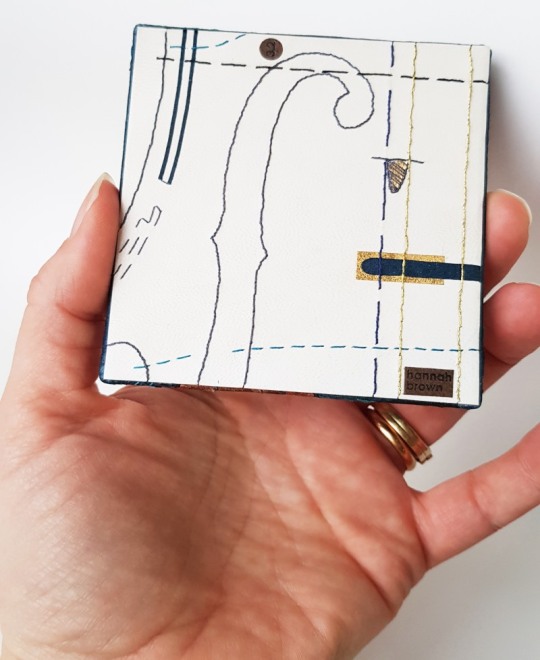
“Music” Miniature Board
Commissioned as part of a series on the same theme by Neale Albert, New York, USA.
Measuring 3 inches square
Made in 2020
This series of boards was inspired by a collection of full size boards which Neale Albert was shown during a trip to George Bayntuns in Bath in 2018. The boards he saw had all been made by members of Designer Bookbinders for a separate project on the theme of Architecture. This project gave Neale the idea for a new project: a series of miniature designer bound boards on the theme of music, three inches (7.62 centimetres) square in size. In early 2019 myself and a number of other binders were asked to participate in this project. Each binder was given total control of the design of their piece (as usual for Neale’s commissions) the only common ground between them was to be the size and the musical theme.
Neale started collecting dolls house miniatures in the mid-1980’s, which then progressed to commissioning miniature reproductions of his favourite things leading eventually to having entire miniature rooms made for him. But of course miniature rooms need miniature things to go into them, and naturally when Neale’s second room project was going to be the library at Cliveden House in the UK he needed miniature books for the shelves! Initially these were blank books purchased at doll house shows until he discovered the world of real miniature books with real type and real illustrations.
I believe that this was the start of Neale’s passion for collecting miniature bindings, commissioning bookbinders from around the world to create miniature books for him. Over 250 of Neale’s bindings are illustrated in the 2008 publication, “The Neale M. Albert Collection of Miniature Designer Bindings: A Catalogue of an Exhibition Held at the John Rylands Library 4 June – 18 October 2008”, and he has commissioned many more since then too.

When I considered the theme my thoughts naturally turned to cellos as I played the cello up until the age of 20. I made it all the way up to Grade 8 (which seems unbelievable to me now as I can barely remember how to read music anymore!) and was a member of both the orchestra at my secondary school as well as a local music centre. I started learning the cello when I was at primary school - here I am on the far right!

I was also part of a record breaking attempt in 1998 and made it into the local paper (below on the right!). Nearly 4000 young musicians got together at the National Indoor Arena in Birmingham along with the City of Birmingham Symphony Orchestra and the conductor Sir Simon Rattle to perform Sir Malcolm Arnold’s Suite No.2, along with school children from all over the country - we successfully broke the previous record of 2212 musicians!
Sadly leaving home to go to university was the end of my cello playing as I decided I didn’t want to take such a large instrument away with me. It sat in the cupboard at my parents house for many years however I am pleased to say that it has finally gone to a new owner and is being played again.

As luck would have it a neighbour of mine is a luthier, based in Somerset and specialising in cellos. Kai-Thomas Roth was born in Germany. From the age of eight he knew he wanted to become a violinmaker and made his first instrument at the age of thirteen. After training as a cabinetmaker in Switzerland he came to England to study at the Newark School of Violin Making. Following work experience in the trade he established with his wife Caroline Crowley their business as makers of fine instruments of the violin family in 1990.
Below: Head of Baroque cello, No 103, after Guadagnini (Photo Credit: Kai-Thomas Roth Instgram account @kaithomasrothcellos)
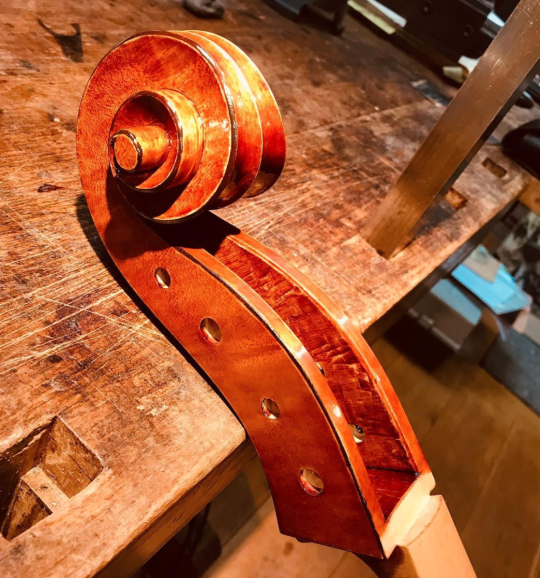
Specialising exclusively in making bowed stringed instruments all experience and expertise gained since 1986 are concentrated on the manufacture of these intricate complex artefacts. For that reason Kai-Thomas neither has a shop nor employees and he does not deal in old instruments or undertake repairs. This puts him amongst the few makers who immerse themselves completely in creating instruments but amazingly he’s never played the instrument he so lovingly creates!
I approached Kai to ask whether he had any technical drawings of cellos that I might borrow to base the design of my board on. What he lent me was a drawing of a “Violoncello Piccolo” made by Johann Christian Hoffmann in Leipzig in 1732. This instrument belongs to the Museum of Musical Instruments of Leipzig University and the maker was in Leipzig at the same time as Johann Sebastian Bach. This violoncello is a small cello that would be played braced against the shoulder rather than between the legs. This instrument is also a five-string version of the instrument, standard cellos have just four strings.

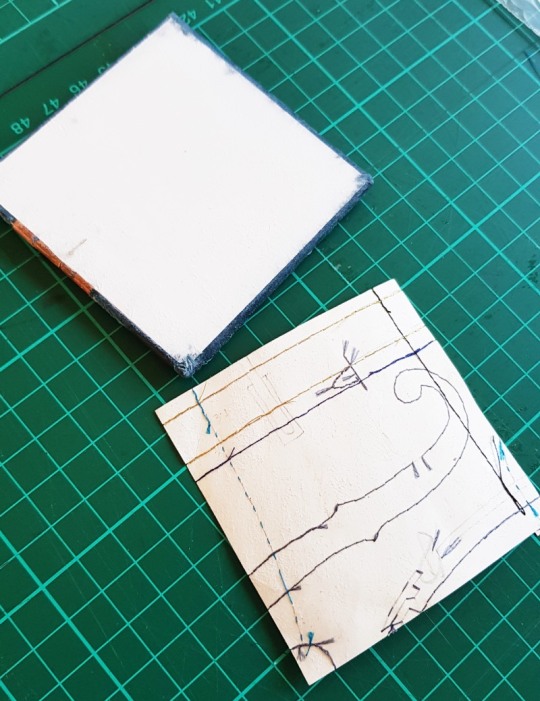
The inner board was made up as I would make up the board for a binding. Two 1mm think squares of Gemini board were glued together, with a piece of kraft paper glued on the inner side of the board and two layers of 145gsm water colour paper to the outside. Once dry the outside face of the board was bevelled using sandpaper.
The front of the board is covered in “Colvert” coloured bull skin from the Remy Carriat Tannerie in France, this was edge pared for the turn-ins using my Brockman paring machine and then further pared with a rounded scalpel blade. The bull skin is very stretchy and difficult to pare with a conventional paring knife so I have found through experimenting that I get the best result using a scalpel with a size 23 Swan Morton blade in it.
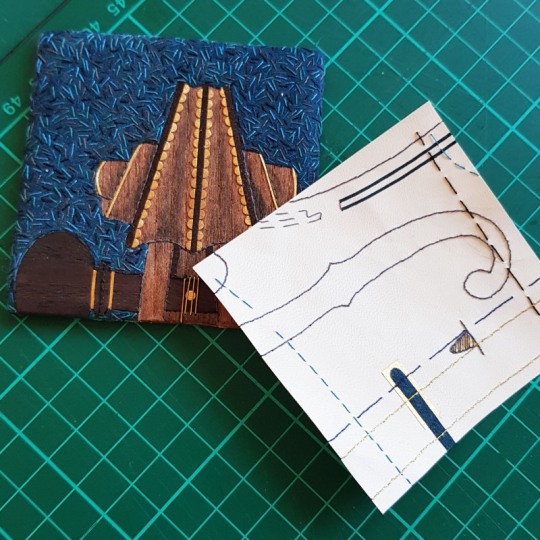
I traced the scroll section of the cello, including the top peg, onto some paper and transferred this onto the back of the leather I chose to use for the board. I then embroidered a series of individual short lines in a variety of colours of cotton thread to break up the uniform blue of the leather. These stitches were done around the outline of where the scroll was going to sit on the board.
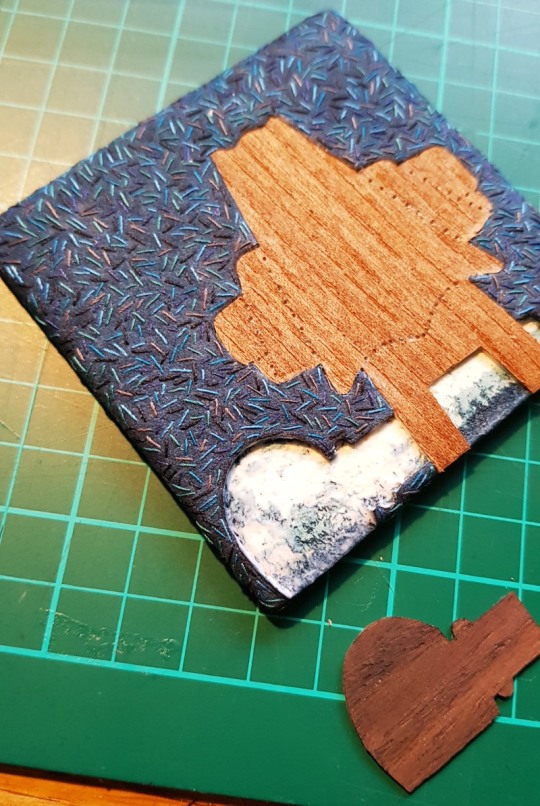
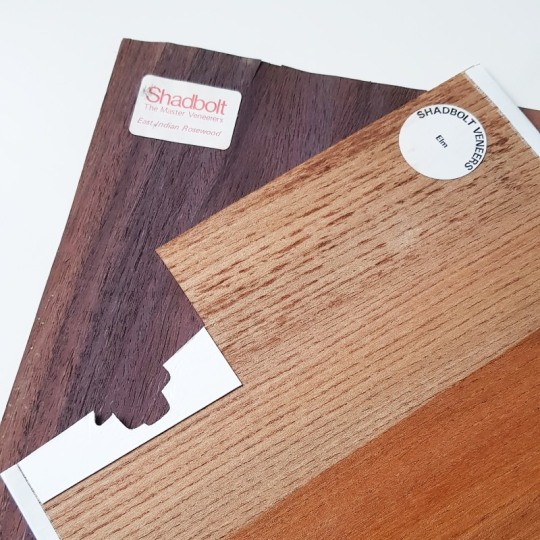
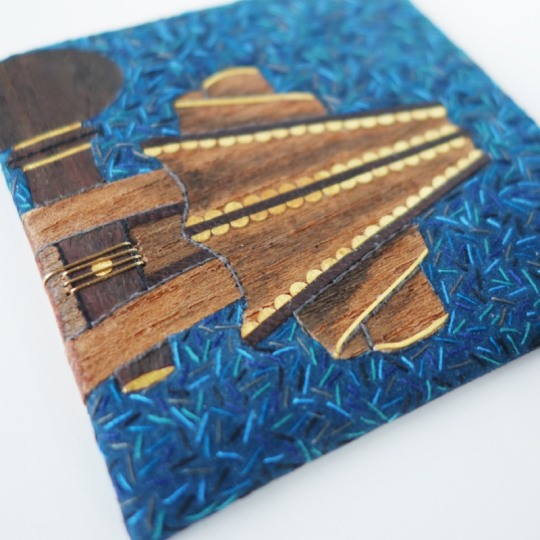
The leather was then pasted to the board, turned in and left to dry. I then cut out the outline of the cello scroll (within the line of stitches) and peeled this away to leave a void. I used two varieties of veneer (Rosewood and Elm), which I backed onto card to give extra thickness and strength, cutting them out very carefully with a sharp scalpel so that they exactly matched the void that they needed to fill.
They were glued in place using PVA glue and held with small clips whilst the glue dried to ensure that they dried flat. Where the veneer met the edge of the board I bevelled the veneer to match the profile of the leather as it thinned towards the edges.
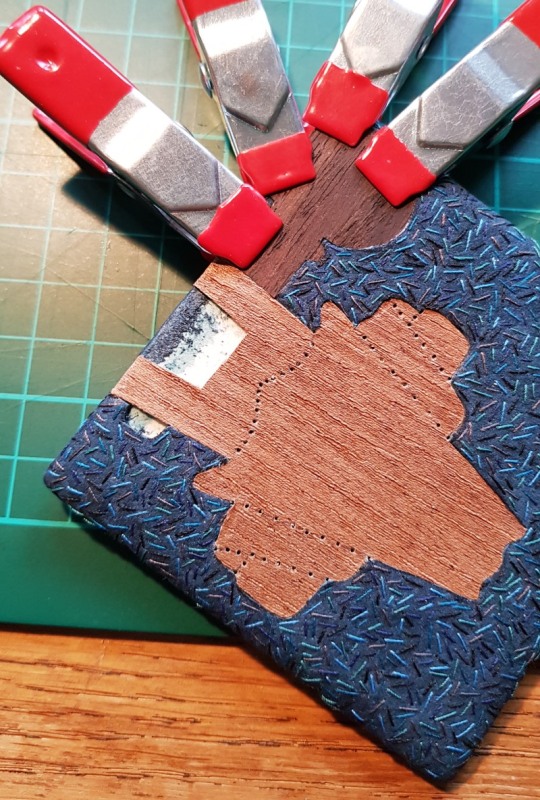
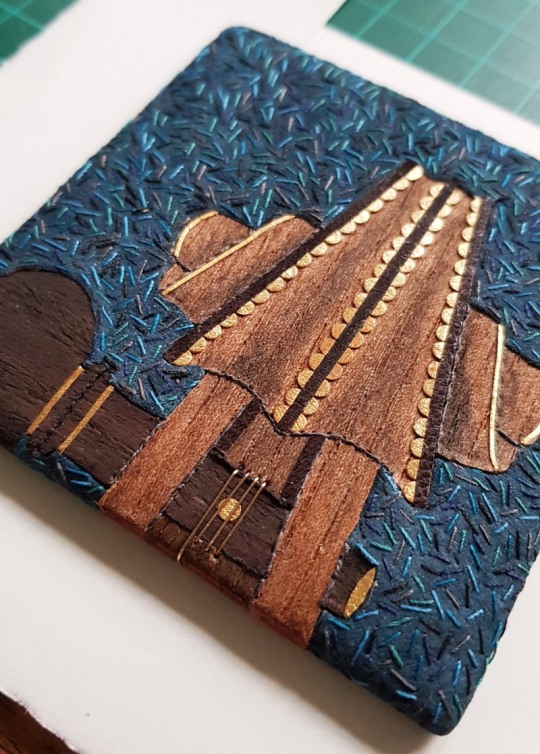
I forgot to take too many photos of how I built up the detail on the veneered sections of the board (I was enjoying this part too much and forgot!), but I drilled small holes right through the board using a fine drill bit in my Dremel and added outlines using thread sewn through these holes. I also added a thin wash of acrylic paint to some areas of the veneer to add an appearance of shading and depth to the surface, plus I also included some detail in gold leaf to jolly up the design!
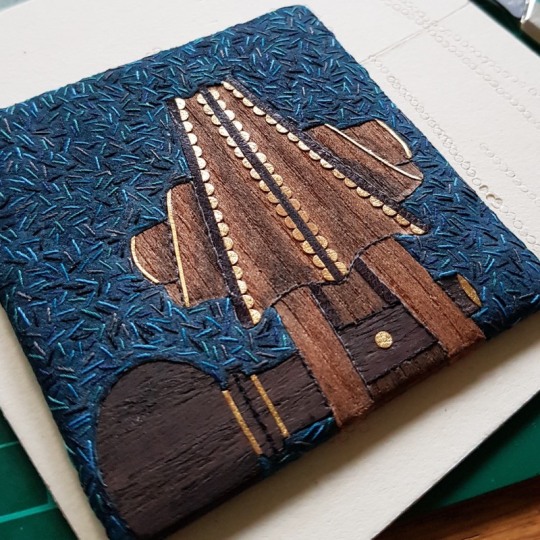
Finally, I used thin gold wire that was also passed through more small holes drilled in the board to depict the cello string wound round the topmost peg. The wire was passed through the board and embedded into the reverse before being covered with the infill on the back of the board.
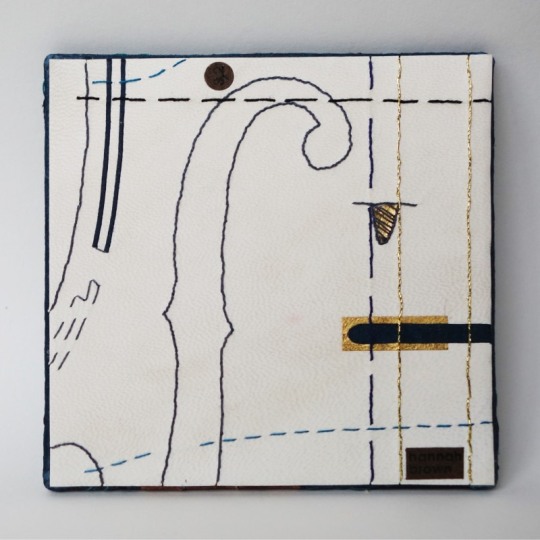
Once the back of the board had been infilled and built up it was time to work on the design for the back of the board. I cut a small piece of vellum to 3 inches square and traced another part of the cello technical drawing onto the reverse of it using a light box. This section included part of the F hole and the bridge that supports the strings.
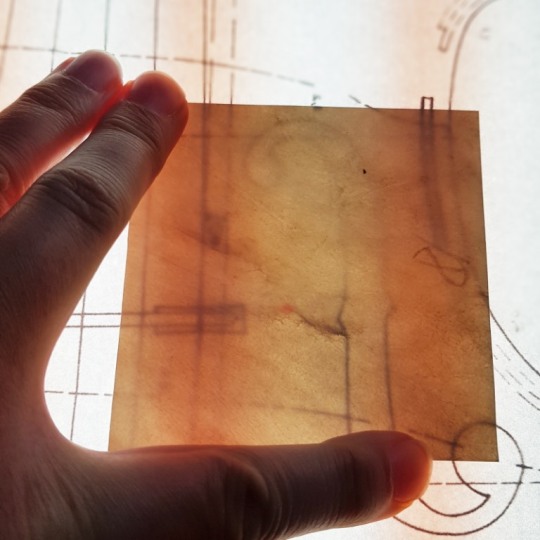
I was then able to use these lines as a guide for embroidering the design using the same colours of thread as used on the front of the board.

I also used some gold leaf and small elements of the “Colvert” bull skin to match what I had used on the front of the board.
The back of the board was built up with a couple of layers of Zerkall paper and sanded flat. Once the vellum was complete I stuck it down to the back of the board and left it to dry, making sure I rubbed it down all over to ensure it stuck down properly.
And so we had a completed board! All that was left to do was to add my signature and a small number annotation to the vellum back of the board then it was photographed and posted over to join the other boards in New York. This was a very pleasurable little project to work in in amongst other commissions and I was pleased to reminisce back to my more musical days!
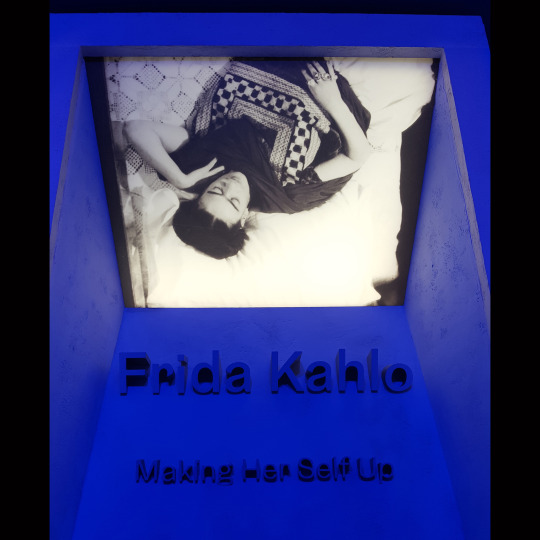
Being a bookbinder requires a vast array of different skills, some of which can be utilised in ways other than making books! I worked at the Victoria and Albert Museum for seven and a half years as a mount-maker before leaving to become a full time bookbinder but still keep in touch with my colleagues from the museum. An ex-colleague and friend of mine, Rachael Lee, who still works at the museum as a Textile Conservation Display Specialist in the Textile Conservation Department has spent the last year and a half, alongside many other people from the museum and abroad, working towards the opening of the current Frida Kahlo exhibition entitled, Frida Kahlo: Making Her Self Up.
The exhibition presents an extraordinary collection of personal artifacts and outfits belonging to the iconic Mexican artist Frida Kahlo. It explores how Kahlo used make-up, jewellery and in particular indigenous Mexican clothing to create her identity. The majority of objects, including medical corsets and Kahlo’s prosthetic leg, are loans from the Museo Frida Kahlo in Mexico City. The colourful collection of clothing and objects were hidden away for 50 years in the museum, Frida’s former home, and found in 2004. The home was converted into a museum after her husband, Diego Rivera’s death. The objects have never left Mexico before so it’s very exciting that the V&A is exhibiting them.
Rachael worked closely on the mannequin development with two different manufactures to create a new figure that evoked the feeling of Frida Kahlo. A 3D printed render of Kahlo’s head was created and turned into fibreglass, it was then seamlessly merged with the rest of the body to create a complete figure. The mannequins weren’t designed to be too realistic or an exact copy of Frida, but a likeness of her with recognisable features, such as her braided crown of plaits. This unique style of display figure couldn’t of been achieved using commercially available mannequins. A paper finish was chosen to cover the surface of the mannequins in order to slightly abstract the figures and give a neutral effect.

My brief was to make individual head treatments, or headdresses, for three of the Frida mannequins going into the exhibition and was initially sent images of these to give me an idea of what the Senior Co-Curator, Claire Wilcox, wanted to recreate. I was asked to make three dimensional paper flowers to attach to the mannequin heads to resemble iconic images of Frida, however I was told that the headdresses didn’t need to be exact copies of these reference images. Frida had many different flower adornments and often wore fresh flowers in her hair so my initial brief was to “create something beautiful but at the same time subtle. There are so many interpretations of Frida, we want ours to be respectful and not pastiche”.
1.“The Resplandor” (Self-portrait as Tehuana)
The exact costume pictured below, still exists as part of Kahlo’s wardrobe and was to be mounted onto a mannequin as portrayed in this self-portrait. As only the face of the mannequin and the flowers on the head were going to be seen, I needed to make the same flowers and arrange them as seen in the portrait.

2 and 3. “The Seated Fridas”
The flowers for these two mannequins were to sit across the front of Frida’s head, with some also fitting neatly behind her big plait. The mannequins were to be displayed seated next to each other holding hands in the exhibition, so they were going to have the flowers in their hair displayed as mirror images of one another.

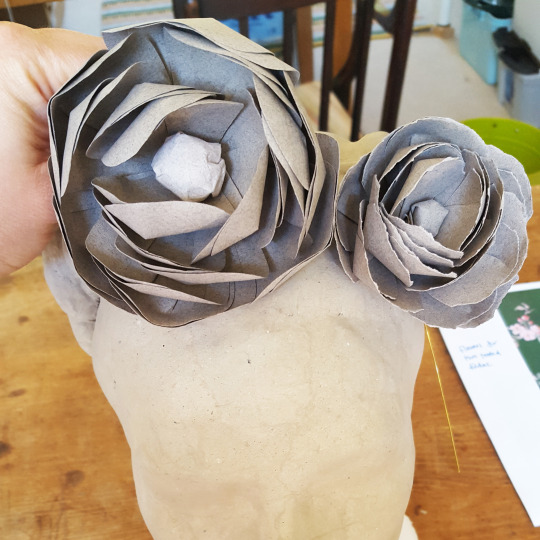
My first task was to make some sample flowers to send over to the V&A for the team to look at against the mannequin heads, at this point I had only seen photos of the heads so it was important to do some trials. All of the flowers were to be made from the same colour paper as the mannequins to tie it all together visually and so not to distract from the clothing.
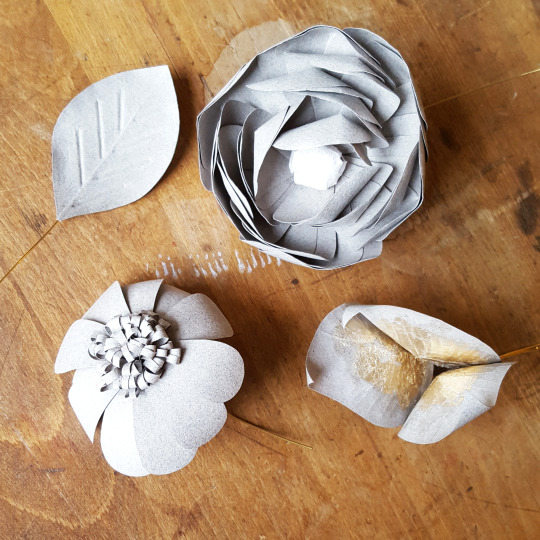
I started by making four trials pieces: one rose, one abstract leaf, one daisy and one leaf.
FRONTS OF TRIALS:
BACKS OF TRIALS:

Due to the fact that the finish of the heads was to be a distressed paper finish with an uneven texture, it was decided that the trial flowers therefore looked a little too pristine next to the head. When sending the trials off to the V&A I explained that the edges could be made to look ‘more frilly’, by altering the templates and tearing the paper petal edges and it was decided that this would be a good alteration to make. The samples were also too large against the head so they were all to be scaled down when making the actual headdresses.
Below shows the trial flower on the left, and the modified flower on the right with the torn petal edges and it is smaller in scale.
Following this initial feedback I then received a parcel back from Rachael with one of the Frida mannequins heads in it, a pack of papers, a pot of paint-wash and some sample card that had been used on the mannequin heads, plus extra images and instructions to work from.
Other similar papers were also supplied for me to use to help create subtle variations in the tone of the flowers. Below shows two roses, the left one has the outer petals made from paler paper that was subtly coloured in the same paint-wash as the mannequin heads.

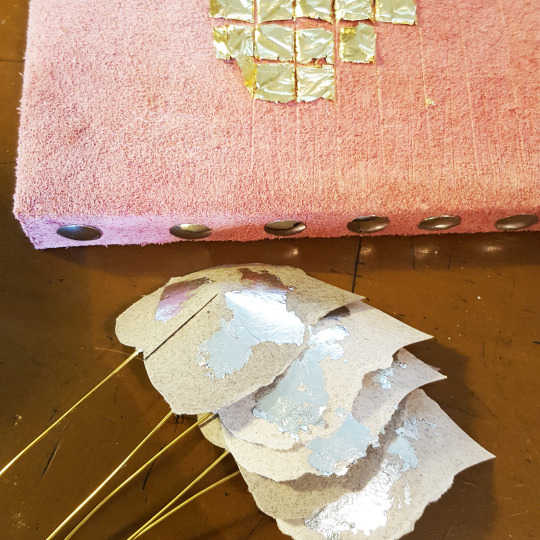
It was also decided that for The Resplandor the curator wanted to trial a bit of gold leaf inside some of the flowers, so they would shimmer under the museum lighting. I stuck a small amount of gold and silver leaf on one of the paper leaves to give an indication of how this might look.

Once the trial pieces were analysed and the alternations noted it was time to commence with the making of the headdress components, described in stages as follows:
MAKING UP THE ROSES FOR THE TWO SEATED FRIDAS
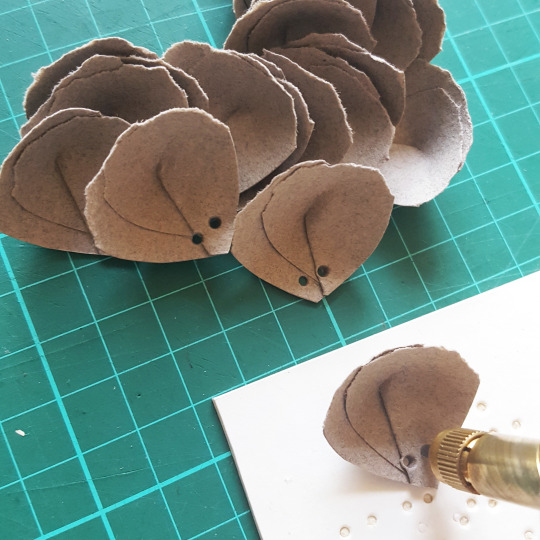
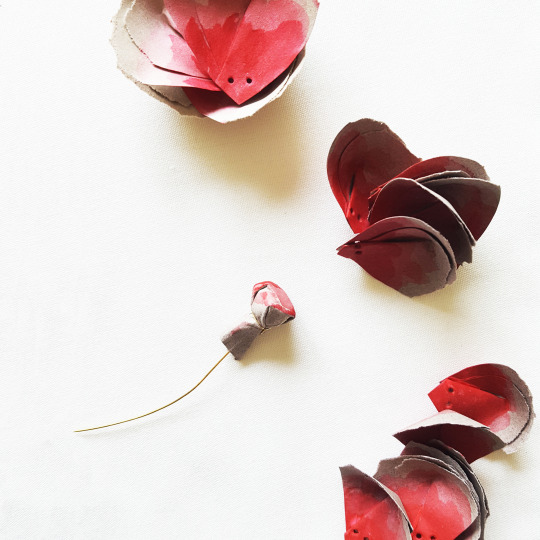
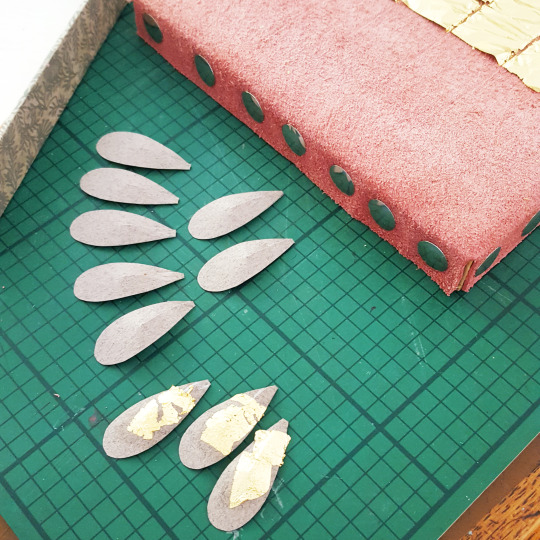
I cut out the petals using a template. These were in four different sizes so I could make up different sizes of rose. The side edges were cut with scissors and the top edges torn into a curve.

The petals were kept in pairs and glued together slightly off-set with some PVA, as seen in the top-most group of petals in the below picture. Once dry they were then folded into a pleat at the base of the petals and glued again to create a more three-dimensional shape - see the bottom group of three petals.

Once formed they were then punched twice with a Japanese hole punch at the base of each of the petals.
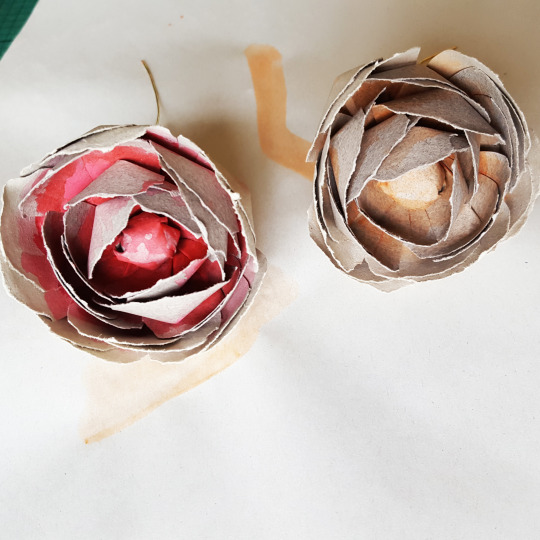
For the two Seated Fridas, the mannequins were going to re-enact the scene from one of Frida’s most notable paintings, The Two Fridas; herself and her double, holding hands, with exposed hearts connected by a shared artery. Claire Wilcox wanted one mannequin to look very Victorian and the other very Mexican to enhance the outfits they were due to be dressed in.
I was therefore asked to try painting inside the paper roses, the Victorian flowers were to have a sepia tint inside and the Mexican flowers to have a red/pink tint. The didn’t want a solid colour, just to have some colour inside the petals/leaves so that the flowers still looked like paper and match the mannequins. The first trial was discarded as the colour was too bold.
So a more subtle colour wash was chosen, using watered down acrylic paints building the colour up from the bottom of each petal in stages.
RED/PINK FOR THE VICTORIAN-LOOKING FRIDA:
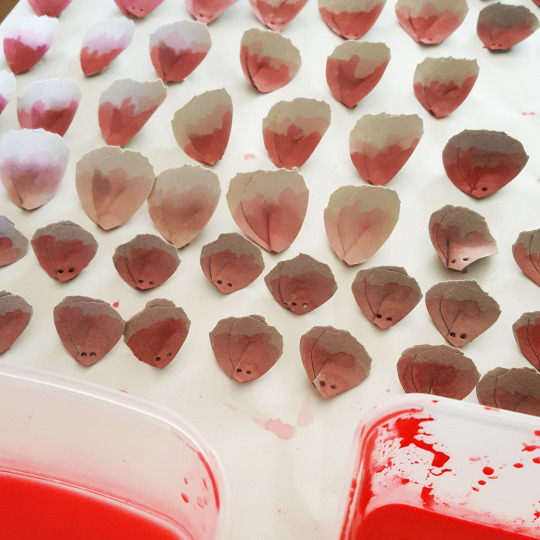
SEPIA FOR THE MEXICAN-LOOKING FRIDA:

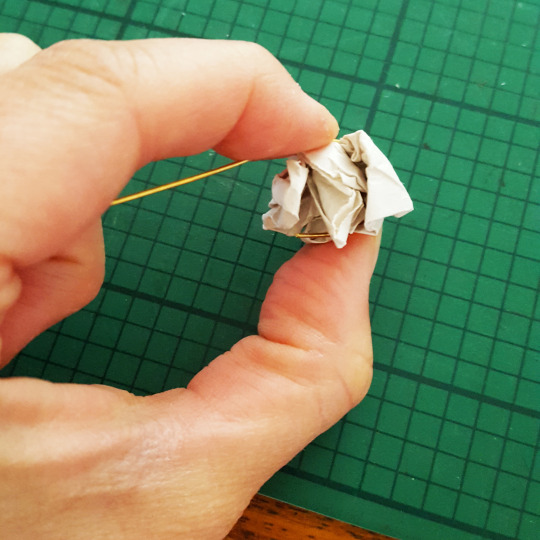
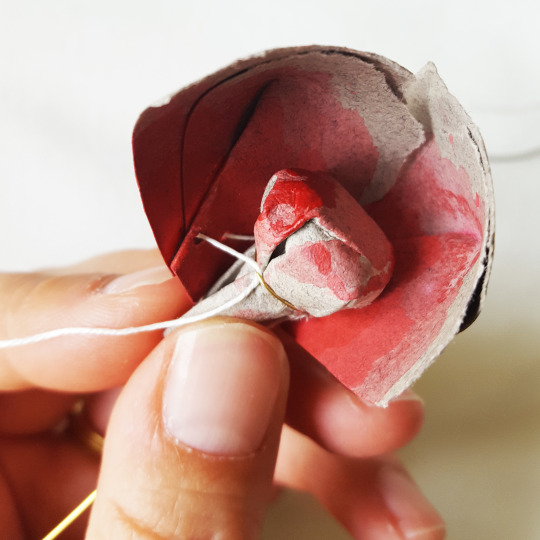
Once the petals were coloured and dry it was time to make up the roses. The centre of each rose was made by winding some wire around a small ball of newsprint. This was then wrapped in a square of the grey paper and wire was wound around it at the base to hold it together.
The petals were laid out in size order. For the largest of the flowers there were six small, five medium and six large petals making up each flower.
I tied some linen thread to the wire.

I then worked around the flower centre attaching each of the petals in place by threading a curved needle through the punched holes.


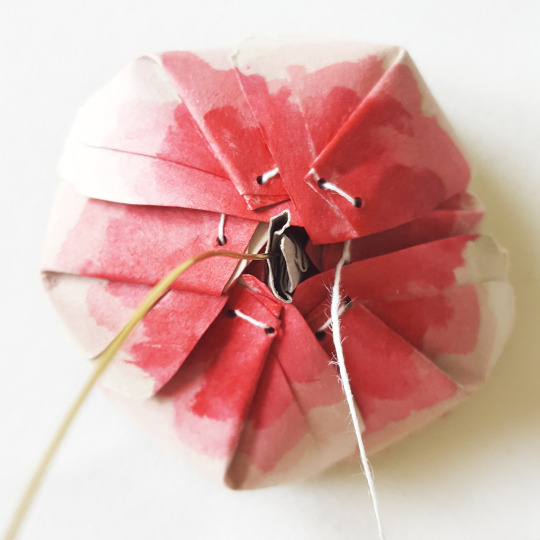
Each Seated Frida headdress had one large, three medium, two small and one petite rose, so the same process was repeated to make up each of these and again for the sepia flowers.

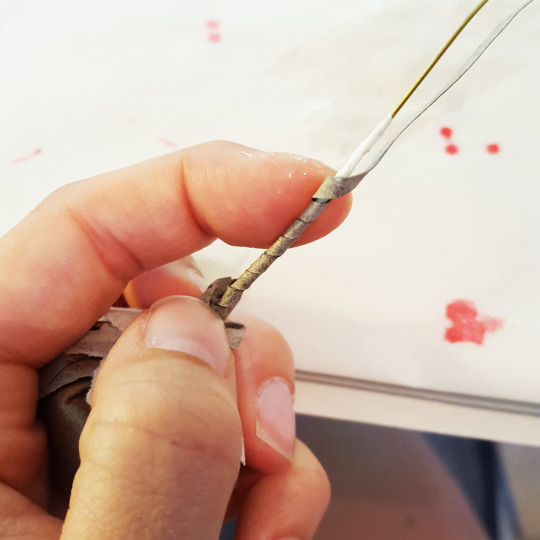
The exposed wire stem of the flowers was wound with masking tape in order to allow for it to then be covered in paper to match the flowers.

Paper leaves were also cut out and stuck to the back of each flower. Once glued they were curled using the edge of a pair of scissors to give them more shape.

The stems were all then wrapped in a coiled thin strip of paper and fixed with PVA glue.
PLACEMENT OF ROSES ON MANNEQUIN HEAD
Once all of the roses were made it was time to concentrate on their placement on the mannequin head.

Starting with the petite rose in the front centre, holes were drilled right through into the mannequin head for the flower stems to push in to.


Given I only had one head to work on I had to mark the positions of each flower so Rachael and her colleagues could repeat the placement (in reverse) on the other head. I also left it up to them to glue the flowers in position once the parcel got back to the V&A as it was safer to send the flowers and head back separately.


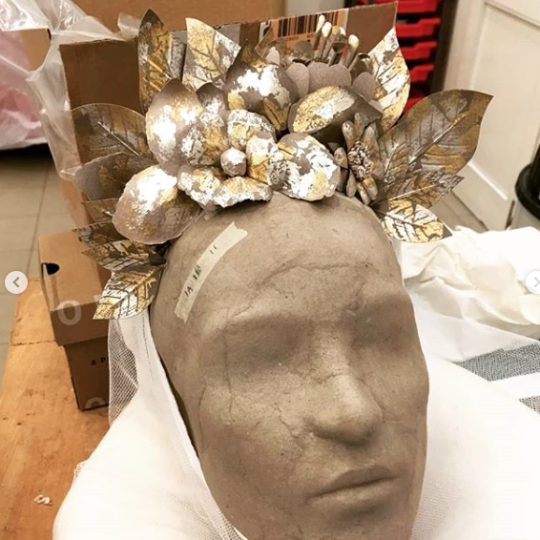
MAKING UP THE ELEMENTS FOR THE RESPLANDOR
Following the completion of the Seated Frida headdresses it was time to work on the more complex Resplandor head. The iconic image showed Frida with the following on her head: 1 x rose, 1 x daisy, 1 x large flower, 7 x bougainvillaea, 7 x large leaves and 9 x small leaves.
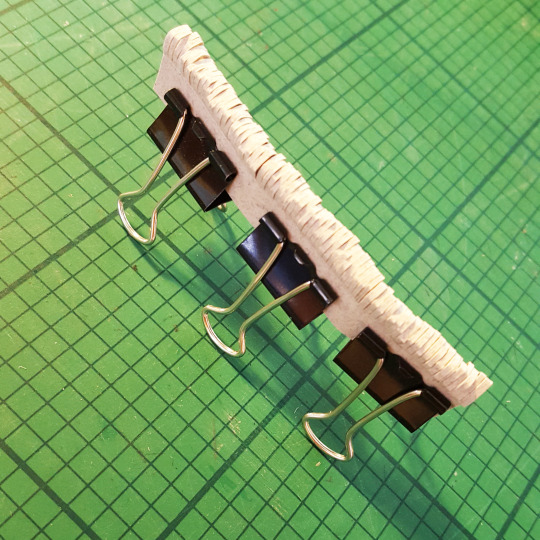
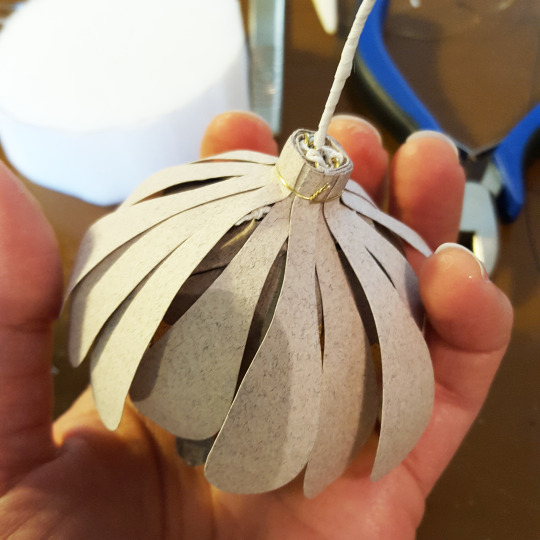
I started by working on the daisy, creating the centre first. I cut a series of thin lines using a scalpel across the centre of a strip of paper.

The two outer, uncut edges were then glued together and held with bulldog clips allowing the cut strips to curve in the centre. This strip was then coiled around a piece of wire to create the textured centre of the daisy.
A series of petals were cut from a template, these were then made more three dimensional by cutting and gluing the tips of the petals together.

Following the trial leaf I did at the start of the process with gold and silver leaf added on, the curator decided she wanted this on all of the Resplandor petals and leaves. I had to make sure that the gold and silver leaf was only going to be on the front face of each of the elements as it was important that no metal was going to be in contact with the object.
The costume was going to be seen through the reflection of a mirror in the exhibition so the gold and silver leaf needed to be quite bright and bold to stand out.

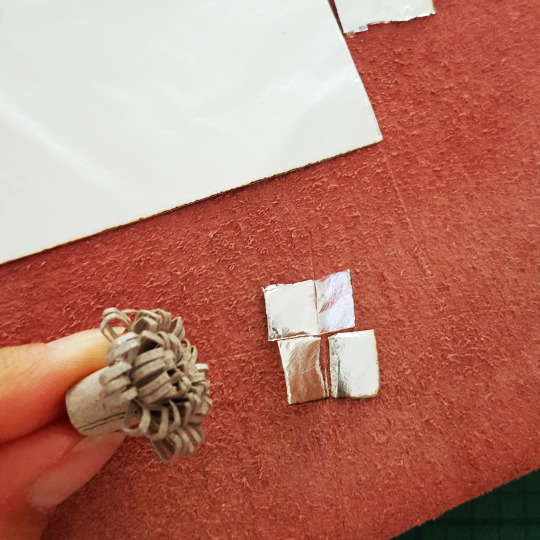
I cut gold leaf into squares on my gold cushion and lifted it up using a piece of cotton wool that had some grease on it to attract the leaf. I applied a wash of PVA glue to each of the petals and then placed the gold leaf onto these in turn and waited for them to dry. Once dry I rubbed off the excess to give a more distressed look.
The same applied for the daisy flower centre, dabbing glue onto the paper and then pressing silver leaf squares down into the detail of the paper swirl.
I then attached the petals to the outside of the flower centre. It was decided that more gold and silver leaf was needed on the flower so I added more to the flower all over.

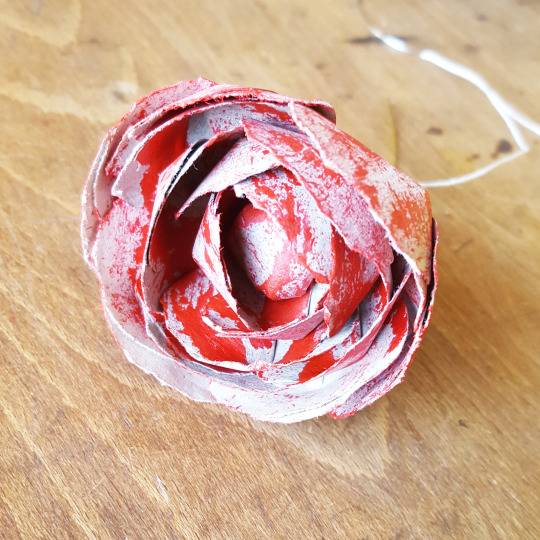
Next I made petals for the rose, a different style rose to that of the Seated Fridas. These had gold and silver leaf added and were then attached around a flower centre ball of paper.

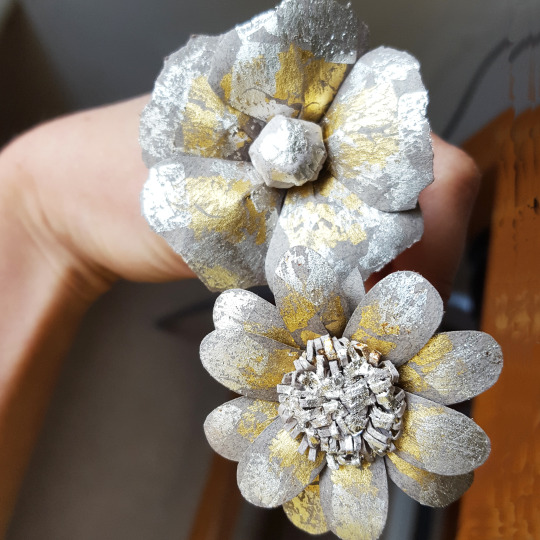
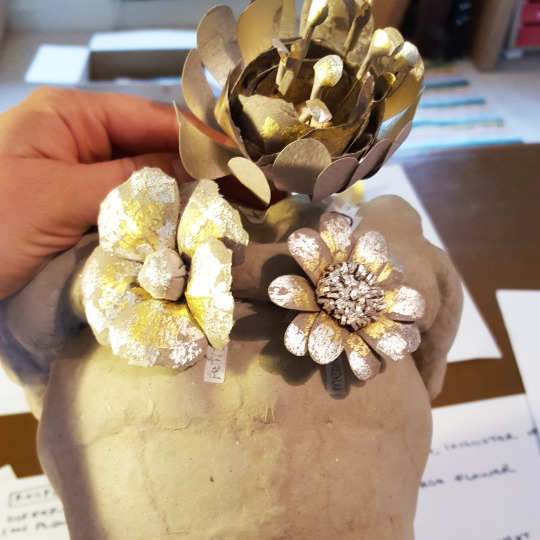
The completed rose and daisy with their distressed mix of metal leaf on the front face:
Next I made up a series of leaves in two different sizes. These were constructed of two layers of paper stuck together with a piece if wire sandwiched in the middle to use as the stem of the leaves.

Again, squares of gold and silver leaf were stuck to one side and then rubbed down to give a more distressed look.

As well as the flat leaves, I also made up a number of bougainvillea-style elements, combining two or three curved leaves into bunches to build up the look.
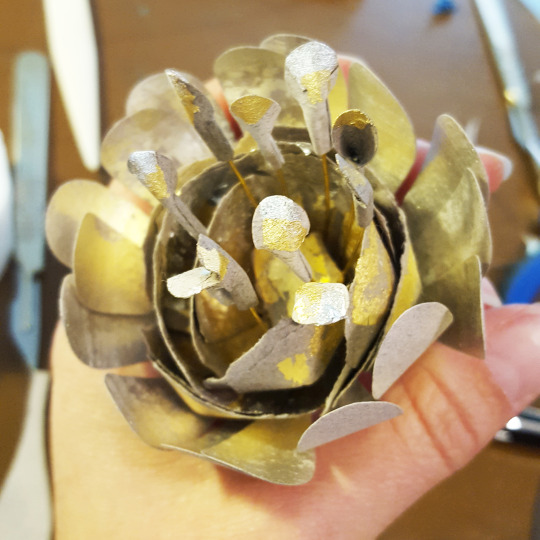
Finally, there was one large flower to make. I used the same base centre and petals as the Seated Frida roses but added in extra long wires to the centre so they stuck out past the petals. The ends of these wires had small curved paper elements stuck to them.
For the outermost petals of this flower I first covered a piece of paper with a block of silver leaf. From this I then cut out individual long petals.

These were stuck to the outside of the centre flower and secured with a small piece of twisted wire. This wire was then concealed with some outer paper leaves.
The completed flower definitely shimmered with all of the detail and leaf on it!
Again, I had to work on the placement of the elements once the pieces were all made. Rachael and her team needed an accurate plan of where everything needed to be placed so I broke the elements down into four rows, marked each piece up and wrapped everything separately to try and make it as clear as possible.


Thanks to Rachael for the following photo showing the Resplandor head with all of the elements attached before it was then dressed with the object.
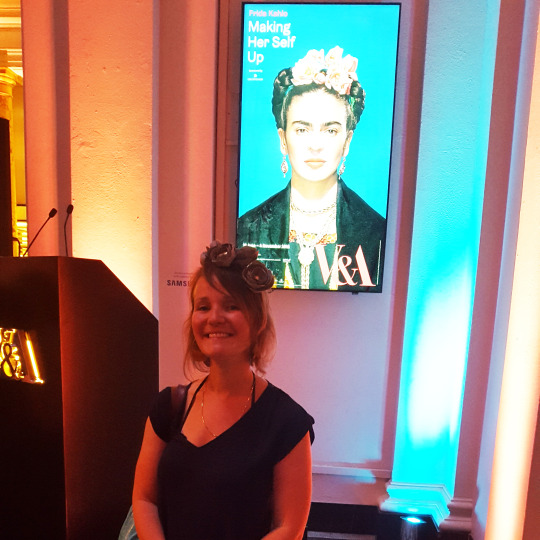
I am hoping to get access to some of the professional photos taken of the exhibition to better illustrate the final results of the headdresses but in the meantime all I have is the ones I took myself (you might spot me in the second of these two pictures!)

***************************************
Seated Frida ‘European’ (LEFT)
Outfit worn to a New York gallery opening
Kahlo wore this dramatic outfit to an opening in New York in 1933. The velvet evening cape has embroidered ribbon appliqué and two silk bows attached to its long, pointed tails and is professionally made. She paired it with a silk devoré skirt with ruffled hem made from imported silk, which may have been sewn by a local dressmaker. The origin of many of Kahlo’s European-style clothes is uncertain.
Early 1900s, possibly made in France (cape); fabric from France (skirt)
Silk velvet, satin, lace trimming, synthetic lining (cape); Jacquard silk (skirt)
Banco de México Diego Rivera & Frida Kahlo Museums Trust
***************************************
Seated Frida ‘Mexican’ (RIGHT)
Blouse and skirt Before 1954, Tehuantepec, Oaxaca, Mexico
This huipil (blouse) and rabona (gathered skirt) are from the town of Juchitán de Zaragoza on the Isthmus of Tehuantepec, Oaxaca, in Southern Mexico. Tehuana dress was regarded as one of the most beautiful forms of regional dress, and was particularly admired by Rivera. Although not a Tehuana by birth, Kahlo adopted the style of this region after her marriage and wore variations upon it for most of her life.
Cotton
Banco de México Diego Rivera & Frida Kahlo Museums Trust
***************************************

***************************************
Radiance
Lace headdress and skirt Before 1954, Juchitan, Oaxaca, Mexico
The hulpll grande or resplandor as it has come to be known in recent years, after the radiating headpieces of statues of the Virgin Mary, is a ceremonial headdress worn by the women of Tehuantepecfor church, weddings and processions. Its origins are unknown, as are the function of the two vestigial ‘sleeves’ that are glued fast by starch and never used. The garment is worn in two ways by Tehuananas. During Mass, the headdress resembles a cape, with one sleeve to the front and the second hanging behind. On other ceremonial occasions, the wide frill fames the face.
Machine-made lace, cotton and ribbon
Banco de México Diego Rivera & Frida Kahlo Museums Trust
***************************************
I was invited to the private view of the exhibition on Wednesday 13th of June, the dress code being “inspired by Frida”. So, naturally I made some extra flowers to wear in my hair on such an occasion!
***************************************
Frida Kahlo: Making Her Self Up
On now until Sunday, 4 November 2018


She held it always close to her heart, like a wounded beast. ‘Secret’, gouache and metal leaf. … … … . #art #gouache #goldleaf #illustration #fairytale #dreamy #fantasticalart #watercolor #painting
Post link


#MiniatureMonday
Gilding & the making of Gold Leaf by Richard H. Barnes
Here is a tiny look into the world of gold leaf in the mid 1900’s. It focuses in particular on the process of gilding the pages of books, with the whole process carefully explained. Maybe not as flashy as you would expect for a book about gold leaf, but it’s still very interesting and educational!
Bound in blue leather with gilt title on front cover.
–Diane R., Special Collections Graduate Student

^Not the recommended technique^

Bumblebees - Mixed media and gold leaf on cream paper. First small original of 2022, I start the year gently.
I’ve always loved creating patterns from bramble and blackberry flowers, it’s one of my favourite plants to represent. The branches, leaves and thorns add rhythm and the flowers and berries add roundness to the design. I like to use this unloved plant to make a harmonious golden pattern.
#bumblebee #drawing #goldleaf
https://www.instagram.com/yoann.lossel/p/CY6oHaIOFsk/?utm_medium=tumblr
Post link


based on the crease-pattern of my cicada. which is omnipresent in Japanese summers and symbolizes transformation and the ephemeral
molding paste, acrylic, gold leaf & pencil on canvas
#cicada #semi #蝉 #origami #karesansui #folded #goldleaf #zen #circlepacking
https://www.instagram.com/p/CDg_sKBJlPl/?igshid=no6hs6i9iuzt
Post link
molding paste, acrylic, gold leaf &a")
inspired by traditional japanese origami bases (bird&frog)
molding paste, acrylic, gold leaf & pencil on canvas
#birdbase #frogbase #origami #karesansui #folded #goldleaf
https://www.instagram.com/p/CCbd7qbp–T/?igshid=1749ls08s8yeq
Post link

“Pieces of eight! Pieces of eight!”
#pirates #goldleaf
https://www.instagram.com/p/B9ewrdFHiyn/?igshid=bkjysisgy54n
Post link


Some in progress shots of a new piece. Will be moving on to digital paint of her face soon.
Post link


Not only skulls are there to gild. This is a birthpresent for my friend her child Rémi, born the 12th of june 2019. ❤
2019 - Rémi flowerpot and papercard.
23 karaat - roodgoud, los - verguld op oliebasis
6 karaat - witgoud, los - verguld op waterbasis
Post link


(2018) - vleugel libel (dragonfly wing)
22 karaat - oranjegoud, vast - verguld op oliebasis
23 karaat - roodgoud, los - verguld op oliebasis")
23 karaat - roodgoud, los - verguld op oliebasis")
23 karaat - roodgoud, los - verguld op oliebasis")
")
")
")
")
")
")
")
")
")
23,75 karaat - rosenobel dubbelgoud, los - verguld op oliebasis")
23,75 karaat - rosenobel dubbelgoud, los - verguld op oliebasis")
23,75 karaat - rosenobel dubbelgoud, los - verguld op oliebasis")
2018 -Neushoornvogel (hornbill)
23,75 karaat - rosenobel dubbelgoud, los - verguld op oliebasis
Post link
23,75 karaat")
23,75 karaat")
23,75 karaat")
23,75 karaat")
2018 - Then there were three of them.
Eend - muskusrat - wever
(Duck - Muskrat - weaver)
23,75 karaat - rosenobel dubbelgoud, los - verguld op oliebasis
Post link
23,75 karaat - rosenobel dubbelgoud, los - verguld op oliebasis")
23,75 karaat - rosenobel dubbelgoud, los - verguld op oliebasis")
23,75 karaat - rosenobel dubbelgoud, los - verguld op oliebasis")
23,75 karaat - rosenobel dubbelgoud, los - verguld op oliebasis")
23,75 karaat - rosenobel dubbelgoud, los - verguld op oliebasis")
23,75 karaat - rosenobel dubbelgoud, los - verguld op oliebasis")
23,75 karaat - rosenobel dubbelgoud, los - verguld op oliebasis")

23,75 karaat - rosenobel dubbelgoud, los - verguld op oliebasis")
23,75 karaat - rosenobel dubbelgoud, los - verguld op oliebasis")
23,75 karaat - rosenobel dubbelgoud, los - verguld op oliebasis")


23,75 karaat - rosenobel dubbelgoud, los - verguld op oliebasis")
23,75 karaat - rosenobel dubbelgoud, los - verguld op oliebasis")
23,75 karaat - rosenobel dubbelgoud, los - verguld op oliebasis")
23,75 karaat - rosenobel dubbelgoud, los - verguld op oliebasis")


2017 - Kat met schedelbreuk
23,75 karaat - rosenobel dubbelgoud, los - verguld op oliebasis
Post link

2017 - Stappen in het verguld proces
23,75 karaat - rosenobel dubbelgoud, los - verguld op oliebasis
Post link


