#wig tips
Wig Hack Wednesday #5 !
Have you ever wanted to use the same wig for that one character who can’t decide if she wants to wear her hair in twin tails or let her hair down? (Aka Nozomi from Love Live) Or, have you found a perfect wig color for your character but the wig just doesn’t come with a back-parting? Well, here is one way you can fufill your cosplay goals on a budget! Also good for when you want to re-purpose a wig for different characters.
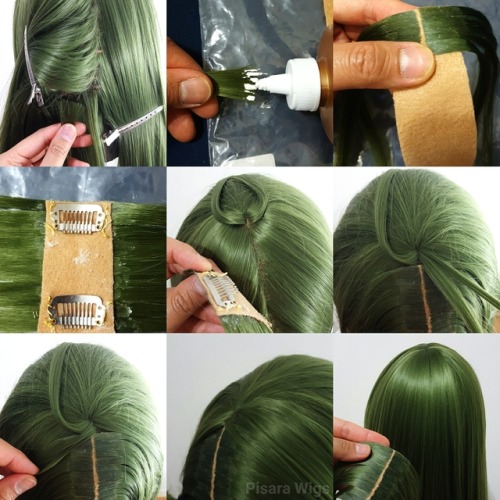
For this demo, I’m using a Venus in grass green from Arda Wigs. I love this color and the length is perfect for Mallow from Pokemon Sun and Moon. My goal is to add a back-parting to the Venus base wig but make it detachable in case I wanna use the wig for other cosplay.
- Part the wig down the middle in the back, and clip the hair away on each side. Cut the hair from the inside layers of the wig to use as wefts for this project. By leaving the outer layers uncut, when you tie the wig into twin tails or let the hair down completely, it will hide the trimmed part
- Use Tacky glue (or other glue that dries clear but flexible) on the tip of a small piece of hair. Use your fingers to squeeze the hair flat to make sure the glue covers all of the hair on the tip of that piece. Wait until it almost dries
- Put more glue in the back side of the piece of hair by the tip. Press the hair piece down onto a strip of soft felt sheet. I happened to find a nude colored one that matched me, but you can use acrylic paints to get the level of color you want (paint the felt strip prior to the start of the project) Also, I find that holding up the felt strip and pressing the glued hair down allow more control and help create more “curve” shape from the center part
- Once you finish gluing hair down on the whole felt strip, turn it over, and hand-sew some wig clips on the back side. 1 inch spacing between each wig clip worked well for me. You’ll need about 4-5 wig clips for the whole felt strip
- Now you can clip the felt strip onto the main wig in the back. Make sure you leave two small pieces of hair from the main wig at the top where your felt strip would go
- Clip the felt strip in place. Make sure it doesn’t come off when you tuck on it. Take the little piece of hair from the main wig that you left out earlier, and section it in half on each side
- Criss-cross the hair pieces to hide the “seam” of the top of the felt strip
- Comb and blend the hair from the main wig with the hair from the felt strip, and tie your twin tails
- You can unclip the felt strip later and comb down the hair to use the same wig as a normal long wig!
Another good thing about this method is that you can use your felt strip for other projects if you buy other wigs from the same company later and in the same color. Or, you can turn an ombre wig into twin tail style for J-fashion shoot and wear the wig as a long wig the next time. This is not the “best” way to do back-parting, but I wanted to focus on being cost-effective and easy enough for beginners to attempt. Have fun wiggin’!
Post link
Throwback Thursday styling tips! Since I wasn’t feeling well and missed the chance to upload this week’s Wednesday Wig Hack, a friend of mine suggested that it would be a cool idea to talk about some wigs I have styled in the past.
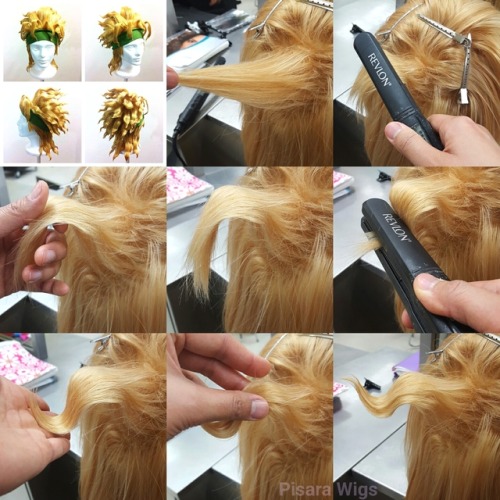
I have gotten questions about how to style “wavy spikes” like I did for my Dio (Jojo’s Bizarre Adventure) wig so here is a little demo. You can also use this technique for characters like Nagito Komaeda (Dangan Ronpa), or Lancer / Diarmuid (Fate/Zero). :)
- First, you want to make your spike. Follow countless of spiking tutorials online for this step. :P Don’t apply too much hair product though because we will use heat on it so it still needs to be sort of soft and flexible
- Use a flat iron, with the medium heat setting (I used 380 F for this), grab the spike where you want the wave to start. Bend you wrist so that the spike point downwards. Keep in mind, for this kind of wavy spikes, the pattern of wave will be down>up>down
- Let go of the flat iron after a few seconds and immediately use your fingers to catch the spike to hold its shape until it cools down. (Use gloves if you’re sensitive to heat. My hands can’t feel a thing because I’m used to heat tools)
- Go at it with the flat iron again! Grab the spike a good distance from the first wave, around 1 inch and a half for me. Then flip your wrist so that the spike points upwards
- After a few seconds, let go of the flat iron and catch the spike with your hand again. If you want extreme curve near the tip, you can push the spike in towards the wig. Once it cools down, it should hold the shape
- Now you can go in and “puff” up the spike by squeezing the sides. I use Got2B spiking glue on my fingers to lightly coat the spike throughout
- Touch up the tip by adding another wave with the same steps as before. Use Got2B spray to seal the style. And you’re done! (Just kidding you have to do like 30 other spikes. Good luck )
Base wig used for tutorial: Malinda in pale blonde from Arda Wigs
Base wig used for Dio: Magnum Long in light blonde from Arda Wigs
Post link
Wig Hack Wednesday #6 !
Want to make your ponytail wig more believable with top volume? Ponytail clips are cool but they can be uncomfortable after long hours of wearing. You can make seamless high ponytail with this method for characters like Kasumi (Dead or Alive), Widowmaker (Overwatch), or Medea (Fate/Grand Order)
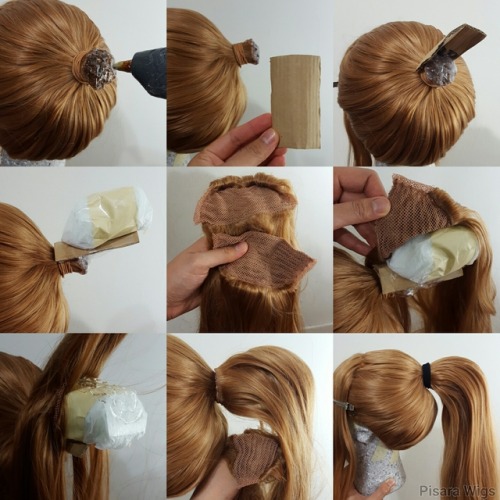
For this demo, I used a Sandy Brown Jeannie base wig from Arda Wigs. The Jeannie comes with a tied up ponytail wig with a ponytail clip. You can use normal non-ponytail wig as a start as well. Make sure to alter the wig so you can tie it up for the stubbed part and use extra wefts for the high ponytail part.
- Undo the tail of the Jeannie base wig and re-tie it higher. Use elastic band for this instead of rubber band so that it won’t melt against hot glue later. Cut off the extra length of the tail as closely as you can to the tied area. Stub with hot glue.
- Cut a piece of cardboard for the tail’s “extension”.
- Hot glue the cardboard piece to the top of the tail, going around it. I used a half-piece, but if you need extra support, cut a bigger piece so that you can completely wrap it around the tail.
- Add paper to the top of the cardboard using packaging tape. You can stack it higher if you wish but keep the weight in mind.
- Take the butterfly clip out of the ponytail clip that comes with the Jeannie. Cut the piece in half.
- Use the bottom piece from the last step to glue onto the top of the tail. Start gluing near the tied area first.
- Section off the hair so it’s easier to neatly glue it down to the paper form. Start from the top area, and then the two sides.
- Remember the other half piece from the ponytail clip earlier? Cut it in half again and use one of the halves to glue to the underside of your big ponytail to close the gap.
- Brush the hair and hairspray it in place and you have a strong high ponytail! Since it’s heavy-back, you may need to sew in some wig clips or zig zag flexi comb inside the wig cap by the hairline to make sure the wig doesn’t slide backward when you walk around.
Post link
Throwback Thursday Styling Tip this week will be focused on how to do big poofy 90’s anime bangs! I did similar bangs on a Sailor Jupiter wig before, but the base wig I used for that had much thicker bangs. I’ve been asked to do a tutorial for long haired characters like Sesshomaru (Inuyasha) or Misato (Evangelion). So if your base wig is a long wig that doesn’t have thick bangs, and you’re too broke to buy more wefts (like me)? You can still get that volume! For this tutorial, I used a special edition Candy Striper wig from Arda Wigs
- First, you wanna part the bangs area into the parting you want in the final result. I did a side-part this time. Work on one side of the part first. You’ll need to section off the top layer of that part and clip it away for now, and work on the bottom half of that section first. To get the wig ready for teasing, you have to create layers. Long wigs don’t have many varied layers so that’s why it’s harder to tease for volume. Snip small pieces of hair off, leaving half an inch space between each snip, and about 2 inches in length from the “root” of the hair
- Remove the hair you snipped from the main wig, and tease alot with the teasing brush
- Grab the top layer that was clipped away, and start snipping! You can see more clearly here where to snip. Remove the hair that was cut, and tease a whole bunch
- Clean up the tease hair by lightly combing the top layer with a fine tooth comb. At this point, you can cut more layers to the bangs to create more dimensions and volume. Use slide-cutting technique
- Since you worked with different sections of layers in the earlier steps, you want to make sure the hair looks unified by teasing all the layers together at the front. Clean up with a fine-tooth comb and hair spray in place
- I found that holding your hand diagonally under the teased bangs while you clean up the top layer will help keeping the shape of the raised “cowlick” part of the bangs
- Again, notice the angled hand placement for the side of the teased bangs. This helps bring the hair to close the space between the teased bangs and the main wig when you comb the top layer down
- Use a flat iron on medium heat (I used 330 F, but check and test how much heat your wig can stand beforehand), grab the “cowlick” area and bend it downward to create the curve. I also used the flat iron to grab small pieces of the top layer of the bangs and create curved shape with it to make the overall appearance of the bangs more “round”
- Repeat the same steps for the other parted section, and you’re done!
I took alot of pictures for this tutorial, so if any part is unclear to you, feel free to ask. I wanted to keep it 9 pictures as usual so couldn’t show every little step. I love old school anime designs and hope this will help you feel more confident cosplaying them!
Post link


