#ardawigs
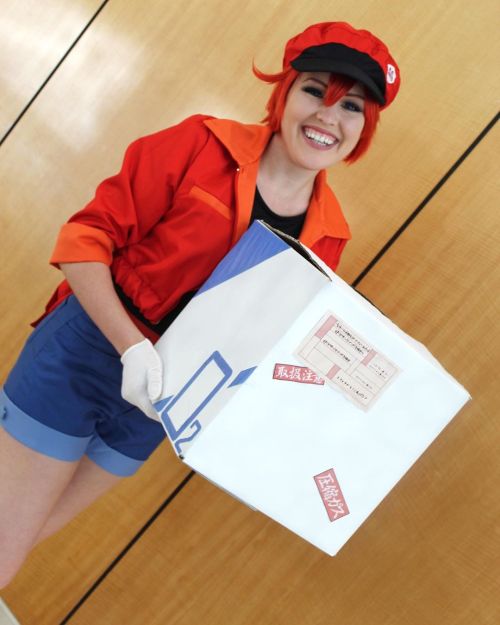
Before and after!! I styled a Lulu in Cherry Red (CL-005) from @ardawigscanada for my AE3803 (Red Blood Cell) cosplay from Cells at Work! It’s the perfect wig!!
**
#cellsatwork #cellsatworkcosplay #hatarakusaibou #hatarakusaiboucosplay #redbloodcell #redbloodcellcosplay #ae3803 #ae3803cosplay #ardawigs #ardawigscanada #wigstyling #wip #cosplay #cosplaywip (at Gainesville, Florida)
https://www.instagram.com/p/B5QQ1SBjles/?igshid=9xppho99cgil
Post link
“I hope to serve you again!”
**
The wig isa Lulu in Cherry Red (CL-005) from @ardawigscanada
**
#cellsatwork #cellsatworkcosplay #hatarakusaibou #hatarakusaiboucosplay #redbloodcell #redbloodcellcosplay #ae3803 #ae3803cosplay #ardawigs #ardawigscanada #cosplay #holidaymatsuri #holidaymatsuri2019 #holmat #holmat2019 #floridacosplay #floridacosplayer (at Orlando, Florida)
https://www.instagram.com/p/B79kX1kjlFS/?igshid=d3olyg11jams
Post link
Day 24 - Favorite wig I’ve done. I love my Princess Jasmine wig!! I learned sooo much from this wig, but looking back there is a LOT I would do differently. While it looks great, it came out super heavy due to the cotton batting and tons of hot glue I used If I redid it, to get the shape I would probably use a combo of styrofoam, teasing, and tacky glue instead. My friend @phavorianne wore the wig for a Disney Princess swimsuit group, and @yayahan even complemented me on it during fanime one year . I made both my Jasmine costume and @lostsymbiote
’s Aladdin costume, and the base wig and all extensions used were from @ardawigs
.
#shepropchallenge #sheprop #cosplay #cosplaychallenge #costume #sewing #sewingproject #convention #disney #disneyland #jasmine #aladdin #genie #princess #disneyprincesses #disneyprincess #agrabah #adventureland #wig #ardawigs #arda #ardastyle #kingdomhearts #disneybound #disneycosplay #princessjasmine #princealaddin
https://www.instagram.com/p/CFiSCZdDS6L/?igshid=9zpv5nexx95z
Post link
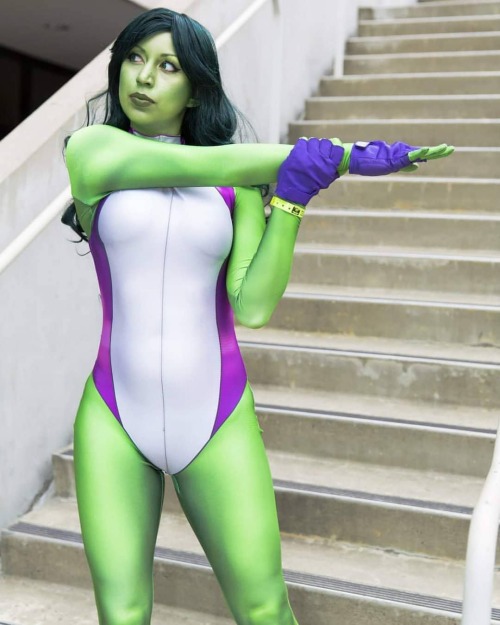
Favorite makeup I’ve done - 9/23 . I have several makeups that I loveeee, so I’ll choose this day that I was She-Hulk at Wizard World Sac. I love how this makeup turned out, and while my face looks a bit different from the body suit in photos, it matched super well in real life and lasted alllll day (oh and I was starfire the day before so I had orange patches all under my bodysuit from the pax LOL)
.
.
#shepropchallenge #sheprop #cosplay #cosplaychallenge #costume #sewing #sewingproject #convention #marvel #shehulk #hulk #jenniferwalters #bodypaint #greenskin #avengers #arda #ardawigs #superhero #comic #comics #comicbook #spandex #zentaisuit #dyesublimation #dyesub
https://www.instagram.com/p/CFgUgMIDTiU/?igshid=k6qe6ag0y497
Post link
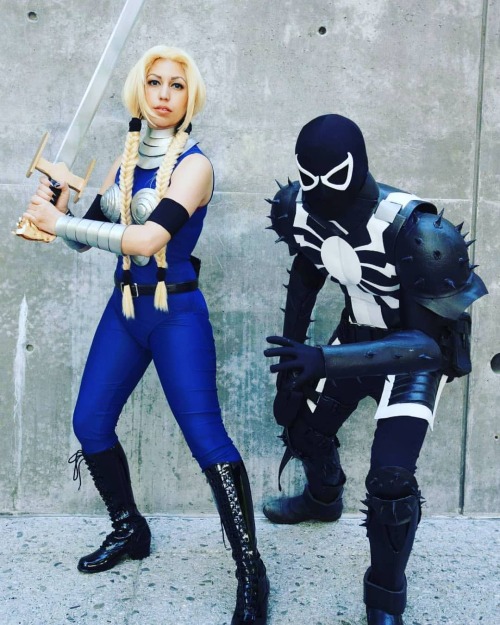
Day 17 of the #shepropchallenge is first time tackling a new material. When I made my Valkyrie costume to go with @lostsymbiote ’s Agent Venom, I used some of his leftover worbla to make my boob armor. It was my first time working with worbla and I was rushing last minute (to no one’s surprise) so it came out looking like doodoo, lol. (Meanwhile J’s Venom armor came out soooo good but then it all melted in a hot car )
.
.
#sheprop #cosplay #cosplaychallenge #costume #sewing #sewingproject #convention #worbla #armor #marvel #comics #marvelcomics #valkyrie #venom #agentvenom #sword #asgard #asgardian #arda #ardawigs
https://www.instagram.com/p/CFQk2lyD9te/?igshid=9lvr8u08uphe
Post link
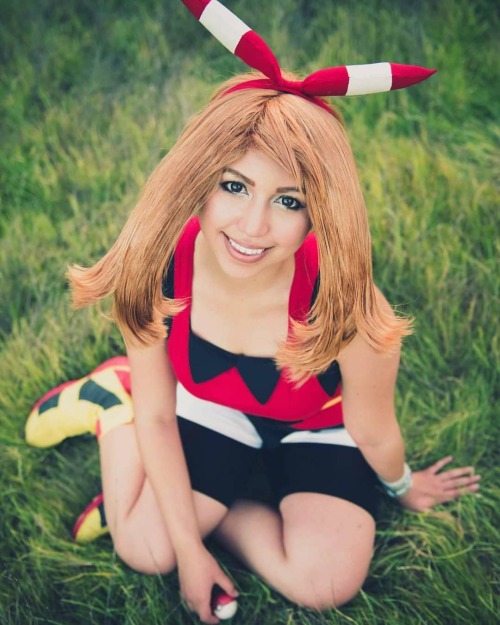
Yayy the just announced Pokemon Go capability to Pokemon Home! I can finally transfer hundreds of pokemon taking up space
.
.
Photo by Jesus H.
#pokemon #ookemongo #pokemonhome #pokemonoras #oras #pikachu #pokémon #pika #may #haruka #pokemonruby #pokemonsapphire #swsh #swordshield #pokeball #cosplay #costume #halloween #pokemoncosplay #handmade #arda #ardawigs #ardastyle #spicydoki #rosiegaga
https://www.instagram.com/p/CHbbPNEDG19/?igshid=16a3wtbfx2ckc
Post link
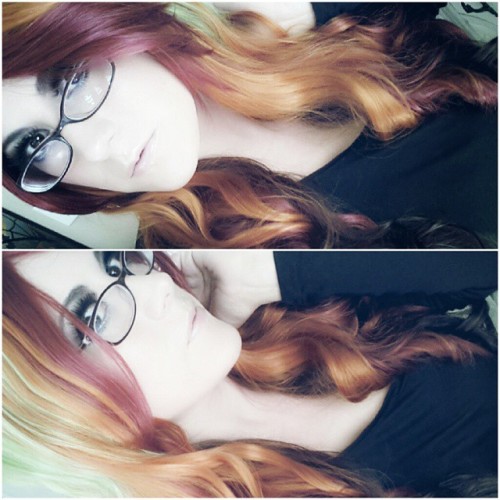
I’m totally in LOVE with this fall edition wig @ardawigs. It looks like a soft fall rainbow *_* #arda #ardawigs #arda_wigs #wigs #wig #fall #fallcolors
Post link
I’m totally in LOVE with this fall edition wig @ardawigs. It looks like a soft fall rainbow *_* #arda #ardawigs #arda_wigs #wigs #wig #fall #fallcolors
Post link
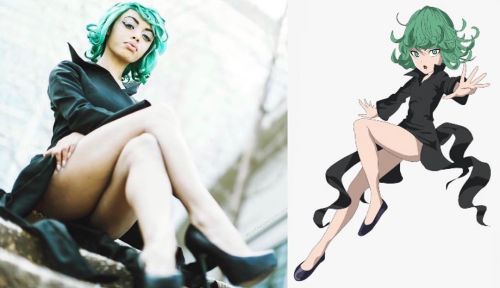
Cosplay vs. Character - Tatsumaki (Tornado of Terror)
•
•
Contacts - Dolly Eye Green from @uniqso
Wig from @ardawigs
- mugenconcept
#cosplays #cosplayer #cosplayers #cosplaying #cosplayersofinstagram #blackcosplayersrock #blackgirlmagic
#Tornado #tornadoofterror #tornadocosplay #tornadoonepunchman #tatsumakicosplay #tatsumaki #onepunchman #onepunchmancosplay #onepunchmantornado #cosplayers #cosplaying #green #ardawigs @ardawigs #katsucon #katsucon2017 #katsu #girlswhocosplay #instacosplay #sidebysidecosplay #blackcosplayerhere #sidebyside #cosplayvscharacter #charactervscosplay
https://www.instagram.com/p/B_3IWyFjje0/?igshid=1sqfecxfifyu5
Post link
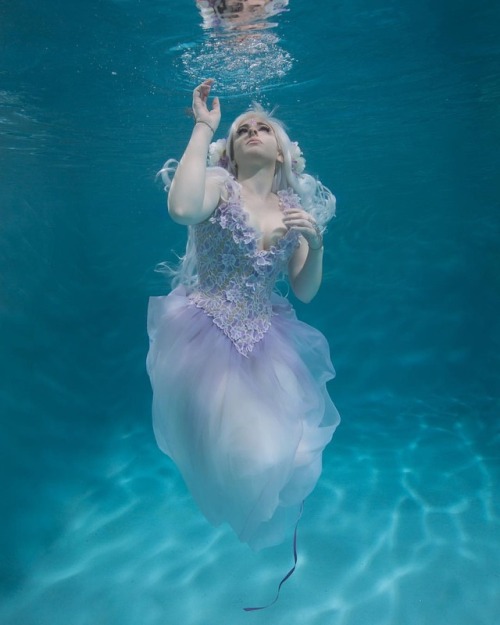
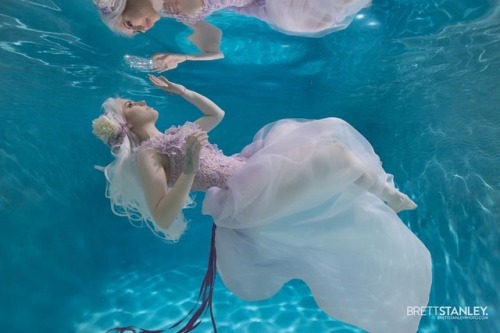
Last but not least from my underwater shoot inspired by The Last Unicorn. Photograhper: @brettsphoto
MUA: Jessica Vaughn Wardrobe/model @anachronisminaction #photoshoot #underwater #underwaterphotography #cosplay #costume #corset #authenticcorset #fantasy #lace #couture #thelastunicorn #amalthea #ladyamalthea #ardawigs #headdress #artnoveau #brettstanleyphotography #anachronisminaction (at Atlanta, Georgia)
Post link
underwater shoot inspired by The Last Unicorn. Photograhper: @brettsphoto
MUA: Jessica Vaughn Wardrobe/model @anachronisminaction #photoshoot #underwater #underwaterphotography #cosplay #costume #corset #authenticcorset #fantasy #lace #couture #thelastunicorn #amalthea #ladyamalthea #ardawigs #headdress #artnoveau #brettstanleyphotography #anachronisminaction (at Divers Supply Marietta)
Post link
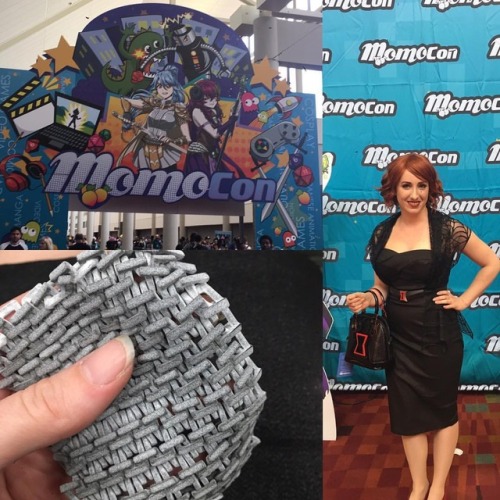
Having an awesome time today at @momocon so glad I was able to get the chance to come today before I head back to Los Angeles for good tomorrow. Highlights we’re definitely @gstqfashions (who I’ve admired from afar) panel on sewing machines, props and 3dprintinh panels by @jarmanprops and @thefarmicist #momocon #props #3dprinting #panels #blackwidow #marvel #casualcosplay #ardawigs
Post link
Lady Amalthea among the waves, inspired by The Last Unicorn Photograhper: @brettsphoto
MUA: Jessica Vaughn Wardrobe/model @anachronisminaction #photoshoot #underwater #underwaterphotography #cosplay #costume #corset #authenticcorset #fantasy #lace #couture #thelastunicorn #amalthea #ladyamalthea #ardawigs #headdress #artnoveau #brettstanleyphotography #anachronisminaction (at Pinewood Atlanta Studios)
Post link
Happy @starwars 40th anniversary!!! Looking forward to many more years to come! #tbt to @starwarscelebration with @27crossroads picture is a still from the upcoming #lookingforleia documentary. #starwars #starwarsanniversary #starwarscosplay #starwarscelebration #twilek #cosplay #cosplayers #geekgirl #geekgirlsdoitbetter #marajade #cosplayfabrics #ardawigs #twilekpam #saberforge (at Orange County Convention Center)
Post link
Finished up two new Mara Jade cowls, the more comic accurate version with out tails. I’m in love with these vintage hinged army motorcycle goggles I found on Etsy! Both fabrics are from @cosplayfabrics the white I dyed to match my beige gloves per the #501stlegion CRL guidelines. #cosplay #marajade #goggles #vintage #costume #dyeing #cosplayfabrics #ardawigs #geekgirl #starwars #ineedanap
Post link
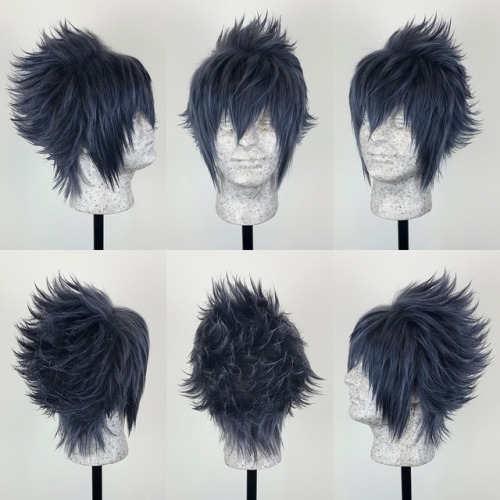
Noct! I used an Inigo in Blue Grey from Arda Wigs to style into this Noctis wig. It would be easier to trim a Jaguar or a Magnum Long for this. But at the time I purchased the base wig, the other wigs were on backorder. This is seriously the perfect color for our prince though. I had the chance to see the Arda team who went above and beyond to develop this special color blend, through many trials and errors, now this is here. ❤
Post link
Katsuki Bakugou (My Hero Academia) wig commission
Base wig used: Jareth in Champagne from @ardawigs
Our favorite explosive boy! I’ll post the styling progress for this wig later this week. I have been working on multiple projects in the past weeks so I’ll be uploading a lot more.
Wig commissions are OPEN! Please email your inquiry to: [email protected]
Post link
Noctis (Final Fantasy XV) wig commission
Base wig used: Inigo in Blue Grey from @ardawigs
This is the 6th Noctis wig I have styled in the past 3 months..xD You guys really love him, hah? I have done 3 Gladio wig commissions, and recently got a first Prompto and an Ignis. Normally, I don’t post pictures of every wig I style if they are the same character. This Noctis wig is a bit different than the one I posted. I made the spikes more prominent this time and left the “mullet” in the back longer.
Wig commissions are OPEN! Please email to [email protected]
Post link
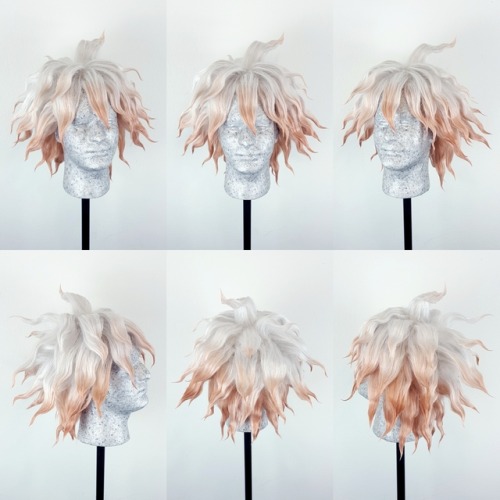
Nagito Komaeda (Danganronpa 2) wig commission
Base wig used: Jareth in Silver from @ardawigs , dyed with Rit Dyemore dyes in Chocolate brown mixed with Apricot orange.
Surprisingly, I didn’t have to do a tons of trimming on this wig since the base wig has layers that are pretty good length for the style. Did a ton of teasing and hair shaping with a flat iron though. I used the same technique to get “wavy spikes” like in my wig tutorial for Dio (Jojo) wig.
Wig commissions are open! Please email to [email protected] for a price quote
Post link
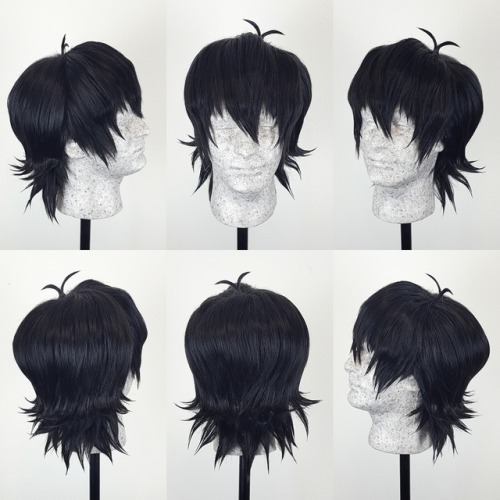
Keith (Voltron) wig commission
Base wig used: Inigo in Black with extra wefts from @ardawigs
The mullet game is strong on this guy. If you want to know how I made the “seamless” antenna for this wig, I have an antenna/ahoge tutorial in my tutorial album on Facebook page. (Link in profile) You only need small rubberband and glue!
Wig commissions are open. Please email to [email protected] for a price quote.
Post link
Mai (Avatar: The Last Airbender) wig commission
Base wig used: Silky Venus base wig in Onyx, and a leftover backparting piece from one of the Chibi base wigs from Arda Wigs.
The hairbuns were made purely from hair that are attached to the main base wig. A lot of wrapping the gluing the hair on itself to create the shape. It’s more natural-looking and secure since it is part of the main wig and not made separately. I’ll be making a tutorial for the hairbun soon!
Wig commissions are always open! Please email for a quote: [email protected]
Post link
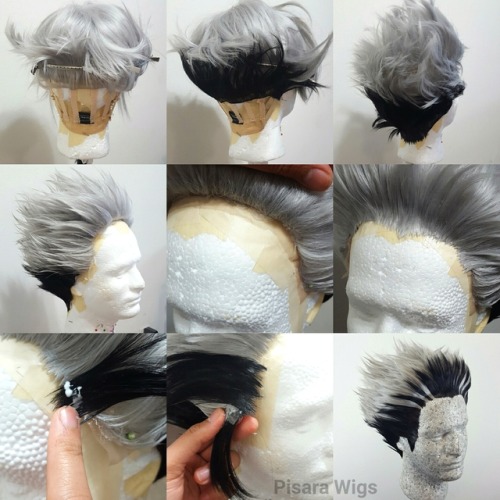
Bokuto (Haikyuu!!) wig process.
I used a Jaguar in Light Grey from Arda Wigs as the base. First, I used a seamripper to take out some wefts from the bottom part of the back of the wig. Then I glued down rolls of black wefts in place, making sure the black wefts are pointing upward. Since most wigs have the hair pointing downward in the back, it is harder to spike it up. So, changing the weft’s direction help make it easier to spike and the hair will stay up longer with minimal hair product. I glued down some loose black wefts at the very bottom by the nape to create the “back hairline”.
I then cut layers all over and teased the hair up with a teasing brush. At this point, I sprayed Got2B freezing spray to shape the hair.
I did a “new” way to do glued hairline this time since I had some leftover lace fabric that I trimmed off from other lacefront wig. The lace fabric was glued to the underside of the wig along the hairline. I started gluing down small pieces of light grey hair (from the rolls of wefts that were taken out in the first step!) using Fabri-Tac glue on the lace fabric. I laid the hair down on the glue, spray it so it temporarily stick together, blow-dry it, then I applied tacky glue about 1 cm from the root of the hairline. Using my fingertip, I pressed down on the glue spot and drag the glue to the root and repeat for the whole piece. Doing this will nicely spread the glue so that it dries clear in thin layer but still cover all the roots of the hairline throughly.
I cut a bigger piece of loose black weft to glue under the lace fabric infront of the ear area for sideburns. Then I continued to glue down hair and finished the hairline which will then hide where the sideburns start. More loose black wefts were added to the front hairline for variation. The hairline won’t look perfect but you can go back and point-cut it with your shears so the roots are more pointy. Final trimming and then it was done!
Let me hear you say “HEY HEY HEY!”
Wig commissions are always open! Email me for a quote at [email protected]
Post link
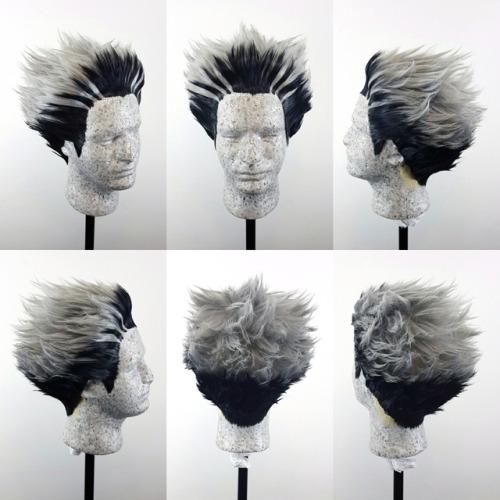
Bokuto (Haikyuu!!) wig commission
Base wig used: Jaguar in Light Grey, and extra wefts in Black from Arda Wigs
This wig was a challenge mainly because the reference for the character changes alot, even from the official source. So I had to use my artistic judgement on where to place the black “highlights”. Custom glued hairline was added for the front as well as the back by the nape area. I’ll be putting up a short tutorial for this wig soon if you’re curious how I made it. :)
Wig commissions are open! Please email me for a quote at: [email protected]
Post link
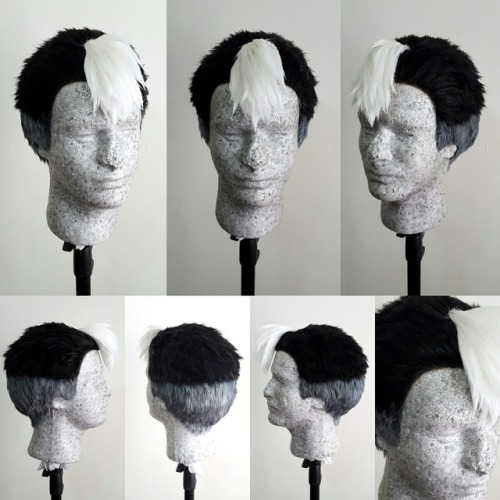
Shiro (Voltron) wig commission
Base wig used: Marty in Black, Marty in Silver (custom dyed), and weft in Pure White from Arda Wigs
I spliced two Marty base wigs together to make this wig. If you are able to dye a wig black then you could just use one Marty. I used RitDyemore in Graphite but could not get a solid black color on the silver Marty. The grey turned out quite nice though.
Wig commissions are OPEN! For a quote, email to: [email protected]
Post link
Takumi (Fire Emblem Fates) wig commission
Base wig used: Jeannie in Victory Blonde from Arda Wigs
For the long ponytail volume, I teased the hair on the inner layer and then comb the outer layer to smooth. The long ponytail is removable.
Wig Commissions are open! Please email: [email protected]
Post link
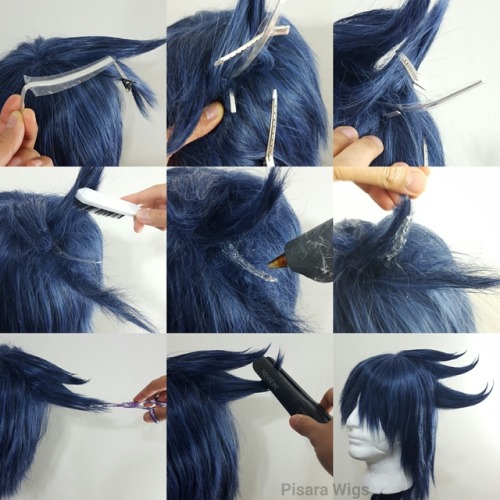
Wig Hack Wednesday #7!
So, many of you guys are probably familiar with the wire+tape method to make drill curls in wigs. But did you know you can also use wire+tape for spikes? You can get more natural-looking spikes that won’t flop over time with this method. And you won’t have to spend hours glueing hair down on a foam core. This method is good for long spikes that stick outward like Axel from Kingdom Hearts, or Aigami from Yu-Gi-Oh! In this tutorial, I used a Vegas base wig in Dark Blue from Arda Wigs
Here are the steps:
- Section off hair for the spike. Cut a piece of floral wire in the length you need for the spike plus extra 1 inch (you will know why later). And sandwich the wire between two strips of clear heavy-duty packaging tape. Trim the tape down to long triangle shape
- Divide the hair you parted eariler into two sections and clip them away (make sure the top section has more hair than the bottom). Stick the end tip of the wire into the wig cap and have it poke out below. If you need to, use your shears to punch a small hole in the wig cap so the wire can poke through
- Bend the end tip of the wire up into the main wire to create a triangle leg that will help support the wire’s position. Hot glue part of the wig cap to the wire inside the leg to secure it
- Tease the inner layer of hair from each half of the spike with a teasing brush or fine-tooth comb
- Comb out the outer layer of the spike to clean it up. Put glue on the wire and press down the top section of the spike first
- Do the same for the bottom section of the spike
- Trim more layers near the tip of the spike to create more dimension
- With a flat iron on medium heat, flip the end of the spike to shape it, hold until it cools
- Comb the outer layer of the spike, spray it in place with Got2B spray, and use Got2B glue or Tacky glue to secure the tip
And that’s it! Enjoy your cool spikes with minimal effort. I hope this was helpful to you guys. :D
Post link
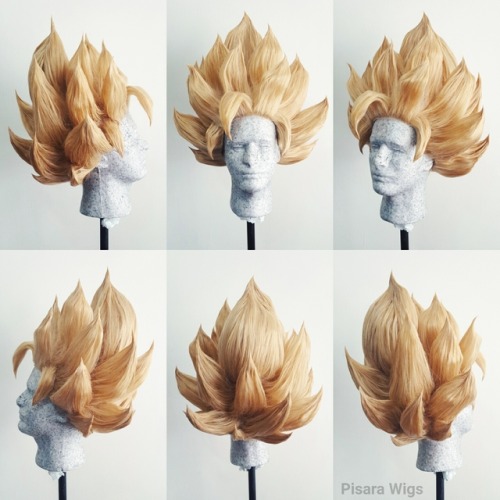
SS2 Goku (Dragonball Z) wig commission
Base wig used: 2 Malinda in Pale Blonde from Arda Wigs, with added hand-ventilation for the lacefront hairline
This is my first time styling a lacefront DBZ wig and it was certainly a challenge! No foam core was used, only lots wig hair and lots of teasing. It’s pretty light weight though. :)
Wig commissions are open! Please email to [email protected] for a quote
Post link
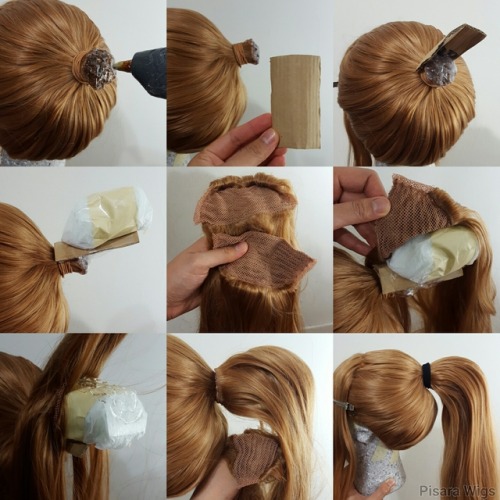
Wig Hack Wednesday #6 !
Want to make your ponytail wig more believable with top volume? Ponytail clips are cool but they can be uncomfortable after long hours of wearing. You can make seamless high ponytail with this method for characters like Kasumi (Dead or Alive), Widowmaker (Overwatch), or Medea (Fate/Grand Order)
For this demo, I used a Sandy Brown Jeannie base wig from Arda Wigs. The Jeannie comes with a tied up ponytail wig with a ponytail clip. You can use normal non-ponytail wig as a start as well. Make sure to alter the wig so you can tie it up for the stubbed part and use extra wefts for the high ponytail part.
- Undo the tail of the Jeannie base wig and re-tie it higher. Use elastic band for this instead of rubber band so that it won’t melt against hot glue later. Cut off the extra length of the tail as closely as you can to the tied area. Stub with hot glue.
- Cut a piece of cardboard for the tail’s “extension”.
- Hot glue the cardboard piece to the top of the tail, going around it. I used a half-piece, but if you need extra support, cut a bigger piece so that you can completely wrap it around the tail.
- Add paper to the top of the cardboard using packaging tape. You can stack it higher if you wish but keep the weight in mind.
- Take the butterfly clip out of the ponytail clip that comes with the Jeannie. Cut the piece in half.
- Use the bottom piece from the last step to glue onto the top of the tail. Start gluing near the tied area first.
- Section off the hair so it’s easier to neatly glue it down to the paper form. Start from the top area, and then the two sides.
- Remember the other half piece from the ponytail clip earlier? Cut it in half again and use one of the halves to glue to the underside of your big ponytail to close the gap.
- Brush the hair and hairspray it in place and you have a strong high ponytail! Since it’s heavy-back, you may need to sew in some wig clips or zig zag flexi comb inside the wig cap by the hairline to make sure the wig doesn’t slide backward when you walk around.
Post link
Throwback Thursday Styling Tip this week will be focused on how to do big poofy 90’s anime bangs! I did similar bangs on a Sailor Jupiter wig before, but the base wig I used for that had much thicker bangs. I’ve been asked to do a tutorial for long haired characters like Sesshomaru (Inuyasha) or Misato (Evangelion). So if your base wig is a long wig that doesn’t have thick bangs, and you’re too broke to buy more wefts (like me)? You can still get that volume! For this tutorial, I used a special edition Candy Striper wig from Arda Wigs
- First, you wanna part the bangs area into the parting you want in the final result. I did a side-part this time. Work on one side of the part first. You’ll need to section off the top layer of that part and clip it away for now, and work on the bottom half of that section first. To get the wig ready for teasing, you have to create layers. Long wigs don’t have many varied layers so that’s why it’s harder to tease for volume. Snip small pieces of hair off, leaving half an inch space between each snip, and about 2 inches in length from the “root” of the hair
- Remove the hair you snipped from the main wig, and tease alot with the teasing brush
- Grab the top layer that was clipped away, and start snipping! You can see more clearly here where to snip. Remove the hair that was cut, and tease a whole bunch
- Clean up the tease hair by lightly combing the top layer with a fine tooth comb. At this point, you can cut more layers to the bangs to create more dimensions and volume. Use slide-cutting technique
- Since you worked with different sections of layers in the earlier steps, you want to make sure the hair looks unified by teasing all the layers together at the front. Clean up with a fine-tooth comb and hair spray in place
- I found that holding your hand diagonally under the teased bangs while you clean up the top layer will help keeping the shape of the raised “cowlick” part of the bangs
- Again, notice the angled hand placement for the side of the teased bangs. This helps bring the hair to close the space between the teased bangs and the main wig when you comb the top layer down
- Use a flat iron on medium heat (I used 330 F, but check and test how much heat your wig can stand beforehand), grab the “cowlick” area and bend it downward to create the curve. I also used the flat iron to grab small pieces of the top layer of the bangs and create curved shape with it to make the overall appearance of the bangs more “round”
- Repeat the same steps for the other parted section, and you’re done!
I took alot of pictures for this tutorial, so if any part is unclear to you, feel free to ask. I wanted to keep it 9 pictures as usual so couldn’t show every little step. I love old school anime designs and hope this will help you feel more confident cosplaying them!
Post link
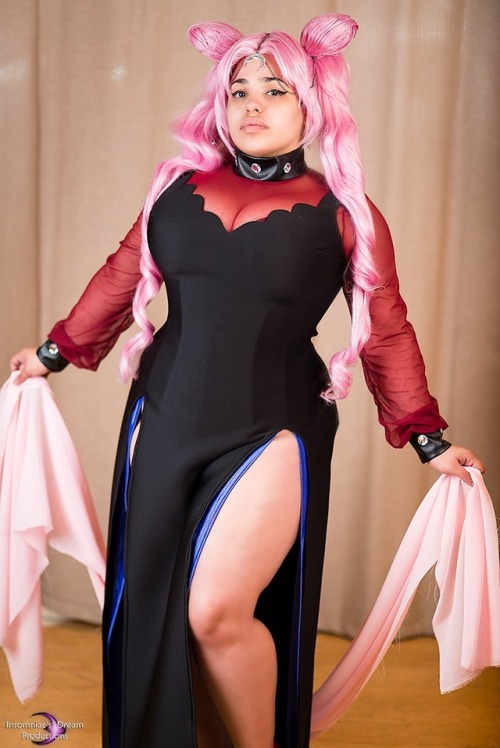
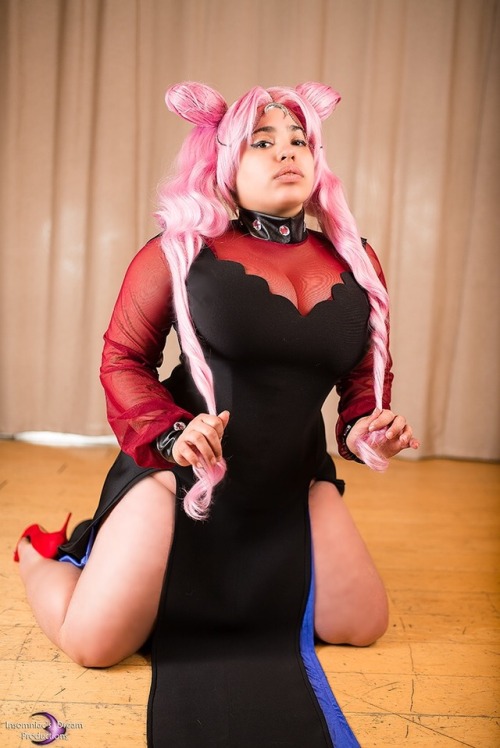
New video kittens! Guide to wigs!
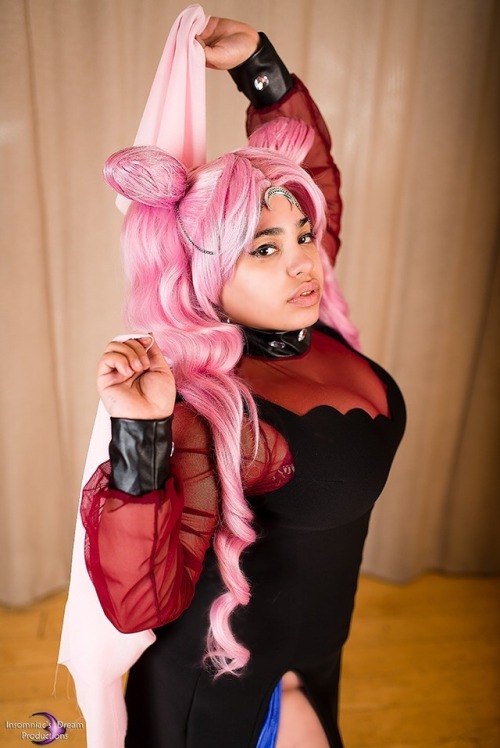
April’s Patreon Cosplay Set
Was My Wicked Lady Cosplay!
https://patreon.com/cinvonquinzel
https://facebook.com/cinvonquinzel
https://www.instagram.com/cin_von_quinzel/
https://www.twitch.tv/cinvonquinzel
https://twitter.com/cinvonquinzel
Photograph by Insomniacs Dream Productions
Post link
I made a custom #HarleyQuinn #costumewig for a friend!
It took 3 days of work, mostly because THERE WAS SO MUCH HAIR! #Arda, I love you, but these quality wigs are killing my hands. :D :D :D
@ardawigs #lacefront style “Matilda” in Titanium Blonde.
The soft large curls take 8 hours to dye, and 5 hours to curl into tight curls, comb through, cut, and twist into soft ringlets.
It’s a labor of love though, and the end product is so worth it! Now she’s off to her new #cosplay mom.
#revyourharley #harleyquinncosplay #cosplaywig #suicidesquad #suicidesquadcosplay #arkham #joker #clown #ardawigs #ardamatilda #customcostume #etsy #etsyshop #hisqueen #cosplaywip #crazy #blue #pink
Post link
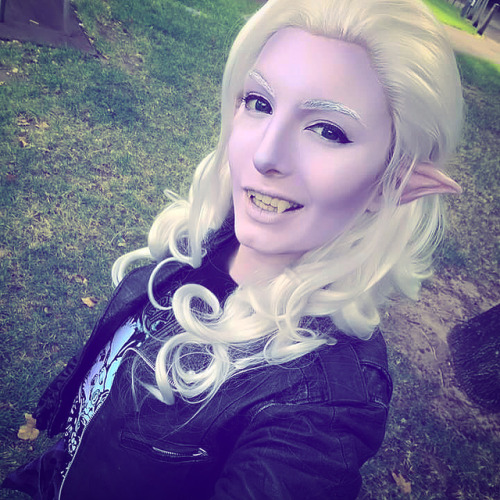
Have u ever just spent 3 hours painting urself purple to go sit around in a park for a while with some other purple friends lookin like Legolas’s goth stepbrother… ‘cause that’s totally not what I did last week at all Shoutout to @mickidona my galra sister and @mephala_arclight my Quiche, we always here for a good time; so glad I did this first test of Lotor too because damn there was a lot goin on there and it was not what I expected, face paint and long fancy lace fronts are hard work ya’ll! Ended up doing some serious wig restyling and buying completely different face paint after this which works much better on my skin, things are slowly coming together and I’m on my way to hopefully finishing his full outfit soon. H O P E F U L L Y.
.
.
.
lotor:
Galra Allura: @mickidona
Keithy boi: @mephala_arclight
.
#voltron #voltroncosplay #voltronlegendarydefender #lotor #lotorcosplay #cosplay #ardawigs #galraempire #vrepitsa
Post link


