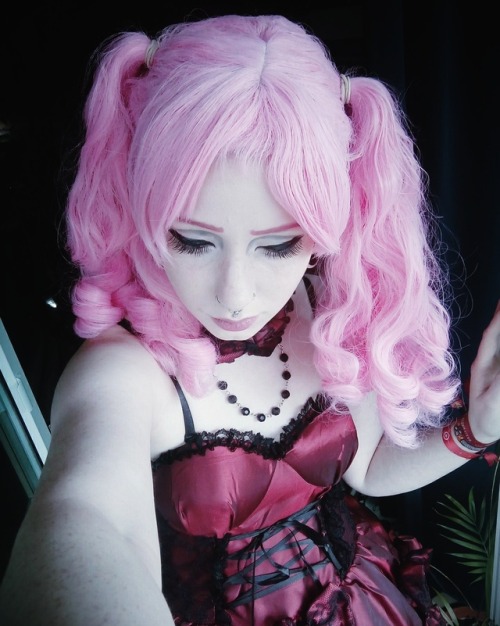
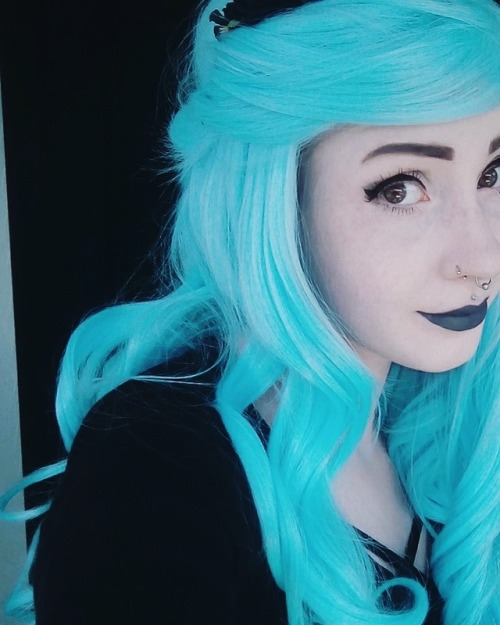
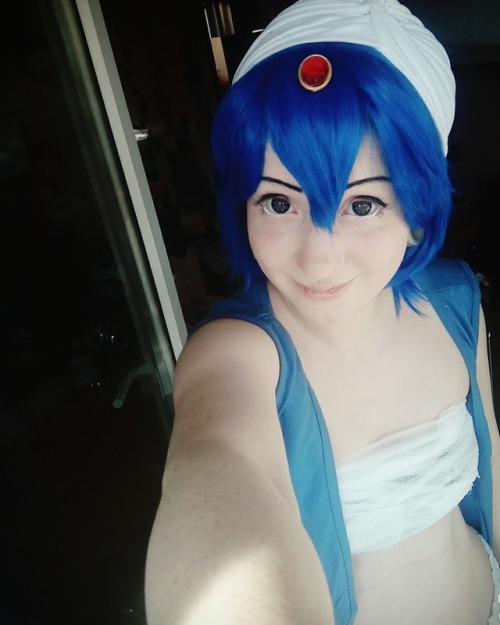
#cosplay wig

yeety spagheety


**????**
Post-Otakon has been an ordeal for me. Depression came back in full swing and I struggled finding motivation to do /anything/, let alone all the cos work I need to start for Warrior Peach. To give myself something to look forward to in the short run, I’m doing a side-project at the same time for Colossal East. Can anyone guess what I’m working on?
Wig is an Emerald Green Daphne from @epiccosplay! I took a flat iron and used my super neat new heat-resistant gloves from @cosplaysupplies to keep from burning my hands.
✴ My Youtube intro. ✴
Noct! I used an Inigo in Blue Grey from Arda Wigs to style into this Noctis wig. It would be easier to trim a Jaguar or a Magnum Long for this. But at the time I purchased the base wig, the other wigs were on backorder. This is seriously the perfect color for our prince though. I had the chance to see the Arda team who went above and beyond to develop this special color blend, through many trials and errors, now this is here. ❤
Post link
Wig Hack Wednesday #5 !
Have you ever wanted to use the same wig for that one character who can’t decide if she wants to wear her hair in twin tails or let her hair down? (Aka Nozomi from Love Live) Or, have you found a perfect wig color for your character but the wig just doesn’t come with a back-parting? Well, here is one way you can fufill your cosplay goals on a budget! Also good for when you want to re-purpose a wig for different characters.
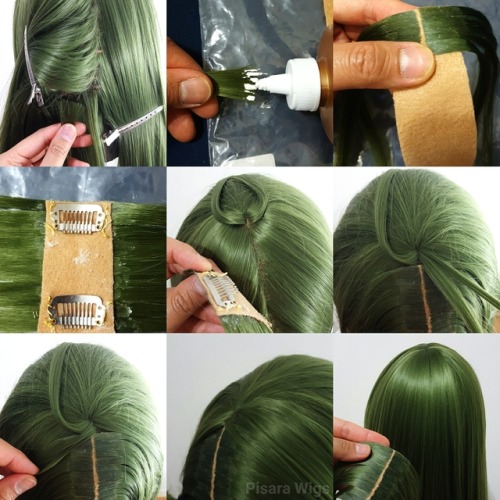
For this demo, I’m using a Venus in grass green from Arda Wigs. I love this color and the length is perfect for Mallow from Pokemon Sun and Moon. My goal is to add a back-parting to the Venus base wig but make it detachable in case I wanna use the wig for other cosplay.
- Part the wig down the middle in the back, and clip the hair away on each side. Cut the hair from the inside layers of the wig to use as wefts for this project. By leaving the outer layers uncut, when you tie the wig into twin tails or let the hair down completely, it will hide the trimmed part
- Use Tacky glue (or other glue that dries clear but flexible) on the tip of a small piece of hair. Use your fingers to squeeze the hair flat to make sure the glue covers all of the hair on the tip of that piece. Wait until it almost dries
- Put more glue in the back side of the piece of hair by the tip. Press the hair piece down onto a strip of soft felt sheet. I happened to find a nude colored one that matched me, but you can use acrylic paints to get the level of color you want (paint the felt strip prior to the start of the project) Also, I find that holding up the felt strip and pressing the glued hair down allow more control and help create more “curve” shape from the center part
- Once you finish gluing hair down on the whole felt strip, turn it over, and hand-sew some wig clips on the back side. 1 inch spacing between each wig clip worked well for me. You’ll need about 4-5 wig clips for the whole felt strip
- Now you can clip the felt strip onto the main wig in the back. Make sure you leave two small pieces of hair from the main wig at the top where your felt strip would go
- Clip the felt strip in place. Make sure it doesn’t come off when you tuck on it. Take the little piece of hair from the main wig that you left out earlier, and section it in half on each side
- Criss-cross the hair pieces to hide the “seam” of the top of the felt strip
- Comb and blend the hair from the main wig with the hair from the felt strip, and tie your twin tails
- You can unclip the felt strip later and comb down the hair to use the same wig as a normal long wig!
Another good thing about this method is that you can use your felt strip for other projects if you buy other wigs from the same company later and in the same color. Or, you can turn an ombre wig into twin tail style for J-fashion shoot and wear the wig as a long wig the next time. This is not the “best” way to do back-parting, but I wanted to focus on being cost-effective and easy enough for beginners to attempt. Have fun wiggin’!
Post link
Throwback Thursday styling tips! Since I wasn’t feeling well and missed the chance to upload this week’s Wednesday Wig Hack, a friend of mine suggested that it would be a cool idea to talk about some wigs I have styled in the past.
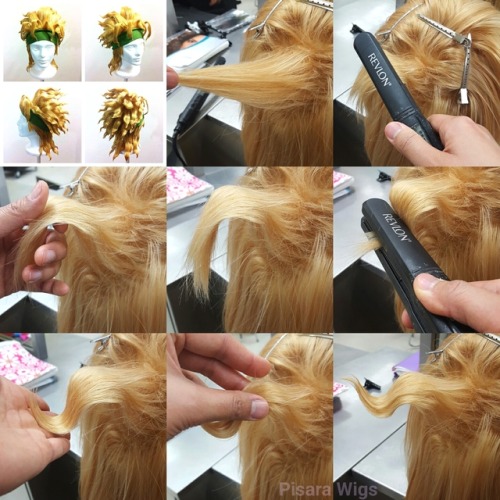
I have gotten questions about how to style “wavy spikes” like I did for my Dio (Jojo’s Bizarre Adventure) wig so here is a little demo. You can also use this technique for characters like Nagito Komaeda (Dangan Ronpa), or Lancer / Diarmuid (Fate/Zero). :)
- First, you want to make your spike. Follow countless of spiking tutorials online for this step. :P Don’t apply too much hair product though because we will use heat on it so it still needs to be sort of soft and flexible
- Use a flat iron, with the medium heat setting (I used 380 F for this), grab the spike where you want the wave to start. Bend you wrist so that the spike point downwards. Keep in mind, for this kind of wavy spikes, the pattern of wave will be down>up>down
- Let go of the flat iron after a few seconds and immediately use your fingers to catch the spike to hold its shape until it cools down. (Use gloves if you’re sensitive to heat. My hands can’t feel a thing because I’m used to heat tools)
- Go at it with the flat iron again! Grab the spike a good distance from the first wave, around 1 inch and a half for me. Then flip your wrist so that the spike points upwards
- After a few seconds, let go of the flat iron and catch the spike with your hand again. If you want extreme curve near the tip, you can push the spike in towards the wig. Once it cools down, it should hold the shape
- Now you can go in and “puff” up the spike by squeezing the sides. I use Got2B spiking glue on my fingers to lightly coat the spike throughout
- Touch up the tip by adding another wave with the same steps as before. Use Got2B spray to seal the style. And you’re done! (Just kidding you have to do like 30 other spikes. Good luck )
Base wig used for tutorial: Malinda in pale blonde from Arda Wigs
Base wig used for Dio: Magnum Long in light blonde from Arda Wigs
Post link
Wig Hacks Wednesday #3 !
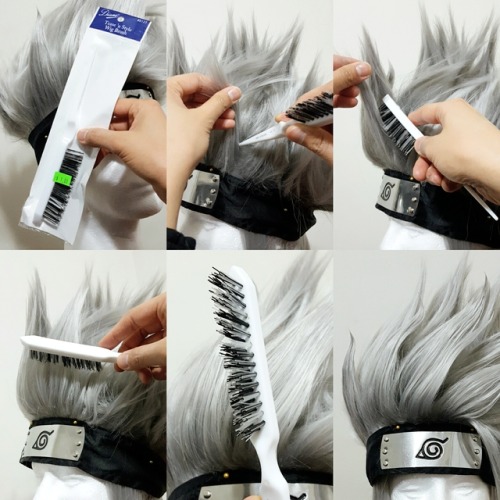
Today I wanna highlight on one of my favorite tools for spiking. This teasing brush cost me only $1 from a local beauty store. It has made my life much easier when it comes to teasing and getting that extra volume in wigs. You could buy it online for a bit more, look up “Diane Teasing Brush”.
This brush is very versatile. Use the tail to pick out hair and section off the spikes. Use the brush part to tease the hair starting from the roots and up (I like to go in at an angle). Then use the brush part again to lightly smooth the outter layer of the spike.
There are many different teasing combs/brushes in the market. But from my experience, this brush works SO WELL and is affordable. I like that its bristles are synthethic, flexible, but sturdy enough. Give it a try and you’ll be able to spike wigs much easier. :)
Wig in pic is Jareth in light grey from Arda Wigs.
Post link
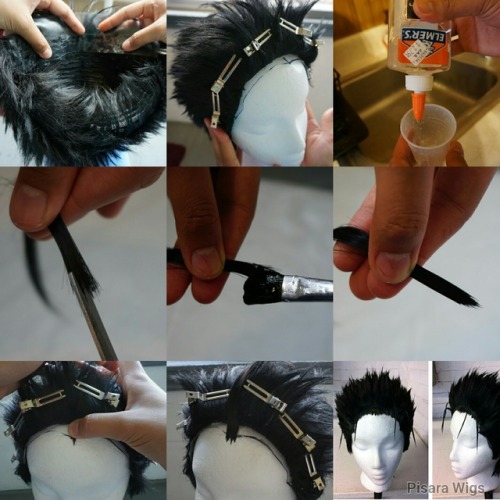
Throwback Thursday Styling Tip this week will be focused on how to create custom glued hairline on a wig from scratch. Now, I know there are tons of glued hairline tutorials out there, but I do it a little differently and I found it to produce a pretty realistic result without the hairline “floating” problem. The wig in this pic is a cheap wig I bought to style into a Kurogane (Tsubasa: Reservoir Chronicle) wig. I used the same hairline technique to create extremely unique-shaped hairlines for the Vegeta (DBZ) wig and Yusuke (Yu Yu Hakusho) wig as well. Using this technique is easier to get accurate custom hairline which is very difficult to replicate with a lacefront wig, especially if you don’t know how to hand-ventilate hair.
- On the inside of the wig, glue a strip of clear vinyl fabric on with Fabri-Tac glue. Hold until it completely dries. I chose to use clear vinyl because it’s waterproof and can be shaped with heat from the hairdryer if need to. Since it’s waterproof, when you wear the wig and apply spirit gum to glue down the inside of the hairline to your forehead area, it will stick better and is easier to clean off the residue later.
- Pin the wig on a foam head. Use a marker that’s close in color to your wig and mark the hairline shape you want. You may want to do the marking while trying the wig on to make sure it works for your forehead shape. Cut off the excess vinyl outside the marked area. If you need the vinyl to be larger for more extreme hairline, you can cut in darts and Fabri-Tac glue it so it’s more curved to your forehead shape, and not pointing out straight.
- Mix craft glue and water in a cup. I used Elmer’s clear glue. You can use regular Elmer’s glue or school glue, but I find the clear Elmer’s glue to be best for dark colored wigs. Mixing ratio of glue to water is 3:1. Make sure to not use too much water, you want a syrup-like texture after you mix it with a paint brush.
- Cut a small piece of hair from loose wefts. Point-cut into the tip of the hair piece to create varying points and thin out the tip.
- Brush on the water-downed glue to the tip of the hair piece on both sides. I don’t go above one inch from the tip. Use your finger to squeeze the glue on the hair to help spread it through all layers and to help flatten the piece.
- It should look flat and pointy after it dries. You can make a lot of pieces like this and set them to dry on a big plastic bag. I make about 30-40 of these hair pieces for a normal wig’s hairline. It is time-consuming but the result is worth it!
- Next, put a thin layer of Fabri-Tac glue on the back of the hair piece. Press down the hair piece to the clear vinyl in the center. Fabri-Tac takes longer to dry than hot glue but it’s more permanent and won’t cause the hair piece to be bulky.
- Continue the same step as the last. Make sure to position the hair piece so that the tips go a bit past the clear vinyl. This will help cover the seams and hide the vinyl in the process.
- And you’re done! Enjoy fabulous hairline. Make sure to research how to apply and remove spirit gum before wearing the wig.
Post link
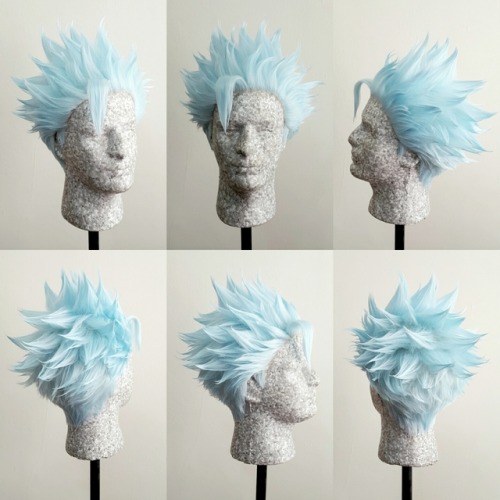
Ban (Nanatsu no Taizai / Seven Deadly Sins) wig for Phil Mizuno ! Thank you for letting me style your wig for BEST BOY. Haha he is definitely my fav from that series. Follow Phil’s page on Facebook to see the completed cosplay in action!
Base wig used is the lacefront Cady in powder blue from Arda Wigs , custom ventilation added for the hairline for widow’s peak and more natural looks.
Post link
Watched Frozen the other day for the second time. I personally liked it more than Brave. Probably my favorite animated film since Tangled.
I love both Anna and Elsa, and will probably cosplay both of them eventually. For now though, I don’t have a wig suitable for an Elsa makeup test, so here is Anna.
Post link


Let me just show off my wig real quick


